


Goal
- Understand what contours are.
- Learn to find contours, draw contours etc
- You will see these functions : cv2.findContours(), cv2.drawContours()
What are contours?
Contours can be explained simply as a curve joining all the continuous points (along the boundary), having same color or intensity. The contours are a useful tool for shape analysis and object detection and recognition.
- For better accuracy, use binary images. So before finding contours, apply threshold or canny edge detection.
- findContours function modifies the source image. So if you want source image even after finding contours, already store it to some other variables.
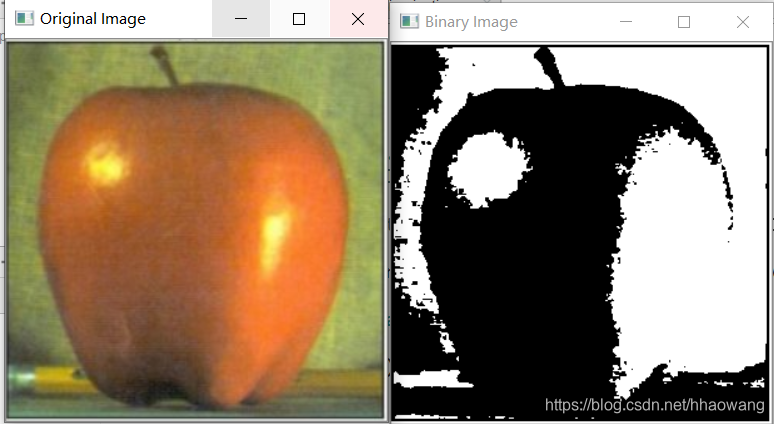
- In OpenCV, finding contours is like finding white object from black background. So remember, object to be found should be white and background should be black.
轮廓可以简单认为成将连续的点(连着边界)连在一起的曲线,具有相同的颜色或者灰度。轮廓在形状分析和物体的检测和识别中很有用。
• 为了更加准确,要使用二值化图像。在寻找轮廓之前,要进行阈值化处理或者 Canny 边界检测。
• 查找轮廓的函数会修改原始图像。如果你在找到轮廓之后还想使用原始图像的话,你应该将原始图像存储到其他变量中。
• 在 OpenCV 中,查找轮廓就像在黑色背景中超白色物体。你应该记住,要找的物体应该是白色而背景应该是黑色。
让我们看看如何在一个二值图像中查找轮廓:
# !/usr/bin/env python
# -*- coding: utf-8 -*-
"""
# @Time    : 2019/10/30 17:10
# @Author  : HaoWang
# @Site    : HongKong, China
# @project : $[PROJECT_NAME]
# @File    : 1201contours.py.py
# @Software: PyCharm
# @license: haowanghk@gmail.com
"""


import numpy as np
import cv2

im = cv2.imread('../pictures/apple.PNG')
imgray = cv2.cvtColor(im, cv2.COLOR_BGR2GRAY)

ret, thresh = cv2.threshold(imgray,0,255,cv2.THRESH_BINARY+cv2.THRESH_OTSU)

im2, contours, hierarchy = cv2.findContours(thresh, cv2.RETR_TREE, cv2.CHAIN_APPROX_SIMPLE)

cv2.imshow("Original Image",im)
cv2.imshow("Binary Image",im2)
print("thresh",ret)
# thresh 127.0

print("contours:",contours)
print("hierarchy:",hierarchy)

cv2.waitKey(0)

cv2.destroyAllWindows()
函数 cv2.findContours() 有三个参数,第一个是输入图像,第二个是轮廓检索模式,第三个是轮廓近似方法。
返回值有三个,第一个是图像,第二个是轮廓,第三个是(轮廓的)层析结构。轮廓(第二个返回值)是一个 Python列表,其中存储这图像中的所有轮廓。每一个轮廓都是一个 Numpy 数组,包含对象边界点( x, y)的坐标。
How to draw the contours?
To draw the contours, cv2.drawContours function is used. It can also be used to draw any shape provided you have its boundary points. Its first argument is source image, second argument is the contours which should be passed as a Python list, third argument is index of contours (useful when drawing individual contour. To draw all contours, pass -1) and remaining arguments are color, thickness etc.
To draw all the contours in an image:
函数 cv2.drawContours() 可以被用来绘制轮廓。它可以根据你提供的边界点绘制任何形状。它的第一个参数是原始图像,第二个参数是轮廓,一个 Python 列表。第三个参数是轮廓的索引(在绘制独立轮廓是很有用,当设置为 -1 时绘制所有轮廓)。接下来的参数是轮廓的颜色和厚度等。
在一幅图像上绘制所有的轮廓:
img = cv2.drawContour(img, contours, -1, (0,255,0), 3)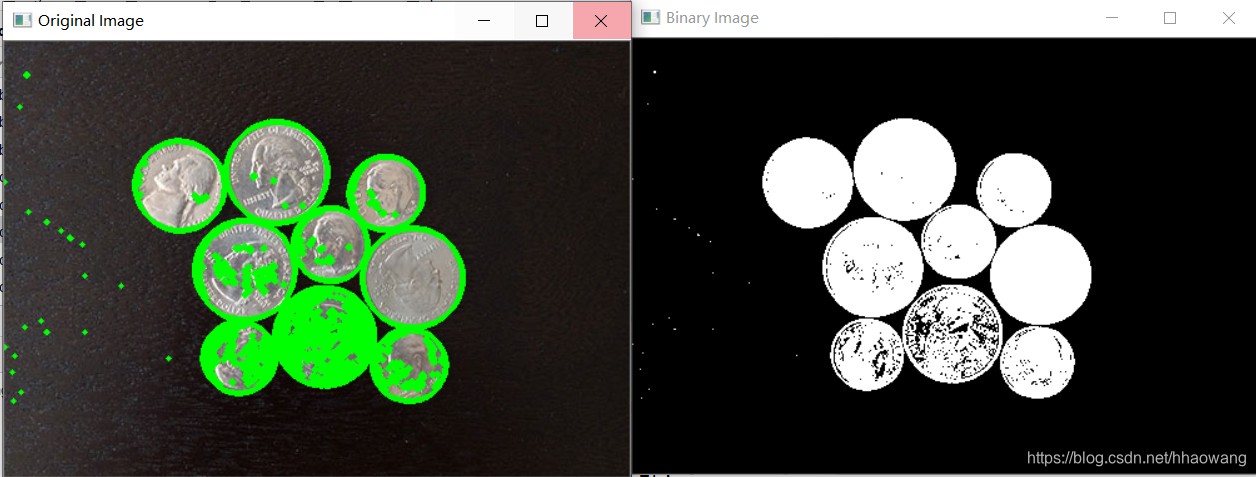
To draw an individual contour, say 4th contour:
1 cv2.drawContours(img, contours, 3, (0,255,0), 3)
But most of the time, below method will be useful:
1 cnt = contours[4]
2 cv2.drawContours(img, [cnt], 0, (0,255,0), 3)
Contour Approximation Method
This is the third argument in cv2.findContours function. What does it denote actually?
Above, we told that contours are the boundaries of a shape with same intensity. It stores the (x,y) coordinates of the boundary of a shape. But does it store all the coordinates ? That is specified by this contour approximation method.
If you pass cv2.CHAIN_APPROX_NONE, all the boundary points are stored. But actually do we need all the points? For eg, you found the contour of a straight line. Do you need all the points on the line to represent that line? No, we need just two end points of that line. This is what cv2.CHAIN_APPROX_SIMPLE does. It removes all redundant points and compresses the contour, thereby saving memory.
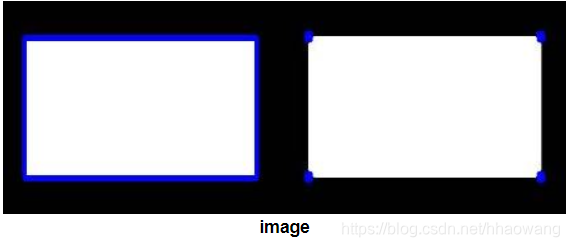
Below image of a rectangle demonstrate this technique. Just draw a circle on all the coordinates in the contour array (drawn in blue color). First image shows points I got with cv2.CHAIN_APPROX_NONE (734 points) and second image shows the one with cv2.CHAIN_APPROX_SIMPLE (only 4 points). See, how much memory it saves!!!
这是函数 cv2.findCountours() 的第三个参数。它到底代表什么意思呢?
上边我们已经提到轮廓是一个形状具有相同灰度值的边界。它会存贮形状边界上所有的 (x, y) 坐标。但是需要将所有的这些边界点都存储吗?这就是这个参数要告诉函数 cv2.findContours 的。
这个参数如果被设置为 cv2.CHAIN_APPROX_NONE,所有的边界点都会被存储。但是我们真的需要这么多点吗?例如,当我们找的边界是一条直线时。你用需要直线上所有的点来表示直线吗?不是的,我们只需要这条直线的两个端点而已。这就是 cv2.CHAIN_APPROX_SIMPLE 要做的。它会将轮廓上的冗余点都去掉,压缩轮廓,从而节省内存开支。
我们用下图中的矩形来演示这个技术。在轮廓列表中的每一个坐标上画一个蓝色圆圈。第一个图显示使用cv2.CHAIN_APPROX_NONE 的效果,一共 734 个点。第二个图是使用 cv2.CHAIN_APPROX_SIMPLE 的结果,只有 4 个点。看到他的威力了吧!


 被折叠的 条评论
为什么被折叠?
被折叠的 条评论
为什么被折叠?
 到【灌水乐园】发言


