


目录
7.a. Straight Bounding Rectangle直边界矩形
Goal
In this article, we will learn
- To find the different features of contours, like area, perimeter, centroid, bounding box etc
- You will see plenty of functions related to contours.
- 查找轮廓的不同特征,例如面积,周长,重心,边界框等。
- 你会学到很多轮廓相关函数
1. Moments
Image moments help you to calculate some features like center of mass of the object, area of the object etc. Check out the wikipedia page on Image Moments
The function cv2.moments() gives a dictionary of all moment values calculated. See below:
# !/usr/bin/env python
# -*- coding: utf-8 -*-
"""
# @Time : 2019/10/30 18:14
# @Author : HaoWang
# @Site : HongKong, China
# @project : $[PROJECT_NAME]
# @File : 1202Image.py
# @Software: PyCharm
# @license: haowanghk@gmail.com
"""
import numpy as np
import cv2
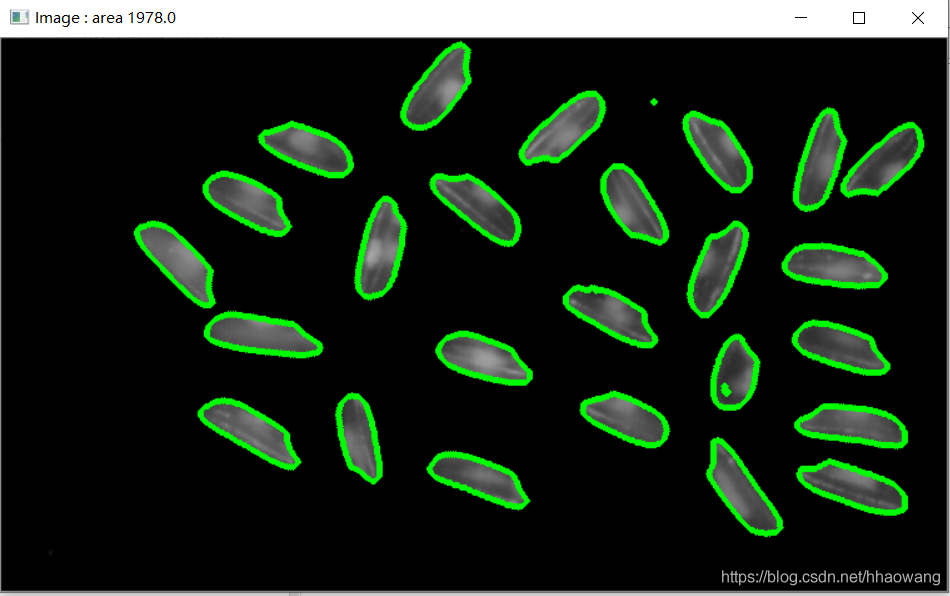
im = cv2.imread('../pictures/rice.png')
imgray = cv2.cvtColor(im, cv2.COLOR_BGR2GRAY)
ret, thresh = cv2.threshold(imgray,0,255,cv2.THRESH_BINARY+cv2.THRESH_OTSU)
im2, contours, hierarchy = cv2.findContours(thresh, cv2.RETR_TREE, cv2.CHAIN_APPROX_SIMPLE)
print("contours:",np.shape(contours))
# (579,)
# draw contours
cont_img = cv2.drawContours(im, contours, -1, (0,255,0), 3)
# 计算图像的距
cnt = contours[0]
M = cv2.moments(cnt)
print(M)
# # 计算对象重心
cx = int(M['m10']/M['m00'])
cy = int(M['m01']/M['m00'])
# 计算面积
area = cv2.contourArea(cnt)
print(area)
# plot image
cv2.imshow("Image", im)
# wait
cv2.waitKey(0)
cv2.destroyAllWindows()
From this moments, you can extract useful data like area, centroid etc. Centroid is given by the relations,
This can be done as follows:
cx = int(M['m10']/M['m00'])
cy = int(M['m01']/M['m00'])
2. Contour Area 轮廓面积
Contour area is given by the function cv2.contourArea() or from moments, M['m00'].
area = cv2.contourArea(cnt)
3. Contour Perimeter 轮廓周长
It is also called arc length. It can be found out using cv2.arcLength() function. Second argument specify whether shape is a closed contour (if passed True), or just a curve.
也被称为弧长。可以使用函数 cv2.arcLength() 计算得到。这个函数的第二参数可以用来指定对象的形状是闭合的( True),还是打开的(一条曲线)。
perimeter = cv2.arcLength(cnt,True)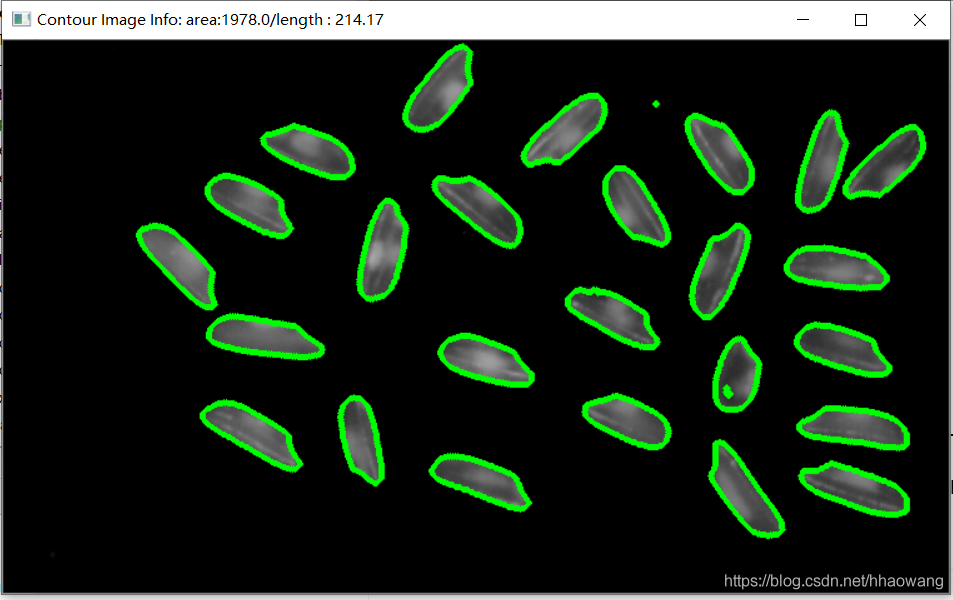
# !/usr/bin/env python
# -*- coding: utf-8 -*-
"""
# @Time    : 2019/10/30 18:14
# @Author  : HaoWang
# @Site    : HongKong, China
# @project : $[PROJECT_NAME]
# @File    : 1202Image.py
# @Software: PyCharm
# @license: haowanghk@gmail.com
"""

import numpy as np
import cv2

im = cv2.imread('../pictures/rice.png')
imgray = cv2.cvtColor(im, cv2.COLOR_BGR2GRAY)

ret, thresh = cv2.threshold(imgray,0,255,cv2.THRESH_BINARY+cv2.THRESH_OTSU)

im2, contours, hierarchy = cv2.findContours(thresh, cv2.RETR_TREE, cv2.CHAIN_APPROX_SIMPLE)

print("contours:",np.shape(contours))
# (579,)
# draw contours
cont_img = cv2.drawContours(im, contours, -1, (0,255,0), 3)


# 计算图像的距
cnt = contours[0]
M = cv2.moments(cnt)
print(M)

# # 计算对象重心
cx = int(M['m10']/M['m00'])
cy = int(M['m01']/M['m00'])

# 计算面积
area = cv2.contourArea(cnt)
print(area)

# 计算周长
perimeter = cv2.arcLength(cnt,True)

# plot image
cv2.imshow("Contour Image Info: "+
           "area:"+ str(area) +
           "/length : %.2f "%perimeter , im)

# wait
cv2.waitKey(0)
cv2.destroyAllWindows()
4. Contour Approximation 轮廓近似
It approximates a contour shape to another shape with less number of vertices depending upon the precision we specify. It is an implementation of Douglas-Peucker algorithm. Check the wikipedia page for algorithm and demonstration.
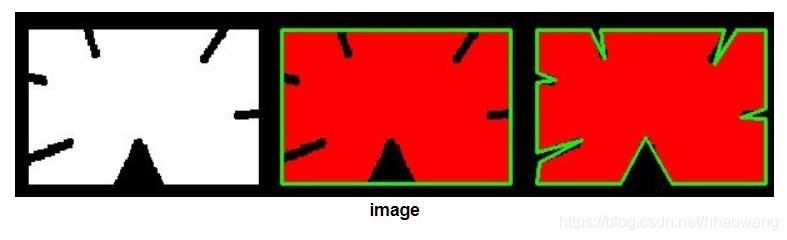
To understand this, suppose you are trying to find a square in an image, but due to some problems in the image, you didn't get a perfect square, but a "bad shape" (As shown in first image below). Now you can use this function to approximate the shape. In this, second argument is called epsilon, which is maximum distance from contour to approximated contour. It is an accuracy parameter. A wise selection of epsilon is needed to get the correct output.
将轮廓形状近似到另外一种由更少点组成的轮廓形状,新轮廓的点的数目由我们设定的准确度来决定。使用的Douglas-Peucker算法,你可以到维基百科获得更多此算法的细节。
为了帮助理解,假设我们要在一幅图像中查找一个矩形,但是由于图像的种种原因,我们不能得到一个完美的矩形,而是一个“坏形状”(如下图所示)。现在你就可以使用这个函数来近似这个形状()了。这个函数的第二个参数叫epsilon,它是从原始轮廓到近似轮廓的最大距离。它是一个准确度参数。选择一个好的 epsilon 对于得到满意结果非常重要。
Below, in second image, green line shows the approximated curve for epsilon = 10% of arc length. Third image shows the same for epsilon = 1% of the arc length. Third argument specifies whether curve is closed or not.
5. Convex Hull 凸包
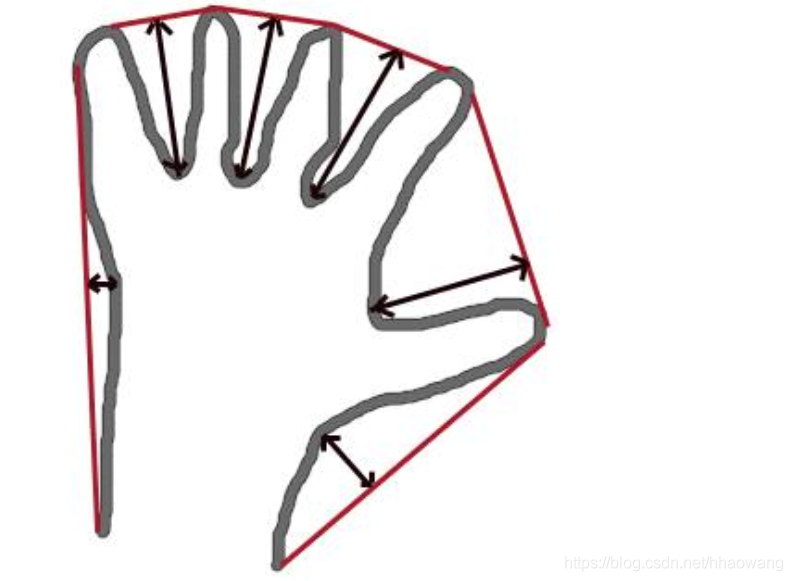
Convex Hull will look similar to contour approximation, but it is not (Both may provide same results in some cases). Here, cv2.convexHull() function checks a curve for convexity defects and corrects it. Generally speaking, convex curves are the curves which are always bulged out, or at-least flat. And if it is bulged inside, it is called convexity defects. For example, check the below image of hand. Red line shows the convex hull of hand. The double-sided arrow marks shows the convexity defects, which are the local maximum deviations of hull from contours.
凸包与轮廓近似相似,但不同,虽然有些情况下它们给出的结果是一样的。函数 cv2.convexHull() 可以用来检测一个曲线是否具有凸性缺陷,并能纠正缺陷。一般来说,凸性曲线总是凸出来的,至少是平的。如果有地方凹进去了就被叫做凸性缺陷。例如下图中的手。红色曲线显示了手的凸包,凸性缺陷被双箭头标出来了。
hull = cv2.convexHull(points[, hull[, clockwise[, returnPoints]]
hull = cv2.convexHull(cnt)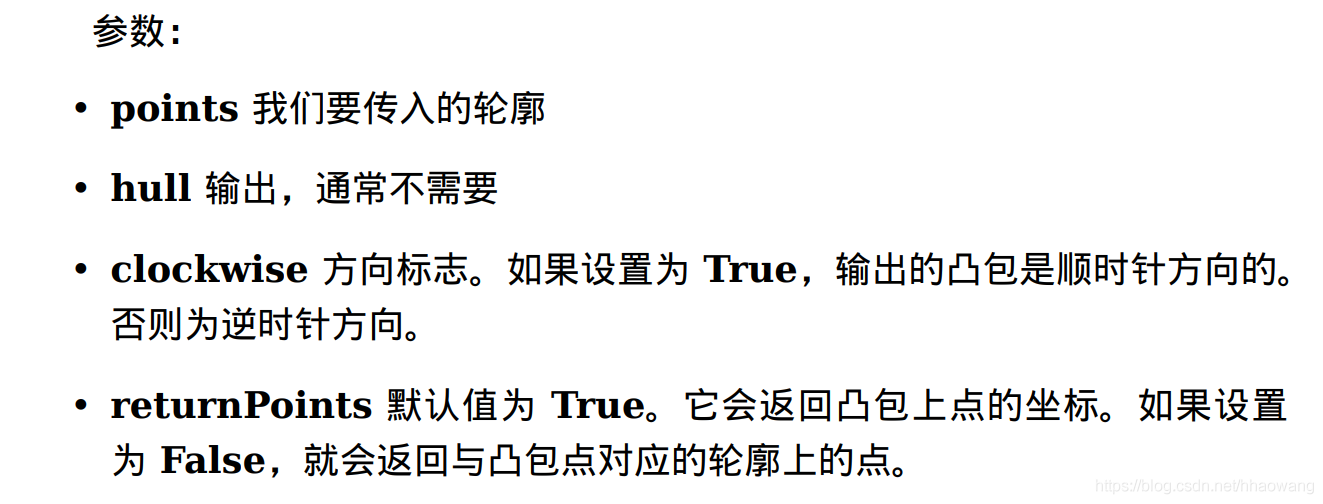
但是如果你想获得凸性缺陷,需要把 returnPoints 设置为 False。以上面的矩形为例,首先我们找到他的轮廓 cnt。
现在我把 returnPoints 设置为 True 查找凸包,我得到下列值:
[[[722 376]]
[[721 377]]
[[715 379]]
[[703 379]]
[[693 377]]
[[675 371]]
[[656 364]]
[[649 361]]
[[643 357]]
[[639 353]]
[[638 351]]
[[637 348]]
[[639 344]]
[[661 338]]
[[663 338]]
[[677 342]]
[[695 348]]
[[705 352]]
[[713 356]]
[[720 363]]
[[722 366]]]
现在把 returnPoints 设置为 False,我得到的结果是:
[[59]
[58]
[54]
[51]
[47]
[35]
[23]
[17]
[13]
[12]
[10]
[ 8]
[ 6]
[ 0]
[91]
[83]
[75]
[69]
[63]
[62]
[60]]
他们是轮廓点的索引。例如: cnt[129] = [[234; 202]],这与前面我们得到结果的第一个值是一样的。
6. Checking Convexity 凸性检验
There is a function to check if a curve is convex or not, cv2.isContourConvex(). It just return whether True or False. Not a big deal.
k = cv2.isContourConvex(cnt)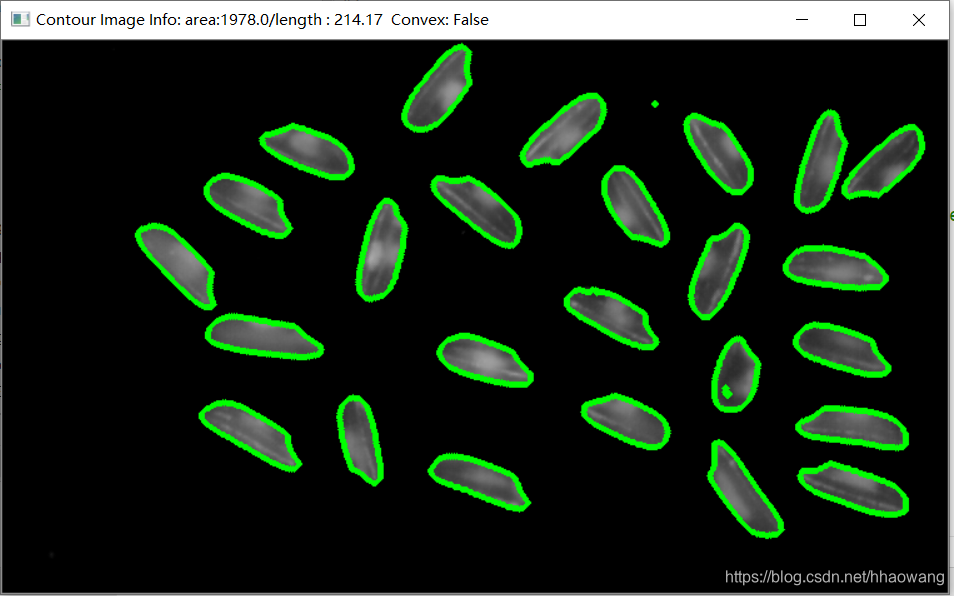
7. Bounding Rectangle 边界矩形
There are two types of bounding rectangles.
7.a. Straight Bounding Rectangle直边界矩形
It is a straight rectangle, it doesn't consider the rotation of the object. So area of the bounding rectangle won't be minimum. It is found by the function cv2.boundingRect().
Let (x,y) be the top-left coordinate of the rectangle and (w,h) be its width and height.
( x, y)为矩形左上角的坐标,( w, h)是矩形的宽和高
x,y,w,h = cv2.boundingRect(cnt)
img = cv2.rectangle(img,(x,y),(x+w,y+h),(0,255,0),2)
旋转的边界矩形 这个边界矩形是面积最小的,因为它考虑了对象的旋转。用到的函数为 cv2.minAreaRect()。返回的是一个 Box2D 结构,其中包含矩形左上角角点的坐标( x, y),矩形的宽和高( w, h),以及旋转角度。但是要绘制这个矩形需要矩形的 4 个角点,可以通过函数 cv2.boxPoints() 获得。
# 边界矩形+旋转
rect = cv2.minAreaRect(cnt)
box = cv2.boxPoints(rect)
box = np.int0(box)
cv2.drawContours(img,[box],0,(0,0,255),2)
Both the rectangles are shown in a single image. Green rectangle shows the normal bounding rect. Red rectangle is the rotated rect.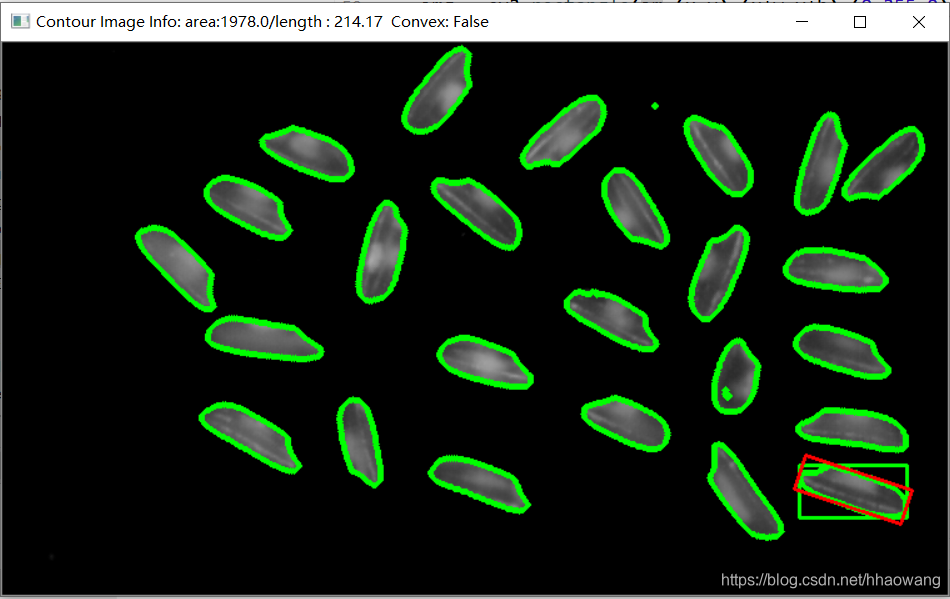
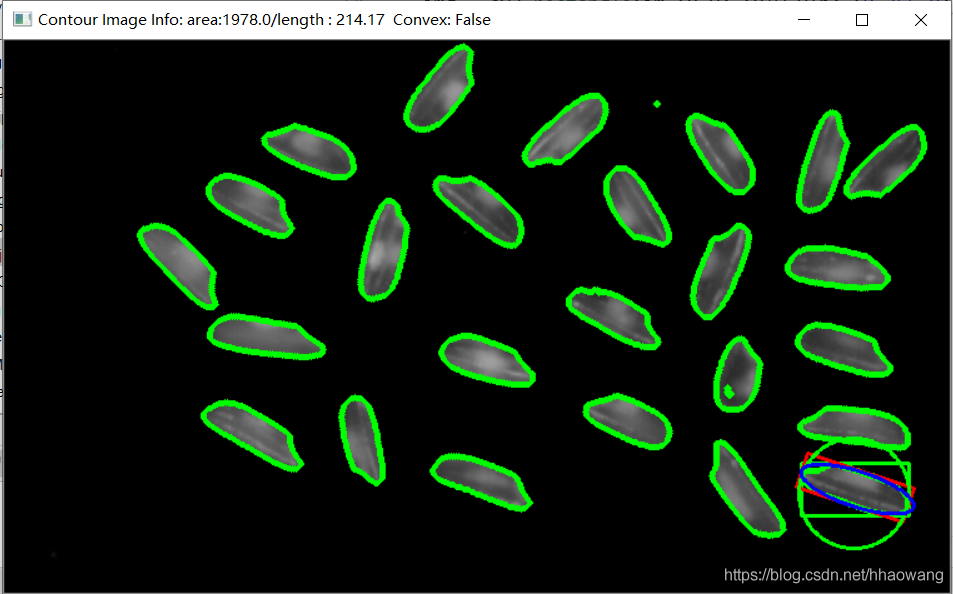
8. Minimum Enclosing Circle
Next we find the circumcircle of an object using the function cv2.minEnclosingCircle(). It is a circle which completely covers the object with minimum area.
函数 cv2.minEnclosingCircle() 可以帮我们找到一个对象的外切圆。它是所有能够包括对象的圆中面积最小的一个。
(x,y),radius = cv2.minEnclosingCircle(cnt)
center = (int(x),int(y))
radius = int(radius)
img = cv2.circle(img,center,radius,(0,255,0),2)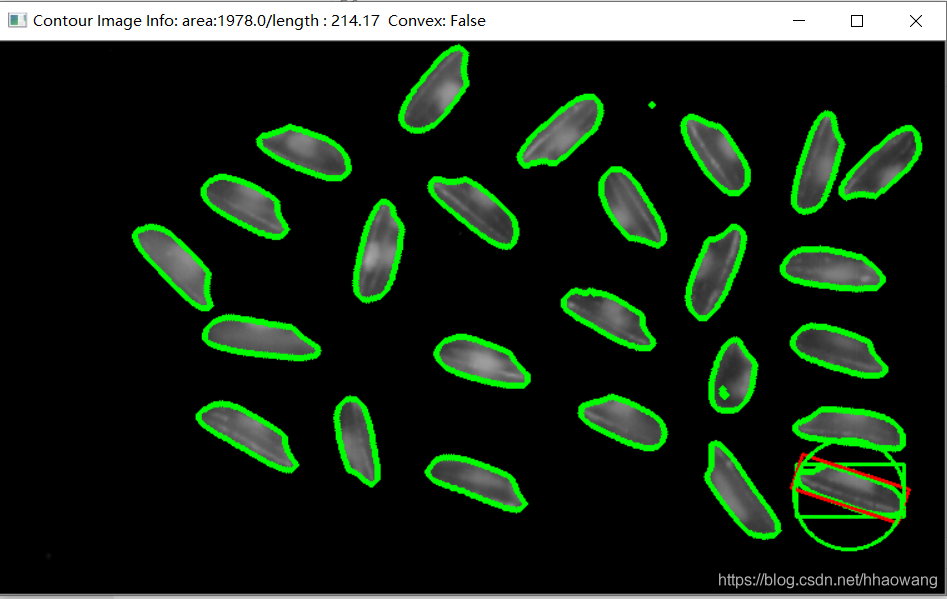
9. Fitting an Ellipse
Next one is to fit an ellipse to an object. It returns the rotated rectangle in which the ellipse is inscribed.
# 椭圆拟合
ellipse = cv2.fitEllipse(cnt)
im = cv2.ellipse(im,ellipse,(255,0,0),2)
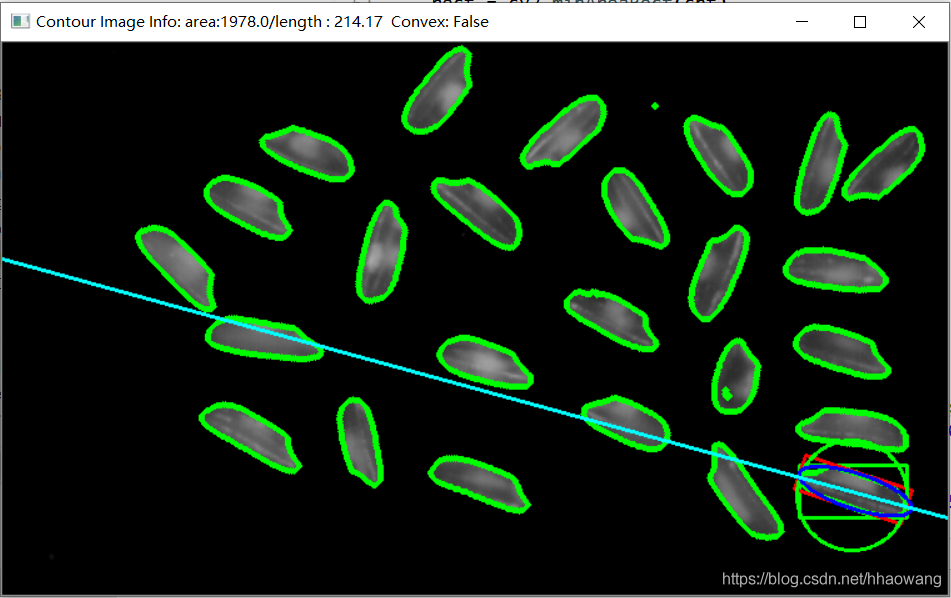
10. Fitting a Line
Similarly we can fit a line to a set of points. Below image contains a set of white points. We can approximate a straight line to it.
# 直线拟合
rows,cols = img.shape[:2]
#cv2.fitLine(points, distType, param, reps, aeps[, line ]) → line
[vx,vy,x,y] = cv2.fitLine(cnt, cv2.DIST_L2,0,0.01,0.01)
lefty = int((-x*vy/vx) + y)
righty = int(((cols-x)*vy/vx)+y)
img = cv2.line(img,(cols-1,righty),(0,lefty),(255,255,0),2)
完整代码:
# !/usr/bin/env python
# -*- coding: utf-8 -*-
"""
# @Time    : 2019/10/30 18:14
# @Author  : HaoWang
# @Site    : HongKong, China
# @project : $[PROJECT_NAME]
# @File    : 1202Image.py
# @Software: PyCharm
# @license: haowanghk@gmail.com
"""

import numpy as np
import cv2

im = cv2.imread('../pictures/rice.png')
imgray = cv2.cvtColor(im, cv2.COLOR_BGR2GRAY)

ret, thresh = cv2.threshold(imgray,0,255,cv2.THRESH_BINARY+cv2.THRESH_OTSU)

im2, contours, hierarchy = cv2.findContours(thresh, cv2.RETR_TREE, cv2.CHAIN_APPROX_SIMPLE)

print("contours:",np.shape(contours))
# (579,)
# draw contours
cont_img = cv2.drawContours(im, contours, -1, (0,255,0), 3)


# 计算图像的距
cnt = contours[0]
M = cv2.moments(cnt)
print(M)

# # 计算对象重心
cx = int(M['m10']/M['m00'])
cy = int(M['m01']/M['m00'])

# 计算面积
area = cv2.contourArea(cnt)
print(area)

# 计算周长
perimeter = cv2.arcLength(cnt,True)

# 轮廓近似
epsilon = 0.1*cv2.arcLength(cnt,True)
approx = cv2.approxPolyDP(cnt,epsilon,True)

# 凸包
# hull = cv2.convexHull(points[, hull[, clockwise[, returnPoints]]
hull = cv2.convexHull(cnt, returnPoints=False)

# 凸性检验
k = cv2.isContourConvex(cnt)
print(k)

# 边界矩形(正)
x,y,w,h = cv2.boundingRect(cnt)
img = cv2.rectangle(im,(x,y),(x+w,y+h),(0,255,0),2)

# 边界矩形+旋转
rect = cv2.minAreaRect(cnt)
box = cv2.boxPoints(rect)
box = np.int0(box)
cv2.drawContours(img,[box],0,(0,0,255),2)

# 最小外接圆
(x,y),radius = cv2.minEnclosingCircle(cnt)
center = (int(x),int(y))
radius = int(radius)
img = cv2.circle(img,center,radius,(0,255,0),2)

# 椭圆拟合
ellipse = cv2.fitEllipse(cnt)
im = cv2.ellipse(im,ellipse,(255,0,0),2)

# 直线拟合
rows,cols = img.shape[:2]
#cv2.fitLine(points, distType, param, reps, aeps[, line ]) → line
[vx,vy,x,y] = cv2.fitLine(cnt, cv2.DIST_L2,0,0.01,0.01)
lefty = int((-x*vy/vx) + y)
righty = int(((cols-x)*vy/vx)+y)
img = cv2.line(img,(cols-1,righty),(0,lefty),(255,255,0),2)

# plot image
cv2.imshow("Contour Image Info: "+
           "area:"+ str(area) +
           "/length : %.2f "%perimeter +
          " Convex: "+str(k),
           img)

# print(hull)
# print(cnt[69])

# wait
cv2.waitKey(0)
cv2.destroyAllWindows()


 2222
2222


 被折叠的 条评论
为什么被折叠?
被折叠的 条评论
为什么被折叠?
 到【灌水乐园】发言


