


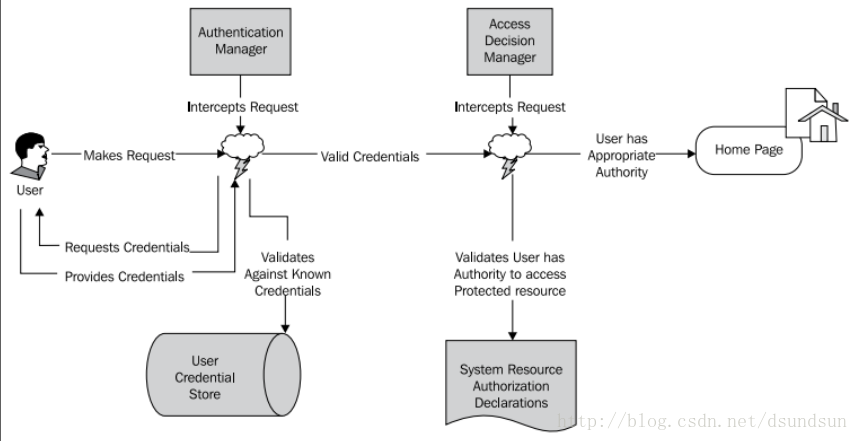
我们了解一下验证的过程 、首先用户发起一个请求、 这时候,认证管理器进行拦截,验证用户发起请求时的一些凭证信息,未通过验证信息审核的那么返回给用户,通过审核的,那么继续进行请求访问,访问页面之前,会被访问决策管理拦截,访问决策管理器验证用户是否有访问页面的权限,如果有,那么继续到访问页面。
其实spring security这样的权限框架就是根据一系列的依赖代理(delegates)和servlet过滤器来实现的。看看如下这个图:
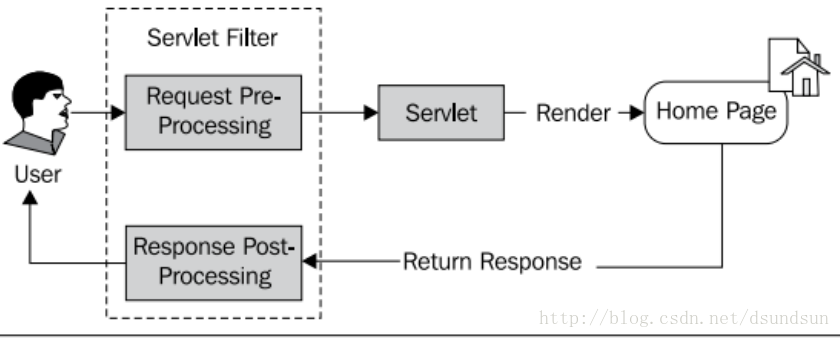
首先先通过过滤器拦截用户的请求,拦截后通过servlet来进行处理,如果处理成功那么进行正常访问,在返回给用户一个请求。
所以了解过滤器链的优先级是非常重要的。通过我查看spring security的帮助说明文档,我们可以看到过滤器链的顺序,如下:
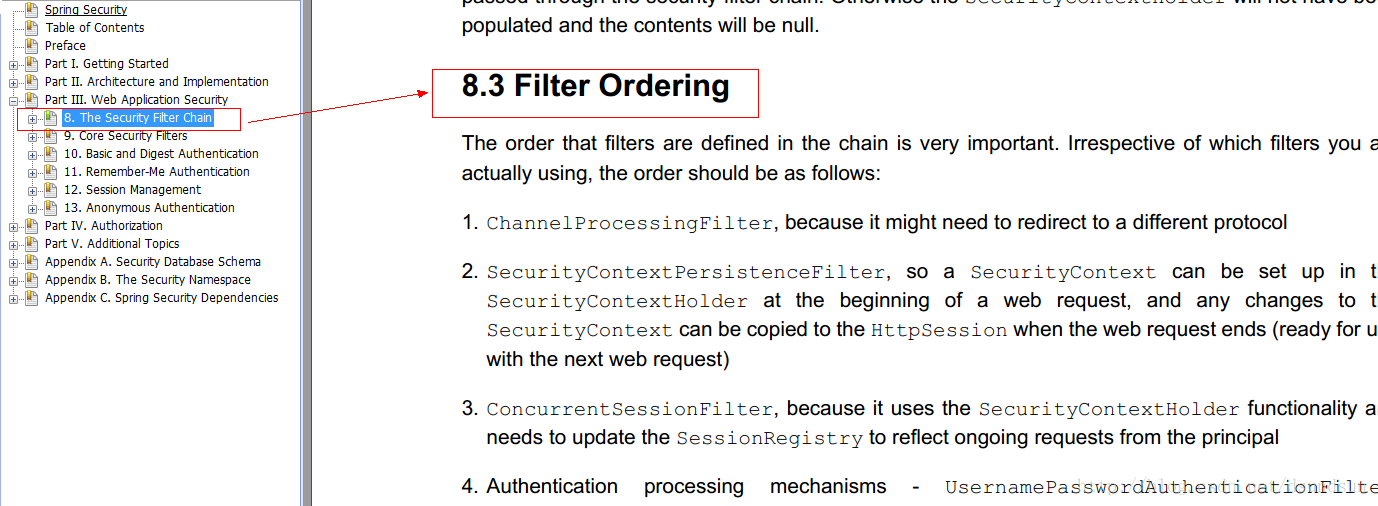
1.ChannelProcessingFilter, because it might need to redirect to a different protocol
2.SecurityContextPersistenceFilter, so a SecurityContext can be set up in the SecurityContextHolder at the beginning of a web request, and any changes to the SecurityContext can be copied to the HttpSession when the web request ends (ready for use with the next web request)
3.ConcurrentSessionFilter, because it uses the SecurityContextHolder functionality and needs to update the SessionRegistry to reflect ongoing requests from the principal
4.Authentication processing mechanisms - UsernamePasswordAuthenticationFilter, CasAuthenticationFilter, BasicAuthenticationFilter etc - so that the SecurityContextHolder can be modified to contain a valid Authentication request token
5.The SecurityContextHolderAwareRequestFilter, if you are using it to install a Spring Security aware HttpServletRequestWrapper into your servlet container
6.The JaasApiIntegrationFilter, if a JaasAuthenticationToken is in the SecurityContextHolder this will process the FilterChain as the Subject in the JaasAuthenticationToken
7.RememberMeAuthenticationFilter, so that if no earlier authentication processing mechanismupdated the SecurityContextHolder, and the request presents a cookie that enables remember-me services to take place, a suitable remembered Authentication object will be put there
8.AnonymousAuthenticationFilter, so that if no earlier authentication processing mechanism updated the SecurityContextHolder, an anonymous Authentication object will be put there
9.ExceptionTranslationFilter, to catch any Spring Security exceptions so that either an HTTP error response can be returned or an appropriate AuthenticationEntryPoint can be launched
10.FilterSecurityInterceptor, to protect web URIs and raise exceptions when access is denied
文档中大概给出了10个过滤器的顺序,我们试着可以翻译一下:
1.ChannelProcessingFilter,使用它因为我们可能会指向不同的协议(如:Http,Https)
2.SecurityContextPersistenceFilter,负责从SecurityContextRepository 获取或存储 SecurityContext。SecurityContext 代表了用户安全和认证过的session
3.ConcurrentSessionFilter,使用SecurityContextHolder的功能,更新来自“安全对象”不间断的请求,进而更新SessionRegistry
4.认证进行机制,UsernamePasswordAuthenticationFilter,CasAuthenticationFilter,BasicAuthenticationFilter等等--SecurityContextHolder可能会修改含有Authentication这样认证信息的token值
5.SecurityContextHolderAwareRequestFilter,如果你想用它的话,需要初始化spring security中的HttpServletRequestWrapper到你的servlet容器中。
6.JaasApiIntegrationFilter,如果JaasAuthenticationToken在SecurityContextHolder的上下文中,在过滤器链中JaasAuthenticationToken将作为一个对象。
7.RememberMeAuthenticationFilter,如果还没有新的认证程序机制更新SecurityContextHolder,并且请求已经被一个“记住我”的服务替代,那么将会有一个Authentication对象将存放到这(就是 已经作为cookie请求的内容)。
8.AnonymousAuthenticationFilter,如果没有任何认证程序机制更新SecurityContextHolder,一个匿名的对象将存放到这。
9.ExceptionTranslationFilter,为了捕获spring security的错误,所以一个http响应将返回一个Exception或是触发AuthenticationEntryPoint。
10.FilterSecurityInterceptor,当连接被拒绝时,保护web URLS并且抛出异常。
通过介绍完这么多的过滤器,相信我们都想到了,,,我应该可以建一个自己的过滤器,, 应该是的。 呵呵。 我们先这么猜测的。 然后继续看书和文档。
还记得spring security的xml吗?、 里边的配置文件、
- <http auto-config="true" >
- <intercept-url pattern= "/*" access="ROLE_USER" />
- </http >
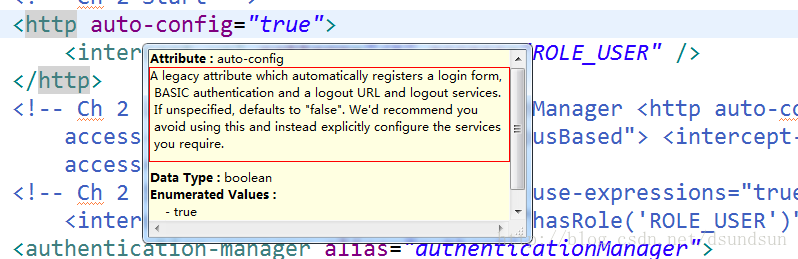
我们可以看到这个属性的介绍,大概意思是:这是一个预留的属性,他可以自动配置login form,BSIC 认证和logout URL 和logout services,如果没有特殊表明,这个的默认值是false。我们推荐你避免使用这个属性,相反的,配置你需要的一些服务。。,,(spring security本来不希望我们使用这个属性,这个事我们都先记着)
那好,今天就到这里,我们了解了两个事情:
第一个:整个spring security是有过滤器链和sevlet组成的,并且是按一定顺序执行的,而且查看相关spring security提供的说明,我们可以清楚的了解到这些过滤器大致都是做什么用的、
第二个:上次我们跑起来的应用中,配置了auto-config="true"这个属性,它帮我们自动添加了一些过滤器,使项目跑起来很快,但是由于不太有针对性(这是我自己的猜测),spring security不建议我们使用它,spring security更希望我们能配置一些有针对性的服务。
安全过滤器链
Spring Security的web架构是完全基于标准的servlet过滤器的。 它没有在内部使用servlet或任何其他基于servlet的框架(比如spring mvc), 所以它没有与任何特定的web技术强行关联。 它只管处理HttpServletRequest 和HttpServletResponse,不关心请求时来自浏览器,web服务客户端,HttpInvoker还是一个AJAX应用。
Spring Security维护了一个过滤器链,每个过滤器拥有特定的功能,过滤器需要服务也会对应添加和删除。 过滤器的次序是非常重要的,它们之间都有依赖关系。 如果你已经使用了命名空间配置,过滤器会自动帮你配置, 你不需要定义任何Spring Bean,但是有时候你需要完全控制Spring过滤器链, 因为你使用了命名空间没有提供的特性,或者你需要使用你自己自定义的类。
1. DelegatingFilterProxy
当使用servlet过滤器时,你很需要在你的web.xml中声明它们, 它们可能被servlet容器忽略。在Spring Security,过滤器类也是定义在xml中的spring bean, 因此可以获得Spring的依赖注入机制和生命周期接口。 spring的DelegatingFilterProxy提供了在 web.xml和application context之间的联系。
当使用DelegatingFilterProxy,你会看到像 web.xml文件中的这样内容:
  <filter>
    <filter-name>myFilter</filter-name>
    <filter-class>org.springframework.web.filter.DelegatingFilterProxy</filter-class>
  </filter>

  <filter-mapping>
    <filter-name>myFilter</filter-name>
    <url-pattern>/*</url-pattern>
  </filter-mapping>
注意这个过滤器其实是一个DelegatingFilterProxy,这个过滤器里没有实现过滤器的任何逻辑。 DelegatingFilterProxy做的事情是代理Filter的方法,从application context里获得bean。 这让bean可以获得spring web application context的生命周期支持,使配置较为轻便。 bean必须实现javax.servlet.Filter接口,它必须和filter-name里定义的名称是一样的。查看DelegatingFilterProxy的javadoc获得更多信息。
2. FilterChainProxy
现在应该清楚了,你可以声明每个Spring Security过滤器bean,你在application context中需要的。 把一个DelegatingFilterProxy入口添加到web.xml, 确认它们的次序是正确的。 这是一种繁琐的方式,会让web.xml显得十分杂乱,如果我们配置了太多过滤器的话。 我们最好添加一个单独的入口,在web.xml中,然后在application context中处理实体, 管理我们的web安全bean。 这就是FilterChainProxy所做的事情。它使用DelegatingFilterProxy (就像上面例子中那样),但是对应的class是org.springframework.security.web.FilterChainProxy。 过滤器链是在application context中声明的。这里有一个例子:
<bean id="filterChainProxy" class="org.springframework.security.web.FilterChainProxy">
  <sec:filter-chain-map path-type="ant">
     <sec:filter-chain pattern="/webServices/**" filters="
           securityContextPersistenceFilterWithASCFalse,
           basicAuthenticationFilter,
           exceptionTranslationFilter,
           filterSecurityInterceptor" />
     <sec:filter-chain pattern="/**" filters="
           securityContextPersistenceFilterWithASCFalse,
           formLoginFilter,
           exceptionTranslationFilter,
           filterSecurityInterceptor" />
  </sec:filter-chain-map>
</bean>
你可能注意到FilterSecurityInterceptor声明的不同方式。 命名空间元素filter-chain-map被用来设置安全过滤器链。 它映射一个特定的URL模式,到过滤器链中,从bean名称来定义的filters元素。 它同时支持正则表达式和ant路径,并且只使用第一个出现的匹配URI。 在运行阶段FilterChainProxy会定位当前web请求匹配的第一个URI模式,由filters属性指定的过滤器bean列表将开始处理请求。 过滤器会按照定义的顺序依次执行,所以你可以对处理特定URL的过滤器链进行完全的控制。
你可能注意到了,我们在过滤器链里声明了两个SecurityContextPersistenceFilter(ASC是allowSessionCreation的简写,是SecurityContextPersistenceFilter的一个属性)。 因为web服务从来不会在请求里带上jsessionid,为每个用户代理都创建一个HttpSession完全是一种浪费。 如果你需要构建一个高等级最高可扩展性的系统,我们推荐你使用上面的配置方法。 对于小一点儿的项目,使用一个HttpSessionContextIntegrationFilter(让它的allowSessionCreation默认为true)就足够了。
在有关声明周期的问题上,如果这些方法被FilterChainProxy自己调用,FilterChainProxy会始终根据下一层的Filter代理init(FilterConfig)和destroy()方法。 这时,FilterChainProxy会保证初始化和销毁操作只会在Filter上调用一次, 而不管它在过滤器链中被声明了多少次)。你控制着所有的抉择,比如这些方法是否被调用 或targetFilterLifecycle初始化参数DelegatingFilterProxy。 默认情况下,这个参数是false,servlet容器生命周期调用不会传播到 DelegatingFilterProxy。
当我们了解如何使用命名控制配置构建web安全。 我们使用一个DelegatingFilterProxy,它的名字是“springSecurityFilterChain”。 你应该现在可以看到FilterChainProxy的名字,它是由命名空间创建的。
2.1. 绕过过滤器链
通过命名空间,你可以使用filters = "none",来提供一个过滤器bean列表。 这会朝向请求模式,使用安全过滤器链整体。注意任何匹配这个模式的路径不会有任何授权或校验的服务 起作用,它们是可以自由访问的。
3. 过滤器顺序
定义在web.xml里的过滤器的顺序是非常重要的。 不论你实际使用的是哪个过滤器,<filter-mapping>的顺序应该像下面这样:
-
ChannelProcessingFilter,因为它可能需要重定向到其他协议。 -
ConcurrentSessionFilter,因为它不使用SecurityContextHolder功能,但是需要更新SessionRegistry来从主体中放映正在进行的请求。 -
SecurityContextPersistenceFilter,这样SecurityContext可以在web请求的开始阶段通过SecurityContextHolder建立,然后SecurityContext的任何修改都会在web请求结束的时候(为下一个web请求做准备)复制到HttpSession中。 -
验证执行机制 -
UsernamePasswordAuthenticationFilter,CasAuthenticationFilter,BasicAuthenticationFilter等等 - 这样SecurityContextHolder可以被修改,并包含一个合法的Authentication请求标志。 -
SecurityContextHolderAwareRequestFilter,如果,你使用它,把一个Spring Security提醒HttpServletRequestWrapper安装到你的servlet容器里。 -
RememberMeAuthenticationFilter,这样如果之前的验证执行机制没有更新SecurityContextHolder,这个请求提供了一个可以使用的remember-me服务的cookie,一个对应的已保存的Authentication对象会被创建出来。 -
AnonymousAuthenticationFilter,这样如果之前的验证执行机制没有更新SecurityContextHolder,会创建一个匿名Authentication对象。 -
ExceptionTranslationFilter,用来捕捉 Spring Security异常,这样,可能返回一个HTTP错误响应,或者执行一个对应的AuthenticationEntryPoint。 -
FilterSecurityInterceptor,保护web URI。
4. 使用其他过滤器 —— 基于框架
如果你在使用SiteMesh,确认Spring Security过滤器在SiteMesh过滤器之前调用。 这可以保证SecurityContextHolder为每个SiteMesh渲染器及时创建。
5. 其他配置例子
方法一:
web.xml配置一个
<filter>
<filter-name>DelegatingFilterProxy</filter-name>
<filter-class>org.springframework.web.filter.DelegatingFilterProxy</filter-class>
<init-param>
<param-name>targetBeanName</param-name>
<param-value>myFilter</param-value> //自己过滤器的名字
</init-param>
<init-param>
<param-name>targetFilterLifecycle</param-name>
<param-value>true</param-value>
</init-param>
</filter>
<filter-mapping>
<filter-name>DelegatingFilterProxy</filter-name>
<url-pattern>/*</url-pattern>
</filter-mapping>
方法二:
web.xml配置一个
<filter>
<filter-name>myFilter</filter-name>
<filter-class>org.springframework.web.filter.DelegatingFilterProxy</filter-class>
<init-param>
<param-name>targetFilterLifecycle</param-name>
<param-value>true</param-value>
</init-param>
</filter>
<filter-mapping>
<filter-name>myFilter</filter-name>
<url-pattern>/*</url-pattern>
</filter-mapping>
方法一或者二不同的地方就是在web.xml中的写法不同而已没有太大的区别,配完web.xml之后还要配置applicationContext.xml中的bean。
applicationContext.xml配置:
<bean id="myFilter" class="com.bjtu.filter"> //指名具体的filter类
<property name="service"> //需要注入的具体参数
<ref bean="service"/>
</property>
</bean>
<bean id="service" parent="baseTransactionProxy">//这里的service封装了所有对数据库的操作
<property name="target">
<bean class="com.maimaiche.service.MaiMaiCheServiceImpl">
......
</bean>
</property>
</bean>


 527
527

 被折叠的 条评论
为什么被折叠?
被折叠的 条评论
为什么被折叠?
 到【灌水乐园】发言


