


原理实现请看:spring自定义标签原理
一、首先建立一个标签对应的实体类User
- public class User {
- private String userName;
- private String email;
- public String getUserName() {
- return userName;
- }
- public void setUserName(String userName) {
- this.userName = userName;
- }
- public String getEmail() {
- return email;
- }
- public void setEmail(String email) {
- this.email = email;
- }
- }
二、建立解析自定义标签的类 UserBeanDefinitionParser
- package vip.spring.demo.customTag;
- import org.springframework.beans.factory.support.BeanDefinitionBuilder;
- import org.springframework.beans.factory.xml.AbstractSingleBeanDefinitionParser;
- import org.springframework.util.StringUtils;
- import org.w3c.dom.Element;
- public class UserBeanDefinitionParser extends AbstractSingleBeanDefinitionParser {
- protected Class getBeanClass(Element element) {
- return User.class;
- }
- protected void doParse(Element element, BeanDefinitionBuilder bean) {
- String userName = element.getAttribute("userName");
- String email = element.getAttribute("email");
- if (StringUtils.hasText(userName)) {
- bean.addPropertyValue("userName", userName);
- }
- if (StringUtils.hasText(email)) {
- bean.addPropertyValue("email", email);
- }
- }
- }
三、建立处理的类 NamespaceHandlerSupport,这个类主要用来调用解释类
- package vip.spring.demo.customTag;
- import org.springframework.beans.factory.xml.NamespaceHandlerSupport;
- public class MyNamespaceHandler extends NamespaceHandlerSupport {
- public void init() {
- registerBeanDefinitionParser("user", new UserBeanDefinitionParser());
- }
- }
四、建立xsd 文件,用来校验我们的自定义标签的有效性
- <?xml version="1.0" encoding="UTF-8"?>
- <schema xmlns="http://www.w3.org/2001/XMLSchema" targetNamespace="http://www.lexueba.com/schema/user"
- xmlns:tns="http://www.lexueba.com/schema/user" elementFormDefault="qualified">
- <element name="user">
- <complexType>
- <attribute name="id" type="string" />
- <attribute name="userName" type="string" />
- <attribute name="email" type="string" />
- </complexType>
- </element>
- </schema>
五、spring读取我们自定义的schema和handlers默认是根据spring.handlers和spring.schemas来读取的,这两个文件默认要放在META-INF下
具体配置:
spring.handlers
- http\://www.lexueba.com/schema/user=vip.spring.demo.customTag.MyNamespaceHandler
spring.schemas
- http\://www.lexueba.com/schema/user.xsd=META-INF/spring-test.xsd
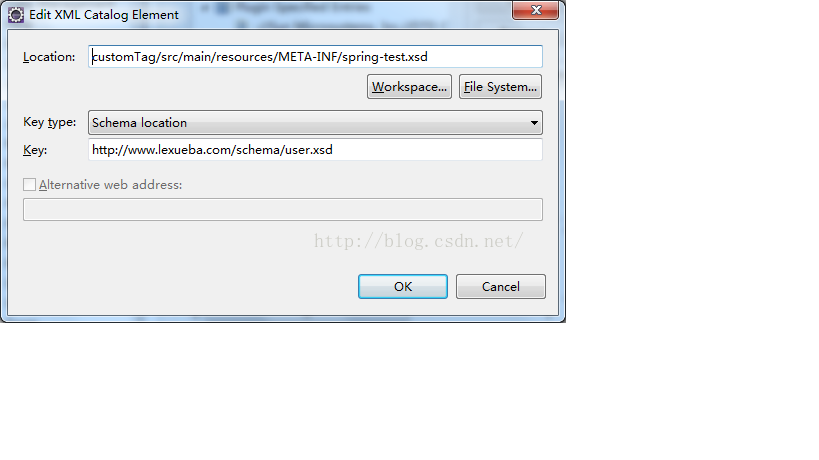
六、配置完毕后,我们就可以使用自定义标签了,建立test.xml.建立的时候,如果eclipse没有提示,可以在Preferencers -> XML Catalog 下添加我们刚刚的xsd
test.xml
- <?xml version="1.0" encoding="UTF-8"?>
- <beans xmlns="http://www.springframework.org/schema/beans"
- xmlns:xsi="http://www.w3.org/2001/XMLSchema-instance"
- xmlns:myname="http://www.lexueba.com/schema/user"
- xsi:schemaLocation="
- http://www.springframework.org/schema/beans http://www.springframework.org/schema/beans/spring-beans-2.0.xsd
- http://www.lexueba.com/schema/user http://www.lexueba.com/schema/user.xsd">
- <myname:user id="testBean" userName="cong" email="mail.163.com"/>
- </beans>
最后,编写test的文件 SpringCustomTest.java
- package vip.spring.demo.customTag;
- import org.springframework.context.ApplicationContext;
- import org.springframework.context.support.ClassPathXmlApplicationContext;
- public class SpringCustomTest {
- public static void main(String[] args) {
- ApplicationContext ac = new ClassPathXmlApplicationContext("test.xml");
- User user = (User) ac.getBean("testBean");
- System.out.println(user.getUserName());
- }
- }
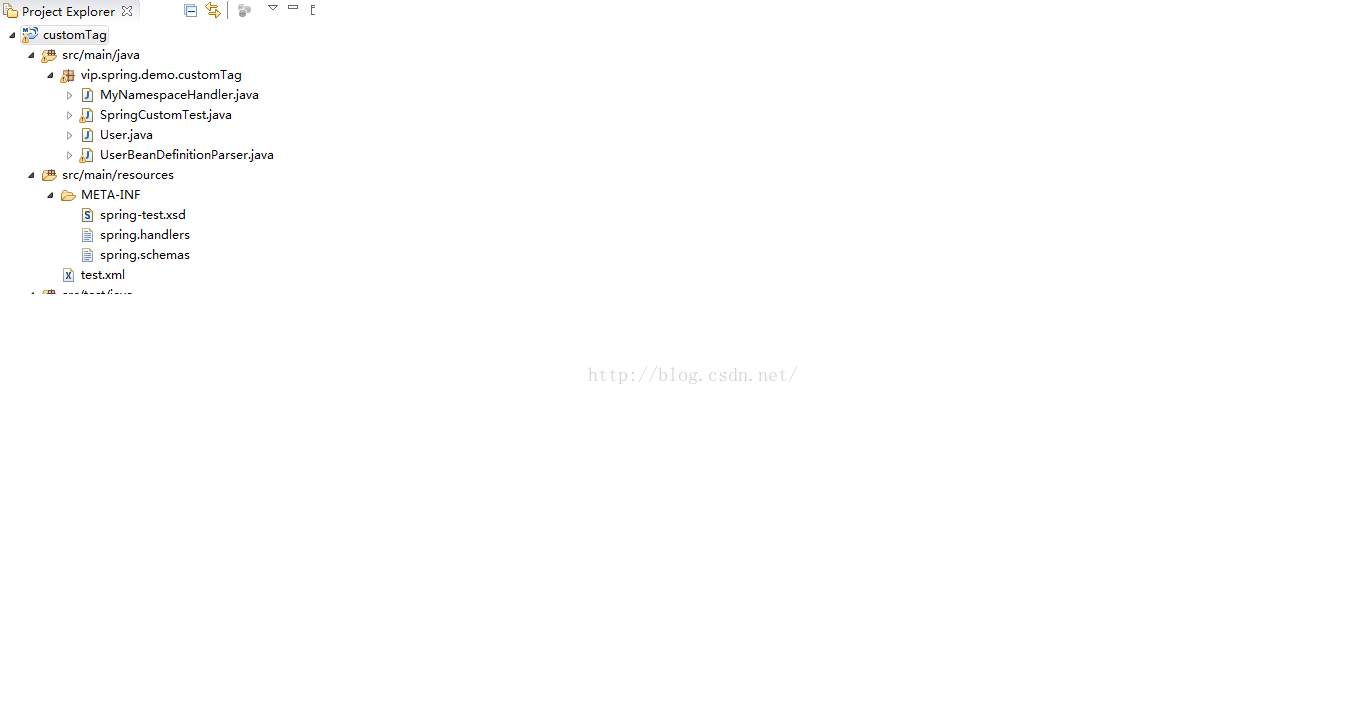
整个项目目录如下:
项目 pom.xml
- <properties>
- <project.build.sourceEncoding>UTF-8</project.build.sourceEncoding>
- </properties>
- <dependencies>
- <dependency>
- <groupId>org.springframework</groupId>
- <artifactId>spring-core</artifactId>
- <version>3.2.3.RELEASE</version>
- </dependency>
- <dependency>
- <groupId>org.springframework</groupId>
- <artifactId>spring-test</artifactId>
- <version>3.2.0.RELEASE</version>
- </dependency>
- </dependencies>
- <build>
- <plugins>
- <plugin>
- <groupId>org.apache.maven.plugins</groupId>
- <artifactId>maven-compiler-plugin</artifactId>
- <version>3.2</version>
- <configuration>
- <source>1.7</source>
- <target>1.7</target>
- <encoding>UTF8</encoding>
- </configuration>
- </plugin>
- </plugins>
- </build>

转载链接:http://blog.csdn.net/sonycong/article/details/52386783


 621
621

 被折叠的 条评论
为什么被折叠?
被折叠的 条评论
为什么被折叠?
 到【灌水乐园】发言


