


1.UITableView继承自UIScrollView,可以表现为Plain和Grouped两种风格(具体区别的话大家可以自行试验,区别还是蛮大,不过因为iOS7扁平化的效果,感觉没6显示的区别大):
typedefNS_ENUM(NSInteger, UITableViewStyle) {
UITableViewStylePlain, // regular table view
UITableViewStyleGrouped // preferences style table view
};
2.因为继承UIScrollView,因此也支持滚动,可以分区(组)显示内容,其中分区成为section,行成为row3.frame决定tableView显示的位置和边框,每一行的位置都会放一个UITableView负责显示行的内容
4.style样式(参照第一条) // 分割线样式 separatorStyle // 分割线颜色 separatorColor // 行高 rowHeight // 控制代理 delegate // 数据代理 dataSource // 与边框的分隔距离设置 separatorInset
二.UITableView基本配置
@主要是通过2个协议:UITableViewDataSource和UITableViewDelegate
1.dataSource是UITableViewDataSource类型,主要为UITableView提供显示用的数据(UITableViewCell),指定UITableViewCell支持的编辑操作类型(insert,delete和eordering),并根据用户的操作进行相应的数据更新操作,如果数据没有更具操作进行正确的更新,可能会导致显示异常,甚至crush。
2.delegate是UITableViewDelegate类型,主要提供一些可选的方法,用来控制tableView的选择、指定section的头和尾的显示以及协助完成cell的删除和排序等功能。
UITableView *tableView = [[UITableView alloc] initWithFrame:self.view.frame style:UITableViewStylePlain]; (我的编辑环境都是支持ARC的)
// 设置tableView的数据源
tableView.dataSource = self;
// 设置tableView的委托
tableView.delegate = self;
// 设置tableView的背景图
tableView.backgroundView = [[UIImageView alloc] initWithImage:[UIImage imageNamed:@"humingtao.png"]];
@一个UIView中可以有多个UITableView,我们这里先举例就一个UITableView,所以配置时,没用到(UITableView *)tableView这个参数,直接返回值了
@protocol UITableViewDataSource<NSObject>
// 可选,默认是返回1,1个分区
- (NSInteger)numberOfSectionsInTableView:(UITableView *)tableView{
return 4; // 这里将UITableView分成4个分区
}
// 下面2个方法都是完成配置必须实现的(引申,OC中的协议相当于JAVA中的接口,只不过,如果引用JAVA中的接口,则必须实现它的全部方法,在OC中则不用)
- (NSInteger)tableView:(UITableView *)tableView numberOfRowsInSection:(NSInteger)section{
// 设置每个section的row数量(都是从0下标开始)
if (section == 0) {
return 10;
}
if (section == 1) {
return 5;
}
if (section == 2) {
return 5;
}
return 7;
}
// 用于设置每个row上面的cell,其中indexPath 索引路径-->两个属性:section and row
- (UITableViewCell *)tableView:(UITableView *)tableView cellForRowAtIndexPath:(NSIndexPath *)indexPath{
// UITableViewCell的重用机制,将在下一章进行详细分析
// cell的重用标识(*******************不是很懂,不知道是不是为了标识各种不同的cell)
static NSString * cellIdentifier = @"cell";
// 从重用队列中取出cell对象
UITableViewCell * cell = [tableView dequeueReusableCellWithIdentifier:cellIdentifier];
// 如果没有,则创建(解释:一般刚进入界面的时候,是不需要重用的,当时显示的是能够映入界面的足够的cell,只有拖动的时候,才需要)
if (!cell) {
cell = [[UITableViewCell alloc] initWithStyle:(UITableViewCellStyleDefault) reuseIdentifier:cellIdentifier];
}
if (indexPath.section == 1) {
cell.imageView.image = [UIImage imageNamed:@"image1.png"];
}else{
cell.imageView.image = [UIImage imageNamed:@"image.png"];
}
if (indexPath.row == 1) {
cell.textLabel.text = @"我是个小小小小菜鸟";
}else{
cell.textLabel.text = @"我是个大大大大傻逼";
}
return cell;
}
// section头的title(例如,通讯录不同姓名标识)
- (NSString *)tableView:(UITableView *)tableView titleForHeaderInSection:(NSInteger)section{
return [NSString stringWithFormat:@"%i",section+1];
}
// section尾段的title
- (NSString *)tableView:(UITableView *)tableView titleForFooterInSection:(NSInteger)section{
return @"失恋者联盟";
}
// section索引的title集合(例如,通讯录索引,帮助快速找到姓名)
- (NSArray *)sectionIndexTitlesForTableView:(UITableView *)tableView{
return [NSArray arrayWithObjects:@"A", @"B",@"C",@"D",@"E",@"F",@"G",@"H",nil];
}
@protocol UITableViewDelegate<NSObject, UIScrollViewDelegate>
// 设置cell行高(因为参数是indexPath,所以可以设置不同section的行高,也能设置同一section不容row的行高)
- (CGFloat)tableView:(UITableView *)tableView heightForRowAtIndexPath:(NSIndexPath *)indexPath{
return 80;
}
// section头部的height
- (CGFloat)tableView:(UITableView *)tableView heightForHeaderInSection:(NSInteger)section{
}
// section尾部的height
- (CGFloat)tableView:(UITableView *)tableView heightForFooterInSection:(NSInteger)section{
}
// section头部的view
- (UIView *)tableView:(UITableView *)tableView viewForHeaderInSection:(NSInteger)section{
}
// section尾部的view
- (UIView *)tableView:(UITableView *)tableView viewForFooterInSection:(NSInteger)section{
}
// cell的缩进级别
- (NSInteger)tableView:(UITableView *)tableView indentationLevelForRowAtIndexPath:(NSIndexPath *)indexPath{
}
三.UITableViewCell(label,button等是添加在"contentView"属性上,切记)
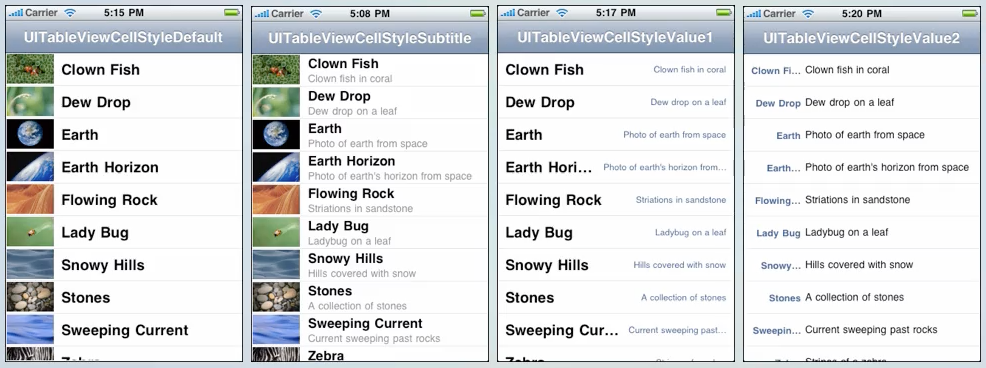
1.系统提供的UITableView也包含了四种风格的布局,分别是:
typedef enum {
UITableViewCellStyleDefault,
UITableViewCellStyleValue1,
UITableViewCellStyleValue2,
UITableViewCellStyleSubtitle
} UITableViewCellStyle;
2.下面我们看一下cell在正常状态下和编辑状态下的构成图:

3.cel的属性
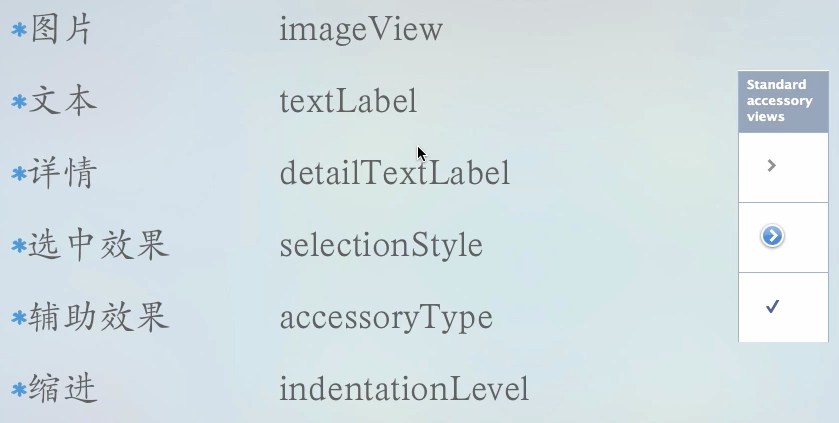
其中,cell.accessoryType = UITableViewCellAccessoryCheckmark 对应上图第三个标识
cell.accessoryType = UITableViewCellAccessoryDisclosureIndicator 对应上图第一个标识
cell.accessoryType = UITableViewCellAccessoryDetailDisclosureButton 对应上图第二个标识
4.cell的一些控制方法
// 辅助button点击
- (void)tableView:(UITableView *)tableView accessoryButtonTappedForRowWithIndexPath:(NSIndexPath *)indexPath{
}
// cell将要被选中
- (NSIndexPath *)tableView:(UITableView *)tableView willSelectRowAtIndexPath:(NSIndexPath *)indexPath{
}
// cell被选中
- (void)tableView:(UITableView *)tableView didSelectRowAtIndexPath:(NSIndexPath *)indexPath{
[tableView deselectRowAtIndexPath:indexPath animated:YES]; // 选中cell后,高亮状态立马就消失
}
// cell将要被取消选中
- (NSIndexPath *)tableView:(UITableView *)tableView willDeselectRowAtIndexPath:(NSIndexPath *)indexPath NS_AVAILABLE_IOS(3_0){
}
// cell被取消选中
- (void)tableView:(UITableView *)tableView didDeselectRowAtIndexPath:(NSIndexPath *)indexPath NS_AVAILABLE_IOS(3_0){
}
// 选择cell滑动出现[delete]按钮
- (void)tableView:(UITableView *)tableView commitEditingStyle:(UITableViewCellEditingStyle)editingStyle forRowAtIndexPath:(NSIndexPath *)indexPath
{
NSLog(@"删除");
}
@就是当往上滑动UITableview的时候广告条也跟着往上滑动,刚开始以为那个广告得单独定义一个scrollview,现在才知道uitableview有个 tableHeaderView 这个属性,我们只需要设置tableHeaderView 这个属性就可以 ,就可以实现广告条跟着滚动的,想实现点击关闭按钮后广告条消失 ,只需要将 tableHeaderView 设为 nil 即可 ,即 mytableview.tableHeaderView = nil;原来如此简单
// 根据indexPath获取cell对象
@- (UITableViewCell *)cellForRowAtIndexPath:(NSIndexPath *)indexPath;
//获取tableview正在window上显示的cell的indexPath
@- (NSArray *)indexPathsForVisibleRows;
@ 隐藏多余的分割线
- (void)_setExtraCellLineHidden:(UITableView *)tableView
{
UIView *view =[ [UIView alloc]init];
view.backgroundColor = [UIColor clearColor];
[tableView setTableFooterView:view];
}
@根据indexPath定位tableView的位置
NSIndexPath * indexPath = [NSIndexPath indexPathForRow:row inSection:section];
[_tableView scrollToRowAtIndexPath:indexPath atScrollPosition:UITableViewScrollPositionTop animated:YES];


 1419
1419


 被折叠的 条评论
为什么被折叠?
被折叠的 条评论
为什么被折叠?
 到【灌水乐园】发言


