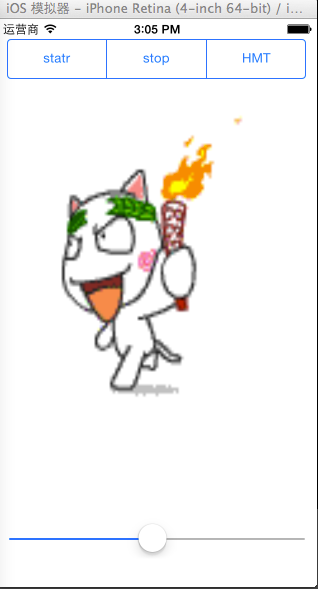
- (void)viewDidLoad
{
    [super viewDidLoad];

    UIImageView * animatedImageView = [[UIImageView alloc]initWithFrame:CGRectMake(60, 80, 200, 300)];
    animatedImageView.backgroundColor = [UIColor redColor];
    animatedImageView.tag = 100;
    [self.view addSubview:animatedImageView];
    [animatedImageView release];

    NSMutableArray * arrayImages = [NSMutableArray array];
    for (int i = 1; i < 8; i++) {

        [arrayImages addObject:[UIImage imageNamed:[NSString stringWithFormat:@"huoju_%i.tiff",i]]];

    }
    // 添加要实现动画效果的一系列图片
    animatedImageView.animationImages = arrayImages;

#pragma mark - 分段控制器
    //initWithItems:可以添加图片或者字符串
    UISegmentedControl * segment = [[UISegmentedControl alloc]initWithItems:@[@"statr",@"stop",@"HMT"]];
    segment.frame = CGRectMake(10, 20, 300, 40);
    // 分了几段
    NSLog(@"%lu",segment.numberOfSegments);
    // 选中时,是一直呈现高亮状态(NO)还是瞬间的高亮(YES)
    segment.momentary = YES;
    [segment addTarget:self action:@selector(onClickSegmentedControl:) forControlEvents:UIControlEventValueChanged];
    // 把下标为2的区段,设置为不可点击
    [self.view addSubview:segment];
    [segment release];


    // 滑动控制器
    UISlider * slider  = [[UISlider alloc]initWithFrame:CGRectMake(10, 500, 300, 40)];
    slider.maximumValue = 3;
    slider.minimumValue = 0.1;
    NSLog(@"%f",slider.value);
    [self.view addSubview:slider];
    [slider release];
    [slider addTarget:self action:@selector(changeSliderValue:) forControlEvents:UIControlEventValueChanged];

}


- (void)onClickSegmentedControl:(UISegmentedControl *)segmented{

     // selectedSegmentIndex
    if (segmented.selectedSegmentIndex == 0) {
        // 启动动画
        [((UIImageView *)[self.view viewWithTag:100]) startAnimating];

    } else {
        // 停止动画
        [((UIImageView *)[self.view viewWithTag:100]) stopAnimating];

    }
}

- (void)changeSliderValue:(UISlider *)sLider{

    // 通过滑动控件,增减速度
    ((UIImageView *)[self.view viewWithTag:100]).animationDuration = sLider.value;
    [((UIImageView *)[self.view viewWithTag:100]) startAnimating];
}


- (void)didReceiveMemoryWarning
{
    [super didReceiveMemoryWarning];
    // Dispose of any resources that can be recreated.
}

@end


 121
121

 被折叠的 条评论
为什么被折叠?


