


前言
多数项目都会有开发环境、测试环境、生产环境,各个环境配置可能都会不一样,于是在构建时,会涉及到环境配置的切换。来回手工修改配置,效率低下,容易出错。可以配置多个含有不同环境配置的Profile,在构建时指定构建环境,达到多环境下快速灵活构建的目的。
项目结构
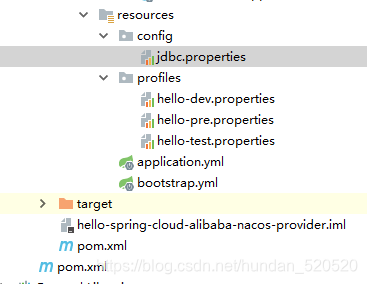
jdbc.properties
jdbc_driver_class=@jdbc.driver.class@
jdbc_connection_url=@jdbc.connection.url@
jdbc_username1=@jdbc.username@
jdbc_password1=@jdbc.password@

这里因为 ${jdbc.driver.class} 获取不到值,改成 @jdbc.driver.class@
profiles 目录下:
- hello-dev.properties 开发环境配置
- hello-test.properties 测试环境配置
- hello-pre.properties 预发布环境配置
hello-dev.properties:
# 开发环境的 配置
jdbc.driver.class=dev_class
jdbc.connection.url=jdbc:mysql://localhost:3306/dev_db
jdbc.username=dev_user
jdbc.password=123456
hello-test.properties:
# 测试环境的 配置
jdbc.driver.class=test_class
jdbc.connection.url=jdbc:mysql://localhost:3306/test_db
jdbc.username=test_user
jdbc.password=123456
hello-pre.properties:
# 预发布环境的 配置
jdbc.driver.class=pre_class
jdbc.connection.url=jdbc:mysql://localhost:3306/pre_db
jdbc.username=pre_user
jdbc.password=123456
pom.xml 添加配置
	<profiles>
        <profile>
            <id>dev</id>
            <properties>
                <!-- 自定义属性 env,在不同环境有不同的值 -->
                <env>dev</env>
                <!--还可以自定义其他属性-->
                <pom.profile.name>dev</pom.profile.name>
                <!--Nacos配置中心地址-->
                <pom.nacos.ip>127.0.0.1</pom.nacos.ip>
                <pom.nacos.port>8848</pom.nacos.port>
                <!--Nacos配置中心命名空间,用于支持多环境.这里必须使用ID,不能使用名称,默认为空-->
                <pom.nacos.namespace>b1741b1f-d032-4b74-aa5a-6b6beb0d1f15</pom.nacos.namespace>
            </properties>
            <activation>
                <!-- 默认激活dev环境的配置 -->
                <activeByDefault>true</activeByDefault>
            </activation>
        </profile>
        <profile>
            <id>test</id>
            <properties>
                <env>test</env>
                <pom.profile.name>test</pom.profile.name>
                <!--Nacos配置中心地址-->
                <pom.nacos.ip>127.0.0.1</pom.nacos.ip>
                <pom.nacos.port>8848</pom.nacos.port>
                <!--Nacos配置中心命名空间,用于支持多环境.这里必须使用ID,不能使用名称,默认为空-->
                <pom.nacos.namespace>7e268b1b-442c-476b-b4c2-9ae3b2902c60</pom.nacos.namespace>
            </properties>
        </profile>
        <profile>
            <id>pre</id>
            <properties>
                <env>pre</env>
                <pom.profile.name>test</pom.profile.name>
                <!--Nacos配置中心地址-->
                <pom.nacos.ip>127.0.0.1</pom.nacos.ip>
                <pom.nacos.port>8848</pom.nacos.port>
                <!--Nacos配置中心命名空间,用于支持多环境.这里必须使用ID,不能使用名称,默认为空-->
                <pom.nacos.namespace>3f52aad7-a9e7-4cd0-bcfb-7c308e9b6dea</pom.nacos.namespace>
            </properties>
        </profile>
    </profiles>

	<build>

        <filters>
            <!-- 指定filter,根据最终profile下的env属性获取对应的配置文件 -->
            <filter>src/main/resources/profiles/hello-${env}.properties</filter>
        </filters>

        <!-- 开启资源过滤,让Maven能解析资源文件中的Maven属性 -->
        <resources>
            <resource>
                <directory>src/main/resources</directory>
                <includes>
                    <include>**/*</include>
                </includes>
                <filtering>true</filtering>
            </resource>
            <resource>
                <directory>src/main/webapp</directory>
                <includes>
                    <include>**/**</include>
                </includes>
                <filtering>true</filtering>
                <targetPath>META-INF/resources</targetPath>
            </resource>
        </resources>

        <plugins>
            <plugin>
                <groupId>org.springframework.boot</groupId>
                <artifactId>spring-boot-maven-plugin</artifactId>
                <configuration>
                    <mainClass>com.funtl.hello.spring.cloud.alibaba.nacos.provider.NacosProviderApplication</mainClass>
                </configuration>
            </plugin>
        </plugins>
    </build>
构建时,指定参数-P加上profile的id来激活对应的profile。也可以通过指定默认激活的profile
maven clean package -Ptest
maven clean package -Pdev
maven clean package -Ppre
和 nacos 配置中心配合使用:
my:
  nacos:
    ip: '@pom.nacos.ip@'
    port: '@pom.nacos.port@'
    namespace: '@pom.nacos.namespace@'
spring:
  application:
    name: '@project.artifactId@'
  profiles:
    active: '@pom.profile.name@'
  cloud:
    nacos:
      discovery:
        server-addr: ${my.nacos.ip}:8848
        namespace: ${my.nacos.namespace}
      config:
        server-addr: ${my.nacos.ip}:8848
        namespace: ${my.nacos.namespace}
        file-extension: yml
类似 @pom.nacos.ip@ 是获取到 pom.xml 文件中的属性,同时也可以统一 spring.profiles.active 属性


 4221
4221


 被折叠的 条评论
为什么被折叠?
被折叠的 条评论
为什么被折叠?
 到【灌水乐园】发言


