


第一篇【NIS】深入了解NIS
1 环境准备
操作系统:CentOS7.2
服务端安装如下软件:
| 软件名称 | 功能 |
| ypserv | NIS Server端的服务进程 |
| rpcbind | 提供RPC服务 |
客户端安装如下软件:
| 软件名称 | 功能 |
| yp-tools | 提供NIS相关的查询指令功能(yp-tools和ypbind必须同时安装) |
| ypbind | NIS Client端的服务进程(yp-tools和ypbind必须同时安装) |
Yptools和ypbind互相依赖,需要如下方式安装
[root@node2deps-centos72_1511]# rpm -ivh yp-tools-2.14-3.el7.x86_64.rpmypbind-1.37.1-7.el7.x86_64.rpm网络拓扑:
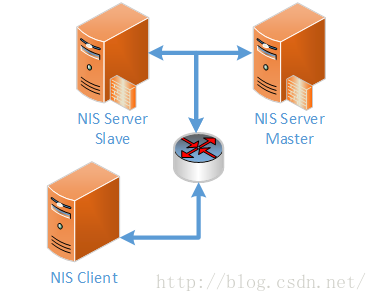
| Hostname | IP地址 | 角色 | 软件 |
| node0 | 192.168.192.90 | NIS Master Server,NIS Client | ypserv, rpcbind, yp-tools, ypbind |
| node1 | 192.168.192.91 | NIS Slave Server,NIS Client | ypserv, rpcbind, yp-tools, ypbind |
| node2 | 192.168.192.92 | NIS Client | yp-tools, ypbind |
NIS 的域名为 hikuss
2 搭建
2.1 Masterserver 端配置
2.1.1 设置NIS域名
设置 NIS 的域名,新增如下内容:
临时设置:
[root@node0 nis]# nisdomainname hikuss永久设置:
[root@node0 nis]# cat /etc/sysconfig/network
# Created by anaconda
# 设定nis的域名
NISDOMAIN=hikuss
# 设定nis固定在1011端口,方便设定防火墙规则
YPSERV_ARGS="-p 1011"
2.1.2 设置hosts
设定IP地址与主机名的对应关系/etc/hosts,新增如下内容
[root@node0 nis]# cat /etc/hosts
192.168.192.90 node0
192.168.192.91 node1
192.168.192.92 node2
2.1.3 设置主要配置文件/etc/ypserv.conf
设定server端的主配置文件/etc/ypserv.conf
[root@node0 nis]# cat /etc/ypserv.conf
#
# ypserv.conf   Inthis file you can set certain options for the NIS server,
#       andyou can deny or restrict access to certain maps based
#       on theoriginating host.
#
#       Seeypserv.conf(5) for a description of the syntax.
#

# Some options for ypserv. This things are all notneeded, if
# you have a Linux net.

# NIS 服务器大多使用于内部局域网络,只要有/etc/hosts 即可,不用 DNS
dns: no

# How many map file handles should be cached ?
# 默认会有30个数据库被读入内存当中,账号多的话,可以调大点。
files: 30

# Should we register ypserv with SLP ?
# slp: no
# After how many seconds we should re-registerypserv with SLP ?
# slp_timeout: 3600

# xfr requests are only allowed from ports <1024
xfr_check_port: yes

# The following, when uncommented,  will give you shadow like passwords.
# Note that it will not work if you have slave NISservers in your
# network that do not run the same server as you.
# 与 master/slave 有关,将同步更新的数据库比对所使用的端口,放置于 <1024 内。
# 底下则是设定限制客户端或 slave server查询的权限,利用冒号隔成四部分:
# [主机名/IP] : [NIS域名] : [可用数据库名称map] : [安全限制security]
# [主机名/IP]   :可以使用network/netmask 如 192.168.124.0/255.255.255.0
# [NIS域名]   :hikuss
# [可用数据库名称]:就是由 NIS 制作出来的数据库名称;
# [安全限制]      :包括没有限制 (none)、仅能使用 <1024 (port) 及拒绝 (deny)
# 一般来说,你可以依照我们的网域来设定成为底下的模样:
# Host                     : Domain  : Map              : Security
#
# *                        : *       : passwd.byname    : port
# *                        : *       : passwd.byuid     : port
127.0.0.0/255.255.255.0     : * : * : none
192.168.192.0/255.255.255.0 : * : * : none
*                           : * : * : deny
# 星号 (*) 代表任何数据都接受的意思。上面三行的意思是,1)开放 lo 内部接口、
# 2)开放内部 LAN 网域,3)且杜绝所有其他来源的 NIS 要求的意思。
# 还有一个简单作法,你可以先将上面三行批注,然后加入底下这一行即可:
*                         : * : * : none
#这样会允许任何主机连接到 NIS server,可以配合防火墙规则再做过滤。

# Not everybody should see the shadow passwords,not secure, since
# under MSDOG everbody is root and can access ports< 1024 !!!
*              : *      : shadow.byname    : port
*              : *      : passwd.adjunct.byname : port

# If you comment out the next rule, ypserv andrpc.ypxfrd will
# look for YP_SECURE and YP_AUTHDES in the maps.This will make
# the security check a little bit slower, but youonly have to
# change the keys on the master server, not theconfiguration files
# on each NIS server.
# If you have maps with YP_SECURE or YP_AUTHDES,you should create
# a rule for them above, that's much faster.
# *                        : *       : *                : none
2.1.4 设置防火墙
让yppasswdd启动在固定端口,方便防火墙管理
[root@node0 nis]# vi /etc/sysconfig/yppasswdd
YPPASSWDD_ARGS="--port 1012"
2.1.5 启动及开机启动
启动如下命令:
[root@node0 nis]# systemctlstart ypserv
[root@node0 nis]# systemctlstart rpcbind
[root@node0 nis]# systemctl statrtyppasswdd.service
设置开机启动
 [root@node0 nis]# systemctl enable ypserv
Created symlink from/etc/systemd/system/multi-user.target.wants/ypserv.service to/usr/lib/systemd/system/ypserv.service.
 [root@node0 nis]# systemctl enable rpcbind
Created symlink from/etc/systemd/system/sockets.target.wants/rpcbind.socket to/usr/lib/systemd/system/rpcbind.socket.
[root@node0 nis]# systemctl enableyppasswdd.service
Created symlink from/etc/systemd/system/multi-user.target.wants/yppasswdd.service to/usr/lib/systemd/system/yppasswdd.service.
2.1.6 建立NIS账户和资料库
1. 新建5个账号
[root@node0 nis]# for i in `seq 1 5`; do echo"=====create nisuser$i====="; useradd -u 100$i nisuser$i; echopassword | passwd --stdin nisuser$i; done2. 建立资料库
ypinit命令初始化主服务器和常见NIS映射表。默认的ypinit同make命令给出的操作一样。
按照提示 ctrl+D,确认即可完成资料库建立。
[root@node0 nis]# /usr/lib64/yp/ypinit -m

At this point, we have to construct a list of thehosts which will run NIS
servers. node0 is in the list of NIS server hosts.  Please continue to add
the names for the other hosts, one per line.  When you are done with the
list, type a <control D>.
    next hostto add:  node0
    next hostto add:
The current list of NIS servers looks like this:

node0

Is this correct? [y/n: y]  y
We need a few minutes to build the databases...
Building /var/yp/hikuss/ypservers...
Running /var/yp/Makefile...
gmake[1]: Entering directory `/var/yp/hikuss'
Updating passwd.byname...
Updating passwd.byuid...
Updating group.byname...
Updating group.bygid...
Updating hosts.byname...
Updating hosts.byaddr...
Updating rpc.byname...
Updating rpc.bynumber...
Updating services.byname...
Updating services.byservicename...
Updating netid.byname...
Updating protocols.bynumber...
Updating protocols.byname...
Updating mail.aliases...
gmake[1]: Leaving directory `/var/yp/hikuss'

node0 has been set up as a NIS master server.

Now you can run ypinit -s node0 on all slaveserver.
[root@node0 nis]#
2.1.7 更新NIS账户和资料库
在 server 端新增账号或者删除账号或者修改账号信息后,就得要重新制作数据库,make -C /var/yp
[root@node0 nis]# cd /var/yp
[root@node0 yp]# make
或者
[root@node0 nis]# make -C /var/yp
make: Entering directory `/var/yp'
gmake[1]: Entering directory `/var/yp/hikuss'
Updating netid.byname...
gmake[1]: Leaving directory `/var/yp/hikuss'
make: Leaving directory `/var/yp'
[root@node0 nis]#
把信息写进资料库,让后 client 端才可以读取到最新信息
2.1.8 与Slave相关的设定
当执行了 ypinit -m 之后,所有的主机上面的账号相关档案会被转成数据库档案, 这些数据库会被放置到 /var/yp/"nisdomainname" 当中,
[root@node0 nis]# ls /var/yp/hikuss/
group.bygid  hosts.byaddr  mail.aliases  passwd.byname protocols.byname   rpc.byname    services.byname         ypservers
group.byname hosts.byname  netid.byname  passwd.byuid  protocols.bynumber rpc.bynumber services.byservicename
[root@node0 nis]#
1. 若变更了使用者帐号密码参数,针对这个档案进行数据库更新:
[root@node0 nis]# cd /var/yp/
[root@node0 yp]# make passwd
或
[root@node0 nis]# make -C /var/yp passwd
make: Entering directory `/var/yp'
Updating passwd.byname...
Updating passwd.byuid...
make: Leaving directory `/var/yp'
2. 开启Slave服务推送
将 /var/yp/Makefile中的NOPUSH定义修改为false
[root@node0 nis]# grep "NOPUSH="/var/yp/Makefile
# slave servers (NOPUSH=true). If you have slaveservers, change this
# to "NOPUSH=false" and put all hostnamesof your slave servers in the file
NOPUSH=false
[root@node0 nis]#
3. 指定Slave服务主机,告诉master要把数据给谁->node1
[root@node0 nis]# cat /var/yp/ypservers
node0
node1
[root@node0 nis]#
4. 启动 ypxfrd服务
可以让 slave 服务器主动链接上 ypxfrd 来更新数据库, 可以免除系统管理原自己手动更新。
[root@node0 ~]# systemctl start ypxfrd设置为自动启动
[root@node0 ~]# systemctl enable ypxfrd此外,如果 master 机器想要直接将某些特定的数据库直接传给 slave 主机的话, 那么可以使用 yppush 这个指令。
例如:#yppush -h slave.abcnis passwd.*
2.2 Slave server端配置
2.2.1 设置NIS域名
设置 NIS 的域名,新增如下内容
临时设置:
[root@node0 nis]# nisdomainname hikuss永久设置:
[root@node0 nis]# cat /etc/sysconfig/network
# Created by anaconda
NISDOMAIN=hikuss
YPSERV_ARGS="-p 1011"
2.2.2 设置hosts
设定IP地址与主机名的对应关系/etc/hosts,新增如下内容
[root@node0 nis]# cat /etc/hosts
192.168.192.90 node0
192.168.192.91 node1
192.168.192.92 node2
2.2.3 设置主要配置文件/etc/ypserv.conf
设定server端的主配置文件/etc/ypserv.conf
[root@node0 nis]# cat /etc/ypserv.conf
#
# ypserv.conf   Inthis file you can set certain options for the NIS server,
#       andyou can deny or restrict access to certain maps based
#       on theoriginating host.
#
#       Seeypserv.conf(5) for a description of the syntax.
#

# Some options for ypserv. This things are all notneeded, if
# you have a Linux net.

# How many map file handles should be cached ?
files: 30

# Should we register ypserv with SLP ?
# slp: no
# After how many seconds we should re-register ypservwith SLP ?
# slp_timeout: 3600

# xfr requests are only allowed from ports <1024
xfr_check_port: yes

# The following, when uncommented,  will give you shadow like passwords.
# Note that it will not work if you have slave NISservers in your
# network that do not run the same server as you.
# Host                     : Domain  : Map              : Security
#
# *                        : *       : passwd.byname    : port
# *                        : *       : passwd.byuid     : port
127.0.0.0/255.255.255.0     : * : * : none
192.168.192.0/255.255.255.0 : * : * : none
*                           : * : * : deny

# Not everybody should see the shadow passwords,not secure, since
# under MSDOG everbody is root and can access ports< 1024 !!!
*              : *       : shadow.byname    : port
*              : *      : passwd.adjunct.byname : port
# If you comment out the next rule, ypserv andrpc.ypxfrd will
# look for YP_SECURE and YP_AUTHDES in the maps.This will make
# the security check a little bit slower, but youonly have to
# change the keys on the master server, not theconfiguration files
# on each NIS server.
# If you have maps with YP_SECURE or YP_AUTHDES,you should create
# a rule for them above, that's much faster.
2.2.4 设置防火墙
让yppasswdd启动在固定端口,方便防火墙管理
[root@node0 nis]# vi /etc/sysconfig/yppasswdd
YPPASSWDD_ARGS="--port 1012"
2.2.5 启动及开机启动
启动如下命令:
[root@node0 nis]# systemctlstart ypserv
[root@node0 nis]# systemctlstart rpcbind
[root@node0 nis]#
设置开机启动
 [root@node0 nis]# systemctl enable ypserv
Created symlink from/etc/systemd/system/multi-user.target.wants/ypserv.service to/usr/lib/systemd/system/ypserv.service.
 [root@node0 nis]# systemctl enable rpcbind
Created symlink from/etc/systemd/system/sockets.target.wants/rpcbind.socket to/usr/lib/systemd/system/rpcbind.socket.
[root@node0 nis]#
2.2.6 拉取数据库
获取源数据库
[root@node1 nis]# /usr/lib64/yp/ypinit -s node0
The local host's domain name hasn't been set.  Please set it.
因为nisdomain没有设置,解决方法:
[root@node1 nis]# nisdomainname hikuss继续测试:
[root@node1 nis]# /usr/lib64/yp/ypinit -s node0
We will need a few minutes to copy the data fromnode0.
Transferring netid.byname...
Trying ypxfrd ... not running
….

node1's NIS data base has been set up.
If there were warnings, please figure out what wentwrong, and fix it.

At this point, make sure that /etc/passwd and/etc/group have
been edited so that when the NIS is activated, thedata bases you
have just created will be used, instead of the /etcASCII files.
[root@node1 nis]#
原因是Master server端ypxfrd没有启动。解决方案如下:
[root@node0 ~]# systemctl start ypxfrd继续获取:
[root@node1 nis]# /usr/lib64/yp/ypinit -s node0
We will need a few minutes to copy the data fromnode0.
Transferring netid.byname...
Trying ypxfrd ... success

Transferring mail.aliases...
Trying ypxfrd ... success
…
Transferring ypservers...
Trying ypxfrd ... success


node1's NIS data base has been set up.
If there were warnings, please figure out what wentwrong, and fix it.

At this point, make sure that /etc/passwd and/etc/group have
been edited so that when the NIS is activated, thedata bases you
have just created will be used, instead of the /etcASCII files.
[root@node1 nis]#
测试结果:
[root@node1 ~]# ypcat -h localhost passwd.byname
nisuser1:$1$2e4n/ePv$xnfaSHSSUZhApRpjHn1Lw.:1001:1001::/home/nisuser1:/bin/bash
nisuser2:$1$NBitWXE9$43ezdKoamgw0ze8PnIOtT/:1002:1002::/home/nisuser2:/bin/bash
nisuser3:$1$GUtQO.zB$38oGHfzgWGYG84cKa7bkZ0:1003:1003::/home/nisuser3:/bin/bash
nisuser4:$1$nc3FDwqx$aKhlazecXTmDSmGciCBkG1:1004:1004::/home/nisuser4:/bin/bash
nisuser5:$1$krWvFybT$yUwL3dCDVz0qp5Sg7wifX1:1005:1005::/home/nisuser5:/bin/bash
[root@node1 ~]#
2.2.7 设置数据同步时间
利用crontab设置数据同步时间,在/etc/crontab最后添加如下同步命令:
*/5 * * * * /usr/lib64/yp/ypxfr -h node0 passwd.byname
*/5 * * * * /usr/lib64/yp/ypxfr -h node0 passwd.byuid
更改配置文件/usr/lib64/yp/ypxfr_1perday,/usr/lib64/yp/ypxfr_1perhour, /usr/lib64/yp/ypxfr_2perday:
$YPBINDIR/ypxfr $map -h node02.3 Client端配置
安装软件:
[root@node2deps-centos72_1511]# rpm -ivh yp-tools-2.14-3.el7.x86_64.rpmypbind-1.37.1-7.el7.x86_64.rpm/etc/sysconfig/network:加入 NIS 的域名
/etc/hosts:至少需要有各个 NIS 服务器的 IP 与主机名对应;
/etc/yp.conf:这个则是 ypbind 的主要配置文件,里面主要设定NIS 服务器所在
/etc/sysconfig/authconfig:规范账号登入时的允许认证机制;
/etc/pam.d/system-auth :因为账号通常由 PAM 模块所管理, 所以必须要在 PAM 模块内加入 NIS 的支持才行!
/etc/nsswitch.conf :设定账号密码与相关信息的查询顺序,默认是先找 /etc/passwd 再找 NIS 数据库;
2.3.1 设置NIS域名
设置 NIS 的域名,新增如下内容:
临时设置:
[root@node0 nis]# nisdomainname hikuss永久设置:
[root@node0 nis]# cat /etc/sysconfig/network
# Created by anaconda
NISDOMAIN=hikuss
YPSERV_ARGS="-p 1011"
2.3.2 设置hosts
设定IP地址与主机名的对应关系/etc/hosts,新增如下内容
[root@node0 nis]# cat /etc/hosts
192.168.192.90 node0
192.168.192.91 node1
192.168.192.92 node2
2.3.3 设施ypbind连接server-方法1
2.3.3.1 账户信息的读取顺序
配置账户信息的读取顺序
[root@node2 nis]# vim /etc/nsswitch.conf
…
passwd:    files nis sss
shadow:    files nis sss
group:     files nis sss
…
hosts:      files nis dns
…
[root@node2 nis]#
2.3.3.2 配置/etc/yp.conf
配置/etc/yp.conf,最后添加如下两行代码:
domain hikuss server node0
domain hikuss server node1
ypserver node0
ypserver node1
2.3.3.3 设置账号登入认证机制
登入时的允许认证机制
[root@node2 nis]# grep NIS/etc/sysconfig/authconfig
USENIS=yes
2.3.3.4 设置PAM授权
修改文件/etc/pam.d/system-auth,增加nis
…
password sufficient pam_unix.so md5shadow nis nullok try_first_passuse_authtok
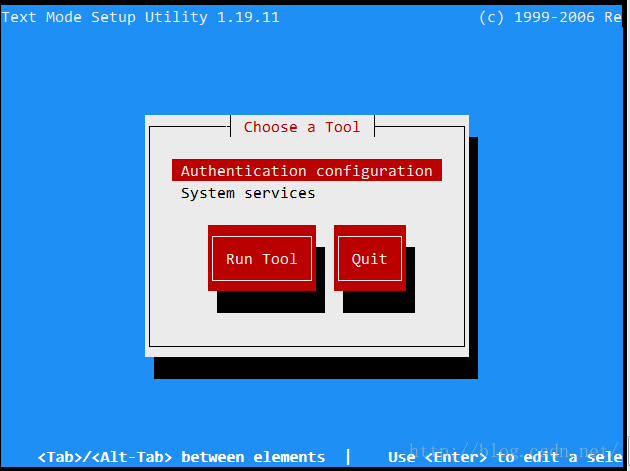
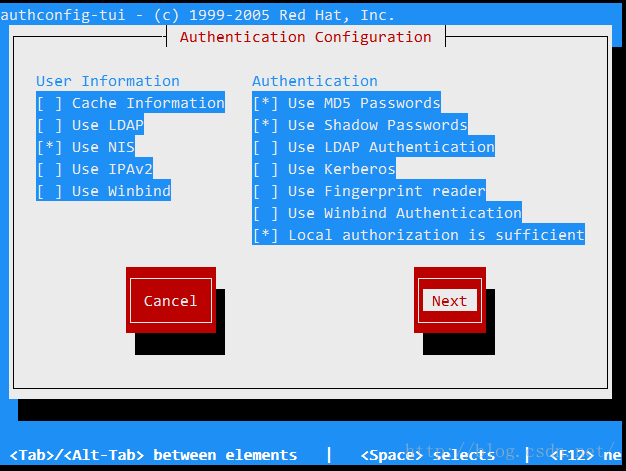
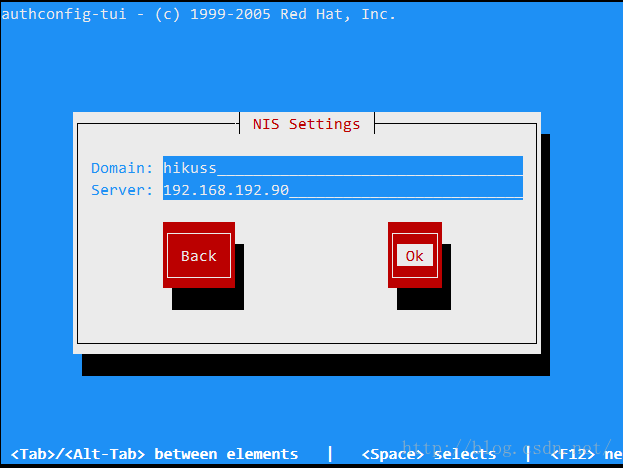
…2.3.4 设施ypbind连接server-方法2
[root@node1 nis]#setup1. 第一步:选择authentication
2. 第二步:设置nis
3. 第三步:设置nis服务器
2.3.5 启动及开机启动
启动如下命令:
[root@node0 nis]# systemctlstart rpcbind
[root@node0 nis]# systemctlstart ypbind
[root@node0 nis]#
设置开机启动
[root@node2 nis]# systemctlenable ypbind
Created symlink from/etc/systemd/system/multi-user.target.wants/ypbind.service to /usr/lib/systemd/system/ypbind.service.
[root@node0 nis]# systemctlenable rpcbind
Created symlink from/etc/systemd/system/sockets.target.wants/rpcbind.socket to/usr/lib/systemd/system/rpcbind.socket.
[root@node0 nis]#
2.4 Client测试
2.4.1 yptest
yptest用来测试 server 端和 client 端能否正常通讯
#如果配置成功,会返回成功的结果
#如果返回fail,则根据提示进行排查
[root@node2 nis]# yptest
Test 1: domainname
Configured domainname is "hikuss"

Test 2: ypbind
Used NIS server: node0

Test 3: yp_match
WARNING: No such key in map (Map passwd.byname, keynobody)

Test 4: yp_first
cephceph:$1$X9Z9IOh1$QJtLqBSk75qIf/h3oaRBO0:1000:1000:ceph:/home/ceph:/bin/bash

Test 5: yp_next
…
Test 6: yp_master
node0

Test 7: yp_order
1478832908

Test 8: yp_maplist
…

Test 9: yp_all
…
1 tests failed
[root@node2 nis]#
从这个测试当中可能发现一些错误,就是在 Test 3 出现的那个警告信息啦。只是说没有该数据库而已~ 该错误是可以忽略的。
重点在第 9 个步骤 yp_all 必须要有列出你 NIS server 上头的所有帐户信息,如果有出现账号相关数据的话,那么应该就算验证成功了!
2.4.2 ypwhich
ypwhich用来查看资料库映射数据
1. 查看NIS domain
[root@node2 nis]# ypwhich
node0
[root@node2 nis]#
2. 查看数据库映射
[root@node2 nis]# ypwhich -x
Use "ethers"    for map "ethers.byname"
Use "aliases"   for map "mail.aliases"
Use "services"  for map "services.byname"
Use "protocols" for map "protocols.bynumber"
Use "hosts" for map "hosts.byname"
Use "networks"  for map "networks.byaddr"
Use "group" for map "group.byname"
Use "passwd"    for map "passwd.byname"
[root@node2 nis]#
2.4.3 ypcat
利用ypcat读取数据库内容
[root@node2 nis]# ypcat -?
Usage: ypcat [-kt] [-d domain] [-h hostname]mapname | -x
ypcat - print values of all keys in a NIS database

  -ddomain      Use 'domain' instead of thedefault domain
  -hhostname    Query ypserv on 'hostname'instead the current one
  -k             Display map keys
  -t             Inhibits map nickname translation
  -x             Display the map nickname translationtable
  -?,--help     Give this help list
     --usage    Give a short usagemessage
     --version  Print program version
[root@node2 nis]#
1. 查看数据库映射
[root@node2 nis]# ypcat -x
Use "ethers"    for map "ethers.byname"
Use "aliases"   for map "mail.aliases"
Use "services"  for map "services.byname"
Use "protocols" for map "protocols.bynumber"
Use "hosts" for map "hosts.byname"
Use "networks"  for map "networks.byaddr"
Use "group" for map "group.byname"
Use "passwd"    for map "passwd.byname"
[root@node2 nis]#
2. 查看数据库映射ypcat -k <map>
[root@node2 nis]# ypcat -k passwd
cephceph:$1$X9Z9IOh1$QJtLqBSk75qIf/h3oaRBO0:1000:1000:ceph:/home/ceph:/bin/bash
nisuser1nisuser1:$1$2e4n/ePv$xnfaSHSSUZhApRpjHn1Lw.:1001:1001::/home/nisuser1:/bin/bash
nisuser2 nisuser2:$1$NBitWXE9$43ezdKoamgw0ze8PnIOtT/:1002:1002::/home/nisuser2:/bin/bash
nisuser3nisuser3:$1$GUtQO.zB$38oGHfzgWGYG84cKa7bkZ0:1003:1003::/home/nisuser3:/bin/bash
nisuser4nisuser4:$1$nc3FDwqx$aKhlazecXTmDSmGciCBkG1:1004:1004::/home/nisuser4:/bin/bash
nisuser5nisuser5:$1$krWvFybT$yUwL3dCDVz0qp5Sg7wifX1:1005:1005::/home/nisuser5:/bin/bash
[root@node2 nis]#
---轻轻地我走了,正如我轻轻地来---


 391
391


 被折叠的 条评论
为什么被折叠?
被折叠的 条评论
为什么被折叠?
 到【灌水乐园】发言


