


Linux 日志管理(16. Linux 日志管理)
rsyslog 日志配置
rsyslog 服务配置
rsyslog 是 Linux 系统中一款强大的开源日志管理工具,用于收集、处理、存储和转发系统日志信息。
配置文件位置
-
主配置: /etc/rsyslog.conf。主配置文件中以下配置作用是引入从配置目录中配置文件。
# Include all config files in /etc/rsyslog.d/ include(file="/etc/rsyslog.d/*.conf" mode="optional") -
从配置:/etc/rsyslog.d/*.conf。
rsyslog 的配置文件
核心配置文件为 /etc/rsyslog.conf,以及 /etc/rsyslog.d/ 目录下的自定义配置文件(用于扩展配置)。
配置文件的基本语法格式(规则)为:
# 格式:[来源筛选条件]  动作(存储或转发)
 facility.priority  target
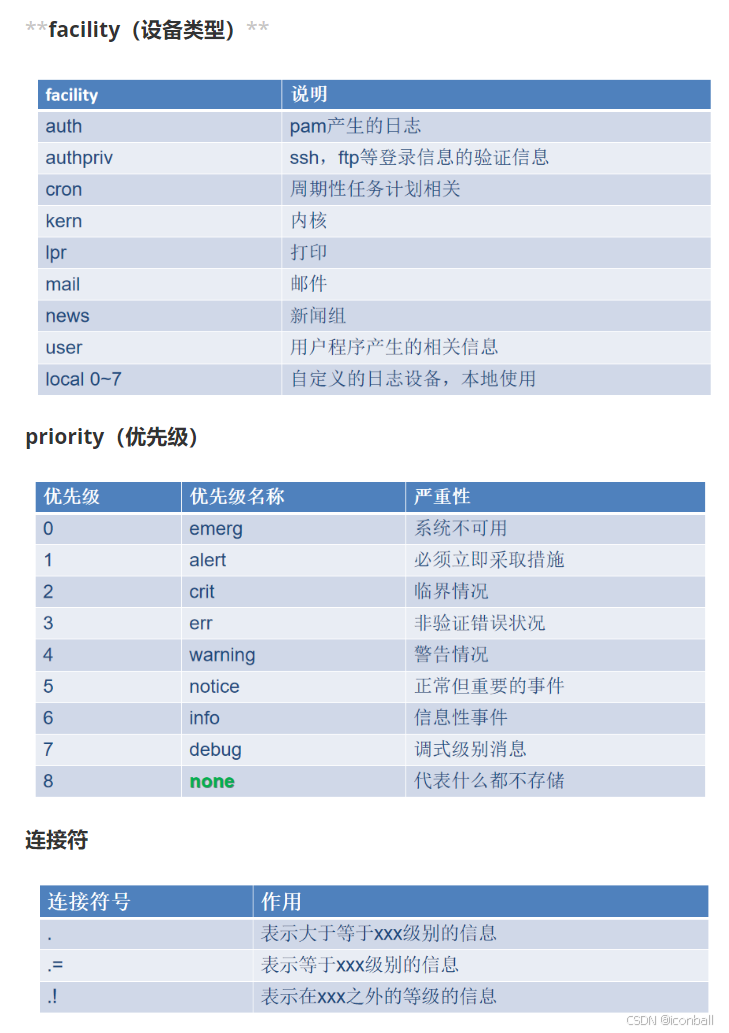
facility:日志来源(如auth认证相关、kern内核、user用户程序、mail邮件服务等);priority:日志级别(如info及以上级别、err错误级别等);target:处理动作(如本地文件路径、远程服务器地址@远程IP:端口或@@远程IP:端口,@表示 UDP,@@表示 TCP)。
日志记录规则
每一条日志消息都可以通过消息类型facility和priority分类,参考rsyslog.conf(5)。
日志记录规则格式: facility+连接符号+priority 处理方式
常用 rsyslog 命令
-
启动 / 停止 / 重启服务(基于
systemd的系统):systemctl start rsyslog # 启动服务 systemctl stop rsyslog # 停止服务 systemctl restart rsyslog # 重启服务(修改配置后需执行) systemctl status rsyslog # 查看服务状态
查看日志内容
[root@centos7 ~]# tail -f /var/log/messages
......
Nov 10 10:23:05 centos7 systemd-logind: New session 15 of user laoma.
Nov 10 10:23:05 centos7 systemd: Started Session 15 of user laoma.
......
Nov 10 10:23:34 centos7 systemd-logind: Removed session 15.
日志内容说明:
- Nov 10 10:23:34,代表日志产生时间。
- centos7,产生日志的主机名。
- systemd-logind,产生日志的进程。
- 最后一个区域是日志内容,例如,“Removed session 15.”。
[root@centos7 ~]# tail -f /var/log/secure
......
Nov 10 10:27:26 centos7 sshd[2755]: Accepted password for laoma from 10.1.8.1 port 5530 ssh2
Nov 10 10:27:27 centos7 sshd[2755]: pam_unix(sshd:session): session opened for user laoma by (uid=0)
Nov 10 10:27:31 centos7 sshd[2755]: pam_unix(sshd:session): session closed for user laoma
messages和secure的区别
/var/log/messages:
核心作用:记录系统的通用日志信息,涵盖系统运行的大部分常规活动,是排查系统状态和排查一般故障的主要参考。
记录内容:
- 系统启动过程中的关键事件(如服务启动 / 停止、内核初始化信息);
- 内核相关消息(如硬件驱动加载、系统资源警告、内核错误);
- 大部分系统服务的常规运行日志(如
crond定时任务、rsyslog自身、network网络服务等); - 非敏感的用户级消息(如普通程序的启动信息)。
特点:
- 内容较全面,但不包含敏感的安全相关信息;
- 是排查系统常规问题(如服务启动失败、网络配置错误)的首选日志。
/var/log/secure:
核心作用:专门记录与系统安全和认证授权相关的日志,聚焦于用户登录、权限变更等敏感操作,是安全审计和排查入侵的关键依据。
记录内容:
- 用户认证信息(如
ssh远程登录、su/sudo权限切换、本地终端登录的成功 / 失败记录); - 安全相关服务的活动(如
pam认证模块的日志、iptables防火墙的关键规则匹配); - 敏感操作记录(如用户密码修改、权限变更、
root用户的操作跟踪)。
特点:
- 内容与系统安全直接相关,包含大量敏感信息(如登录 IP、失败次数);
- 是检测暴力破解(如多次 ssh 登录失败)、异常登录等安全事件的核心日志。
| 维度 | /var/log/messages | /var/log/secure |
|---|---|---|
| 核心用途 | 记录系统通用运行日志 | 记录安全与认证相关日志 |
| 典型内容 | 服务启动、内核消息、常规系统活动 | 登录尝试、权限切换、安全模块事件 |
| 主要用途 | 排查系统常规故障(如服务崩溃) | 安全审计、检测入侵或未授权访问 |
| 敏感性 | 低(多为公开系统信息) | 高(包含用户认证等敏感数据) |
自定义日志记录规则
[root@centos7 ~]# vim /etc/rsyslog.d/laoma.conf
local5.* /var/log/laoma.log
[root@centos7 ~]# systemctl restart rsyslog.service
[root@centos7 ~]# ls /var/log/laoma.log
ls: 无法访问/var/log/laoma.log: 没有那个文件或目录

# 手动生成一个消息
[laoma@centos7 ~]$ logger -p local5.info "test my log"
[root@centos7 ~]# cat /var/log/laoma.log
Nov 10 10:32:26 centos7 laoma: test my log
补充
-
虽然系统提供了日志服务,但并不会记录所有内容。
-
系统中的应用程序是否使用 rsyslog 服务记录日志,取决于应用程序设计。
例如:
-
httpd 服务使用自己的日志记录。
-
sshd 服务使用 rsyslog 服务记录登录和退出日志。
[root@server ~]# grep AUTHPRIV /etc/ssh/sshd_config
SyslogFacility AUTHPRIV

[root@server ~]# grep ^authpri /etc/rsyslog.conf
authpriv.*                                              /var/log/secure

[root@server ~]# tail -1 /var/log/secure
Jul 25 14:10:39 server sshd[20527]: pam_unix(sshd:session): session opened for user root by (uid=0)
-
rsyslog 日志集中管理
多个客户端将日志发给服务端,由服务端统计记录。
服务端配置
# 启用 tcp 监听
[root@server ~]# vim /etc/rsyslog.conf
# 取消如下两行记录注释
module(load="imtcp") # needs to be done just once
input(type="imtcp" port="514")

# 重启服务
[root@server ~]# systemctl restart rsyslog.service

# 关闭防火墙:停止并禁止开机自动启动
[root@server ~]# systemctl disable firewalld.service --now
客户端配置
# 将本机所有日志通过tcp协议发送给远端服务器10.1.8.10
[root@client ~]# echo '*.* @@10.1.8.10' > /etc/rsyslog.d/remote.conf
[root@client ~]# systemctl restart rsyslog.service
测试
# 服务端监控日志,客户端注销用户或者ssh登录
[root@server ~]# tail -f /var/log/secure
......
Jul 25 14:43:03 server sshd[20527]: pam_unix(sshd:session): session closed for user root
Jul 25 14:46:52 client su[4509]: pam_unix(su-l:session): session closed for user root
Jul 25 14:47:28 client su[3975]: pam_unix(su-l:session): session closed for user laoma
Jul 25 14:47:43 client sshd[3901]: error: Received disconnect from 10.1.8.1 port 51521:0:
Jul 25 14:47:43 client sshd[3901]: Disconnected from user root 10.1.8.1 port 51521
Jul 25 14:47:43 client sshd[3897]: pam_unix(sshd:session): session closed for user root
systemd-journald 日志
systemd-journald 配置文件 /etc/systemd/journald.conf
详情参考 journald.conf(5)
Storage参数,更改参数值后需要重启systemd-journald服务。
- persistent:将日志存储在/var/log/journal目录中,这可在系统重启后持久保留。如果/var/log/journal目录不存在,systemd-journald服务会创建它。
- volatile:将日志存储在易失性/run/log/journal目录中。因为/run文件系统是临时的,仅存在于运行时内存中,存储在其中的数据(包括系统日志)不会在系统启后持久保留。
- auto:如果/var/log/journal目录存在,那么rsyslog会使用持久存储,否则使用易失性存储。如果未设置Storage参数,此为默认操作。
[root@centos7 ~]# vim /etc/systemd/journald.conf
......
[Journal]
# Storage=auto
Storage=persistent
......
[root@centos7 ~]# systemctl restart systemd-journald
systemd-journald 日志分析
[root@centos7 ~]# ls /var/log/journal/
b8b0960cabe3452ca432f45acb1df028

# systemd-journald日志是以二进制方式存储,不能使用常规文本工具查看
# 查看所有日志条目,默认使用less查看文档
[root@centos7 ~]# journalctl

# 动态查看所有日志条目
[root@centos7 ~]# journalctl -f

# 查看本次系统启动到现在所有日志条目
[root@centos7 ~]# journalctl -b 0
# 1 第1次启动的日志
# 2 第2次启动的日志
# N 第n次启动的日志

# 查看最近5条日志
[root@centos7 ~]# journalctl -n 5

# 查看error级别日志
[root@centos7 ~]# journalctl -p err
[root@centos7 ~]# journalctl -p err | cat

# 根据时间查看日志
[root@centos7 ~]# journalctl --since today
[root@centos7 ~]# journalctl --since "2019-02-10 20:30:00" --until "2019-02-13 12:00:00"
[root@centos7 ~]# journalctl --since "-1 hour"

# 详细查看所有日志
[root@centos7 ~]# journalctl -o verbose

# 查看特定unit日志
[root@centos7 ~]# journalctl -u sshd.service
故障模拟
故障1:配置文件丢失
[root@centos7 ~]# mv /etc/ssh/sshd_config .
[root@centos7 ~]# systemctl restart sshd
处理过程:通过日志发现 /etc/ssh/sshd_config: No such file or directory,文件丢失。
# 重启服务时,动态监控日志
[root@centos7 ~]# journalctl -f
7月 28 13:52:26 server.laoma.cloud systemd[1]: Starting OpenSSH server daemon...
7月 28 13:52:26 server.laoma.cloud sshd[2045]: /etc/ssh/sshd_config: No such file or directory
7月 28 13:52:26 server.laoma.cloud systemd[1]: sshd.service: main process exited, code=exited, status=1/
7月 28 13:52:27 server.laoma.cloud systemd[1]: Failed to start OpenSSH server
......

# 移动回来,并重启服务
[root@centos7 ~]# mv sshd_config /etc/ssh/sshd_config
[root@centos7 ~]# systemctl restart sshd
故障2:配置文件参数错误
[root@centos7 ~]# echo 'PermitRootLogin hahaha' >> /etc/ssh/sshd_config
[root@centos7 ~]# systemctl restart sshd
处理过程:通过日志发现/etc/ssh/sshd_config line 141: unsupported option "hahaha".
# 重启服务时,动态监控日志
[root@centos7 ~]# journalctl -f
7月 28 14:30:03 server.laoma.cloud systemd[1]: Stopped OpenSSH server daemon.
7月 28 14:30:03 server.laoma.cloud systemd[1]: Starting OpenSSH server daemon...
7月 28 14:30:03 server.laoma.cloud sshd[2806]: /etc/ssh/sshd_config line 141: unsupported option "hahaha".
7月 28 14:30:03 server.laoma.cloud systemd[1]: sshd.service: main process exited, code=exited, status=25
7月 28 14:30:03 server.laoma.cloud systemd[1]: Failed to start OpenSSH server daemon.
7月 28 14:30:03 server.laoma.cloud systemd[1]: Unit sshd.service entered failed state.

# 清理对应无效记录,并重启服务
[root@server ~ 14:33:32]# sed -i '/hahaha/d' /etc/ssh/sshd_config
[root@centos7 ~]# systemctl restart sshd
故障3:配置文件参数错误
[root@centos7 ~]# yum install -y httpd
[root@centos7 ~]# sed -i 's/Listen 80/Listen 80000/g' /etc/httpd/conf/httpd.conf
[root@centos7 ~]# systemctl restart httpd
处理过程:通过日志发现 AH00526: Syntax error on line 42 of /etc/httpd/conf/httpd.conf
# 重启服务时,动态监控日志
[root@centos7 ~]# journalctl -f
7月 28 14:34:49 server.laoma.cloud systemd[1]: Starting The Apache HTTP Server...
7月 28 14:34:49 server.laoma.cloud httpd[2877]: AH00526: Syntax error on line 42 of /etc/httpd/conf/httpd.conf:
7月 28 14:34:49 server.laoma.cloud httpd[2877]: Invalid address or port
7月 28 14:34:49 server.laoma.cloud systemd[1]: httpd.service: main process exited, code=exited, status=1/FAILURE
7月 28 14:34:49 server.laoma.cloud systemd[1]: Failed to start The Apache HTTP Server.
7月 28 14:34:49 server.laoma.cloud systemd[1]: Unit httpd.service entered failed state.

# 修改回来,并重启服务
[root@centos7 ~]# sed -i 's/Listen 80000/Listen 80/g' /etc/httpd/conf/httpd.conf
[root@centos7 ~]# systemctl restart httpd
Linux 时间管理(17. Linux 时间管理)
系统时间设置
date 命令
同笔记1
hwclock 命令
hwclock 是 Linux 系统中用于访问和修改 硬件时钟(Hardware Clock) 的命令行工具,也常被称为 实时时钟(RTC, Real-Time Clock)。
硬件时钟是独立于操作系统的物理时钟芯片(通常集成在主板上,由纽扣电池供电),用于在电脑关机后仍能维持时间记录;而操作系统运行时使用的是 系统时钟(System Clock),其初始值通常从硬件时钟同步而来。
# 读取硬件时钟
[root@centos7 ~]# hwclock -r
2022年11月11日 星期五 11时35分56秒  -0.320836 秒

# 将硬件时钟时间设置与系统时间一致
[root@centos7 ~]# hwclock -w

# 将系统时间设置与硬件时钟时间一致
[root@centos7 ~]# hwclock -s
timedatectl 命令
timedatectl 是 systemd 系统中用于管理系统时间、日期、时区及硬件时钟(RTC)的命令行工具
timedatectl 整合了传统工具(如 date、hwclock、tzselect 等)的功能,可一站式管理:
- 系统时间和日期
- 时区设置
- 硬件时钟(RTC)与系统时钟的同步
- 网络时间同步(NTP)开关
[root@centos7 ~]# timedatectl
      Local time: 五 2022-11-11 11:38:00 CST
  Universal time: 五 2022-11-11 03:38:00 UTC
        RTC time: 五 2022-11-11 03:38:07
       Time zone: Asia/Shanghai (CST, +0800)
     NTP enabled: yes
NTP synchronized: no
 RTC in local TZ: no
      DST active: n/a

# RTC real time clock,也就是硬件时钟时间。
# NTP enabled: yes,代表对时服务chronyd应开机自启。

# 关闭自动对时
[root@centos7 ~]# timedatectl set-ntp no
[root@centos7 ~]# timedatectl
      Local time: Thu 2022-11-10 11:43:16 CST
  Universal time: Thu 2022-11-10 03:43:16 UTC
        RTC time: Thu 2022-11-10 03:43:16
       Time zone: Asia/Shanghai (CST, +0800)
     NTP enabled: no
NTP synchronized: no
 RTC in local TZ: no
      DST active: n/a


[root@centos7 ~]# LANG=en_US.utf8
[root@centos7 ~]# timedatectl set-time '2022-11-10 11:42:54'

# 如果自动对时未关闭,显示如下
[root@centos7 ~]# timedatectl set-time '2022-11-10 11:42:54'
Failed to set time: Automatic time synchronization is enabled

# 设置时区
[root@centos7 ~]# timedatectl set-timezone Asia/Shanghai
tzselect 命令
查询时区名称。
[root@centos7 ~]# tzselect
Please identify a location so that time zone rules can be set correctly.
Please select a continent or ocean.
 1) Africa
 2) Americas
 3) Antarctica
 4) Arctic Ocean
 5) Asia
 6) Atlantic Ocean
 7) Australia
 8) Europe
 9) Indian Ocean
10) Pacific Ocean
11) none - I want to specify the time zone using the Posix TZ format.
#? 5
Please select a country.
 1) Afghanistan		  18) Israel		    35) Palestine
 2) Armenia		  19) Japan		    36) Philippines
 3) Azerbaijan		  20) Jordan		    37) Qatar
 4) Bahrain		  21) Kazakhstan	    38) Russia
 5) Bangladesh		  22) Korea (North)	    39) Saudi Arabia
 6) Bhutan		  23) Korea (South)	    40) Singapore
 7) Brunei		  24) Kuwait		    41) Sri Lanka
 8) Cambodia		  25) Kyrgyzstan	    42) Syria
 9) China		  26) Laos		    43) Taiwan
10) Cyprus		  27) Lebanon		    44) Tajikistan
11) East Timor		  28) Macau		    45) Thailand
12) Georgia		  29) Malaysia		    46) Turkmenistan
13) Hong Kong		  30) Mongolia		    47) United Arab Emirates
14) India		  31) Myanmar (Burma)	    48) Uzbekistan
15) Indonesia		  32) Nepal		    49) Vietnam
16) Iran		  33) Oman		    50) Yemen
17) Iraq		  34) Pakistan
#? 9
Please select one of the following time zone regions.
1) Beijing Time
2) Xinjiang Time
#? 1

The following information has been given:

	China
	Beijing Time

Therefore TZ='Asia/Shanghai' will be used.
Local time is now:	Mon Jul 28 16:03:22 CST 2025.
Universal Time is now:	Mon Jul 28 08:03:22 UTC 2025.
Is the above information OK?
1) Yes
2) No
#? 1

You can make this change permanent for yourself by appending the line
	TZ='Asia/Shanghai'; export TZ
to the file '.profile' in your home directory; then log out and log in again.

Here is that TZ value again, this time on standard output so that you
can use the /bin/tzselect command in shell scripts:
Asia/Shanghai
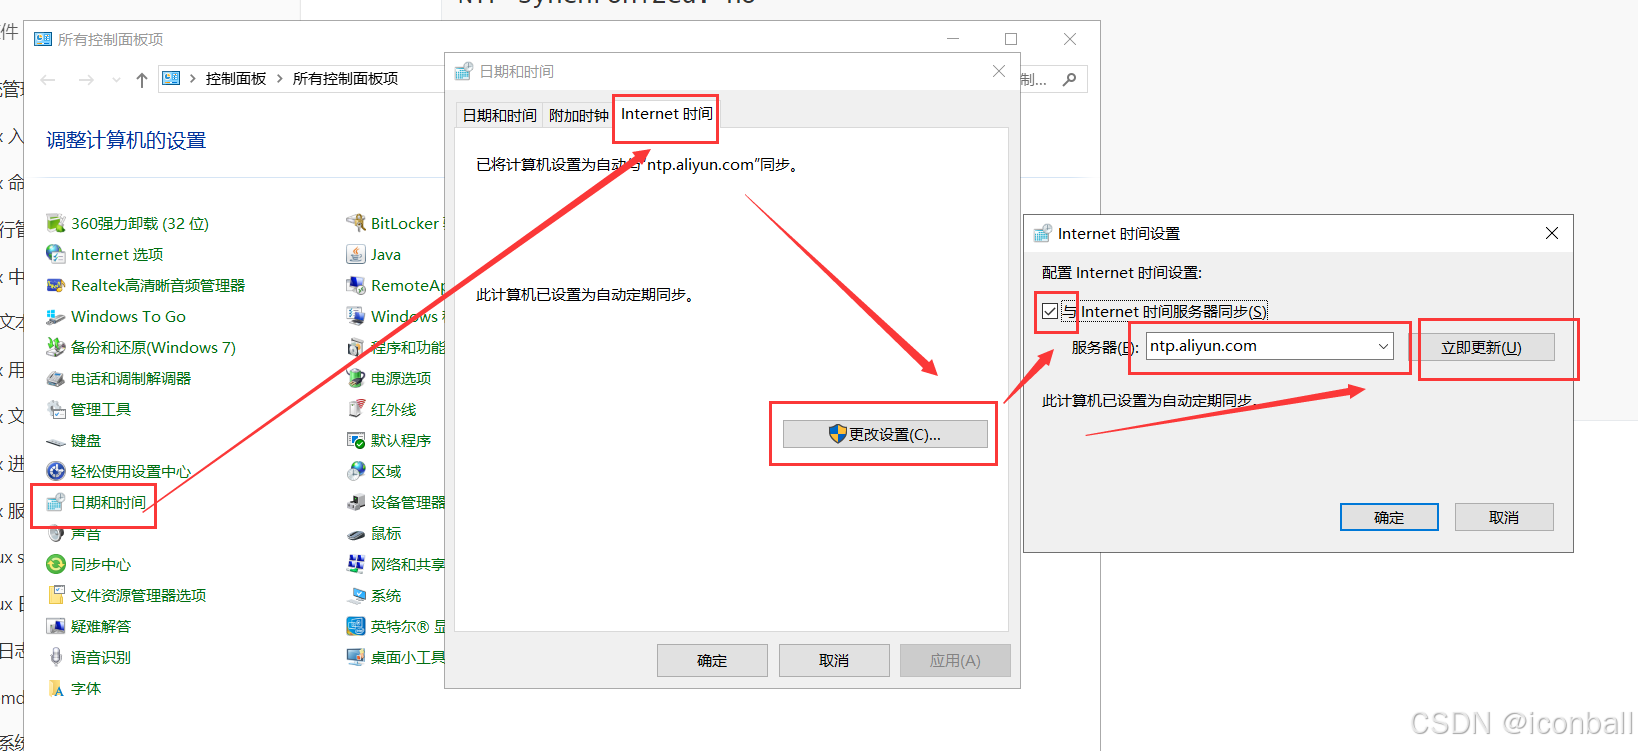
windows 自动对时
自动对时-chronyd 服务
自动对时-chronyd 服务
# 修改对时服务器
[root@centos7 ~]# vim /etc/chrony.conf
# 与时间池对时
# 时间池是包含多个时间服务器的服务器组
pool 2.rocky.pool.ntp.org iburst

# 与单个服务器 ntp.aliyun.com 对时
server ntp.aliyun.com iburst

# 启用并启动chronyd服务
[root@centos7 ~]# systemctl enable chronyd --now

# 如果之前已经启动,需要重启
[root@centos7 ~]# systemctl restart chronyd

# 验证对时情况
[root@centos7 ~]# chronyc sources -v
  .-- Source mode  '^' = server, '=' = peer, '#' = local clock.
 / .- Source state '*' = current best, '+' = combined, '-' = not combined,
| /             'x' = may be in error, '~' = too variable, '?' = unusable.
||                                                 .- xxxx [ yyyy ] +/- zzzz
||      Reachability register (octal) -.           |  xxxx = adjusted offset,
||      Log2(Polling interval) --.      |          |  yyyy = measured offset,
||                                \     |          |  zzzz = estimated error.
||                                 |    |           \
MS Name/IP address         Stratum Poll Reach LastRx Last sample
===============================================================================
^* 203.107.6.88                2   6    77     9  -1840us[-4378us] +/-   23ms
部署时间服务器
chrony既可以作为客户端,也可以作为服务端(为客户端提供对时服务)。
服务端
[root@server ~]# vim /etc/chrony.conf
# 最后添加两条记录

# 配置监听地址
bindaddress 10.1.8.10

# 配置允许哪些网段主机同步
allow 10.1.8.0/24

[root@server ~]# systemctl restart chronyd

# 停止防火墙服务
[root@server ~]# systemctl stop firewalld.service
客户端
# 修改对时服务器
[root@client ~]# vim /etc/chrony.conf
# 与单个服务器 10.1.8.10 对时
server 10.1.8.10 iburst

[root@client ~]# systemctl restart chronyd
[root@client ~]# chronyc sources -v
210 Number of sources = 1

  .-- Source mode  '^' = server, '=' = peer, '#' = local clock.
 / .- Source state '*' = current synced, '+' = combined , '-' = not combined,
| /   '?' = unreachable, 'x' = time may be in error, '~' = time too variable.
||                                                 .- xxxx [ yyyy ] +/- zzzz
||      Reachability register (octal) -.           |  xxxx = adjusted offset,
||      Log2(Polling interval) --.      |          |  yyyy = measured offset,
||                                \     |          |  zzzz = estimated error.
||                                 |    |           \
MS Name/IP address         Stratum Poll Reach LastRx Last sample
===============================================================================
^* server.laoma.cloud            3   6     7     1    -10us[  +43ms] +/-   76ms
补充
vim 多行插入一列数据:
- 定位到指定行,ctrl+v
- 上下移动光标
- 使用大写的I(Insert)插入
- 写入要出入的内容
- esc退出
vim 按列删除多行数据:
- 定位到指定行,ctrl+v
- 上下左右移动光标,选中要删除的内容
- 使用d(delete)删除选中的内容
= measured offset,
|| \ | | zzzz = estimated error.
|| | |
MS Name/IP address Stratum Poll Reach LastRx Last sample
===============================================================================
^* server.laoma.cloud 3 6 7 1 -10us[ +43ms] +/- 76ms
# 补充

vim 多行插入一列数据:
1. 定位到指定行,ctrl+v
2. 上下移动光标
3. 使用大写的I(Insert)插入
4. 写入要出入的内容
5. esc退出

vim 按列删除多行数据:
1. 定位到指定行,ctrl+v
2. 上下左右移动光标,选中要删除的内容
3. 使用d(delete)删除选中的内容


 被折叠的 条评论
为什么被折叠?
被折叠的 条评论
为什么被折叠?
 到【灌水乐园】发言


