


如何训练图像的新的类别分类
How to Retrain an Image Classifier for New Categories
[https://www.tensorflow.org/hub/tutorials/image_retraining]
Modern image recognition models have millions of parameters. Training them fromscratch requires a lot of labeled training data and a lot of computing power(hundreds of GPU-hours or more). Transfer learning is a technique that shortcutsmuch of this by taking a piece of a model that has alreay been trained on arelated task and reusing it in a new model. In this tutorial, we will reuse thefeature extraction capabilities from powerful image classifiers trained onImageNet and simply train a new classification layer on top. For moreinformation on the approach you can see this paper onDecaf.
Though it's not as good as training the full model, this is surprisinglyeffective for many applications, works with moderate amounts of training data(thousands, not millions of labeled images), and can be run in as little asthirty minutes on a laptop without a GPU. This tutorial will show you how to runthe example script on your own images, and will explain some of the options youhave to help control the training process.
Note:A version of this tutorial is also available as a codelab.
This tutorial uses TensorFlow Hub to ingestpre-trained pieces of models, ormodulesas they are called. For starters,we will use the image feature extraction module with the Inception V3 architecture trained on ImageNet,and come back later to further options, including NASNet / PNASNet, as well as MobileNet V1 and V2.
Before you start, you need to install the PIP package tensorflow-hub ,along with a sufficiently recent version of TensorFlow. SeeTensorFlow Hub's installation instructions for details.
Training on Flowers
Before you start any training, you'll need a set of images to teach the networkabout the new classes you want to recognize. There's a later section thatexplains how to prepare your own images, but to make it easy we've created anarchive of creative-commons licensed flower photos to use initially. To get theset of flower photos, run these commands:
cd~
curl-LO http://download.tensorflow.org/example_images/flower_photos.tgz
tar xzf flower_photos.tgz
Once you have the images, you can download the example code from GitHub(it is not part of the library installation):
mkdir~/example_code
cd~/example_code
curl-LO https://github.com/tensorflow/hub/raw/r0.1/examples/image_retraining/retrain.py
In the simplest cases the retrainer can then be run like this(takes about half an hour):
python retrain.py--image_dir~/flower_photosThe script has many other options. You can get a full listing with:
python retrain.py-hThis script loads the pre-trained module and trains a new classifier on topfor the flower photos you've downloaded. None of the flowerspecies were in the original ImageNet classes the full network was trained on.The magic of transfer learning is that lower layers that have been trained todistinguish between some objects can be reused for many recognition taskswithout any alteration.
Bottlenecks
The script can take thirty minutes or more to complete, depending on the speedof your machine. The first phase analyzes all the images on disk and calculatesand caches the bottleneck values for each of them. 'Bottleneck' is an informalterm we often use for the layer just before the final output layer thatactually does the classification. (TensorFlow Hub calls this an "image featurevector".) This penultimate layer has been trained to output a set ofvalues that's good enough for the classifier to use to distinguish between allthe classes it's been asked to recognize. That means it has to be a meaningfuland compact summary of the images, since it has to contain enough informationfor the classifier to make a good choice in a very small set of values. Thereason our final layer retraining can work on new classes is that it turns outthe kind of information needed to distinguish between all the 1,000 classes inImageNet is often also useful to distinguish between new kinds of objects.
Because every image is reused multiple times during training and calculatingeach bottleneck takes a significant amount of time, it speeds things up tocache these bottleneck values on disk so they don't have to be repeatedlyrecalculated. By default they're stored in the/tmp/bottleneckdirectory, andif you rerun the script they'll be reused so you don't have to wait for thispart again.
Training
Once the bottlenecks are complete, the actual training of the top layer of thenetwork begins. You'll see a series of step outputs, each one showing trainingaccuracy, validation accuracy, and the cross entropy. The training accuracyshows what percent of the images used in the current training batch werelabeled with the correct class. The validation accuracy is the precision on arandomly-selected group of images from a different set. The key difference isthat the training accuracy is based on images that the network has been ableto learn from so the network can overfit to the noise in the training data. Atrue measure of the performance of the network is to measure its performance ona data set not contained in the training data -- this is measured by thevalidation accuracy. If the train accuracy is high but the validation accuracyremains low, that means the network is overfitting and memorizing particularfeatures in the training images that aren't helpful more generally. Crossentropy is a loss function which gives a glimpse into how well the learningprocess is progressing. The training's objective is to make the loss as small aspossible, so you can tell if the learning is working by keeping an eye onwhether the loss keeps trending downwards, ignoring the short-term noise.
By default this script will run 4,000 training steps. Each step chooses tenimages at random from the training set, finds their bottlenecks from the cache,and feeds them into the final layer to get predictions. Those predictions arethen compared against the actual labels to update the final layer's weightsthrough the back-propagation process. As the process continues you should seethe reported accuracy improve, and after all the steps are done, a final testaccuracy evaluation is run on a set of images kept separate from the trainingand validation pictures. This test evaluation is the best estimate of how thetrained model will perform on the classification task. You should see anaccuracy value of between 90% and 95%, though the exact value will vary from runto run since there's randomness in the training process. This number is based onthe percent of the images in the test set that are given the correct labelafter the model is fully trained.
Visualizing the Retraining with TensorBoard
The script includes TensorBoard summaries that make it easier to understand, debug, and optimize the retraining. For example, you can visualize the graph and statistics, such as how the weights or accuracy varied during training.
To launch TensorBoard, run this command during or after retraining:
tensorboard--logdir/tmp/retrain_logsOnce TensorBoard is running, navigate your web browser to localhost:6006 to view the TensorBoard.
Theretrain.pyscript will log TensorBoard summaries to/tmp/retrain_logsby default. You can change the directory with the--summaries_dirflag.
TensorBoard's GitHub repository has a lot more information on TensorBoard usage, including tips & tricks,and debugging information.
Using the Retrained Model
The script will write out the new model trained on your categories to/tmp/output_graph.pb, and a text file containing the labels to/tmp/output_labels.txt. The new model contains both the TF-Hub moduleinlined into it, and the new classificiation layer.The two files are both in a format that the C++ and Python image classification examples can read in, so you can start using your new model immediately. Since you'vereplaced the top layer, you will need to specify the new name in the script, forexample with the flag--output_layer=final_resultif you're using label_image.
Here's an example of how to run the label_image example with yourretrained graphs. By convention, all TensorFlow Hub modules accept image inputswith color values in the fixed range [0,1], so you do not need to set the --input_mean or
--input_std flags.
curl-LO https://github.com/tensorflow/tensorflow/raw/master/tensorflow/examples/label_image/label_image.py
python label_image.py\
--graph=/tmp/output_graph.pb--labels=/tmp/output_labels.txt\
--input_layer=Placeholder\
--output_layer=final_result\
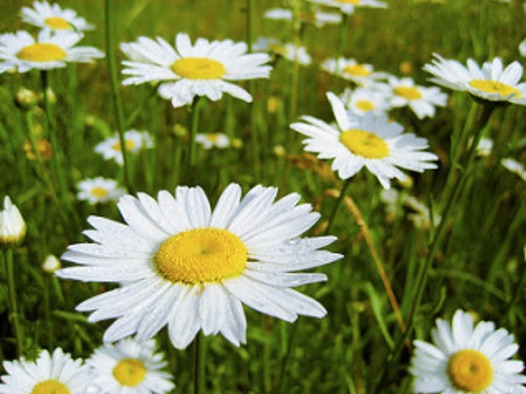
--image=$HOME/flower_photos/daisy/21652746_cc379e0eea_m.jpgYou should see a list of flower labels, in most cases with daisy on top(though each retrained model may be slightly different). You can replace the--imageparameter with your own images to try those out.
If you'd like to use the retrained model in your own Python program, then theabovelabel_imagescript is a reasonable starting point. The label_image directory also contains C++ code which you can use as a template to integratetensorflow with your own applications.
If you find the default Inception V3 module is too large or slow for yourapplication, take a look at the Other Model Architectures sectionbelow for options to speed up and slim down your network.
Training on Your Own Categories
If you've managed to get the script working on the flower example images, youcan start looking at teaching it to recognize categories you care about instead.In theory all you'll need to do is point it at a set of sub-folders, each namedafter one of your categories and containing only images from that category. Ifyou do that and pass the root folder of the subdirectories as the argument to--image_dir, the script should train just like it did for the flowers.
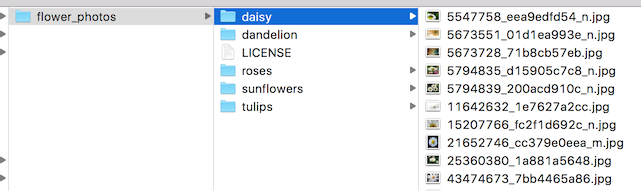
Here's what the folder structure of the flowers archive looks like, to give youand example of the kind of layout the script is looking for:
In practice it may take some work to get the accuracy you want. I'll try toguide you through some of the common problems you might encounter below.
Creating a Set of Training Images
The first place to start is by looking at the images you've gathered, since themost common issues we see with training come from the data that's being fed in.
For training to work well, you should gather at least a hundred photos of eachkind of object you want to recognize. The more you can gather, the better theaccuracy of your trained model is likely to be. You also need to make sure thatthe photos are a good representation of what your application will actuallyencounter. For example, if you take all your photos indoors against a blank walland your users are trying to recognize objects outdoors, you probably won't seegood results when you deploy.
Another pitfall to avoid is that the learning process will pick up on anythingthat the labeled images have in common with each other, and if you're notcareful that might be something that's not useful. For example if you photographone kind of object in a blue room, and another in a green one, then the modelwill end up basing its prediction on the background color, not the features ofthe object you actually care about. To avoid this, try to take pictures in aswide a variety of situations as you can, at different times, and with differentdevices.
You may also want to think about the categories you use. It might be worthsplitting big categories that cover a lot of different physical forms intosmaller ones that are more visually distinct. For example instead of 'vehicle'you might use 'car', 'motorbike', and 'truck'. It's also worth thinking aboutwhether you have a 'closed world' or an 'open world' problem. In a closed world,the only things you'll ever be asked to categorize are the classes of object youknow about. This might apply to a plant recognition app where you know the useris likely to be taking a picture of a flower, so all you have to do is decidewhich species. By contrast a roaming robot might see all sorts of differentthings through its camera as it wanders around the world. In that case you'dwant the classifier to report if it wasn't sure what it was seeing. This can behard to do well, but often if you collect a large number of typical 'background'photos with no relevant objects in them, you can add them to an extra 'unknown'class in your image folders.
It's also worth checking to make sure that all of your images are labeledcorrectly. Often user-generated tags are unreliable for our purposes.For example: pictures tagged#daisymight also include people and charactersnamed Daisy. If you go throughyour images and weed out any mistakes it can do wonders for your overallaccuracy.
Training Steps
If you're happy with your images, you can take a look at improving your resultsby altering the details of the learning process. The simplest one to try is--how_many_training_steps. This defaults to 4,000, but if you increase it to8,000 it will train for twice as long. The rate of improvement in the accuracyslows the longer you train for, and at some point will stop altogether (or evengo down due to overfitting), but you can experiment to see what works bestfor your model.
Distortions
A common way of improving the results of image training is by deforming,cropping, or brightening the training inputs in random ways. This has theadvantage of expanding the effective size of the training data thanks to all thepossible variations of the same images, and tends to help the network learn tocope with all the distortions that will occur in real-life uses of theclassifier. The biggest disadvantage of enabling these distortions in our scriptis that the bottleneck caching is no longer useful, since input images are neverreused exactly. This means the training process takes a lot longer (many hours),so it's recommended you try this as a way of polishing your model only afteryou have one that you're reasonably happy with.
You enable these distortions by passing--random_crop,--random_scaleand--random_brightnessto the script. These are all percentage values thatcontrol how much of each of the distortions is applied to each image. It'sreasonable to start with values of 5 or 10 for each of them and then experimentto see which of them help with your application.--flip_left_rightwillrandomly mirror half of the images horizontally, which makes sense as long asthose inversions are likely to happen in your application. For example itwouldn't be a good idea if you were trying to recognize letters, since flippingthem destroys their meaning.
Hyper-parameters
There are several other parameters you can try adjusting to see if they helpyour results. The--learning_ratecontrols the magnitude of the updates to thefinal layer during training. Intuitively if this is smaller than the learningwill take longer, but it can end up helping the overall precision. That's notalways the case though, so you need to experiment carefully to see what worksfor your case. The--train_batch_sizecontrols how many images are examinedduring each training step to estimate the updates to the final layer.
Training, Validation, and Testing Sets
One of the things the script does under the hood when you point it at a folderof images is divide them up into three different sets. The largest is usuallythe training set, which are all the images fed into the network during training,with the results used to update the model's weights. You might wonder why wedon't use all the images for training? A big potential problem when we're doingmachine learning is that our model may just be memorizing irrelevant details ofthe training images to come up with the right answers. For example, you couldimagine a network remembering a pattern in the background of each photo it wasshown, and using that to match labels with objects. It could produce goodresults on all the images it's seen before during training, but then fail on newimages because it's not learned general characteristics of the objects, justmemorized unimportant details of the training images.
This problem is known as overfitting, and to avoid it we keep some of our dataout of the training process, so that the model can't memorize them. We then usethose images as a check to make sure that overfitting isn't occurring, since ifwe see good accuracy on them it's a good sign the network isn't overfitting. Theusual split is to put 80% of the images into the main training set, keep 10%aside to run as validation frequently during training, and then have a final 10%that are used less often as a testing set to predict the real-world performanceof the classifier. These ratios can be controlled using the--testing_percentageand--validation_percentageflags. In generalyou should be able to leave these values at their defaults, since you won'tusually find any advantage to training to adjusting them.
Note that the script uses the image filenames (rather than a completely randomfunction) to divide the images among the training, validation, and test sets.This is done to ensure that images don't get moved between training and testingsets on different runs, since that could be a problem if images that had beenused for training a model were subsequently used in a validation set.
You might notice that the validation accuracy fluctuates among iterations. Muchof this fluctuation arises from the fact that a random subset of the validationset is chosen for each validation accuracy measurement. The fluctuations can begreatly reduced, at the cost of some increase in training time, by choosing--validation_batch_size=-1, which uses the entire validation set for eachaccuracy computation.
Once training is complete, you may find it insightful to examine misclassifiedimages in the test set. This can be done by adding the flag--print_misclassified_test_images. This may help you get a feeling for whichtypes of images were most confusing for the model, and which categories weremost difficult to distinguish. For instance, you might discover that somesubtype of a particular category, or some unusual photo angle, is particularlydifficult to identify, which may encourage you to add more training images ofthat subtype. Oftentimes, examining misclassified images can also point toerrors in the input data set, such as mislabeled, low-quality, or ambiguousimages. However, one should generally avoid point-fixing individual errors inthe test set, since they are likely to merely reflect more general problems inthe (much larger) training set.
Other Model Architectures
By default the script uses an image feature extraction module with a pretrainedinstance of the Inception V3 architecture. This was a good place to startbecause it provides high accuracy results with moderate running time for theretraining script. But now let's take a look at further options of a TensorFlow Hub module.
On the one hand, that list shows more recent, powerful architectures, such as NASNet (notably nasnet_large and pnasnet_large ),which could give you some extra precision.
On the other hand, if you intend to deploy your model on mobile devices or otherresource-constrained environments, you may want to trade a little accuracyfor much smaller file sizes or faster speeds (also in training). For that, trythe different modules implementing the MobileNetV1 or V2 architectures, or also nasnet_mobile.
Training with a different module is easy: Just pass the--tfhub_moduleflag with the module URL, for example:
python retrain.py\
--image_dir~/flower_photos\
--tfhub_module https://tfhub.dev/google/imagenet/mobilenet_v2_100_224/feature_vector/1
This will create a 9 MB model file in/tmp/output_graph.pbwith a model thatuses the baseline version of MobileNet V2. Opening the module URL in a browserwill take you to the module documentation.
If you just want to make it a little faster, you can reduce the size of inputimages (the second number) from '224' down to '192', '160', or '128' pixelssquared, or even '96' (for V2 only). For more aggressive savings, you can choosepercentages (the first number) '100', '075', '050', or '035' (that's '025' forV1) to control the "feature depth" or number of neurons per position.The number of weights (and hence the file size and speed) shrinks with thesquare of that fraction. The MobileNet V1 blogpostandMobileNet V2 page onGitHub report on the respective tradeoffs for Imagenet classification.
Mobilenet V2 does not apply the feature depth percentage to the bottlenecklayer. Mobilenet V1 did, which made the job of the classification layer harderfor small depths.Would it help to cheat and use the scores for the original 1001 ImageNet classesinstead of tight bottleneck? You can simply try by replacing
mobilenet_v1.../feature_vector with mobilenet_v1.../classification in the module name.
As before, you can use all of the retrained models withlabel_image.py.You will need to specify the image size that your model expects, for example:
python label_image.py\
--graph=/tmp/output_graph.pb--labels=/tmp/output_labels.txt\
--input_layer=Placeholder\
--output_layer=final_result\
--input_height=224--input_width=224\
--image=$HOME/flower_photos/daisy/21652746_cc379e0eea_m.jpg
For more information on deploying the retrained model to a mobile device, seethe codelab version of this tutorial, especiallypart 2, which describes TensorFlow Lite and the additionaloptimizations it offers (including quantization of model weights).
Except as otherwise noted, the content of this page is licensed under theCreative Commons Attribution 3.0 License, and code samples are licensed under the Apache 2.0 License. For details, see our Site Policies. Java is a registered trademark of Oracle and/or its affiliates.
-
官方上次更新日期:7月 2日, 2018


 2746
2746

 被折叠的 条评论
为什么被折叠?
被折叠的 条评论
为什么被折叠?
 到【灌水乐园】发言


