


前言(原文为简书上的一位博主:http://www.zhaojun.im/springboot-exception-expand/)
之前一篇文章介绍了基本的统一异常处理思路: Spring MVC/Boot 统一异常处理最佳实践.
上篇文章也有许多人提出了一些问题:
- 如何区分 Ajax 请求和普通页面请求, 以分别返回 JSON 错误信息和错误页面.
- 如何结合 HTTP 状态码进行统一异常处理.
今天这篇文章就主要来讲讲这些, 以及其他的一些拓展点.
区分请求方式
其实 Spring Boot 本身是内置了一个异常处理机制的, 会判断请求头的参数来区分要返回 JSON 数据还是错误页面. 源码为: org.springframework.boot.autoconfigure.web.servlet.error.BasicErrorController, 他会处理 /error 请求. 核心处理代码如下:
@RequestMapping(
    produces = {"text/html"}
)
// 如果请求头是 text/html, 则找到错误页面, 并返回
public ModelAndView errorHtml(HttpServletRequest request, HttpServletResponse response) {
    // 1. 获取 HTTP 错误状态码
    HttpStatus status = this.getStatus(request);
    // 2. 调用 getErrorAttributes 获取响应的 map 结果集.
    Map<String, Object> model = Collections.unmodifiableMap(this.getErrorAttributes(request, this.isIncludeStackTrace(request, MediaType.TEXT_HTML)));
    // 3. 设置响应头的状态码
    response.setStatus(status.value());
    // 4. 获取错误页面的路径
    ModelAndView modelAndView = this.resolveErrorView(request, response, status, model);
    return modelAndView != null ? modelAndView : new ModelAndView("error", model);
}

@RequestMapping
@ResponseBody
public ResponseEntity<Map<String, Object>> error(HttpServletRequest request) {
    // 调用 getErrorAttributes 获取响应的 map 结果集.
    Map<String, Object> body = this.getErrorAttributes(request, this.isIncludeStackTrace(request, MediaType.ALL));
    // 获取 HTTP 错误状态码
    HttpStatus status = this.getStatus(request);
    // 返回给页面 JSON 信息.
    return new ResponseEntity(body, status);
}
这两个方法的共同点是: 他们都调用了 this.getErrorAttributes(…) 方法来获取响应信息.
然后来看看他默认情况下对于 AJAX 请求和 HTML 请求, 分别的返回结果是怎样的:

对于返回错误页面, 其中还调用了一个非常重要的方法: this.resolveErrorView(...)方法, 源码我就不带大家看了, 他的作用就是根据 HTTP 状态码来去找错误页面, 如500错误会去找 /error/500.html, 403错误回去找/error/403.html, 如果找不到则再找 /error/4xx.html或/error/5xx.html页面. 还找不到的话, 则会去找/error.html页面, 如果都没有配置, 则会使用 Spring Boot 默认的页面. 即:
看到这里, 应该就清楚了, 我们主要需要做四件事:
- 发送异常后, 重定向到 BasicErrorController 来处理 (既然Spring Boot 都已经写好了区分请求的功能, 我们就不必要再写这些判断代码了)
- 自 定义 HTTP 错误状态码
- 他返回的信息格式可能不是我们想要的, 所以必须要改造 getErrorAttributes(…) 方法, 以自定义我们向页面返回的数据. (自定义错误信息)
- 创建我们自己的 /error/4xx.html 或 /error/5xx.html 等页面, (自定义错误页面)
BasicErrorController
第一点很简单, BasicErrorController 他处理 /error 请求, 我们只需要将页面重定向到 /error 即可, 在 ControllerAdvice 中是这样的:
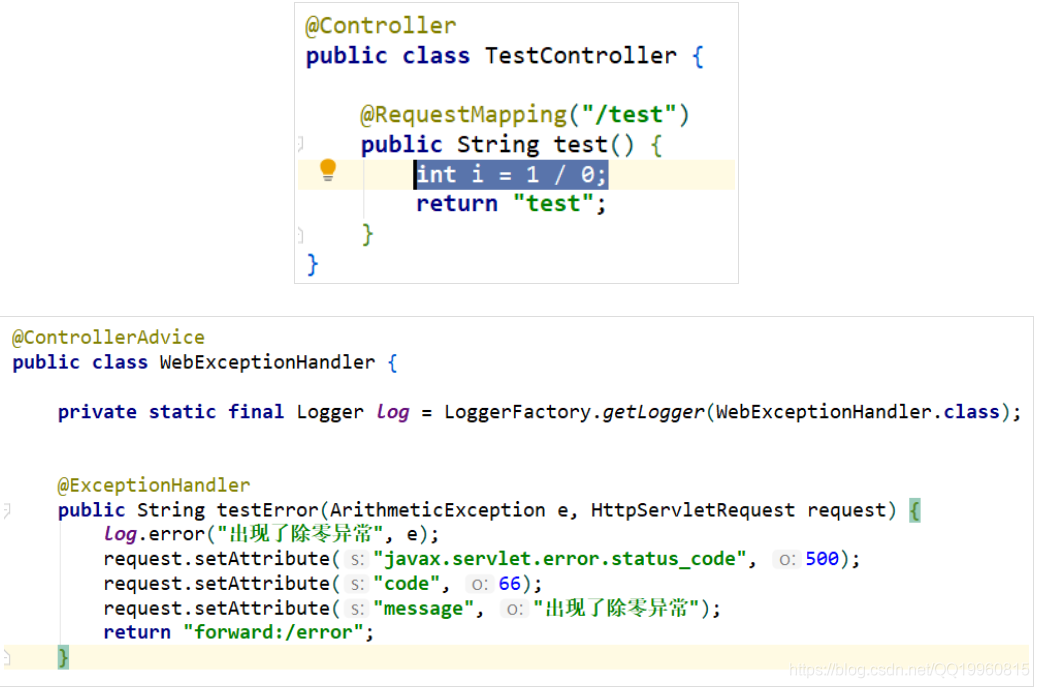
@ControllerAdvice
public class WebExceptionHandler {

    @ExceptionHandler
    public String methodArgumentNotValid(BindException e) {
        // do something
        return "/error";
    }
}
自定义 HTTP 错误状态码
我们来看下 this.getStatus(request); 的源码, 看他原来时如何获取错误状态码的:
protected HttpStatus getStatus(HttpServletRequest request) {
    Integer statusCode = (Integer)request.getAttribute("javax.servlet.error.status_code");
    if (statusCode == null) {
        return HttpStatus.INTERNAL_SERVER_ERROR;
    } else {
        try {
            return HttpStatus.valueOf(statusCode);
        } catch (Exception var4) {
            return HttpStatus.INTERNAL_SERVER_ERROR;
        }
    }
}
简单来说就是从 request 域中获取 javax.servlet.error.status_code 的值, 如果为 null 或不合理的值, 都返回 500. 既然如何在第一步, 重定向到 /error 之前将其配置到 request 域中即可, 如:
@ControllerAdvice
public class WebExceptionHandler {

    @ExceptionHandler
    public String methodArgumentNotValid(BindException e, HttpServletRequest request) {
        request.setAttribute("javax.servlet.error.status_code", 400);
        // do something
        return "forward:/error";
    }
}
自定义错误信息
也就是 getErrorAttributes 方法, 默认的代码是这样的:
public Map<String, Object> getErrorAttributes(WebRequest webRequest, boolean includeStackTrace) {
    Map<String, Object> errorAttributes = new LinkedHashMap();
    errorAttributes.put("timestamp", new Date());
    this.addStatus(errorAttributes, webRequest);
    this.addErrorDetails(errorAttributes, webRequest, includeStackTrace);
    this.addPath(errorAttributes, webRequest);
    return errorAttributes;
}
他获取了时间戳, 错误状态码, 错误信息, 错误路径等信息, 和我们之前看到默认的返回内容是一致的:
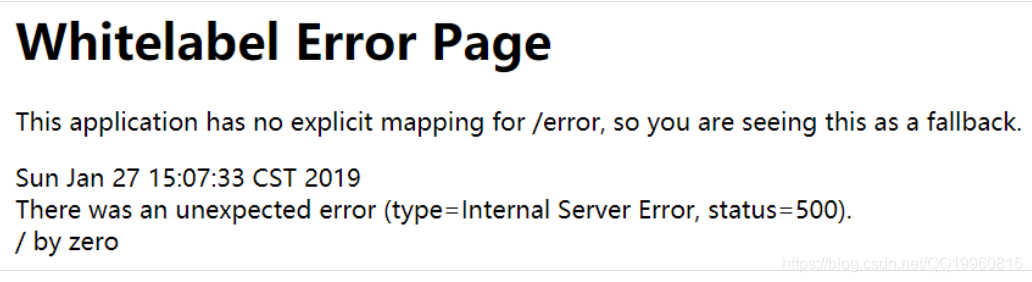
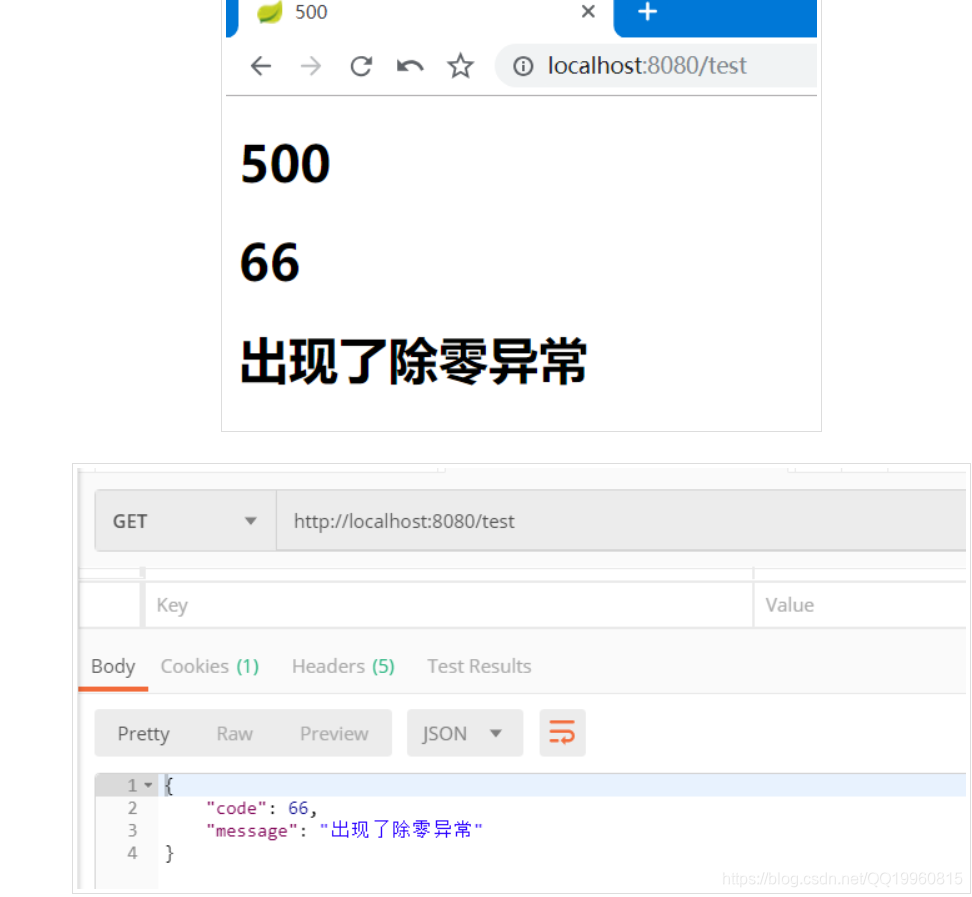
{
    "timestamp": "2019-01-27T07:08:30.011+0000",
    "status": 500,
    "error": "Internal Server Error",
    "message": "/ by zero",
    "path": "/user/index"
}
同样的思路, 我们将错误信息也放到 request 域中, 然后在 getErrorAttributes 中从 request 域中获取:
@ControllerAdvice
public class WebExceptionHandler {

    @ExceptionHandler
    public String methodArgumentNotValid(BindException e, HttpServletRequest request) {
        request.setAttribute("javax.servlet.error.status_code", 400);
        request.setAttribute("code", 1);
        request.setAttribute("message", "参数校验失败, xxx");
        // do something
        return "forward:/error";
    }
}
再继承 DefaultErrorAttributes 类, 重写 getErrorAttributes 方法:
//@Component
public class MyDefaultErrorAttributes extends DefaultErrorAttributes {

    @Override
    //重写 getErrorAttributes方法-添加自己的项目数据
    public Map<String, Object> getErrorAttributes(WebRequest webRequest,
                                                  boolean includeStackTrace) {
        Map<String, Object> map = new HashMap<>();
        // 从 request 域中获取 code
        Object code = webRequest.getAttribute("code", RequestAttributes.SCOPE_REQUEST);
        // 从 request 域中获取 message
        Object message = webRequest.getAttribute("message", RequestAttributes.SCOPE_REQUEST);
        map.put("code", code);
        map.put("message", message);
        return map;
    }
}
自定义错误页面
我们遵循 SpringBoot 的规则, 在 /error/ 下建立 400.html, 500.html 等页面细粒度的错误, 并配置一个 /error.html 用来处理细粒度未处理到的其他错误.
/error/400.html
<!DOCTYPE html>
<html lang="en" xmlns:th="http://www.thymeleaf.org">
<head>
    <meta charset="UTF-8">
    <title>400</title>
</head>
<body>
    <h1>400</h1>
    <h1 th:text="${code}"></h1>
    <h1 th:text="${message}"></h1>
</body>
</html>
/error/500.html
<!DOCTYPE html>
<html lang="en" xmlns:th="http://www.thymeleaf.org">
<head>
    <meta charset="UTF-8">
    <title>500</title>
</head>
<body>
    <h1>500</h1>
    <h1 th:text="${code}"></h1>
    <h1 th:text="${message}"></h1>
</body>
</html>
/error.html
<!DOCTYPE html>
<html lang="en" xmlns:th="http://www.thymeleaf.org">
<head>
    <meta charset="UTF-8">
    <title>系统出现了错误</title>
</head>
<body>
    <h1>ERROR PAGE</h1>
    <h1 th:text="${code}"></h1>
    <h1 th:text="${message}"></h1>
</body>
</html>
测试效果
到此位置, 大功告成, 然后来创造一个异常来测试一下效果:
前端 error 处理
现在使用了 HTTP 状态码, 所以 Ajax 请求出现错误后, 需要在每个 Ajax 请求方法中都写 error: function() {} 方法, 甚至麻烦. 好在 jQuery 为我们提供了全局处理 Ajax 的 error 结果的方法 ajaxError()
$(document).ajaxError(function(event, response){
    console.log("错误响应状态码: ",response.status);
    console.log("错误响应结果: ",response.responseJSON);
    alert("An error occurred!");
});
结语
回顾一下讲到的这些内容:
- 理解 SpringBoot 默认提供的 BasicErrorController
- 自定义 HTTP 错误状态码, (通过 request 域的 javax.servlet.error.status_code 参数)
- 自定义错误信息, (将我们自定义的错误信息放到 request 域中, 并重写 DefaultErrorAttributes 的 getErrorAttributes 方法, 从 request 域中获取这些信息).
- 自定义错误页面, (根据 SpringBoot 查找错误页面的逻辑来自定义错误页面: /error/500.html, /error/400.html, /error.html)


 380
380


 被折叠的 条评论
为什么被折叠?
被折叠的 条评论
为什么被折叠?
 到【灌水乐园】发言


