


- MVC是什么
- Spring MVC 核心架构及请求流程
- Spring MVC 在CRM中的应用
1. MVC是什么
模型-视图-控制器(MVC)是一个众所周知的以设计界面应用程序为基础的设计模式,它分为 模型层(M)、视图层(V)、控制层(C),
各个层次职责不同,控制层负责接收用户请求,调用模型层处理业务逻辑,并且返回请求结果给视图层;模型层负责封装应用程序数据以及与数据库之间的交互;视图层展示数据,不包含任何业务逻辑。MVC架构的核心思想是将业务逻辑从界面中分离出来,允许它们单独改变而不会相互影响。
2.Spring MVC 核心架构及请求流程
Spring Web MVC基于Web MVC设计模式的请求驱动类型的轻量级Web框架,使用了MVC架构模式的思想,将web层进行职责解耦,基于请求驱动指的就是使用请求-响应模型。
Spring Web MVC核心架构图:
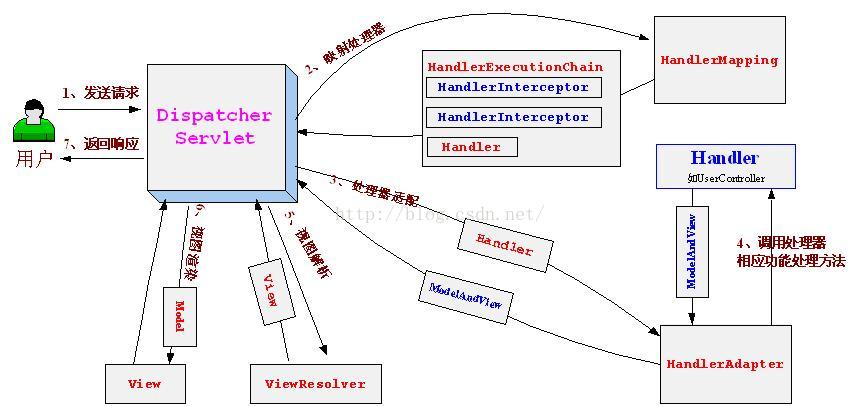
处理步骤如下:
1. 用户向服务器发送请求,请求被Spring前端控制器DispatcherServlet捕获;
2. DispatcherServlet对请求URL进行解析,得到请求资源标识符(URI)。然后根据该URI,调用HandlerMapping获得该Handler配置的所有相关的对象(包括Handler对象以及Handler对象对应的拦截器),最后以HandlerExecutionChain对象的形式返回;
3. DispatcherServlet 根据获得的Handler,选择一个合适的HandlerAdapter。(附注:如果成功获得HandlerAdapter后,此时将开始执行拦截器的preHandler(...)方法);
4. HandlerAdapter调用Handler处理器,执行业务逻辑,Handler执行完成后,向DispatcherServlet 返回一个ModelAndView对象。
5. 根据返回的ModelAndView,选择一个适合的ViewResolver进行视图解析,返回给DispatcherServlet ;
6. ViewResolver 结合Model和View,来渲染视图;
7. 将渲染结果返回给客户端。
3.Spring MVC 在CRM中的应用
一、前端控制器的配置,在web添加如下配置
<?xml version="1.0" encoding="UTF-8"?>
<web-app xmlns:xsi="http://www.w3.org/2001/XMLSchema-instance"
xmlns="http://java.sun.com/xml/ns/javaee"
xmlns:web="http://java.sun.com/xml/ns/javaee/web-app_2_5.xsd"
xsi:schemaLocation="http://java.sun.com/xml/ns/javaee
http://java.sun.com/xml/ns/javaee/web-app_3_0.xsd"
id="WebApp_ID" version="3.0">
<context-param>
<param-name>webAppRootKey</param-name>
<param-value>webapp.user.root</param-value>
</context-param>
<!-- 默认情况下就会自动找到这个配置文件/WEB-INF/applicationContext.xml-->
<context-param>
<param-name>contextConfigLocation</param-name>
<param-value>classpath:config/applicationContext.xml</param-value>
</context-param>
<listener>
<listener-class>org.springframework.web.context.ContextLoaderListener</listener-class>
</listener>
<servlet>
<servlet-name>dispatchServlet</servlet-name>
<servlet-class>org.springframework.web.servlet.DispatcherServlet</servlet-class>
<!-- 默认情况下就会自动找到这个配置文件/WEB-INF/dispatch-servlet.xml-->
<init-param>
<param-name>contextConfigLocation</param-name>
<param-value>classpath:config/dispatchServlet-servlet.xml</param-value>
</init-param>
<load-on-startup>1</load-on-startup>
</servlet>
<servlet-mapping>
<servlet-name>dispatchServlet</servlet-name>
<url-pattern>*.do</url-pattern>
</servlet-mapping>
<!-- 配置spring MVC end -->
</web-app>
load-on-startup:表示启动容器时初始化该Servlet;
url-pattern:表示哪些请求交给Spring Web MVC处理, CRM中将所有的.do的请求交给spring web mvc处理。
接着我们需要配置Spring的配置文件,默认DispatcherServlet会加载WEB-INF/[DispatcherServlet的Servlet名字]-servlet.xml配置文件,
本项目为classpath:config/dispatchServlet-servlet.xml
二、配置 dispatchServlet-servlet.xml
<?xml version="1.0" encoding="UTF-8"?>
<beans xmlns="http://www.springframework.org/schema/beans"
xmlns:xsi="http://www.w3.org/2001/XMLSchema-instance"
xmlns:tx="http://www.springframework.org/schema/tx"
xmlns:context="http://www.springframework.org/schema/context"
xmlns:mvc="http://www.springframework.org/schema/mvc"
xmlns:aop="http://www.springframework.org/schema/aop"
xsi:schemaLocation="http://www.springframework.org/schema/beans
http://www.springframework.org/schema/beans/spring-beans-2.5.xsd
http://www.springframework.org/schema/tx
http://www.springframework.org/schema/tx/spring-tx-2.5.xsd
http://www.springframework.org/schema/context
http://www.springframework.org/schema/context/spring-context-2.5.xsd
http://www.springframework.org/schema/aop
http://www.springframework.org/schema/aop/spring-aop-2.5.xsd">
<!-- 自动扫描base-package下面的java文件如果扫描到有@Component @Controller @Service等这些注解的类注册为bean -->
<context:component-scan base-package="com.dataeye" />
<!--context:annotation-config /-->
<aop:aspectj-autoproxy/>
</beans>
项目中数据库连接池配置在applicationContext.xml中:
<?xml version="1.0" encoding="UTF-8"?>
<beans xmlns="http://www.springframework.org/schema/beans"
xmlns:xsi="http://www.w3.org/2001/XMLSchema-instance" xmlns:tx="http://www.springframework.org/schema/tx"
xmlns:context="http://www.springframework.org/schema/context"
xmlns:mvc="http://www.springframework.org/schema/mvc"
xsi:schemaLocation="http://www.springframework.org/schema/beans
http://www.springframework.org/schema/beans/spring-beans-2.5.xsd
http://www.springframework.org/schema/tx
http://www.springframework.org/schema/tx/spring-tx-2.5.xsd
http://www.springframework.org/schema/context
http://www.springframework.org/schema/context/spring-context-2.5.xsd">
<!-- datasource.properties 用于 配置 jdbcContext.xml里面的占位符 -->
<bean id="propertyConfigurer" class="com.xunlei.spring.ExtendedPropertyPlaceholderConfigurer">
<property name="locations">
<list>
<value>classpath:config/datasource.properties</value>
</list>
</property>
</bean>
<!-- SpringMVC上传文件时,需要配置MultipartResolver处理器 -->
<bean id="multipartResolver" class="org.springframework.web.multipart.commons.CommonsMultipartResolver">
<property name="defaultEncoding" value="UTF-8"/>
<!-- 指定所上传文件的总大小不能超过200KB。注意maxUploadSize属性的限制不是针对单个文件,而是所有文件的容量之和 -->
<property name="maxUploadSize" value="200000"/>
</bean>
<import resource="classpath:config/jdbcContext.xml" />
</beans>
三、控制器的代码如下:
@Controller
public class UserCheckModule {
@Autowired
private UserCheckDAO userCheckDAO;
@RequestMapping("/pages/queryPtloginUserlist.do")
public Object queryPtloginUserlist(HttpServletRequest request, HttpServletResponse response) throws Exception {
DEContext context = (DEContext) request.getAttribute("CTX");
DEParameter parameter = context.getDeParameter();
PageDataModel pageModel = userCheckDAO.queryPtloginUserlist(parameter.getQueryParam());
return pageModel;
}
}
四、请求queryPtloginUserlist.do接口,就可以将结果显示在界面上。
这里我们使用了注解(spring IOC)
@Controller:用于标识是处理器类;
@RequestMapping:请求到处理器功能方法的映射规则;
@Autowired自动装配bean,注入UserCheckDAO 对象。


 70
70


 被折叠的 条评论
为什么被折叠?
被折叠的 条评论
为什么被折叠?
 到【灌水乐园】发言


