


其实不管是什么布局,要想学好它,必须要知道它里面包含的方法,如果连里面的方法都不知道,不会用,怎么能够写出好的代码来呢?
布局的方法很简单,下面我主要写一下布局的属性方法和实例。
1.线性布局
线性布局由LinearLayout类来代表,它可以将容器里的组件一个一个的排列起来,但需要注意的是,当一行或一列排满后,线性布局不会自动换行,后面的东西讲不会显示出来。
xml属性:
android:gravity:设置布局管理器内组件的对齐方式。该属性支持top、bottom、left、right、center_vertical、fill_vertical、center_horizontal、fill_horizontal、center、fill、clip_vertical、clip_horizontal、start、end几个属性值。也可以同时指定多种对齐方式的组合,例如left|center_vertica代表出现在屏幕左边而且是垂直居中
android:orientation:设置布局管理器内组件的排列方式,可以设置为horizontal也可以设置为vertical两个值中的一个。
下面演示一种线性布局方式:
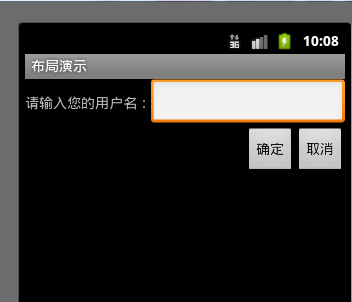
你能想象一下这是什么布局方式吗?
<?xml version="1.0" encoding="utf-8"?> <LinearLayout xmlns:android="http://schemas.android.com/apk/res/android" android:layout_width="fill_parent" android:layout_height="fill_parent" android:orientation="vertical" > <LinearLayout android:layout_width="fill_parent" android:layout_height="wrap_content" android:gravity="right" > <TextView android:layout_width="wrap_content" android:layout_height="wrap_content" android:text="@string/name_text" /> <EditText android:id="@+id/nameText" android:layout_width="fill_parent" android:layout_height="wrap_content" /> </LinearLayout> <LinearLayout android:layout_width="fill_parent" android:layout_height="wrap_content" android:gravity="right" > <Button android:id="@+id/ok_btn" android:layout_width="wrap_content" android:layout_height="wrap_content" android:text="@string/ok_text" /> <Button android:id="@+id/cancel_btn" android:layout_width="wrap_content" android:layout_height="wrap_content" android:text="@string/cancel_text" /> </LinearLayout> </LinearLayout>上面使用的是线性布局,通过使线性布局嵌套,组合出这种新的效果。
2.表格布局
xml属性:
andriod:collapseColumns:设置需要被隐藏的列的列序号
andriod:shrinkColumns:设置需要被收缩的列的列序号
andriod:stretchColumns:设置需要被拉伸的列的列序号
下面演示一种表格布局的例子:

xml布局代码如下:
<?xml version="1.0" encoding="utf-8"?> <TableLayout xmlns:android="http://schemas.android.com/apk/res/android" android:layout_width="fill_parent" android:layout_height="fill_parent" android:stretchColumns="0"> <TableRow > <TableLayout android:layout_width="fill_parent" android:layout_height="fill_parent" android:stretchColumns="1" > <TableRow > <TextView android:layout_width="fill_parent" android:layout_height="wrap_content" android:text="@string/app_name" /> </TableRow> </TableLayout> </TableRow> <TableRow > <TableLayout android:layout_width="fill_parent" android:layout_height="fill_parent" android:stretchColumns="0,1,2,3" > <TableRow > <TextView android:layout_width="fill_parent" android:layout_height="wrap_content" android:text="@string/text1" /> <TextView android:layout_width="fill_parent" android:layout_height="wrap_content" android:text="@string/text2" /> <TextView android:layout_width="fill_parent" android:layout_height="wrap_content" android:text="@string/text3" /> <TextView android:layout_width="fill_parent" android:layout_height="wrap_content" android:text="@string/text4" /> </TableRow> </TableLayout> </TableRow> <TableRow > <TableLayout android:layout_width="fill_parent" android:layout_height="fill_parent" android:stretchColumns="0,1,2,3" > <TableRow > <EditText android:layout_width="fill_parent" android:layout_height="wrap_content" /> <EditText android:layout_width="fill_parent" android:layout_height="wrap_content" /> <EditText android:layout_width="fill_parent" android:layout_height="wrap_content" /> <EditText android:layout_width="fill_parent" android:layout_height="wrap_content" /> </TableRow> </TableLayout> </TableRow> <TableRow > <TableLayout android:layout_width="fill_parent" android:layout_height="fill_parent" android:stretchColumns="0,1,2,3" > <TableRow > <EditText android:layout_width="fill_parent" android:layout_height="wrap_content" /> <EditText android:layout_width="fill_parent" android:layout_height="wrap_content" /> <EditText android:layout_width="fill_parent" android:layout_height="wrap_content" /> <EditText android:layout_width="fill_parent" android:layout_height="wrap_content" /> </TableRow> </TableLayout> </TableRow> <TableRow > <TableLayout android:layout_width="fill_parent" android:layout_height="fill_parent" android:stretchColumns="0,1,2,3" > <TableRow > <EditText android:layout_width="fill_parent" android:layout_height="wrap_content" /> <EditText android:layout_width="fill_parent" android:layout_height="wrap_content" /> <EditText android:layout_width="fill_parent" android:layout_height="wrap_content" /> <EditText android:layout_width="fill_parent" android:layout_height="wrap_content" /> </TableRow> </TableLayout> </TableRow> </TableLayout>上面的代码写的很复杂,就是因为没有使用xml的相关属性方法,那如果使用方法,效果会怎么样呢?在这里就不做演示了。代码非常简便。
3.相对布局
RelativeLayout的XML属性:
android:gravity:设置该布局容器内部各子组建的对齐方式
android:ignoreGravity:设置哪个组件不受gravity组件的影响
为了控制该布局容器内个组件的布局分析,RelativeLayout提供了一个内部类:RelativeLayout.LayoutParams,该类提供了大量的XML属性来控制Rel布局容器子组件的布局分布。
RelativeLayout.LayoutParams里只能设为true、false的XML属性(boolean)
下面的方法翻译是本人自己翻译的,翻译的不对的地方,请留言指出,本人感激不尽。
android:layout_above控制该子组件位于给出ID组件的上方
android:layout_alignBaseline 控制该子组件位于给出ID组件的基准线位置
android:layout_alignBottom 控制该子组件位于给出ID组件的下边界对齐
android:layout_alignLeft 控制该子组件位于给出ID组件的左边界对齐
android:layout_alignParentBottom如果是真的,控制给子组件与父组件的下边界对齐
android:layout_alignParentLeft如果是真的,控制给子组件与父组件的左边界对齐
android:layout_alignParentRight如果是真的,控制给子组件与父组件的右边界对齐
android:layout_alignParentTopt如果是真的,控制给子组件与父组件的上边界对齐
android:layout_alignRight 控制该子组件位于给出ID组件的右边界对齐
android:layout_alignTop 控制该子组件位于给出ID组件的上边界对齐
android:layout_alignWithParentIfMissing如果设置成true,则可以被用来当作找不到给出的其他组件可以对应的ID方法时的一个锚
android:layout_below 控制该子组件位于给出ID组件的下边界对齐
android:layout_centerHorizontal 如果真,使该组件在父组件中水平居中
android:layout_centerInParent 如果真,在其父组件中横向,纵向都居中
android:layout_centerVertical 如果真,使该子组件垂直居中于父组件
android:layout_toLeftOf 控制该子组件位于给出ID组件的左侧
android:layout_toRightOf 控制该子组件位于给出ID组件的右侧
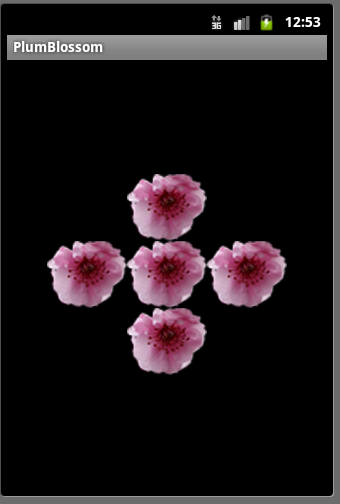
下面演示一种相对布局的例子:
梅花效果:我做的图片不好,所以出来不太好看,大家凑合着看吧,嘿嘿
xml源代码如下:
<?xml version="1.0" encoding="utf-8"?> <RelativeLayout xmlns:android="http://schemas.android.com/apk/res/android" android:layout_width="fill_parent" android:layout_height="fill_parent" android:orientation="vertical" > <TextView android:id="@+id/view1" android:layout_width="wrap_content" android:layout_height="wrap_content" android:background="@drawable/meihua" android:layout_centerInParent="true"/> <TextView android:id="@+id/view2" android:layout_width="wrap_content" android:layout_height="wrap_content" android:background="@drawable/meihua" android:layout_above="@id/view1" android:layout_alignLeft="@id/view1"/> <TextView android:id="@+id/view3" android:layout_width="wrap_content" android:layout_height="wrap_content" android:background="@drawable/meihua" android:layout_below="@id/view1" android:layout_alignLeft="@id/view1"/> <TextView android:id="@+id/view4" android:layout_width="wrap_content" android:layout_height="wrap_content" android:background="@drawable/meihua" android:layout_toLeftOf="@id/view1" android:layout_alignTop="@id/view1"/> <TextView android:id="@+id/view5" android:layout_width="wrap_content" android:layout_height="wrap_content" android:background="@drawable/meihua" android:layout_toRightOf="@id/view1" android:layout_alignBottom="@id/view1"/> </RelativeLayout>
4.帧布局
帧布局由FrameLayout所代表,FrameLayout直接继承了ViewGroup组件。
帧布局容器为每个加入其中的组件创建一个空白的区域(成为一帧),所有每个子组件占据一帧,这些帧都会根据gravity属性执行自动对齐。
XML属性:
android:foreground 设置该帧布局容器的前景图像
android:foregroundGravity 定义绘制前景图像的gravity属性
下面演示一个帧布局的应用:
霓虹灯效果:
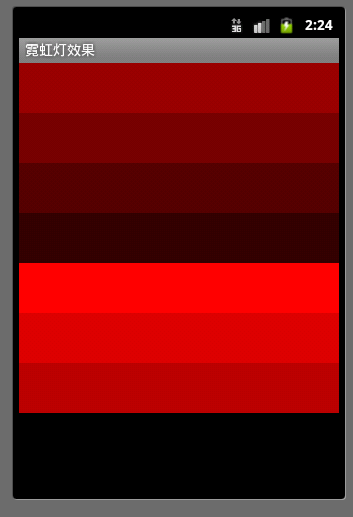
写这个代码我们要做的第一步就是:添加7个大小高度完全相同,宽度递减30的TextView,保证最先添加的TextView不会被完全遮挡。(layout中的xml)
<?xml version="1.0" encoding="utf-8"?> <LinearLayout xmlns:android="http://schemas.android.com/apk/res/android" android:layout_width="fill_parent" android:layout_height="fill_parent" android:orientation="vertical" > <TextView android:id="@+id/view01" android:layout_width="fill_parent" android:layout_height="wrap_content" android:background="#ff0000" android:width="210px" android:height="50px"/> <TextView android:id="@+id/view02" android:layout_width="fill_parent" android:layout_height="wrap_content" android:background="#dd0000" android:width="180px" android:height="50px"/> <TextView android:id="@+id/view03" android:layout_width="fill_parent" android:layout_height="wrap_content" android:background="#bb0000" android:width="150px" android:height="50px"/> <TextView android:id="@+id/view04" android:layout_width="fill_parent" android:layout_height="wrap_content" android:background="#990000" android:width="12px" android:height="50px"/> <TextView android:id="@+id/view05" android:layout_width="fill_parent" android:layout_height="wrap_content" android:background="#770000" android:width="90px" android:height="50px"/> <TextView android:id="@+id/view06" android:layout_width="fill_parent" android:layout_height="wrap_content" android:background="#550000" android:width="60px" android:height="50px"/> <TextView android:id="@+id/view07" android:layout_width="fill_parent" android:layout_height="wrap_content" android:background="#330000" android:width="30px" android:height="50px"/> </LinearLayout>
另外我们再在values中添加一个colors.xml在其中添加7中变化的颜色(要与背景颜色中的颜色相对应,以保证效果不变
<?xml version="1.0" encoding="utf-8"?> <resources> <color name="color1">#330000</color> <color name="color2">#550000</color> <color name="color3">#770000</color> <color name="color4">#990000</color> <color name="color5">#bb0000</color> <color name="color6">#dd0000</color> <color name="color7">#ff0000</color> </resources>
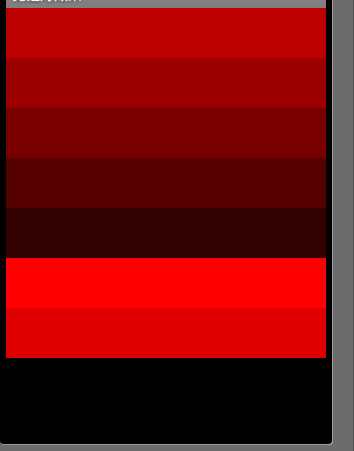
好了,基本的布局写完了,那么现在开始实现颜色渐变吧,开始写Java代码吧
package song.activity; import java.util.Timer; import java.util.TimerTask; import android.app.Activity; import android.os.Bundle; import android.os.Handler; import android.os.Message; import android.widget.TextView; public class FrameLayoutActivity extends Activity { private int currentColor = 0; //定义一个颜色数组 final int[] colors = new int[] { R.color.color7, R.color.color6, R.color.color5, R.color.color4, R.color.color3, R.color.color2, R.color.color1, }; final int[] names = new int[] { R.id.view01, R.id.view02, R.id.view03, R.id.view04, R.id.view05, R.id.view06, R.id.view07 }; TextView[] views = new TextView[7]; @Override public void onCreate(Bundle savedInstanceState) { super.onCreate(savedInstanceState); setContentView(R.layout.main); for (int i = 0 ; i < 7 ; i++) { views[i] = (TextView)findViewById(names[i]); } final Handler handler = new Handler() { @Override public void handleMessage(Message msg) { //表明消息来自本程序所发送 if(msg.what == 0x1122) { //依次改变7个TextView的背景色 for(int i = 0 ; i < 7 - currentColor ; i++) { views[i].setBackgroundResource(colors[i + currentColor]); } for(int i = 7 - currentColor , j = 0 ; i < 7 ; i++ ,j++) { views[i].setBackgroundResource(colors[j]); } } super.handleMessage(msg); } }; //定义一个线程周期性的改变currentColor变量值 new Timer().schedule(new TimerTask() { @Override public void run() { currentColor++; if(currentColor >= 6) { currentColor = 0; } //发送一条消息通知系统改变7个TextView组件的背景色 Message m = new Message(); //给该消息定义一个标识 m.what = 0x1122; handler.sendMessage(m); } }, 0 , 100); } }
哦了,完成,感觉怎么样呢?看着自己写出来的效果,感觉很不错哦~


 845
845

 被折叠的 条评论
为什么被折叠?
被折叠的 条评论
为什么被折叠?
 到【灌水乐园】发言


