MSSQL2005 Replication
For distributed databases, SQL Server 2005 provides comprehensive schema change (DDL) replication, next-generation monitoring capabilities, built in replication from Oracle to SQL Server, merge replication over https, and significant merge replication scalability and performance improvements. Additionally, the new peer-to-peer transactional replication feature improves support for data scale out using replication.
Replication is designed to increase data availability by distributing the data across multiple database servers. Availability is increased by allowing applications to scale out the SQL Server read workload across databases. SQL Server 2005 offers enhanced replication using a new peer-to-peer model that provides a new topology in which databases can be synchronized transactionally with any identical peer database.
Note
Distributor&Publisher:WIN2003R2[192.168.5.100]
Subscriber:ZHY[192.168.5.200]
<place w:st="on"><sn w:st="on"><strong style="mso-bidi-font-weight: normal"><span lang="EN-US" style="FONT-SIZE: 9pt; FONT-FAMILY: Arial; mso-font-kerning: 0pt"></span></strong></sn></place>
<place w:st="on"><sn w:st="on"><strong style="mso-bidi-font-weight: normal"><span lang="EN-US" style="FONT-SIZE: 9pt; FONT-FAMILY: Arial; mso-font-kerning: 0pt"></span></strong></sn></place>
<place w:st="on"><sn w:st="on"><strong style="mso-bidi-font-weight: normal"><span lang="EN-US" style="FONT-SIZE: 9pt; FONT-FAMILY: Arial; mso-font-kerning: 0pt"></span></strong></sn></place>
<place w:st="on"><sn w:st="on"><strong style="mso-bidi-font-weight: normal"><span lang="EN-US" style="FONT-SIZE: 9pt; FONT-FAMILY: Arial; mso-font-kerning: 0pt">Step</span></strong></sn><strong style="mso-bidi-font-weight: normal"><span lang="EN-US" style="FONT-SIZE: 9pt; FONT-FAMILY: Arial; mso-font-kerning: 0pt"> <sn w:st="on">I.</sn></span></strong></place> Configure Distribution
First, you must connect to the SQL Server Distributor:
1. Open SQL Server 2005 Management Studio.
2. If you are not already connected to the instance of SQL Server that will serve as the Distributor, click Object Explorer and select the instance.
<shapetype id="_x0000_t75" coordsize="21600,21600" o:spt="75" o:preferrelative="t" path="m@4@5l@4@11@9@11@9@5xe" filled="f" stroked="f"><stroke joinstyle="miter"></stroke><formulas><f eqn="if lineDrawn pixelLineWidth 0"></f><f eqn="sum @0 1 0"></f><f eqn="sum 0 0 @1"></f><f eqn="prod @2 1 2"></f><f eqn="prod @3 21600 pixelWidth"></f><f eqn="prod @3 21600 pixelHeight"></f><f eqn="sum @0 0 1"></f><f eqn="prod @6 1 2"></f><f eqn="prod @7 21600 pixelWidth"></f><f eqn="sum @8 21600 0"></f><f eqn="prod @7 21600 pixelHeight"></f><f eqn="sum @10 21600 0"></f></formulas><path o:extrusionok="f" gradientshapeok="t" o:connecttype="rect"></path><lock v:ext="edit" aspectratio="t"></lock></shapetype><shape id="_x0000_i1025" style="WIDTH: 310.5pt; HEIGHT: 231pt" type="#_x0000_t75"><imagedata src="file:///C:%5CDOCUME~1%5CADMINI~1%5CLOCALS~1%5CTemp%5Cmsohtml1%5C05%5Cclip_image001.jpg" o:title="rep_1"></imagedata></shape>
Figure 1. Connecting to the Distributor
After you have connected to the instance, start the New Publication Wizard.
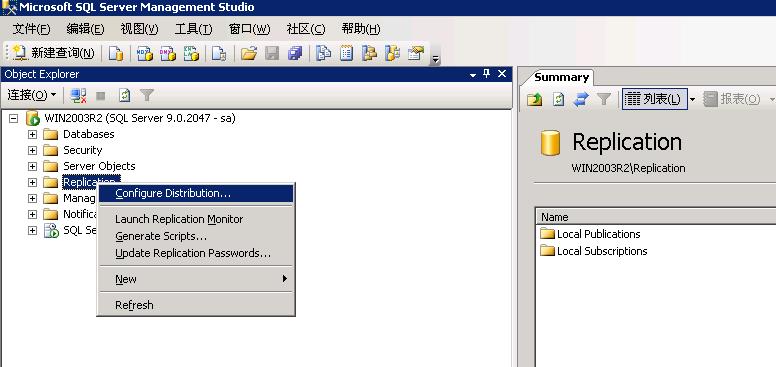
1. Expand the server node.
2. Expand the Replication folder.
3. Right-click the Local Publications folder and then click Configure Distribution
<shape id="_x0000_i1030" style="WIDTH: 414.75pt; HEIGHT: 196.5pt" type="#_x0000_t75"><imagedata src="file:///C:%5CDOCUME~1%5CADMINI~1%5CLOCALS~1%5CTemp%5Cmsohtml1%5C05%5Cclip_image002.jpg" o:title="rep_2"></imagedata></shape>
Figure 2. Starting the Configure Distribution Wizard
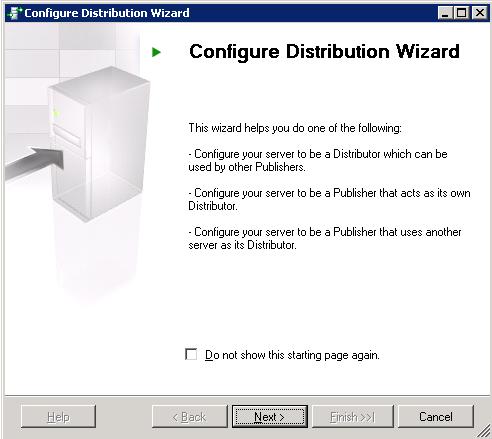
4.The Configure Distribution Wizard introduction page is displayed.
Click Next
<shape id="_x0000_i1031" style="WIDTH: 369pt; HEIGHT: 329.25pt" type="#_x0000_t75"><imagedata src="file:///C:%5CDOCUME~1%5CADMINI~1%5CLOCALS~1%5CTemp%5Cmsohtml1%5C05%5Cclip_image004.jpg" o:title="rep_3"></imagedata></shape>
Figure 3. the Configure Distribution Wizard page
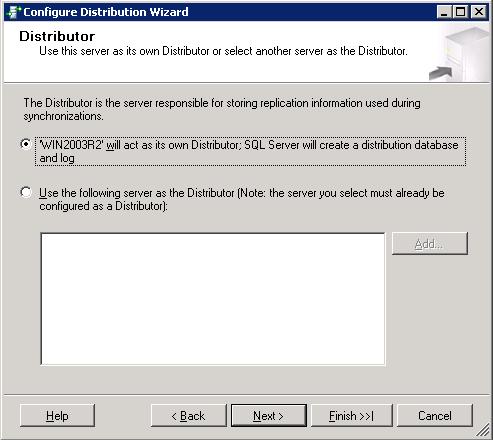
5.Verify that the instance that you are connected to is selected as the Distributor and click Next.
<shape id="_x0000_i1032" style="WIDTH: 369.75pt; HEIGHT: 330pt" type="#_x0000_t75"><imagedata src="file:///C:%5CDOCUME~1%5CADMINI~1%5CLOCALS~1%5CTemp%5Cmsohtml1%5C05%5Cclip_image005.jpg" o:title="rep_4"></imagedata></shape>
Figure 4. Specifying the Distributor
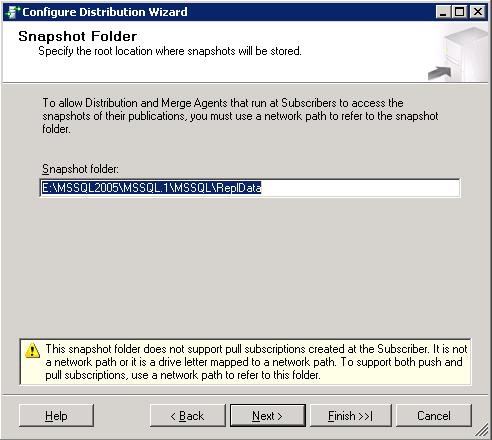
6.Specify Snapshot Folder This snapshot folder does not support pull subscriptions created at the Subscriber. It is not a network path or it is a drive letter mapped to a network path. To support both push and pull subscriptions, use a network path to refer to this folder.
<shape id="_x0000_i1033" style="WIDTH: 369pt; HEIGHT: 330pt" type="#_x0000_t75"><imagedata src="file:///C:%5CDOCUME~1%5CADMINI~1%5CLOCALS~1%5CTemp%5Cmsohtml1%5C05%5Cclip_image006.jpg" o:title="rep_5"></imagedata></shape>
Figure 5.Specify the Snapshot Folder
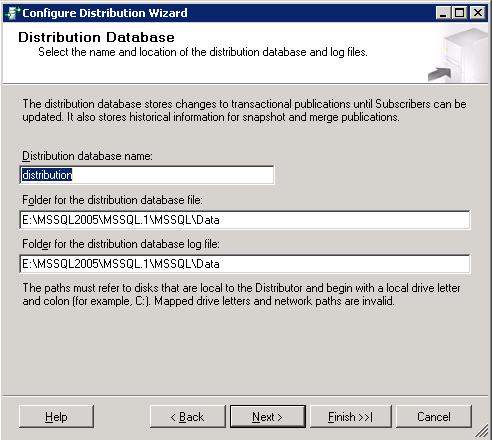
7.Specify Distribution Database .Locate the distribution database and log files.Click Next
<shape id="_x0000_i1035" style="WIDTH: 369pt; HEIGHT: 330pt" type="#_x0000_t75"><imagedata src="file:///C:%5CDOCUME~1%5CADMINI~1%5CLOCALS~1%5CTemp%5Cmsohtml1%5C05%5Cclip_image007.jpg" o:title="rep_6"></imagedata></shape>
Figure 6. specifying distribution database
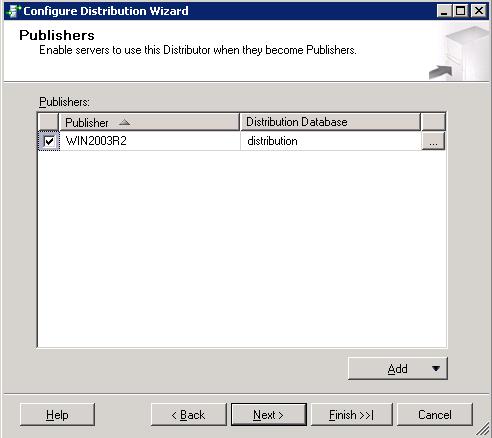
8.Specify Publisher.Enable servers to use this distributor when they become publisher.click Next
<shape id="_x0000_i1036" style="WIDTH: 369pt; HEIGHT: 328.5pt" type="#_x0000_t75"><imagedata src="file:///C:%5CDOCUME~1%5CADMINI~1%5CLOCALS~1%5CTemp%5Cmsohtml1%5C05%5Cclip_image008.jpg" o:title="rep_7"></imagedata></shape>
Figure 7. Specifying publisher and distribution database
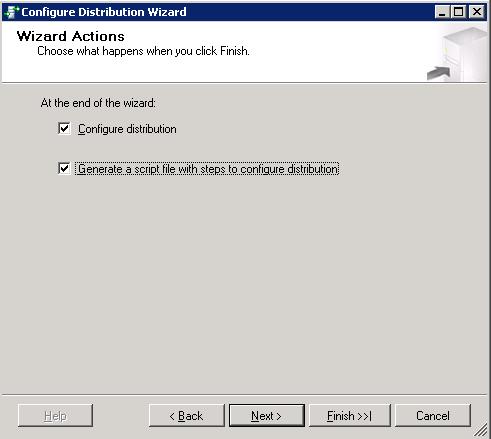
9. On the Wizard Actions page, you specify the distribution will be created, and whether the distribution configuration is saved in a script. We recommend that you select the check box for scripting so that you will have a copy of the distribution configuration for future reference. click Next.
<shape id="_x0000_i1037" style="WIDTH: 368.25pt; HEIGHT: 329.25pt" type="#_x0000_t75"><imagedata src="file:///C:%5CDOCUME~1%5CADMINI~1%5CLOCALS~1%5CTemp%5Cmsohtml1%5C05%5Cclip_image009.jpg" o:title="rep_8"></imagedata></shape>
Figure 8. Scripting and creating the distribution
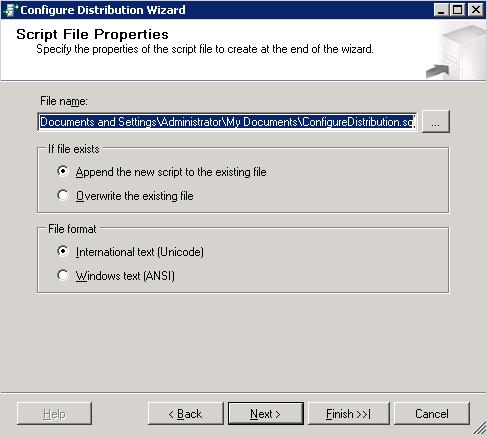
10. specify the distributor of script ,Click Next.
<shape id="_x0000_i1038" style="WIDTH: 365.25pt; HEIGHT: 327.75pt" type="#_x0000_t75"><imagedata src="file:///C:%5CDOCUME~1%5CADMINI~1%5CLOCALS~1%5CTemp%5Cmsohtml1%5C05%5Cclip_image010.jpg" o:title="rep_9"></imagedata></shape>
Figure 9. Specify the distributor script
11. On the Complete the Wizard page, verify that all options are correct.Click Finish
<shape id="_x0000_i1046" style="WIDTH: 368.25pt; HEIGHT: 325.5pt" type="#_x0000_t75"><imagedata src="file:///C:%5CDOCUME~1%5CADMINI~1%5CLOCALS~1%5CTemp%5Cmsohtml1%5C05%5Cclip_image011.jpg" o:title="rep_10"></imagedata></shape>
Figure 10. Verifying wizard options
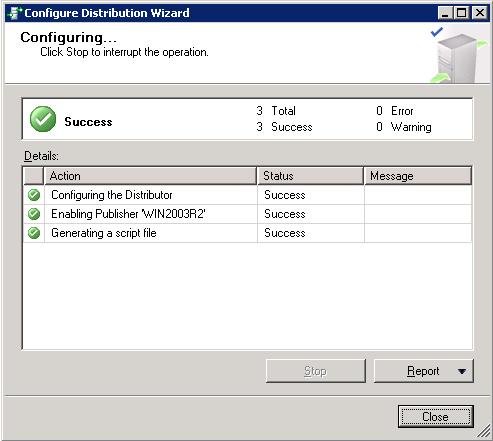
12. The Distribution Wizard now saves the configuration information that you have entered and creates the distribution.
Click Close after the steps are complete
<shape id="_x0000_i1047" style="WIDTH: 369.75pt; HEIGHT: 330.75pt" type="#_x0000_t75"><imagedata src="file:///C:%5CDOCUME~1%5CADMINI~1%5CLOCALS~1%5CTemp%5Cmsohtml1%5C05%5Cclip_image012.jpg" o:title="rep_11"></imagedata></shape>
Figure 11. Creating the distribution
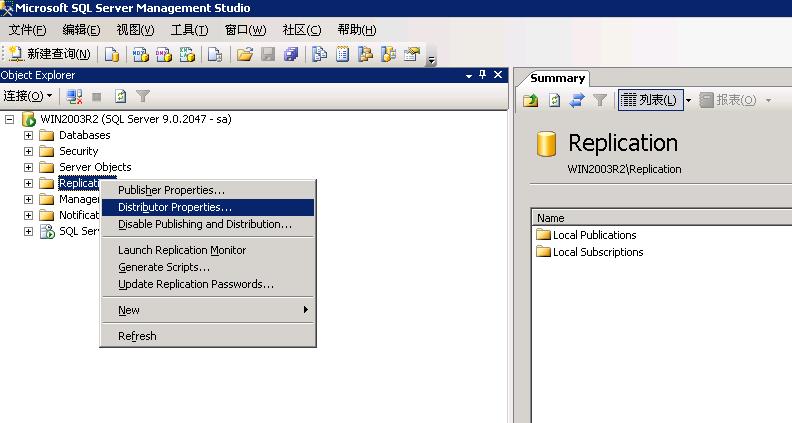
13. Specifying the connection properties
Right-click the Replication folder and then click Distribution Properties
<shape id="_x0000_i1048" style="WIDTH: 415.5pt; HEIGHT: 222pt" type="#_x0000_t75"><imagedata src="file:///C:%5CDOCUME~1%5CADMINI~1%5CLOCALS~1%5CTemp%5Cmsohtml1%5C05%5Cclip_image013.jpg" o:title="rep_12"></imagedata></shape>
Figure 12. Specifying the connection properties
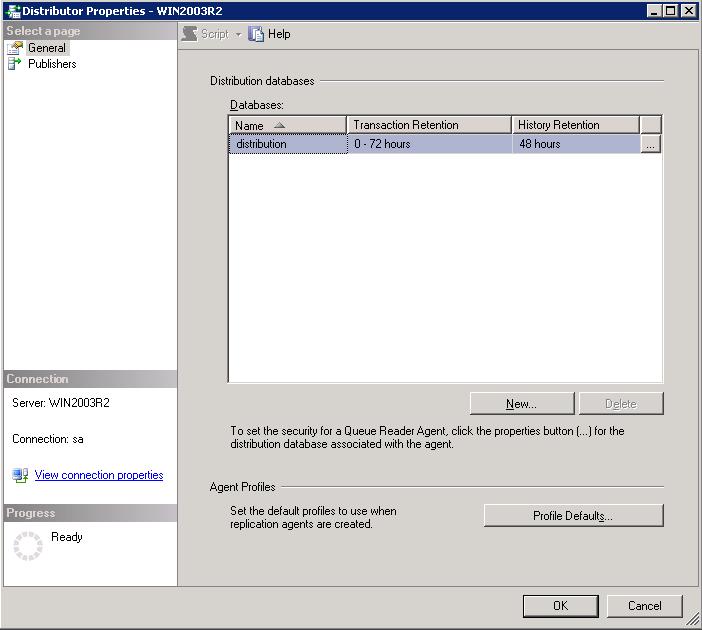
<shape id="_x0000_i1049" style="WIDTH: 414.75pt; HEIGHT: 372pt" type="#_x0000_t75"><imagedata src="file:///C:%5CDOCUME~1%5CADMINI~1%5CLOCALS~1%5CTemp%5Cmsohtml1%5C05%5Cclip_image015.jpg" o:title="rep_13"></imagedata></shape>
Figure 13. Saving the Distributor configuration
Step II. Create Publication
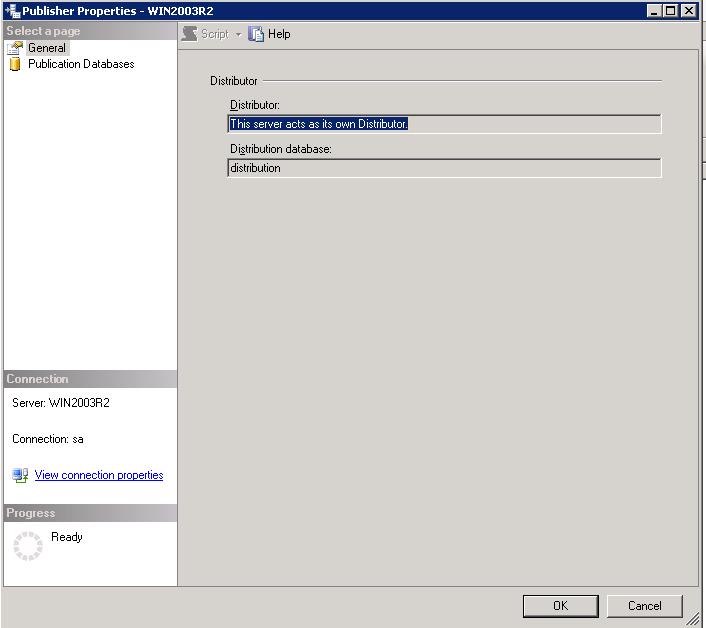
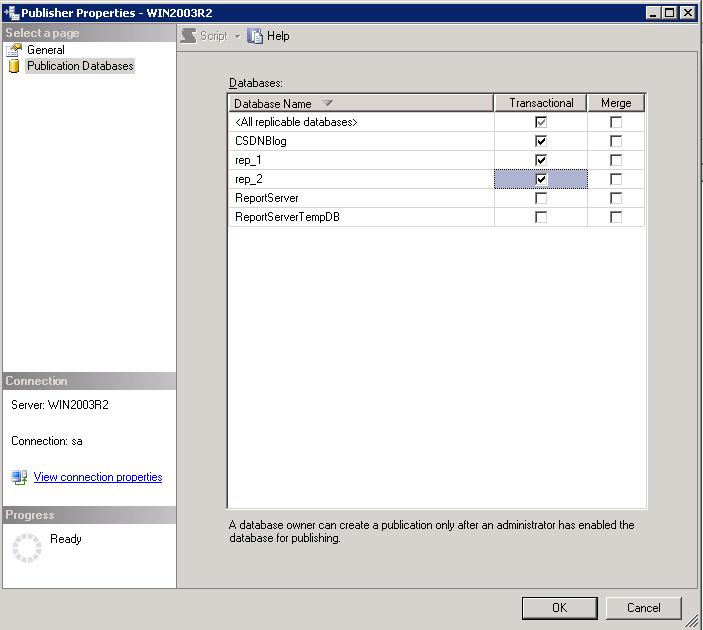
1.Specify the Publisher Properties and select Transactional Databases at this artical
<shape id="_x0000_i1039" style="WIDTH: 414.75pt; HEIGHT: 261.75pt" type="#_x0000_t75"><imagedata src="file:///C:%5CDOCUME~1%5CADMINI~1%5CLOCALS~1%5CTemp%5Cmsohtml1%5C05%5Cclip_image017.jpg" o:title="rep_14"></imagedata></shape>
Figure 15 staring the publisher properties
<shape id="_x0000_i1040" style="WIDTH: 414.75pt; HEIGHT: 372pt" type="#_x0000_t75"><imagedata src="file:///C:%5CDOCUME~1%5CADMINI~1%5CLOCALS~1%5CTemp%5Cmsohtml1%5C05%5Cclip_image019.jpg" o:title="rep_16"></imagedata></shape>
Figure 16.specifing the publication databases.
For more information about Transactional and merge,pls see "Troubleshooting Oracle Publishers" in SQL Server Books Online
2. After you have connected to the instance, start the New Publication Wizard.
A.Expand the server node.
B.Expand the Replication folder.
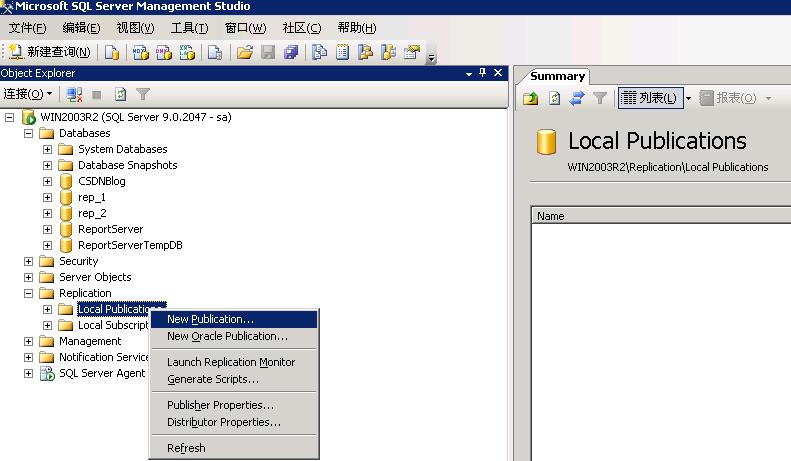
C.Right-click the Local Publications folder and then click New Publication
The rest of this section covers the steps in the wizard in more detail
<shape id="_x0000_i1050" style="WIDTH: 415.5pt; HEIGHT: 242.25pt" type="#_x0000_t75"><imagedata src="file:///C:%5CDOCUME~1%5CADMINI~1%5CLOCALS~1%5CTemp%5Cmsohtml1%5C05%5Cclip_image021.jpg" o:title="rep_17"></imagedata></shape>
Figure 17. Starting the New Publication Wizard
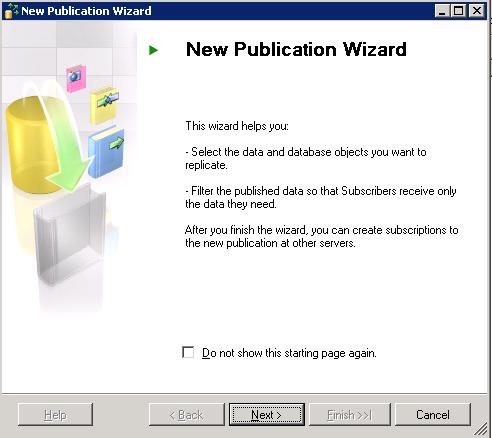
3. The New Publication Wizard introduction page is displayed.then click Next
<shape id="_x0000_i1051" style="WIDTH: 369pt; HEIGHT: 328.5pt" type="#_x0000_t75"><imagedata src="file:///C:%5CDOCUME~1%5CADMINI~1%5CLOCALS~1%5CTemp%5Cmsohtml1%5C05%5Cclip_image023.jpg" o:title="rep_18"></imagedata></shape>
Figure 18. New Publication Wizard introduction page
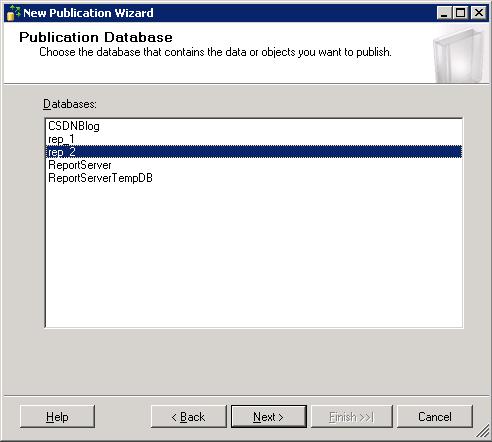
4. Choose the database U wanna to publish. Select the publication type and click Next
<shape id="_x0000_i1052" style="WIDTH: 369pt; HEIGHT: 331.5pt" type="#_x0000_t75"><imagedata src="file:///C:%5CDOCUME~1%5CADMINI~1%5CLOCALS~1%5CTemp%5Cmsohtml1%5C05%5Cclip_image024.jpg" o:title="rep_19"></imagedata></shape>
Figure 19.specifing the publication database
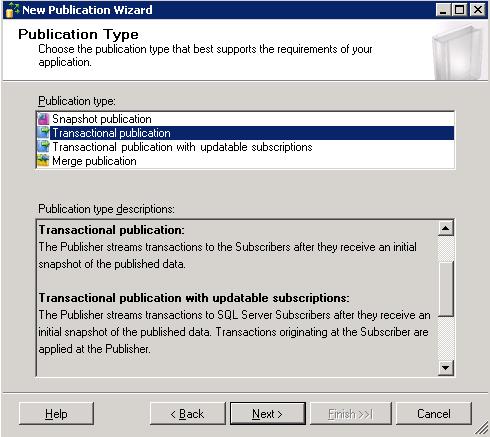
5. On the Publication Type page, you select the type of replication to use. Select Snapshot publication if you want all the published data to be copied every time replication executes. Select Transactional publication if you want to start by copying all the published data and then continuously stream subsequent data changes to SQL Server in near real time.
Note For more information, see the topic "Transactional Replication Publishers" in SQL Server Books Online.
Select the publication type and click Next.
The rest of this article assumes that you selected Transactional publication.
<shape id="_x0000_i1053" style="WIDTH: 367.5pt; HEIGHT: 327.75pt" type="#_x0000_t75"><imagedata src="file:///C:%5CDOCUME~1%5CADMINI~1%5CLOCALS~1%5CTemp%5Cmsohtml1%5C05%5Cclip_image025.jpg" o:title="rep_20"></imagedata></shape>
Figure 20. Specifying the publication type
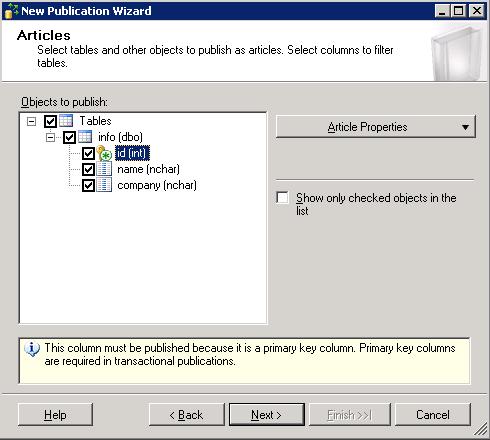
6.On the Articles page, select the tables that you want to publish from the Objects to publish list. If there are columns of data that you do not want to replicate, you can remove the columns from the published table by clearing the check box next to each column.
Note A table can appear among the Objects to publish only if SELECT permissions for the table have been granted directly to the replication administrative user.
<shape id="_x0000_i1054" style="WIDTH: 367.5pt; HEIGHT: 330pt" type="#_x0000_t75"><imagedata src="file:///C:%5CDOCUME~1%5CADMINI~1%5CLOCALS~1%5CTemp%5Cmsohtml1%5C05%5Cclip_image026.jpg" o:title="rep_21"></imagedata></shape>
Figure 21. Selecting the tables to replicate
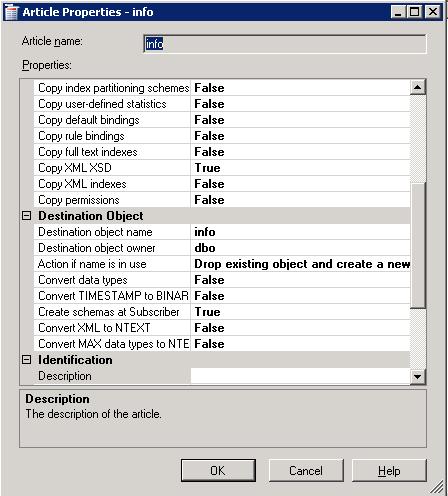
Note If a column contains an MSSQL data type that might result in data loss when it is converted to a SQL Server data type, a yellow warning sign is displayed next to the column. In the following illustration, the HIREDATE column contains date data that might result in data loss. You can optionally select an alternative to the default SQL Server data type. First, access the properties for the published table.
A. Select the table in the Objects to publish list and then click Article Properties.
B. Click Set the Properties of Highlighted Table Article.
In the next step, you can select an alternative data type.
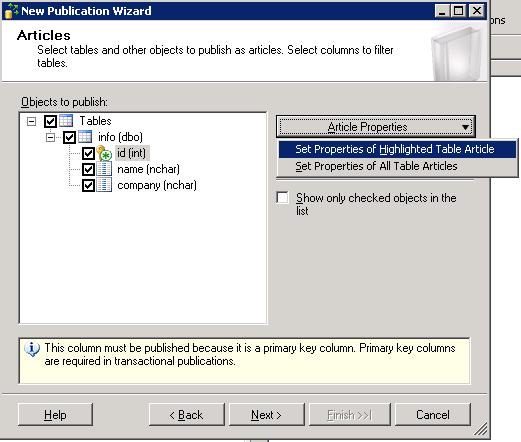
<shape id="_x0000_i1055" style="WIDTH: 390.75pt; HEIGHT: 331.5pt" type="#_x0000_t75"><imagedata src="file:///C:%5CDOCUME~1%5CADMINI~1%5CLOCALS~1%5CTemp%5Cmsohtml1%5C05%5Cclip_image027.jpg" o:title="rep_22"></imagedata></shape>
Figure 22. Accessing properties of published tables
<shape id="_x0000_i1056" style="WIDTH: 336pt; HEIGHT: 372pt" type="#_x0000_t75"><imagedata src="file:///C:%5CDOCUME~1%5CADMINI~1%5CLOCALS~1%5CTemp%5Cmsohtml1%5C05%5Cclip_image028.jpg" o:title="rep_23"></imagedata></shape>
Figure 23. Changing article types for Subscriber article
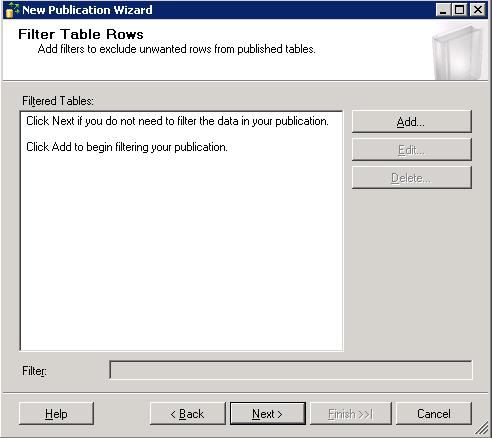
7.You can optionally specify that you require only a subset of the data to be published. To specify a filter for a table, you specify a WHERE clause using SQL-compliant syntax.
A. On the Filter Table Rows page, click Add.
B. In the Add Filter dialog box, select a table to filter from the list.
C. In the Filter statement text area, type a WHERE clause.
D. Click OK.
E. Click Next.
<shape id="_x0000_i1057" style="WIDTH: 369pt; HEIGHT: 328.5pt" type="#_x0000_t75"><imagedata src="file:///C:%5CDOCUME~1%5CADMINI~1%5CLOCALS~1%5CTemp%5Cmsohtml1%5C05%5Cclip_image029.jpg" o:title="rep_24"></imagedata></shape>
Figure 24. Filtering data
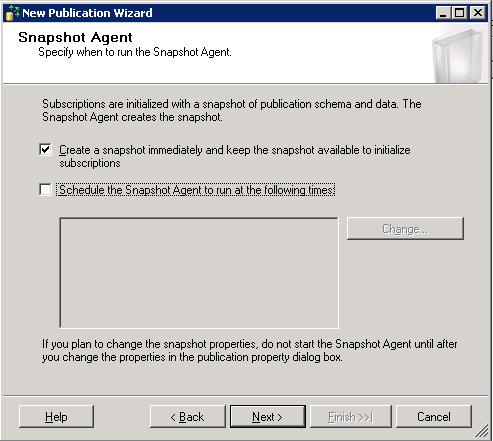
8.On the Snapshot Agent page, select whether you want to start creating snapshot data files immediately after the wizard finishes, or at a later time.
A. Select the option to create a snapshot immediately.
B. Click Next.
<shape id="_x0000_i1058" style="WIDTH: 369.75pt; HEIGHT: 330.75pt" type="#_x0000_t75"><imagedata src="file:///C:%5CDOCUME~1%5CADMINI~1%5CLOCALS~1%5CTemp%5Cmsohtml1%5C05%5Cclip_image030.jpg" o:title="rep_25"></imagedata></shape>
Figure 25. Scheduling the snapshot
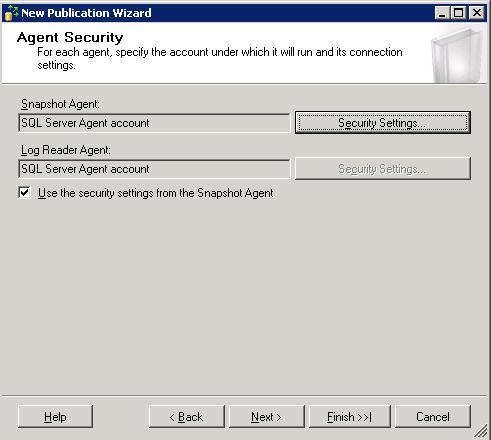
9.The Snapshot Agent and Log Reader Agent pull data from the Publisher. On the Agent Security page, you specify the Windows user under which each agent should run.
Each user must be a member of the sysadmin fixed server role on the SQL Server Distributor.
Additionally, the Windows user under which the Snapshot Agent runs must have write permissions on the snapshot folder. By default, the snapshot folder is located at <drive>\Program Files\Microsoft SQL Server\MSSQL.1\MSSQL\repldata\.
A.Click Security Settings to specify settings for each agent. If you want to specify the same settings for the Log Reader Agent and Snapshot Agent, specify the Snaphot Agent settings first and then select Use the security settings from the Snapshot Agent.
B. Click Next.
<shape id="_x0000_i1059" style="WIDTH: 368.25pt; HEIGHT: 330pt" type="#_x0000_t75"><imagedata src="file:///C:%5CDOCUME~1%5CADMINI~1%5CLOCALS~1%5CTemp%5Cmsohtml1%5C05%5Cclip_image031.jpg" o:title="rep_26"></imagedata></shape>
Figure 26. Setting security options for replication agents
10.On the Wizard Actions page, you specify when the publication will be created, and whether the publication configuration is saved in a script. We recommend that you select the check box for scripting so that you will have a copy of the replication configuration for future reference.
A. Select both check boxes.
B. Click Next.
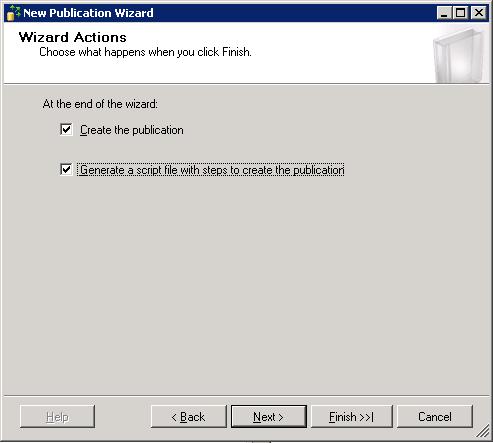
<shape id="_x0000_i1060" style="WIDTH: 369.75pt; HEIGHT: 332.25pt" type="#_x0000_t75"><imagedata src="file:///C:%5CDOCUME~1%5CADMINI~1%5CLOCALS~1%5CTemp%5Cmsohtml1%5C05%5Cclip_image032.jpg" o:title="rep_27"></imagedata></shape>
Figure 27. Scripting and creating the publication
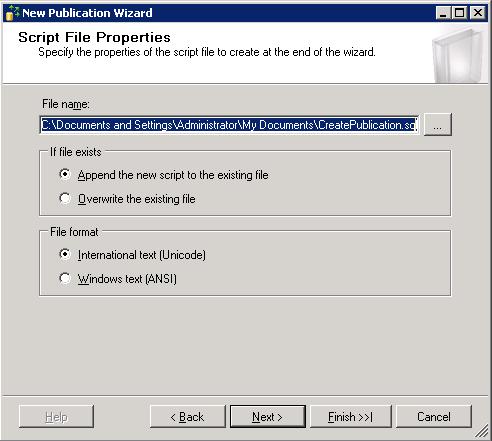
11. Create Publication Script File.click Next
<shape id="_x0000_i1061" style="WIDTH: 369pt; HEIGHT: 330.75pt" type="#_x0000_t75"><imagedata src="file:///C:%5CDOCUME~1%5CADMINI~1%5CLOCALS~1%5CTemp%5Cmsohtml1%5C05%5Cclip_image033.jpg" o:title="rep_28"></imagedata></shape>
Figure 28. CreatePublication sql script
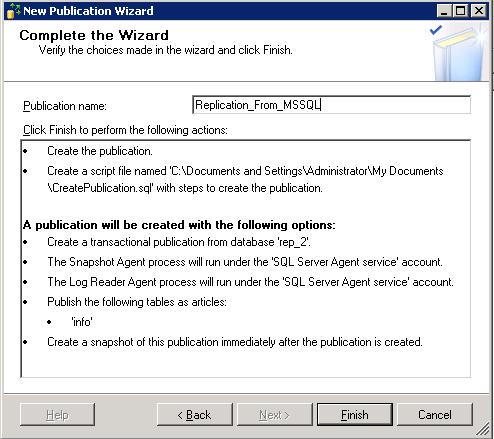
12.On the Complete the Wizard page, you can verify that all options are correct, and provide a name for the publication.
A. Type a name for the publication.
B. Verify options, and click Back to change your selections if necessary.
C. Click Finish.
<shape id="_x0000_i1062" style="WIDTH: 370.5pt; HEIGHT: 329.25pt" type="#_x0000_t75"><imagedata src="file:///C:%5CDOCUME~1%5CADMINI~1%5CLOCALS~1%5CTemp%5Cmsohtml1%5C05%5Cclip_image034.jpg" o:title="rep_29"></imagedata></shape>
Figure 29. Completing the New Publication Wizard
13.The New Publication Wizard now saves the configuration information that you have entered and creates the publication. Click Close after the steps are finished.


 本文介绍如何使用 SQL Server 2005 的复制功能进行分布式数据库管理,包括设置发布者、订阅者及配置复制类型等关键步骤。


 被折叠的 条评论
为什么被折叠?


