| 下载本文示例源代码
在阅读这篇文章之前,最好能够接触过以下几项 GDI+
利用ATL生成组件
STL
ASP使用组件
aspImage是ServerObjects站点上非常好的一个组件,它可以使我们利用Asp实现很多对于图形的处理功能,他的功能强大,如果你需要了解更详细的信息你可以访问它的官方网站,在这里就不讲如何使用这个组件了,我们在这里要讲的是如何实现这类组件,当然下面的例子中使用GDI+并不是实现组件图形处理的唯一方法,大家也可以自己试试其他的方法.
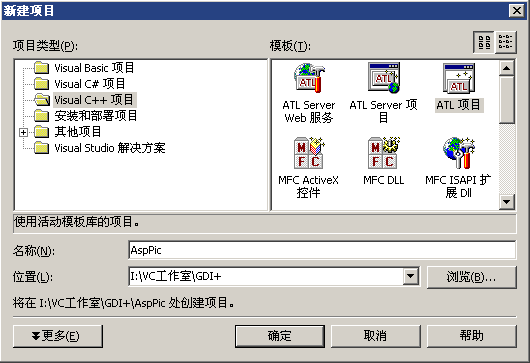
以下是实现过程 一、首先使用Visual C++的向导建立ATL项目
二、接下来添加一个ATL Active Server Page 组件接口类

三、生成名称为AspPicCom的类并且选择ASP内部对象Response

四、在IAspPicCom接口上添加属性和方法,如下表
| 名称 | 类别 | 含义 | 调用方法 | | FontName | 属性 | 字体名称 | 字符串类型
使用方法
.FontName="宋体" | | FontSize | 属性 | 字体大小 | 整型
使用方法
.FontSize=40 | | FontStyle | 属性 | 字体类型 | 整形
Regular = 0,
Bold = 1,
Italic = 2,
BoldItalic = 3,
Underline = 4,
Strikeout = 8
使用方法
.FontStyle=8 | | ImgFormat | 属性 | 图形格式 | 字符串类型
image/gif
image/jpeg
image/bmp
......
使用方法
.ImgFormat="image/gif" | | SetFontColor | 方法 | 设置字体颜色 | 使用方法
.SetFontColor 255,3,242,4
上面的数字分别代表Alpha,Red,Green,Blue | | SetBackColor | 方法 | 设置字体背景颜色 | 使用方法
.SetBackColor 255,3,242,4
上面的数字分别代表Alpha,Red,Green,Blue | | ShowPic | 方法 | 将图片发送到客户端 | 使用方法
.ShowPic |
五、 要在ASP组件中使用GDI+,需要加入一些代码
1、你需要在Stdafx.h文件中加入下面两行:
#include <Gdiplus.h> using namespace Gdiplus; 而且需要连接GDIPlus.lib库 #pragma comment(lib,"gdiplus.lib") 2、声明ULONG_PTR gdiplusToken;为一个全局或者类的内部成员变量。
3、在实现类的FinalConstruct函数中加入: GdiplusStartupInput gdiplusStartupInput; //初始化 GDI+ GdiplusStartup(&gdiplusToken, &gdiplusStartupInput, NULL); 4、在FinalRelease函数中加入: GdiplusShutdown(gdiplusToken); 这样你就可以使用GDI+提供的图形处理函数了。
注:关于GDI+的使用你可以在以下网址找到参考 http://msdn.microsoft.com/library/default.asp?url=/library/en-us/gdicpp/gdi+/gdi+.asp http://www.codeproject.com/vcpp/gdiplus/ 六 接下来就是实现在四中列出的这些属性和方法,下面列出ShowPic方法的一段代码,其他代码请查看源代码 Bitmap bitmap(1,1,PixelFormat48bppRGB);Graphics graphics(&bitmap);USES_CONVERSION;Font font( OLE2CW(m_bstrFontName),(float)m_fFontSize,m_nFontStyle,
UnitPoint,NULL);PointF origin(0, 0);StringFormat format;format.SetAlignment(StringAlignmentCenter);RectF boundRect; graphics.MeasureString(OLE2CW(m_bstrText),m_bstrText.Length (),
&font, origin, &format, &boundRect);int nWidth = (int)boundRect.Width;int nHeight = (int)boundRect.Height;Bitmap bm(nWidth,nHeight,PixelFormat48bppRGB);Graphics* g=Graphics::FromImage (&bm);boundRect.Width=boundRect.Width*2;SolidBrush solidbrush(m_cBackground);g->FillRectangle(&solidbrush,boundRect);SolidBrush SolidFont(m_cFontColor);PointF fPoint(0,0);g->DrawString(OLE2CW(m_bstrText),m_bstrText.Length (),
&font,fPoint,&SolidFont);int result;CLSID pngClsid;result = GetCodecClsid(OLE2W(m_btrImgFormat ), &pngClsid);HRESULT hr;HGLOBAL hGlobal = GlobalAlloc(GMEM_MOVEABLE, 0);CComPtr<IStream> pStm;if (FAILED(hr = CreateStreamOnHGlobal(hGlobal, TRUE, &pStm) )) return hr;bm.Save(pStm,&pngClsid,NULL);ULONG cElements = (ULONG)GlobalSize(hGlobal);LPBYTE lpData = (LPBYTE)GlobalLock(hGlobal);SAFEARRAY* pArray = SafeArrayCreateVector(VT_UI1, 0, cElements);for (UINT iElement = 0; iElement < cElements; iElement++){long idx = iElement;SafeArrayPutElement(pArray, &idx, ((LPBYTE)lpData) + iElement);}GlobalUnlock(hGlobal);CComVariant vBytes;vBytes.vt = VT_ARRAY | VT_UI1;vBytes.parray = pArray;m_piResponse->Clear ();m_piResponse->put_ContentType (m_btrImgFormat);m_piResponse->BinaryWrite(vBytes);m_piResponse->End (); 七、现在组件的实现部分就大功告成了,我们写一段ASP来测试以下这个组件 <%@LANGUAGE="VBSCRIPT" CODEPAGE="936"%><html><body><%set Picture=Server.CreateObject("AspPic.AspPicCom") picture.Text ="你能看见我吗?我来自www.goodassister.com!"picture.FontName="黑体"picture.FontSize= 40picture.ImgFormat = "image/jpeg"picture.FontStyle= 1Picture.SetFontColor 255,3,242,4 ''代表Alpha ,Red,Green,BluePicture.SetBackColor 10,243,42,54 ''代表Alpha ,Red,Green,BluePicture.ShowPicset Picture=nothing%></body></html> |


 595
595

 被折叠的 条评论
为什么被折叠?
被折叠的 条评论
为什么被折叠?
 到【灌水乐园】发言


