


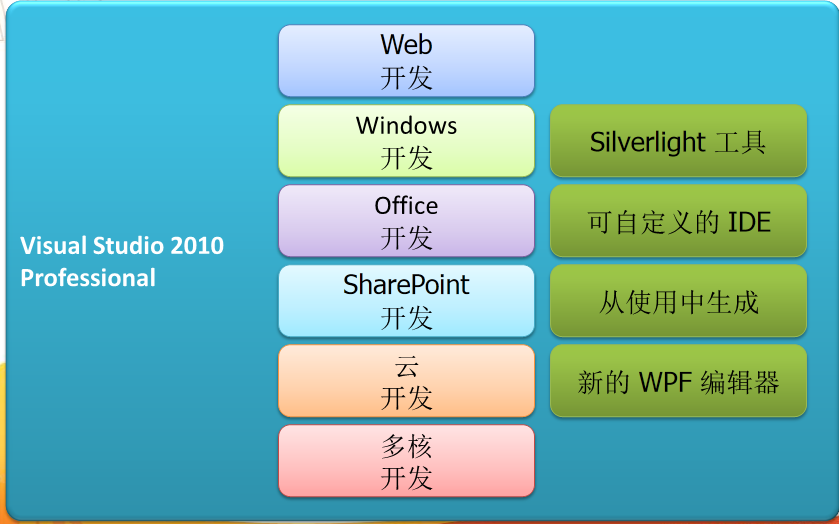
VS2010新特性:
Office Word 2010
Office Word 2010 增强了 Navigation Pane 特性,用户可在 Navigation Pane 中快速切换至任何一章节的开头(根据标题样式判断),同时也可在输入框中进行即时搜索,包含关键词的章节标题会高亮显示。例如
Office Word 2010 也增加了在线实时协作功能,用户可以从 Office Word Web App 中启动 Word 2010 进行在线文档的编辑,并可在左下角看到同时编辑的其他用户(包括其他联系方式、IM 等信息,需要 Office Communicator)。而当其他用户修改了某处后,Word 2010 会提醒当前用户进行同步。(注:此功能也存在于部分其他 Office 2010 程序中)
另外,用户可在 Office Word 2010, Office PowerPoint 2010 以及 Office OneNote 2010 等 Office 2010 程序中直接插入其他正在运行的软件的截图。
Office 2010,是微软推出新一代办公软件,开发代号为Office 14,实际是第12个发行版。该软件共有6个版本,分别是初级版、家庭及学生版、家庭及商业版、标准版、专业版和专业高级版,此外还推出Office 2010免费版本,其中仅包括Word和Excel应用。除了完整版以外,微软还将发布针对Office 2007的升级版Office 2010。Office 2010可支持32位和64位vista及Windows7,仅支持32位WindowsXP,不支持64位XP。

Office 2010所包括的全部应用有,Microsoft Access 2010,Microsoft Excel 2010;Microsoft InfoPath Designer 2010;Microsoft InfoPath Filler 2010;Microsoft OneNote 2010;Microsoft Outlook 2010;Microsoft PowerPoint 2010;Microsoft Publisher 2010;Microsoft SharePoint Workspace 2010;Microsoft Word 2010;Office Communicator 2010等。

新增功能
1、截屏工具
新组件:sharepoint 的加载状态Windows Vista就自带了一个简单的截屏工具,Office2010的Word、PowerPoint等组件里也增加了这个非常有用的功能,在插入标签里可以找到(Screenshot),支持多种截图模式,特别是会自动缓存当前打开窗口的截图,点击一下鼠标就能插入文档中。
2、背景移除工具(Background Removal)
可以在Word的图片工具下或者图片属性菜单里找到,在执行简单的抠图操作时就无需动用Photoshop了,还可以添加、去除水印。
3、保护模式(Protected Mode)
如果打开从网络上下载的文档,Word 2010会自动处于保护模式下,默认禁止编辑,想要修改就得点一下启用编辑(Enble Editing)。大概是出于版权保护的考虑吧。
4、新的SmartArt模板
SmarArt是Office 2007引入的一个很酷的功能,可以轻松制作出精美的业务流程图,而Office 2010在现有类别下增加了大量新模板,还新添了数个新的类别。
5、作者许可(Author Permissions)
在线协作是Office 2010的重点努力方向,也符合当今办公趋势。Office 2007里审阅标签下的保护文档现在变成了限制编辑(Restrict Editing),旁边还增加了阻止作者(Block Authors)。
6、Office按钮文档选项
Office 2007左上角的圆形按扭及其下的菜单让人印象深刻,到了Office 2010里功能更丰富了,特别是文档操作方面,比如在文档中插入元数据、快速访问权限、保存文档到SharePoint位置等等。
7、Office按钮打印选项
打印部分此前只有寥寥三个选项,现在几乎成了一个控制面板,基本可以完成所有打印操作。
8、Outlook 2010 Jumplist
Jumplist是Windows 7任务栏的新特性,Outlook 2010也得到了支持,可以迅速访问预约、联系人、任务、日历等功能。

1.全新的安全策略
Office2010的开发团队给出了一套新的安全战略,通过分析过去的漏洞来了解漏洞是如何被利用的,还要如何做才能防止今后出现类似的情况。Office2010基于五个基本准则建立了新的多层次的安全模型,这是任何一个开发者都应该记住的:
在执行之前验证所有用户输入
查找随机缺陷和不典型使用案例
不要相信第三方库
不要把安全措施推给用户
选择降一级的用户体验,而不是全盘否定
此外,Office2010中还包含一系列的安全性改进,如加强密码的复杂性、查看下载文件的保护模式、对Outlook中电子邮件线程更好的控制等。
2.Office2010中的编程代码有所改变
对开发者来讲,为了支持64位,VBA(应用程序的可视化基础)进行了升级,而Office2010对象模型也已经得到了更新。因此,当企业用户自Office2003升级至Office2010的时候,很有可能需要处理旧的、不兼容的程序代码。
在Office2010中,Outlook可能是受到影响最大的应用程序,对象模型的变化导致了MAPI接口界面以及导航窗口的调整。
如果企业用户不想要因为无效代码而导致业务中断的话,那么关键就是对代码兼容性进行计划和测试。
3.强调云共享功能,提升协同作业效率
新版Office2010的云共享功能包括跟企业SharePoint服务器的整合,让PowerPoint、Word、Excell等Office文件皆可通过SharePoint平台,同时间供多位员工编辑、浏览,提升文件协同作业效率。
微软还增强了Office与其他微软通信服务之间的联系。如果用户通过Office2010来使用OfficeCommunicationsServer2007R2和OfficeCommunicator2007R2,就可以看到同事的状态并通过电子邮件和即时通信与之举得联系。SharePoint与Office的联系更为紧密,并允许用户对Office文档进行协作。
4. 新增的Project 2010
Project2010中的复制粘贴功能也得到了完善,你可以复制粘贴完整格式的内容,任务增至11个,还支持自动换行。在Project2010中可以自动或手动制订任务,自动制订任务功能和之前版本相同,手动制动的任务自动被分配有图钉按钮,默认不会变动。
新增的TeamPlanner允许用户轻松地查看团队的工作随着时间的变动,快速找出问题,通过拖放等操作解决问题。
Project2010还新增了TimelineView,用户可以通过该功能总结你的项目然后和其它Office应用分享这一时间线,用户还可以直接将其复制粘贴到其它Office应用比如Outlook或是PowerPoint中。
5. 模块产品新增功能

Office Word 2010
Office Word 2010 增强了 Navigation Pane 特性,用户可在 Navigation Pane 中快速切换至任何一章节的开头(根据标题样式判断),同时也可在输入框中进行即时搜索,包含关键词的章节标题会高亮显示。例如
Office Word 2010 也增加了在线实时协作功能,用户可以从 Office Word Web App 中启动 Word 2010 进行在线文档的编辑,并可在左下角看到同时编辑的其他用户(包括其他联系方式、IM 等信息,需要 Office Communicator)。而当其他用户修改了某处后,Word 2010 会提醒当前用户进行同步。(注:此功能也存在于部分其他 Office 2010 程序中)
另外,用户可在 Office Word 2010, Office PowerPoint 2010 以及 Office OneNote 2010 等 Office 2010 程序中直接插入其他正在运行的软件的截图。
Office Excel 2010
Office Excel 2010 新增了 Sparklines 特性,可根据用户选择的数据直接在单元格内画出折线图、柱状图等,并配有 Sparklines 设计面板供自定义样式。
Office PowerPoint 2010
Office PowerPoint 2010 除了新增更多幻灯片切换特效、图片处理特效之外,还增加了更多视频功能,用户可直接在 PowerPoint 2010 中设定(调节)开始和终止时间剪辑视频,也可将视频嵌入之 PowerPoint 文件中。
PowerPoint 2010 左侧的幻灯片面板也新增了分区特性,用户可将幻灯片分区归类,也可对整个区内的所有幻灯片进行操作。见下图中的 Default Section 和 LiveSino Section。
PowerPoint 2010 也增加了类似格式刷的工具 – Animation Painter,可将动画效果应用至其他对象,用法同格式刷。另外就是上次我提到的 Broadcast Slide Show 在线幻灯片播放功能。
Office Web Applications 2010
Office Web Applications 2010 包含 Word Web App, Excel Web App, PowerPoint Web App 以及 OneNote Web App,支持简单的编辑及实时协作功能,支持 IE, Firefox, 和 Safari
Office Mobile 2010
Office Mobile 2010 包含新版 Word Mobile, Excel Mobile, PowerPoint Mobile, OneNote Mobile 以及支持对话模式的 Outlook Mobile
好了,现在我再简单的演示一下如何使用自动化输出Excel查询表的大概流程,仅作引导,别无它意。
1.启动VS2010

2.创建一个CLR项目如下,在窗体中插入若干相关空间和文本,插入背景,详情参看下图:
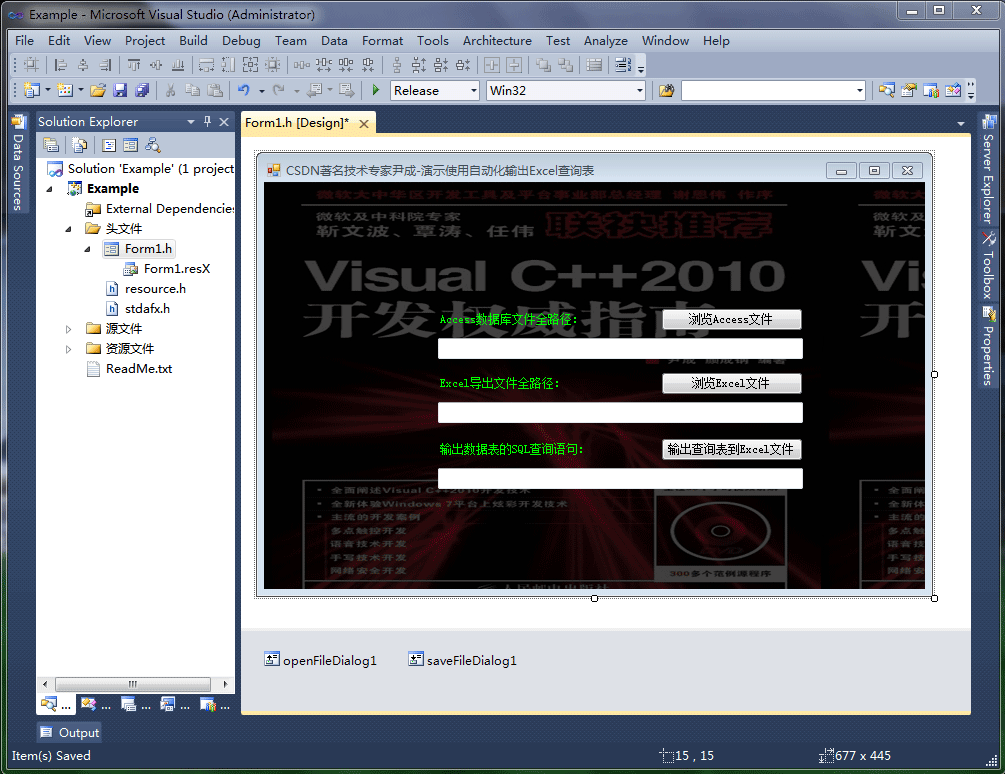
3.添加下列引用

4.在Form1.h中插入以下代码,详细见代码分析与注释
#pragma once namespace Yincheng { using namespace System; using namespace System::ComponentModel; using namespace System::Collections; using namespace System::Windows::Forms; using namespace System::Data; using namespace System::Drawing; /// <summary> /// Form1 摘要 /// /// 警告: 如果更改此类的名称,则需要更改 /// 与此类所依赖的所有 .resx 文件关联的托管资源编译器工具的 /// “资源文件名”属性。否则, /// 设计器将不能与此窗体的关联 /// 本地化资源正确交互。 /// </summary> public ref class Form1 : public System::Windows::Forms::Form { public: Form1(void) { InitializeComponent(); // //TODO: 在此处添加构造函数代码 // } protected: /// <summary> /// 清理所有正在使用的资源。 /// </summary> ~Form1() { if (components) { delete components; } } private: System::Windows::Forms::OpenFileDialog^ openFileDialog1; protected: private: System::Windows::Forms::SaveFileDialog^ saveFileDialog1; private: System::Windows::Forms::Label^ label1; private: System::Windows::Forms::Button^ button1; private: System::Windows::Forms::TextBox^ textBox1; private: System::Windows::Forms::TextBox^ textBox2; private: System::Windows::Forms::Button^ button2; private: System::Windows::Forms::Label^ label2; private: System::Windows::Forms::TextBox^ textBox3; private: System::Windows::Forms::Button^ button3; private: System::Windows::Forms::Label^ label3; private: /// <summary> /// 必需的设计器变量。 /// </summary> System::ComponentModel::Container ^components; #pragma region Windows Form Designer generated code /// <summary> /// 设计器支持所需的方法 - 不要 /// 使用代码编辑器修改此方法的内容。 /// </summary> void InitializeComponent(void) { System::ComponentModel::ComponentResourceManager^ resources = (gcnew System::ComponentModel::ComponentResourceManager(Form1::typeid)); this->openFileDialog1 = (gcnew System::Windows::Forms::OpenFileDialog()); this->saveFileDialog1 = (gcnew System::Windows::Forms::SaveFileDialog()); this->label1 = (gcnew System::Windows::Forms::Label()); this->button1 = (gcnew System::Windows::Forms::Button()); this->textBox1 = (gcnew System::Windows::Forms::TextBox()); this->textBox2 = (gcnew System::Windows::Forms::TextBox()); this->button2 = (gcnew System::Windows::Forms::Button()); this->label2 = (gcnew System::Windows::Forms::Label()); this->textBox3 = (gcnew System::Windows::Forms::TextBox()); this->button3 = (gcnew System::Windows::Forms::Button()); this->label3 = (gcnew System::Windows::Forms::Label()); this->SuspendLayout(); // // openFileDialog1 // this->openFileDialog1->FileName = L"openFileDialog1"; // // label1 // this->label1->AutoSize = true; this->label1->BackColor = System::Drawing::Color::Transparent; this->label1->ForeColor = System::Drawing::Color::Lime; this->label1->Location = System::Drawing::Point(174, 131); this->label1->Name = L"label1"; this->label1->Size = System::Drawing::Size(149, 12); this->label1->TabIndex = 0; this->label1->Text = L"Access数据库文件全路径:"; // // button1 // this->button1->Location = System::Drawing::Point(397, 126); this->button1->Name = L"button1"; this->button1->Size = System::Drawing::Size(142, 23); this->button1->TabIndex = 1; this->button1->Text = L"浏览Access文件"; this->button1->UseVisualStyleBackColor = true; this->button1->Click += gcnew System::EventHandler(this, &Form1::button1_Click); // // textBox1 // this->textBox1->Location = System::Drawing::Point(174, 156); this->textBox1->Name = L"textBox1"; this->textBox1->Size = System::Drawing::Size(365, 21); this->textBox1->TabIndex = 2; // // textBox2 // this->textBox2->Location = System::Drawing::Point(174, 220); this->textBox2->Name = L"textBox2"; this->textBox2->Size = System::Drawing::Size(365, 21); this->textBox2->TabIndex = 5; // // button2 // this->button2->Location = System::Drawing::Point(397, 190); this->button2->Name = L"button2"; this->button2->Size = System::Drawing::Size(142, 23); this->button2->TabIndex = 4; this->button2->Text = L"浏览Excel文件"; this->button2->UseVisualStyleBackColor = true; this->button2->Click += gcnew System::EventHandler(this, &Form1::button2_Click); // // label2 // this->label2->AutoSize = true; this->label2->BackColor = System::Drawing::Color::Transparent; this->label2->ForeColor = System::Drawing::Color::Lime; this->label2->Location = System::Drawing::Point(174, 195); this->label2->Name = L"label2"; this->label2->Size = System::Drawing::Size(131, 12); this->label2->TabIndex = 3; this->label2->Text = L"Excel导出文件全路径:"; // // textBox3 // this->textBox3->Location = System::Drawing::Point(174, 286); this->textBox3->Name = L"textBox3"; this->textBox3->Size = System::Drawing::Size(365, 21); this->textBox3->TabIndex = 8; // // button3 // this->button3->Location = System::Drawing::Point(397, 256); this->button3->Name = L"button3"; this->button3->Size = System::Drawing::Size(142, 23); this->button3->TabIndex = 7; this->button3->Text = L"输出查询表到Excel文件"; this->button3->UseVisualStyleBackColor = true; this->button3->Click += gcnew System::EventHandler(this, &Form1::button3_Click); // // label3 // this->label3->AutoSize = true; this->label3->BackColor = System::Drawing::Color::Transparent; this->label3->ForeColor = System::Drawing::Color::Lime; this->label3->Location = System::Drawing::Point(174, 261); this->label3->Name = L"label3"; this->label3->Size = System::Drawing::Size(155, 12); this->label3->TabIndex = 6; this->label3->Text = L"输出数据表的SQL查询语句:"; // // Form1 // this->AutoScaleDimensions = System::Drawing::SizeF(6, 12); this->AutoScaleMode = System::Windows::Forms::AutoScaleMode::Font; this->BackColor = System::Drawing::SystemColors::ActiveCaptionText; this->BackgroundImage = (cli::safe_cast<System::Drawing::Image^ >(resources->GetObject(L"$this.BackgroundImage"))); this->ClientSize = System::Drawing::Size(661, 407); this->Controls->Add(this->textBox3); this->Controls->Add(this->button3); this->Controls->Add(this->label3); this->Controls->Add(this->textBox2); this->Controls->Add(this->button2); this->Controls->Add(this->label2); this->Controls->Add(this->textBox1); this->Controls->Add(this->button1); this->Controls->Add(this->label1); this->Name = L"Form1"; this->StartPosition = System::Windows::Forms::FormStartPosition::CenterScreen; this->Text = L"CSDN著名技术专家尹成-演示使用自动化输出Excel查询表"; this->ResumeLayout(false); this->PerformLayout(); } #pragma endregion //浏览Access文件 private: System::Void button1_Click(System::Object^ sender, System::EventArgs^ e) { this->openFileDialog1->Filter="所有Access类型文件(*.mdb)|*.mdb"; if(this->openFileDialog1->ShowDialog()==System::Windows::Forms::DialogResult::OK) { this->textBox1->Text=this->openFileDialog1->FileName; } } //浏览Excel文件 private: System::Void button2_Click(System::Object^ sender, System::EventArgs^ e) { this->saveFileDialog1->Filter="所有Excel类型文件(*.xls)|*.xls"; if(this->saveFileDialog1->ShowDialog()==System::Windows::Forms::DialogResult::OK) { this->textBox2->Text=this->saveFileDialog1->FileName; } } //输出查询表到Excel文件 private: System::Void button3_Click(System::Object^ sender, System::EventArgs^ e) { String^ MyExcelFile = this->textBox2->Text; String^ MyAccessFile = this->textBox1->Text; String^ MySQL = this->textBox3->Text; Excel::ApplicationClass^ MyExcel; Excel::Workbooks^ MyBooks; Excel::_Workbook^ MyBook; Excel::_Worksheet^ MySheet; Excel::Range^ MyRange; Excel::QueryTables^ MyQueryTables; Excel::_QueryTable^ MyQueryTable; if (!System::IO::File::Exists(MyAccessFile)) { MessageBox::Show(MyAccessFile + "文件不存在!", "信息提示", MessageBoxButtons::OK, MessageBoxIcon::Information); return; } try { //创建一个新的工作簿 MyExcel=gcnew Excel::ApplicationClass(); MyBooks=MyExcel->Workbooks; MyBook=MyBooks->Add(System::Reflection::Missing::Value); //在A1单元格中创建一个QueryTable MySheet=(Excel::Worksheet^)MyBook->Worksheets[1]; MyRange=MySheet->Range["A1",System::Reflection::Missing::Value]; MyQueryTables=MySheet->QueryTables; MyQueryTable=(Excel::_QueryTable^)MyQueryTables->Add("OLEDB;Provider= Microsoft.Jet.OLEDB.4.0;Data Source="+MyAccessFile+";",MyRange, MySQL); MyQueryTable->RefreshStyle=Excel::XlCellInsertionMode::xlInsertEntireRows; MyQueryTable->Refresh(false); //保存结果 MyBook->SaveAs(MyExcelFile, System::Reflection::Missing::Value, System::Reflection::Missing::Value,System::Reflection::Missing::Value, System::Reflection::Missing::Value, System::Reflection::Missing::Value, Excel::XlSaveAsAccessMode::xlNoChange, System::Reflection::Missing::Value, System::Reflection::Missing::Value,System::Reflection::Missing::Value, System::Reflection::Missing::Value, System::Reflection::Missing::Value); MyBook->Close(false, System::Reflection::Missing::Value, System::Reflection::Missing::Value); MyExcel->Quit(); MessageBox::Show("成功输出Excel查询表:"+this->textBox2->Text, "信息提示", MessageBoxButtons::OK, MessageBoxIcon::Information); } catch (Exception^ MyEx) { MessageBox::Show(MyEx->Message, "信息提示", MessageBoxButtons::OK, MessageBoxIcon::Information); } } }; }
5.启动调试运行如下,在相关设置中选择文件路径和查询数据表的语句:
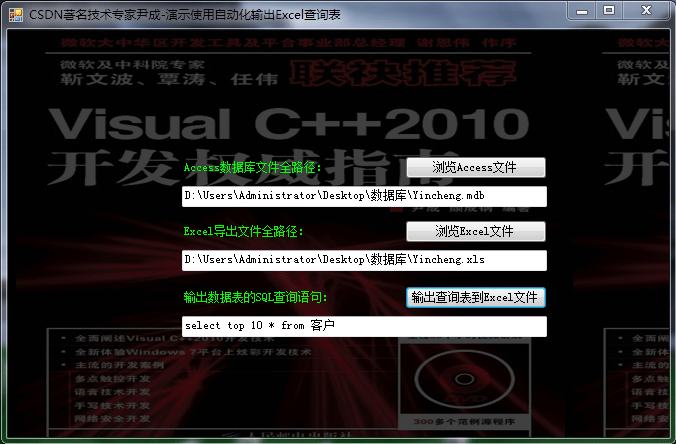
点击”输出查询表到Excel文件“随后手动启动上述Excel你会发现其中完好的现实查询表中的数据,显示如下:
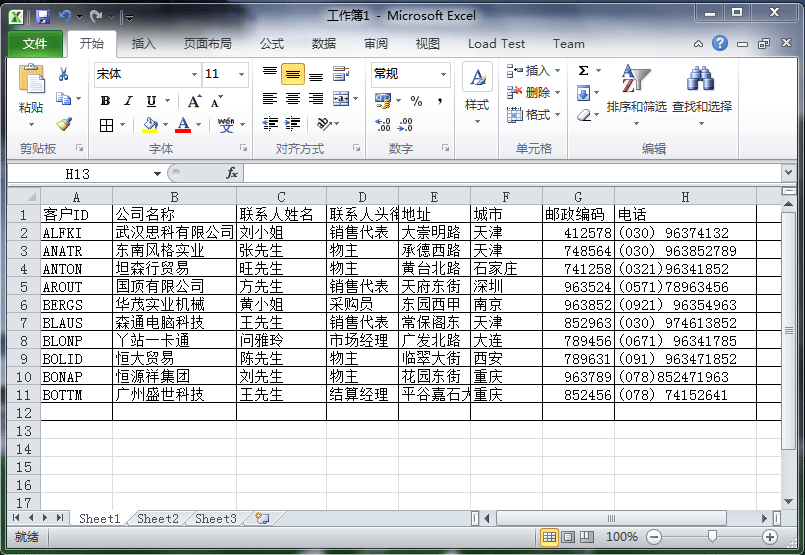
成功的演示了如何输出查询表到Excel文件的方法,希望读者加以巩固举一反三,实际应用还需读者自行研究揣摩,以实现更为复杂高效的功能。


 7568
7568


 被折叠的 条评论
为什么被折叠?
被折叠的 条评论
为什么被折叠?
 到【灌水乐园】发言


