《C++ GUI Qt4编程》第一章、Qt入门


1.1 Hello Qt

创建hello目录,新建源文件hello.cpp:

#include <QApplication> #include <QLabel> int main(int argc, char *argv[]) { QApplication app(argc, argv); QLabel *label = new QLabel("Hello Qt!"); label->show(); return app.exec(); }
进入hello目录,qmake -project生成一个与平台无关的项目文件hello.pro。

TEMPLATE = app
SOURCES = hello.cpp

然后输入命令qmake hello.pro从项目文件生成一个与平台相关的makefile文件。

键入make命令就可以构建该程序了。


1.2 建立连接

#include <QApplication> #include <QPushButton> int main(int argc, char *argv[]) { QApplication app(argc, argv); QPushButton *button = new QPushButton("Quit"); QObject::connect(button, SIGNAL(clicked()), &app, SLOT(quit())); button->show(); return app.exec(); }

将按钮的clicked()信号和QApplication对象的quit()槽连接。


1.3 窗口部件的布局

#include <QApplication> #include <QHBoxLayout> #include <QSlider> #include <QSpinBox> int main(int argc, char *argv[]) { QApplication app(argc, argv); QWidget *window = new QWidget; window->setWindowTitle("Enter Your Age"); QSpinBox *spinBox = new QSpinBox; QSlider *slider = new QSlider(Qt::Horizontal); spinBox->setRange(0, 130); slider->setRange(0, 130); QObject::connect(spinBox, SIGNAL(valueChanged(int)), slider, SLOT(setValue(int))); QObject::connect(slider, SIGNAL(valueChanged(int)), spinBox, SLOT(setValue(int))); spinBox->setValue(35); QHBoxLayout *layout = new QHBoxLayout; layout->addWidget(spinBox); layout->addWidget(slider); window->setLayout(layout); window->show(); return app.exec(); }
关于这段代码需要注意两点:

1.布局管理器会自动将该窗口设置为spin和slider的父对象。
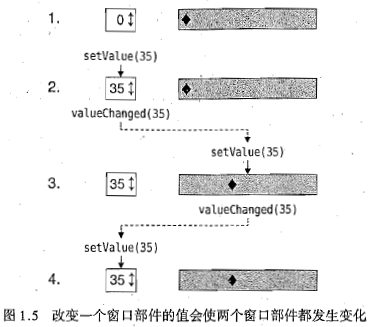
2.当滑动滑块时,QSlider的setValue槽会发射valueChanged信号,这样就触发了spin的
setValue槽。最终回到QSlider的setValue时就不会再发射任何信号了,因为滑块的值
已经是35了。具体过程如下图:


一般步骤总结:

1.声明所需的窗口部件。
2.设置它们所应具备的属性。
3.把它们添加到布局中,布局自动设置它们的位置和大小。
4.利用信号和槽机理,连接各个窗口部件,管理用户的交互行为。


  • 0
    点赞
  • 0
    收藏
    觉得还不错? 一键收藏
  • 0
    评论
书有每章书签。 -------- C++ GUI Programming with Qt 4 (second edition) by Jasmin Blanchette and Mark Summerfield. ISBN 0-13-235416-0 The root of the examples directory contains examples.pro. If you execute qmake examples.pro make (nmake if you use Visual C++), the examples for all chapters with complete cross-platform examples will be built. Note that chapters 11, 17, and 18 use code snippets rather than complete examples, so are not included here. The appendixC directory contains Qt Jambi examples. 1. Getting Started chap01/age chap01/hello chap01/quit 2. Creating Dialogs chap02/find chap02/gotocell1 chap02/gotocell2 chap02/gotocell3 chap02/sort 3. Creating Main Windows chap03/spreadsheet 4. Implementing Application Functionality chap04/spreadsheet 5. Creating Custom Widgets chap05/hexspinbox chap05/iconeditor chap05/iconeditorplugin chap05/plotter 6. Layout Management chap06/findfile1 chap06/findfile2 chap06/findfile3 chap06/mailclient chap06/mdieditor chap06/preferences chap06/splitter 7. Event Processing chap07/ticker 8. 2D Graphics chap08/cityscape chap08/diagram chap08/oventimer 9. Drag and Drop chap09/projectchooser 10. Item View Classes chap10/booleanparser chap10/cities chap10/colornames chap10/coordinatesetter chap10/currencies chap10/directoryviewer chap10/flowchartsymbolpicker chap10/settingsviewer chap10/teamleaders chap10/trackeditor 12. Input/Output chap12/imageconverter chap12/imagespace chap12/tidy 13. Databases chap13/scooters chap13/staffmanager 14. Multithreading chap14/imagepro chap14/semaphores chap14/threads chap14/waitconditions 15. Networking chap15/ftpget chap15
评论
添加红包

请填写红包祝福语或标题

红包个数最小为10个

红包金额最低5元

当前余额3.43前往充值 >
需支付:10.00
成就一亿技术人!
领取后你会自动成为博主和红包主的粉丝 规则
hope_wisdom
发出的红包
实付
使用余额支付
点击重新获取
扫码支付
钱包余额 0

抵扣说明:

1.余额是钱包充值的虚拟货币,按照1:1的比例进行支付金额的抵扣。
2.余额无法直接购买下载,可以购买VIP、付费专栏及课程。

余额充值