


1.创建普通的java项目。
因为Hibernate是一个轻量级的框架,不像servlet,还必须需要tomcat的支持,Hibernate只要jdk支持即可。
2.引入jar包。
可以在项目中直接引入jar包,在:项目--->属性--->然后如下图: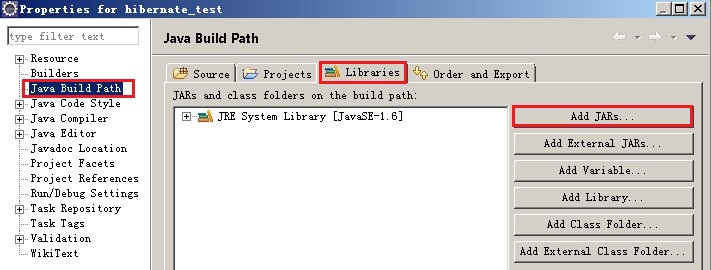
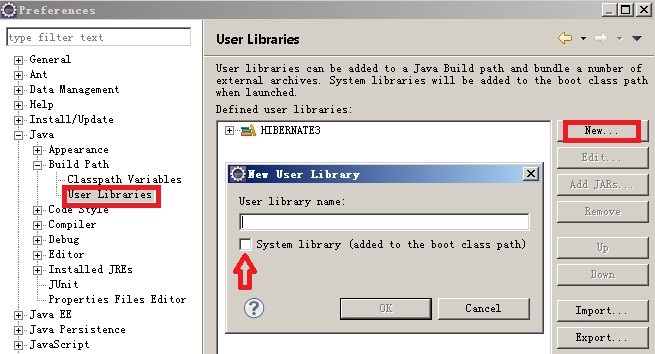
另一种办法就是引入库,相当于一个文件夹,把所有的jar包放到自己新建的文件夹中。在:窗体-->选项-->然后如下图:
3.提供Hibernate的配置文件。hibernate.cfg.xml文件。完成相应的配置。
<hibernate-configuration>

<session-factory>

<property name="hibernate.connection.driver_class">com.mysql.jdbc.Driver</property>

<property name="hibernate.connection.url">jdbc:mysql://localhost:3306/hibernate_first</property>

<property name="hibernate.connection.username">root</property>

<property name="hibernate.connection.password">bjpowernode</property>

<property name="hibernate.dialect">org.hibernate.dialect.MySQLDialect</property>

</session-factory>

</hibernate-configuration>
在这里连接mysql数据库,解释一下上面的标签。按照顺序来依次解释:第一个是连接mySql的驱动;第二个是连接的url;url后面的hibernate_first是数据库名字;第三个是和第四个分别是用户名和密码。第五个是方言。因为 hibernate对数据库封装,对不同的数据库翻译成不同的形式,比如drp中的分页,若是使用oracle数据库,则翻译成sql语句三层嵌套。若是使用mySql数据库,则翻译成limit语句。
4.建立实体User类:
package com.bjpowernode.hibernate;

import java.util.Date;

public class User {

	private String id;

	private String name;

	private String password;

	private Date createTime;

	private Date expireTime;

	public String getId() {
		return id;
	}

	public void setId(String id) {
		this.id = id;
	}

	public String getName() {
		return name;
	}

	public void setName(String name) {
		this.name = name;
	}

	public String getPassword() {
		return password;
	}

	public void setPassword(String password) {
		this.password = password;
	}

	public Date getCreateTime() {
		return createTime;
	}

	public void setCreateTime(Date createTime) {
		this.createTime = createTime;
	}

	public Date getExpireTime() {
		return expireTime;
	}

	public void setExpireTime(Date expireTime) {
		this.expireTime = expireTime;
	}
}
5.建立User.hbm.xml,此文件用来完成对象与数据库表的字段的映射。也就是实体类的那些字段需要映射到数据库表中呢。
<?xml version="1.0"?>
<!DOCTYPE hibernate-mapping PUBLIC
	"-//Hibernate/Hibernate Mapping DTD 3.0//EN"
	"http://hibernate.sourceforge.net/hibernate-mapping-3.0.dtd">
<hibernate-mapping>
	<class name="com.bjpowernode.hibernate.User">
		<id name="id">
			<generator class="uuid"/>
		</id>
		<property name="name"/>
		<property name="password"/>
		<property name="createTime"/>
		<property name="expireTime"/>
	</class>
</hibernate-mapping>
6.我们也映射完毕了,但是hibernate怎么知道我们映射完了呢,以及如何映射的呢?这就需要我们把我们自己的映射文件告诉hibernate,即:在hibernate.cfg.xml配置我们的映射文件。
<mapping resource="com/bjpowernode/hibernate/User.hbm.xml"/>7.生成数据库表。大家也看到了我们上述还没有新建数据表呢,在第三步我们只是新建了数据库而已。按照我们普通的做法,我们应该新建数据表啊,否则实体存放何处啊。这个别急,数据库表这个肯定是需要有的,这个毋庸置疑,但是这个可不像我们原来需要自己亲自动手建立哦,现在hibernate需要帮我们实现哦,如何实现嗯,hibernate会根据配置文件hibernate.cfg.xml和我们的映射文件User.hbm.xml会自动给我们生成相应的表,并且这个表的名字也给我们取好:默认是User。那如何生成表呢?
	//默认读取hibernate.cfg.xml文件
		Configuration cfg = new Configuration().configure();

		SchemaExport export = new SchemaExport(cfg);
		export.create(true, true);
8.那我们就开始进行操作啦,我们添加一个用户对象,看看hibernate是如何添加的呢?跟我们以前的做法有什么不同呢?
public class Client {

	public static void main(String[] args) {

		//读取hibernate.cfg.xml文件
		Configuration cfg = new Configuration().configure();

		//建立SessionFactory
		SessionFactory factory = cfg.buildSessionFactory();

		//取得session
		Session session = null;
		try {
			session = factory.openSession();
			//开启事务
			session.beginTransaction();
			User user = new User();
			user.setName("张三");
			user.setPassword("123");
			user.setCreateTime(new Date());
			user.setExpireTime(new Date());

			//保存User对象
			session.save(user);

			//提交事务
			session.getTransaction().commit();
		}catch(Exception e) {
			e.printStackTrace();
			//回滚事务
			session.getTransaction().rollback();
		}finally {
			if (session != null) {
				if (session.isOpen()) {
					//关闭session
					session.close();
				}
			}
		}
	}
}
第八步,我们可以看到,没有我们熟悉的insert into表的sql语句了,那怎么添加进去的呢,到底添加了没?让我真实滴告诉你,确实添加进去了,不信的,可以自己尝试哦,这也是hibernate的优点,对jdbc封装的彻底,减少了我们对数据的操作时间哈。
这篇博客就是真切滴介绍了hibernate的基本用法,其中好多优点等待我们自己去发现哦,比如hibernate中的缓存机制,映射方案哦。


 204
204

 被折叠的 条评论
为什么被折叠?
被折叠的 条评论
为什么被折叠?
 到【灌水乐园】发言


