


在之前的文章中给大家介绍了Spring Boot的基本运行原理,收到了很多读者朋友们关于目前比较流行的微服务框架Spring Cloud的问题反馈。因此,在这篇文章中小码哥打算和大家一起通过梳理下Spring Cloud的运行原理来相对全面的了解下Spring Cloud。
随着微服务架构在越来越多的公司得到实践和应用,基于Spring Cloud的这一套微服务生态框架体系,也在这个过程中得到大量的实践和运用。虽然目前Service Mesh的概念也越来越得到关注,但是目前微服务开源框架中运用的比较广泛的还是基于Spring Cloud的一套体系。作者之前所在的某共享单车公司也是基于这一套体系,实现了公司整体系统架构微服务化的过程。
从技术本身来来说,Spring Cloud并不是一个具体技术的名称,也并不是一个完全重新定义的技术体系,而是基于Spring Boot这一高度自动化的应用开发框架,将各类业界比较知名的、得到过实践反馈的开源服务治理相关的技术框架进行优化整合的这么一个框架。所以Spring Cloud本身并没有太多的技术创新,而更多的是一种开发方式的优化与组合。
另外,Spring Cloud也不是一两个技术的代名词,而是一组框架的统称。通过Spring Cloud基于Spring Boot的starter定制,实现开箱即用的目标,从而极大的简化了以往利用各类相对碎片的服务治理框架所带来的繁琐。在Spring Cloud中你能通过一个很简单的注解配置,就快速实现服务的注册与发现,通过简单的声明式注解,就能够实现服务的调用、负载均衡、限流、熔断等机制,而这一切对应用开发者而言也都是透明的。
然而,也正是因为如此,所以在使用Spring Cloud进行微服务开发的过程中,我们也很容易忽视一些注解背后的底层技术实现,从而无法窥得其中的技术真谛及全貌。这一点在面试中也尤为不利,因为如果你说使用了这个技术栈,那么面试官必然会问到你底层技术的实现情况,况且真正要使用好一门技术,对其有一个相对整体到细致的掌握,也是运用好一门技术很重要的要求。
在上面的内容中我们说到Spring Cloud是一组框架的组合,那么组成这一组合的核心技术框架到底有那些呢?首先我们需要明确Spring Cloud微服务框架开发体系是基于Spring Boot应用开发模式的,也就是说如果想让Spring Boot应用顺利的实现微服务的功能,那么必然首先需要通过定制一套基于Spring Boot 的Starter以便快速进行框架依赖的集成与配置。所以,我们在基于Spring Cloud进行微服务开发时,在项目中就会通过引入“spring-cloud-starter-parent”父依赖来实现其他框架及组件的快速引入。
<parent>    <groupId>org.springframework.cloud</groupId>    <artifactId>spring-cloud-starter-parent</artifactId>    <version>Edgware.SR5</version>    <relativePath /></parent>
    <groupId>org.springframework.cloud</groupId>
    <artifactId>spring-cloud-starter-parent</artifactId>
    <version>Edgware.SR5</version>
    <relativePath />
</parent>
下面我们来看一下这个包的依赖引用关系:
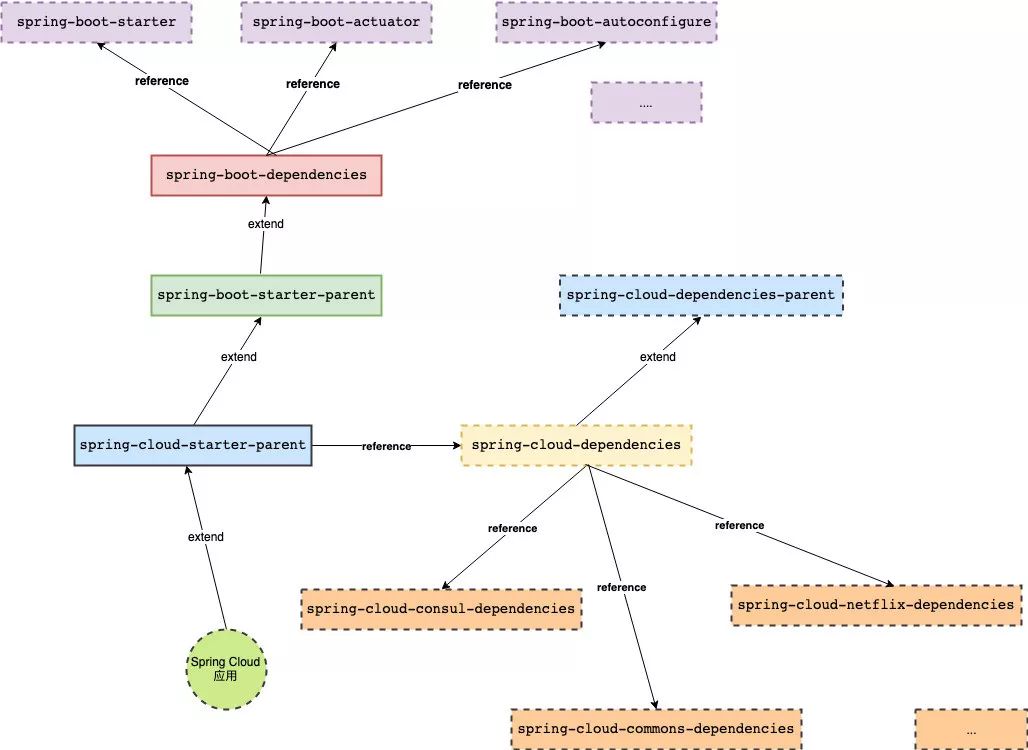
通过上述依赖引用关系的梳理,不难发现,虽然我们只是很简单的继承了"spring cloud parent"这样一个父依赖pom,但实际上却是引入了整个Spring Boot的框架体系以及Spring Cloud框架体系的整个依赖。因此,我们就可以很方便地在基于Spring Cloud的微服务开发过程中,使用到Spring Boot以及Spring Cloud提供的各类组件框架的功能了。
那么Spring Cloud到底集成了那些核心框架来实现微服务体系的整体功能呢?以下我们抽取了Spring Cloud中整合的一些核心组件,如下图所示:
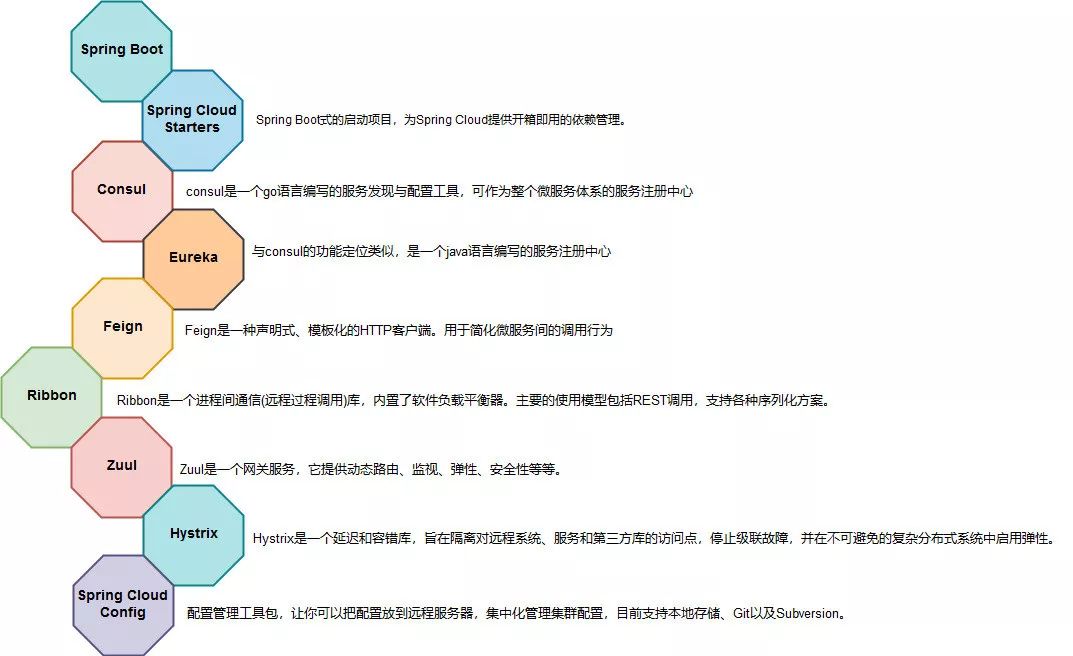
在整个体系中最核心的组件莫过于服务注册中心了,因为所有的微服务需要通过它实现服务的注册与发现功能。而对于注册中心的选择,在Spring Cloud中使用得比较普遍的有基于java语言编写的Eureka,以及基于go语言编写的Consul。考虑到语言的异构问题,如go语言编写的服务也能方便与java编写的服务进行通信,之前作者所在的公司是使用了Consul作为服务注册中心。
而当服务通过注册中心完成服务的注册后,服务间还需要一种便捷的方式进行通讯调用,在Spring Cloud中比较通用的方式是通过Feign进行服务调用。而调用时由于所有的微服务都支持通过consul或eureka进行多节点集群部署,所以在客户端调用时,还需要实现负载均衡等功能,而这种客户端调用时负载均衡功能的实现,在Spring Cloud中是通过Feign框架组合Ribbon框架来实现的。
在微服务体系中,另外一个比较核心的问题是需要实现服务的限流和熔断。作为面向外部的服务,如果服务间的调用出现阻塞,那么就需要进行及时的限流,并通过熔断来保证服务的基本可用性,此时Zuul及Hystrix就会通过注解的方式来提供这样的功能机制。
最后一个必要且核心的问题,是服务配置的管理。是通过Spring Cloud Config这样独立配置管理服务来实现的,通过该组件我们可以实现在Spring Cloud体系中所有微服务应用配置的集中化管理。
以上就是Spring Cloud中必须的核心组件介绍,Spring Cloud正是因为整合来这些核心组件,就总体上实现了微服务架构体系的基本功能。而这些功能要通过友好地方式提供给开发者,那么还需要进行注解的定义与封装,这样开发者就只需要在代码中简单的引入一个注解,就可以实现这些功能了,那么接下来要的内容,就和大家一起看看Spring Cloud提供的核心注解,以及这些注解是怎么来实现微服务的相关功能的呢?
@EnableDiscoveryClient
服务的注册与发现有多种实现方式如eureka、consul而@EnableDiscoveryClient注解则是定义在spring-cloud-commons包中,便于开发者快速实现服务注册与发现的一个功能注解定义。在项目开发中,我们往往简单的通过引入注解,就能够实现微服务与服务注册中心的相连,如:
@EnableFeignClients@EnableDiscoveryClient@EnableCircuitBreaker@SpringBootApplicationpublic class Wallet {    public static void main(String[] args) {        SpringApplication.run(Wallet.class, args);    }}
@EnableDiscoveryClient
@EnableCircuitBreaker
@SpringBootApplication
public class Wallet {

    public static void main(String[] args) {
        SpringApplication.run(Wallet.class, args);
    }
}
那么这个注解怎么这么神奇呢?下面我们就通过源码分析的方式来看看@EnableDiscoveryClient是如何将服务注册到consul中的?
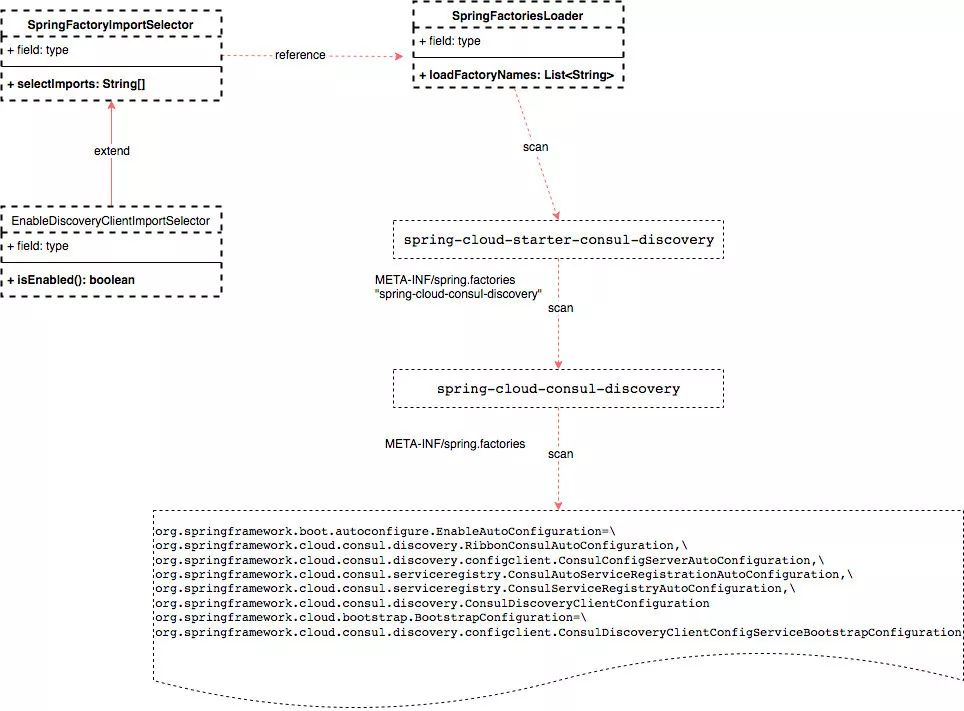
如上图所示,@EnableDiscoveryClient注解的定义中通过“@Import({EnableDiscoveryClientImportSelector.class})"类,此类通过定义“isEnabled()”表示开始服务注册与发现的功能,然后其父类型“SpringFactoryImportSelector”通过“selectImports()"方法开始扫描eureka或者consul的集成starter依赖包。
以我们使用Consul作为注册中心为例,我们需要在项目中引入“spring-cloud-starter-consul-discovery”这个依赖,而这个依赖的“META-INF/spring.factories”文件指向具体依赖“spring-cloud-consul-discovery”,而该依赖中的“META-INF/spring.factories”文件则包含了一系列自动配置类,如下:
org.springframework.boot.autoconfigure.EnableAutoConfiguration=\org.springframework.cloud.consul.discovery.RibbonConsulAutoConfiguration,\org.springframework.cloud.consul.discovery.configclient.ConsulConfigServerAutoConfiguration,\org.springframework.cloud.consul.serviceregistry.ConsulAutoServiceRegistrationAutoConfiguration,\org.springframework.cloud.consul.serviceregistry.ConsulServiceRegistryAutoConfiguration,\org.springframework.cloud.consul.discovery.ConsulDiscoveryClientConfigurationorg.springframework.cloud.bootstrap.BootstrapConfiguration=\org.springframework.cloud.consul.discovery.configclient.ConsulDiscoveryClientConfigServiceBootstrapConfiguration
org.springframework.cloud.consul.discovery.configclient.ConsulConfigServerAutoConfiguration,\
org.springframework.cloud.consul.serviceregistry.ConsulAutoServiceRegistrationAutoConfiguration,\
org.springframework.cloud.consul.serviceregistry.ConsulServiceRegistryAutoConfiguration,\
org.springframework.cloud.consul.discovery.ConsulDiscoveryClientConfiguration
org.springframework.cloud.bootstrap.BootstrapConfiguration=\
org.springframework.cloud.consul.discovery.configclient.ConsulDiscoveryClientConfigServiceBootstrapConfiguration
然后这些自动配置类就会在应用启动的时候进行初始化和加载,完成微服务与Consul的连接。
@ConditionalOnClass(ConfigServicePropertySourceLocator.class)@ConditionalOnProperty(value = "spring.cloud.config.discovery.enabled", matchIfMissing = false)@Configuration@ImportAutoConfiguration({ ConsulAutoConfiguration.class,        ConsulDiscoveryClientConfiguration.class })public class ConsulDiscoveryClientConfigServiceBootstrapConfiguration {}
@ConditionalOnProperty(value = "spring.cloud.config.discovery.enabled", matchIfMissing = false)
@Configuration
@ImportAutoConfiguration({ ConsulAutoConfiguration.class,
        ConsulDiscoveryClientConfiguration.class })
public class ConsulDiscoveryClientConfigServiceBootstrapConfiguration {

}
如上述这个自动配置类,就会在存在配置属性“spring.cloud.config.discovery.enabled=ture"的时候进行初始化。而这些初始化会与项目中关于Consul的配置进行匹配,如:
spring:  cloud:    consul:      host: consul.${ci.environment.slug}.mobike.io      config:        format: FILES        watch:          delay: 30000      discovery:        tags: api        instance-id: ${ci.environment.slug}-${spring.application.name}-${spring.application.instance}
    consul:
      host: consul.${ci.environment.slug}.mobike.io
      config:
        format: FILES
        watch:
          delay: 30000
      discovery:
        tags: api
        instance-id: ${ci.environment.slug}-${spring.application.name}-${spring.application.instance}
以上就基本上说清楚Spring Cloud进行服务自动发现注册配置的基本原理了,实际上还是基于Spring Boot的机制来实现的。关于具体如何是怎么进行交互连接的,大家可以看看“spring-cloud-consul-discovery”的源码。地址如下:
https://github.com/spring-cloud/spring-cloud-consul/tree/master/spring-cloud-consul-discovery
@EnableFeignClients
注解@EnableFeignClients用于告诉框架扫描所有通过注解@FeignClient定义的feign客户端。我们在服务消费方通过@EnableFeignClients注解开启配置后,可以通过@FeignClient("user")注解后就可以进行服务调用了,而且实现了客户端负载均衡。这是为什么呢?
 public void registerBeanDefinitions(AnnotationMetadata metadata, BeanDefinitionRegistry registry) {        this.registerDefaultConfiguration(metadata, registry);        this.registerFeignClients(metadata, registry);//扫描FeignClient配置 }
        this.registerDefaultConfiguration(metadata, registry);
        this.registerFeignClients(metadata, registry);//扫描FeignClient配置
 }
因为,这个注解默认是会默认开启Robbin代理的,而Robbin是实现客户端负载均衡的一个组件,通过从Consul拉取服务节点信息,从而以轮询的方式转发客户端调用请求至不同的服务端节点来实现负载均衡。
@EnableCircuitBreaker
要在SpringCloud中使用断路器,需要加上@EnableCircuitBreaker注解。而该注解会引入Hystrix的配置,其过程与前面我们讲解@EnableDiscoveryClient注解的过程一致。
@Target({ElementType.TYPE})@Retention(RetentionPolicy.RUNTIME)@Documented@Inherited@Import({EnableCircuitBreakerImportSelector.class})public @interface EnableCircuitBreaker {}
@Retention(RetentionPolicy.RUNTIME)
@Documented
@Inherited
@Import({EnableCircuitBreakerImportSelector.class})
public @interface EnableCircuitBreaker {
}
通过导入
EnableCircuitBreakerImportSelector类,开启断路器设置:
protected boolean isEnabled() {    return ((Boolean)(new RelaxedPropertyResolver(this.getEnvironment())).getProperty("spring.cloud.circuit.breaker.enabled", Boolean.class, Boolean.TRUE)).booleanValue();}
    return ((Boolean)(new RelaxedPropertyResolver(this.getEnvironment())).getProperty("spring.cloud.circuit.breaker.enabled", Boolean.class, Boolean.TRUE)).booleanValue();
}
如果项目中引入了“spring-cloud-starter-hystrix”依赖包,那么在应用加载时就会初始化Hystrix相关的自动配置类。
org.springframework.boot.autoconfigure.EnableAutoConfiguration=\org.springframework.cloud.netflix.hystrix.HystrixAutoConfiguration,\org.springframework.cloud.netflix.hystrix.security.HystrixSecurityAutoConfigurationorg.springframework.cloud.client.circuitbreaker.EnableCircuitBreaker=\org.springframework.cloud.netflix.hystrix.HystrixCircuitBreakerConfiguration
org.springframework.cloud.netflix.hystrix.security.HystrixSecurityAutoConfiguration

org.springframework.cloud.client.circuitbreaker.EnableCircuitBreaker=\
org.springframework.cloud.netflix.hystrix.HystrixCircuitBreakerConfiguration
源码地址如下:
https://github.com/spring-cloud/spring-cloud-netflix/tree/master/spring-cloud-netflix-hystrix
Spring Cloud解决方案生态圈
事实上,采用微服务架构实现的分布式系统会面临不少复杂性,以上核心组件只是实现了如服务发现&注册、限流、熔断等核心功能。还有很多的辅助场景,如分布式链路追踪、安全等功能,这些辅助功能是为了确保在微服务架构下,各类服务的管理、监控、维护等需求能够在一个完整的生态体系下实施。
因此,Spring Cloud除了一些核心的项目外,还有很多实现特定功能的组件框架,如Sleuth、Turbine等,下图抽取了Spring Cloud生态中关注度比较高的一些框架,如下:
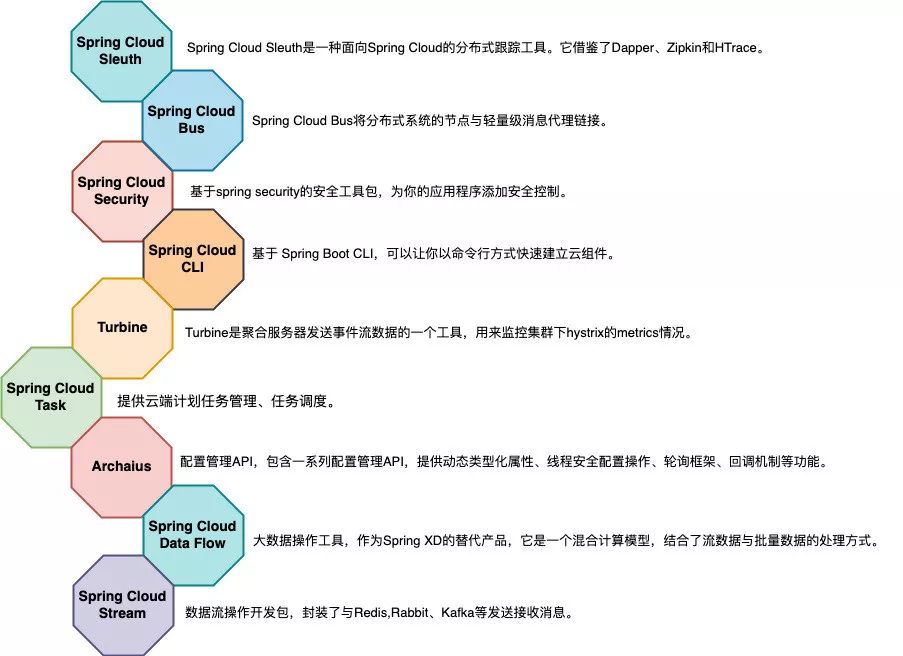
由于篇幅有限加上这些框架本身的实现也都是比较复杂,因此就不在这篇文章中一一展开了,大家可以根据自身项目的实际情况进行选择,也可以通过源码阅读,更为细致的了解这些组件的实现原理。
-END-
纯洁的微笑
一个有故事的程序员


 1592
1592


 被折叠的 条评论
为什么被折叠?
被折叠的 条评论
为什么被折叠?
 到【灌水乐园】发言


