


Android平台上的UI在5.0以前,那真的只能叫做实现功能了!谷歌爸爸总是那么的“好”,于是有了各种各样的support兼容包。MD设计确实不错,但是试问现在有几个UI设计师是知道这个设计的,又有多少设计师设计UI原型图是按照谷歌爸爸的风格?一般悲剧的设计师都是iphone,所以UI各种朝向IOS,那真叫一个蛋疼!但是话说回来一个APP软件,从理论上来讲确实应该是一样的风格界面啊!于是我们为了兼容android的各个版本,我们最好的效果就是自定义View了。MD有其兼容性的限制!
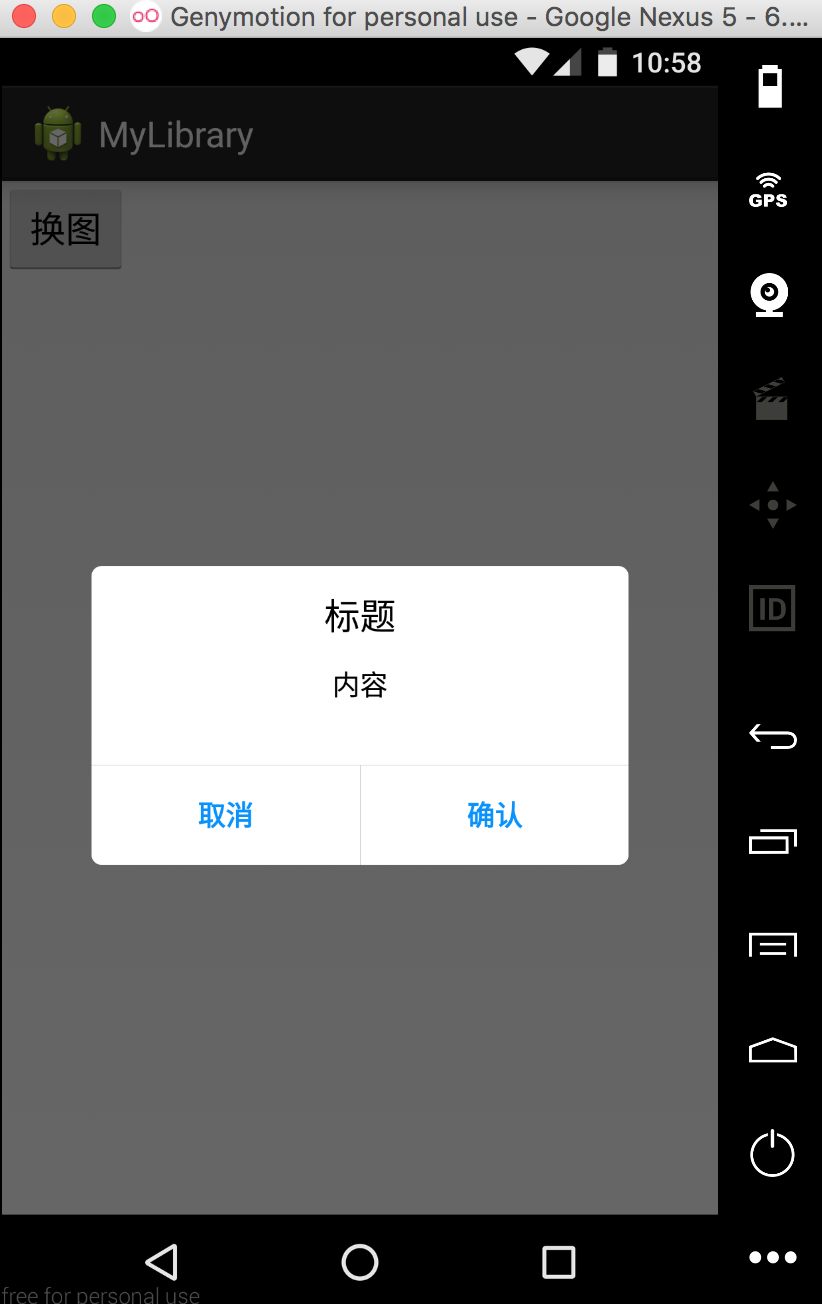
我打算打造一个仿造IOS效果的Dialog,不说了先上图:
new IOSDialog(this).radius(10)
				           .leftText("取消")
				           .rightText("确认")
				           .layout()
				           .show();
没错,就是这样简单粗暴,只需一行代码实现高仿IOS Dialog效果!这个IOSDialog需要实现高度的可定制化:具备以下特色:
1.Dialog的圆角边框弧度可以自定义。
2.Dialog的背景颜色可以自定义。
3.分割线的颜色可以自定义。
4.下面左右两侧的字体颜色,大小,内容可以自定义。
5.标题、内容的字体大小颜色可以自定义。
6.可以去掉内容,只保留标题栏。
7.只用纯java代码实现,拒绝xml布局,方便移植。
首先第一步我们既然是用到Dialog这个名词,当然是少不了,Dialog喽。我采用类似装饰器模式设计IOSDialog类,让其持有一个Dialog对象,然后暴露其方法供外面使用!接着我们需要考虑如何实现这样的布局,如果抽象能力不好的话,不妨先用XML方式写一个出来,然后再封装成java代码!所有的XML形式布局最后都会转化为Java代码,所以XML能实现的90%可以用java代码实现,而且更加的高效!那么我们采用什么布局来实现了?这里我主要采用的是LinearLayout,可能有人会认为使用Relativelayout更好控制,但是我不用,原因可以查阅下这篇文章Android性能优化之布局优化
public class IOSDialog {
    private Dialog mDialog = null;
    private GradientDrawable mBackground = new GradientDrawable();
}
最初的IOSDialog类应该是这样的包含一个Dialog对象,以及一个GradientDrawable对象(它对应的XML是shape资源文件),主要是用它来形成圆角矩形背景。接下来我们先着手布局,如下:
//加载基本布局
    public IOSDialog layout() {
        mBackground.setColor(mBackgroundColor);
        mBackground.setCornerRadius(mRadius);
        mLayout = new LinearLayout(mContext);
        mLayout.setOrientation(LinearLayout.VERTICAL);
        mLayout.setLayoutParams(new LinearLayout.LayoutParams(ViewGroup.LayoutParams.MATCH_PARENT,ViewGroup.LayoutParams.WRAP_CONTENT));//300dp


        mTitle = new TextView(mContext);
        mTitle.setText(mTiltleText);
        mTitle.setTextColor(mTextColor);
        mTitle.setTextSize(18);
        mTitle.setGravity(Gravity.CENTER);
        if(mHasContent) {
            mTitle.setLayoutParams(new LinearLayout.LayoutParams(ViewGroup.LayoutParams.MATCH_PARENT, (int) (mDisplayMetrics.density * 50)));
        }else{
            mTitle.setLayoutParams(new LinearLayout.LayoutParams(ViewGroup.LayoutParams.MATCH_PARENT, (int) (mDisplayMetrics.density * 70)));
        }
        mLayout.addView(mTitle);//添加标题

        if(mHasContent) {
            mContent = new TextView(mContext);
            mContent.setText(mContentText);
            mContent.setTextColor(mTextColor);
            mContent.setTextSize(14);
            mContent.setGravity(Gravity.CENTER_HORIZONTAL);
            mContent.setLayoutParams(new LinearLayout.LayoutParams(ViewGroup.LayoutParams.MATCH_PARENT, (int) (mDisplayMetrics.density * 50))); //50dp
            mLayout.addView(mContent);//添加内容
        }

        TextView hozLine = new TextView(mContext);
        LinearLayout.LayoutParams lineParam = new LinearLayout.LayoutParams(ViewGroup.LayoutParams.MATCH_PARENT, 1);
        hozLine.setLayoutParams(lineParam);
        hozLine.setBackgroundColor(mLineColor);

        mLayout.addView(hozLine); //添加横线


        //底部部分
        LinearLayout buttom = new LinearLayout(mContext);
        LinearLayout.LayoutParams layoutParam = new LinearLayout.LayoutParams(ViewGroup.LayoutParams.MATCH_PARENT,(int) (mDisplayMetrics.density * 50)); //50dp
        layoutParam.gravity = Gravity.BOTTOM;
        buttom.setLayoutParams(layoutParam);
        buttom.setOrientation(LinearLayout.HORIZONTAL);

        mLeft = new TextView(mContext);
        mLeft.getPaint().setFakeBoldText(true);
        mLeft.setLayoutParams(new LinearLayout.LayoutParams(ViewGroup.LayoutParams.MATCH_PARENT, ViewGroup.LayoutParams.MATCH_PARENT,1));
        mLeft.setText(mLeftText);
        mLeft.setTextColor(mCancleColor);
        mLeft.setTextSize(14);
        mLeft.setGravity(Gravity.CENTER);
        mLeft.setTag(NO);
        mLeft.setOnClickListener(this);

        TextView verLine = new TextView(mContext);
        verLine.setLayoutParams(new LinearLayout.LayoutParams(1,ViewGroup.LayoutParams.MATCH_PARENT));
        verLine.setBackgroundColor(mLineColor);

        mRight = new TextView(mContext);
        mRight.getPaint().setFakeBoldText(true);//加粗
        mRight.setText(mRightText);
        mRight.setTextColor(mCancleColor);
        mRight.setTextSize(14);
        mRight.setGravity(Gravity.CENTER);
        mRight.setLayoutParams(new LinearLayout.LayoutParams(ViewGroup.LayoutParams.MATCH_PARENT, ViewGroup.LayoutParams.MATCH_PARENT,1));
        mRight.setTag(YES);
        mRight.setOnClickListener(this);

        buttom.addView(mLeft);
        buttom.addView(verLine);
        buttom.addView(mRight);

        mLayout.addView(buttom);
        config();
        return this;
    }
可以看见在布局的最后我们调用了config()方法,config方法的全文如下:
private void config() {
        if (Build.VERSION.SDK_INT >= 16) {
            mLayout.setBackground(mBackground);
        } else {
            mLayout.setBackgroundDrawable(mBackground);
        }

        //去除蓝色顶部横线
        int dividerID=mContext.getResources().getIdentifier("android:id/titleDivider", null, null);
        View divider=mDialog.findViewById(dividerID);
        divider.setBackgroundColor(Color.TRANSPARENT);

        //去背景框颜色
        //mDialog.getWindow().setBackgroundDrawable(new BitmapDrawable());
        mDialog.getWindow().setBackgroundDrawableResource(android.R.color.transparent);

        //设置Dialog的窗体大小
        Window wm=mDialog.getWindow();
        WindowManager.LayoutParams lp=wm.getAttributes();
        lp.width=(int)(mDisplayMetrics.widthPixels*0.75f);  //设置窗体的宽度
        wm.setAttributes(lp);

        mDialog.setContentView(mLayout);
    }
layout()方法中所用的所有的字体颜色,分割线,等等属性全部用IOSDialog私有变量控制,然后通过,set方法暴露出去,但是这些方法需要在layout方法之前调用!比如设置圆角的大小:
public IOSDialog radius(int radius) {
        if (radius < 0)
         mRadius=(int)(radius*mDisplayMetrics.density);
        return this;
} public interface IOSDialogListener{
public void YES(Dialog dialog);
public void NO(Dialog dialog);
} public IOSDialog setIOSDialogListener(IOSDialogListener listener){
if(listener!=null) {
mListener = listener;
}
return this;
}
 @Override
    public void onClick(View v) {
        int result=(int)v.getTag();
        if(result==YES) {
            if(mListener!=null){
                mListener.YES(mDialog);
                mDialog.dismiss();
            }
        }else if(result==NO){
            if(mListener!=null){
                mListener.NO(mDialog);
                mDialog.dismiss();
            }
        }
    }
打造这样一个IOSDialog并不难,主要是去掉Dialog原生的在Theme.LIGHT主题下顶部蓝色的线,以及装饰器模式的设计,还有就是shape资源文件的代码形式!以及View的setTag方法的调用!这里没有展示完全IOSdialog,全部代码如下文件中:
改进版主要是在项目中发现了问题之前的版本无法解决:
1.文字没办法自适应。
2.当内容过多时无法滑动进行适配。
改进版IOSDialog
当然读者如果有更好的建议欢迎下方留言,大家共同进步!


 1万+
1万+


 被折叠的 条评论
为什么被折叠?
被折叠的 条评论
为什么被折叠?
 到【灌水乐园】发言


