


在iOS中有一整套的数据安全体系,而对于iOS自身的APP来讲只能访问专属于自己的目录,这个目录就是我们通常在iOS开发中所讲的沙箱(沙盒)目录,就此目录而言应用程序间是禁止数据的共享和访问的。
一、沙箱(沙盒)的结构
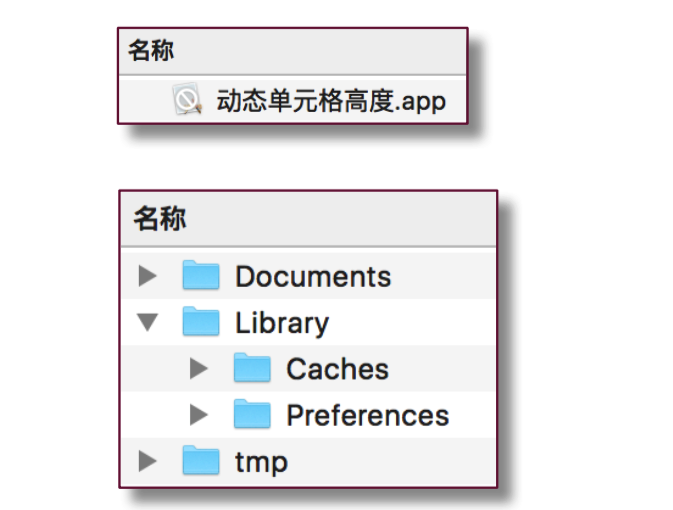
《1》、应用程序包(上图中的动态单元格高度.app);包含了所有的资源文件和可执行文件
《2》、 Documents:保存应用运行时需要持久化的数据,iTunes 同步设备时会备份
该目录。如:游戏存档
《3》、Library/Caches:保存应用运行时需要持久化的数据,iTunes 同步设置时不 会备份该目录,可以用于存储体积大、但不需要备份的非重要数据
《4》、Library/Preference:保存应用的偏好设置,iTunes 同步设备时会备份该目录,可用于保存少量数据
《5》、tmp:保存应用运行时的临时数据,系统可能会在不知何时清楚该目录下的文件。iTunes 同步设备时不会备份该目录
二、如何读取沙盒的目录
1、沙盒根目录:
NSString *homePath = NSHomeDirectory();
2、Documents目录:
NSString *ducumentsPath
=NSSearchPathForDirectoriesInDomains(NSDocumentDirectory,NSUserDomainMask,
YES)[0] 或者NSString*ducumentsPath =
NSSearchPathForDirectoriesInDomains(NSDocumentDirectory,
NSUserDomainMask, YES).firstObject;
3、Library/Caches目录:
(1)、 NSString *cachesPath =
NSSearchPathForDirectoriesInDomains(NSCachesDirectory,
NSUserDomainMask, YES)[0];(2)、NSString *LibraryPath =
NSSearchPathForDirectoriesInDomains(NSLibraryDirectory,
NSUserDomainMask, YES)[0];
/~~~~~~或者~~~~~~~/
NSString *LibraryPath = NSSearchPathForDirectoriesInDomains(NSLibraryDirectory,
NSUserDomainMask, YES).firstObject;
4、Library/Preference目录:
NSString *preferPath =
NSSearchPathForDirectoriesInDomains(NSPreferencePanesDirectory,
NSUserDomainMask, YES).firstObject;
/~~~~~~或者~~~~~~~/
NSString *preferPath = NSSearchPathForDirectoriesInDomains(NSPreferencePanesDirectory,
NSUserDomainMask, YES)[0];
5、tmp目录:
NSString *tmpPath = NSTemporaryDirectory(); NSString *preferPath =
NSSearchPathForDirectoriesInDomains(NSPreferencePanesDirectory,
NSUserDomainMask, YES).firstObject;
以上保存在沙盒目录中的数据其实质都是保存在硬盘Data目录中的,和应用程序本身的资源文件和可执行文件是分开的, 应用程勋本身的资源文件在Bundle目录下.
NSString *path = [[NSBundle mainBundle] bundlePath];
NSLog(@”path : %@”, path);
三、获取沙盒下各种路径详解介绍
1、获取沙盒的根路径
NSString * fileName =NSHomeDirectory();
2、获取mainBundle(xxx.app资源包)的根路径
NSString *bundlePath = [[NSBundle mainBundle] resourcePath];
3、获取doucuments的路径
//参数1:要搜索的文件夹的名字
//参数2;在哪个范围内搜索,一般指的就是当前用户
//参数3:是否将此文件夹之前的根路径展开
// 返回值是数组类型,因为可能有多个同名但层级不同的文件夹
//目前沙盒中只有一个名字叫Doucument的文件夹,所以带下标访问
NSString *documentsPath =
NSSearchPathForDirectoriesInDomains(NSDocumentDirectory,
NSUserDomainMask, YES)[0];
4、获取doucuments路径的方法
方法一:
使用追加的方式获取doucuments的路径(注意:使用此种方法在追加的时候需要手动添加“/”)
NSString *doucumentsPath = NSHomeDirectory()
stringByAppendingString:@”/Documents”;
方法二:
使用stringByAppendingPathComponent方法追加时会自动添加分割线的斜线“/”
NSString *doucumentsPath1 = NSHomeDirectory()
stringByAppendingPathComponent:@”Documents”;
5、获取mainBundle根路径下的某资源绝对路径 Resource 资源
NSString *filePath = [[NSBundle mainBundle] pathForResource:@”fbb01”
ofType:@”jpg”];
// 加载图片使用绝对路径
UIImage *image = [UIImage imageWithContentsOfFile:filePath];
四、存储方式的种类
(一)、 plist *[属性列表]*
(二)、 Preference *[偏好设置]*
(三)、 NSKeyedArchiver *[归档,加密的一种形式]*
(四)、SQLite3/FMDB****[嵌入式数据库]**
(五)、Core Data***[面向对象的嵌入式数据库]**
《一》、属性列表(plist)的操作(不支持自定义模型的存储)
<1>、plist的创建方式
plist的创建方式一【可视化操作】:
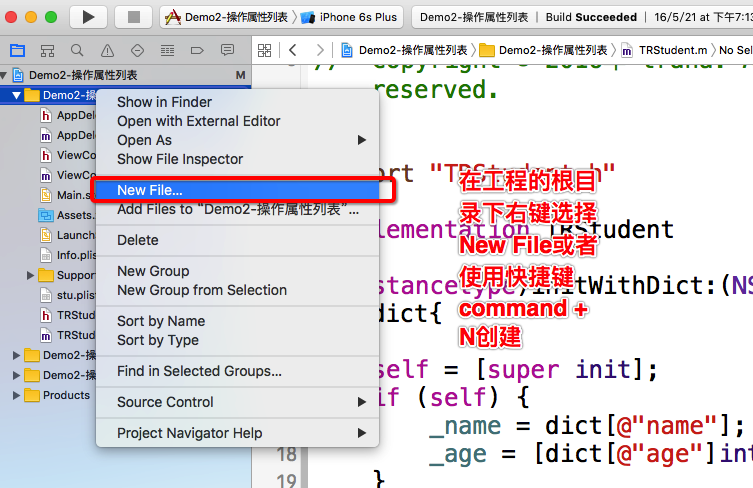
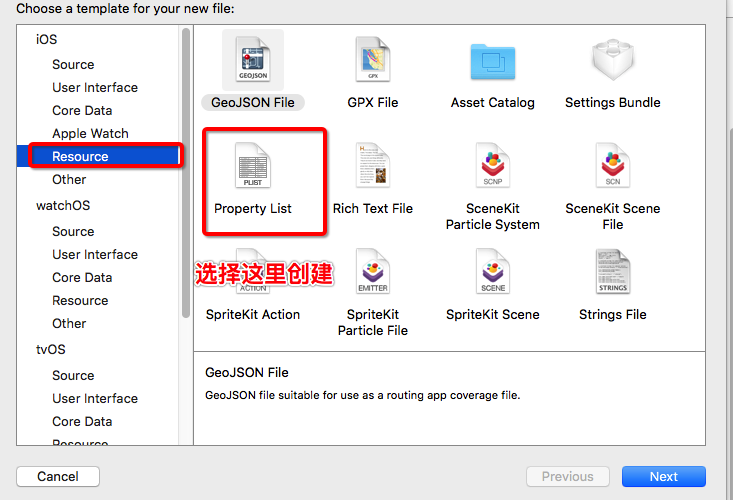
plist的创建方式二:【纯代码创建】
注意:在写入数据时自动创建一个plist文件,不写入数据不会创建plist文件。
//获取应用程序沙盒的Documents目录
NSArray *paths = NSSearchPathForDirectoriesInDomains(NSDocumentDirectory,NSUserDomainMask,YES);
NSString *plistPath = [paths objectAtIndex:0];
//创建一个可变数组
NSMutableArray *marr = [NSMutableArray array];
//得到完整的文件名
NSString *filename=[plistPath stringByAppendingPathComponent:@”city.plist”];
//自己随便起名字,结尾是plist就行
NSLog(@”filename == %@”,filename);
[marr addObject:@”字符串”];//可以添加其他类型数据(字典、数组等)
//写入
[marr writeToFile:filename atomically:YES];
<2>、plist的基本操作与使用
1>、将NSArray数组存放到Plist当中
NSArray *arr = @[@”张三”,@”李四”,@”王五”]; //保存数据的Plist文件的绝对路径
NSString *filePath = [NSSearchPathForDirectoriesInDomains(NSDocumentDirectory,
NSUserDomainMask, YES)[0]
stringByAppendingPathComponent:@”person.plist”]; //将arr保存到stu.plist文件中
[arr writeToFile:filePath atomically:YES];
2>读取plist文件到NSArray
NSString *filePath =
[NSSearchPathForDirectoriesInDomains(NSDocumentDirectory,
NSUserDomainMask, YES)[0]
stringByAppendingPathComponent:@”person.plist”];
// 从文件中读取数据到数组中
NSArray *array = [NSArray arrayWithContentsOfFile:filePath];
3>、将NSDictionary保存到plist中
NSString *filePath
=[NSSearchPathForDirectoriesInDomains(NSDocumentDirectory, NSUserDomainMask, YES)[0] stringByAppendingString:@”person.plist”];NSDictionary *dict =@{ @"name":@"张三", @"age":@20, @"score":@98.3 }; //写文件的时候atomic都是yes不让外界干扰 [dict writeToFile:filePath atomically:YES];
4>、读取plist文件到NSDictionary中
NSString *fieldPth =
[NSSearchPathForDirectoriesInDomains(NSDocumentDirectory,
NSUserDomainMask,
YES)[0]stringByAppendingPathComponent:@”person.plist”];NSDictionary *dict = [NSDictionary dictionaryWithContentsOfFile:fieldPth]; NSLog(@"%@",dict);
5>、读取mainBundle中的plist文件,并输出所有学生的name和age
( 1).构建文件的路径
NSString *filePath = [[NSBundle mainBundle]pathForResource:@"person" ofType:@"plist"];
( 2).读取文件中的数组
NSArray *arr = [NSArray arrayWithContentsOfFile:filePath];
(3).遍历数组,输出姓名和年龄
方式一【直接遍历】:
NSMutableArray *personArr = [NSMutableArray array];
for (NSDictionary *dict in arr) { NSLog(@”姓名:%@ 年龄:%ld
分数:%ld”,dict[@”name”],[dict[@”age”]integerValue],[dict[@”scoures”]integerValue]);
}
方式二【将字典封装成一个对象模型】:
创建了一个Person类
Person.h文件中:
import <Foundation/Foundation.h>
@interface Person : NSObject

@property(nonatomic,strong) NSString *name ;

@property(nonatomic,assign) NSInteger  age;
//传入一个字典,将字典变成数据模型对象 initWithDict: 构造法W要大写
- (instancetype)initWithDict:(NSDictionary *)dict;

//提供一个类方法实现将字典转模型
+(instancetype)studentWithDict:(NSDictionary *)dict;

@end
Person.m文件中:
#import "Person.h"

@implementation Person

-(instancetype)initWithDict:(NSDictionary *)dict{

    self = [super init];
    if (self) {
        _name = dict[@"name"];
        _age = [dict[@"age"]integerValue];
    }

    return self;
}

+ (instancetype)studentWithDict:(NSDictionary *)dict{

    return [[self alloc]initWithDict:dict];
}


@end
ViewController中使用的时候先导入头文件
#import "Person.h"
NSMutableArray *personArr = [NSMutableArray array];
for (NSDictionary *dict in arr) {
Person *stu = [[Person alloc]init];
stu.name = dict[@”name”];
stu.age = [dict[@”age”] integerValue];
[personArr addObject:stu];}
方式三:[字典直接转模型] :
Person模型类不变,然后将封装的对象那块修改一下
  NSMutableArray *personArr = [NSMutableArray array];
   Person *stu = [[Person alloc]initWithDict:dict];
   for (NSDictionary *dict in arr) {
     TRStudent *stu = [[Person alloc]initWithDict:dict];
     [personArr addObject:stu];
}


 1397
1397

 被折叠的 条评论
为什么被折叠?
被折叠的 条评论
为什么被折叠?
 到【灌水乐园】发言


