类结构图:
| ↳ | ||||
|
| ↳ | |||
|
|
| ↳ | ||
|
|
|
| ↳ | android.widget.TableLayout |
TableLayout没有边框的,它是由多个TableRow对象组成,每个TableRow可以 有0个或多个单元格,每个单元格就是一个View。这些TableRow,单元格不能设 置layout_width,宽度默认是fill_parent的,只有高度layout_height可以自定 义,默认是wrap_content。
android:shrinkColumns设置可以收缩的列号,android:stretchColumns设置 可以伸展的列号。需要注意的是列号从0开始,也可以用”*”表示指定所有的列 。
TableLayout中的最大列数是所有的位于TableLayout中的TableRow的列数中 的最大值,即列数最多的一行有多少列,TableLayout就有多少列。
| XML属性 | 相应方法 | 描述 |
| setColumnCollapsed (int columnIndex, boolean isCollapsed) | 设置表格的列是否隐藏 | |
| setShrinkAllColumns (boolean shrinkAllColumns) | 作用:设置表格的列是否收缩(列编号从0开始,下同),多列用逗号隔开(下同),如android:shrinkColumns="0,1,2",即表格的第1、2、3列的内容是收缩的以适合屏幕,不会挤出屏幕。 | |
| setStretchAllColumns (boolean stretchAllColumns) | 设置表格的列是否拉伸 | |
|
|
|
|
实践:
布局文件:
<?xml version="1.0" encoding="utf-8"?>

<LinearLayout xmlns:android="http://schemas.android.com/apk/res/android"

   android:orientation="vertical" android:layout_width="fill_parent"

   android:layout_height="fill_parent">


   <TableLayout android:stretchColumns="1"

      android:layout_width="fill_parent" android:layout_height="wrap_content">

      <TableRow>

        <TextView android:layout_width="wrap_content"

           android:layout_height="wrap_content" android:text="姓名" />

        <EditText android:text="" android:layout_width="fill_parent"

           android:layout_height="wrap_content" />

      </TableRow>

      <TableRow>

        <TextView android:layout_width="wrap_content"

           android:layout_height="wrap_content" android:text="密码 " />

        <EditText android:text="" android:layout_width="fill_parent"

           android:layout_height="wrap_content" />

      </TableRow>

      <TableRow>

        <Button android:text="取消" android:layout_width="wrap_content"

           android:layout_height="wrap_content" />

        <Button android:text="取消" android:layout_width="fill_parent"

           android:layout_height="wrap_content" />

      </TableRow>

   </TableLayout>

</LinearLayout>
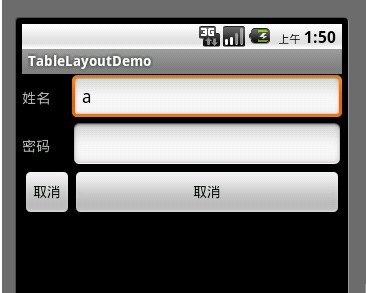
这个关于用到了android:stretchColumns它是指定哪一列被拉伸[从0开始],在这里我们指定了为了1,所以出现如下的效果图:

关于动态添加设置TableLayout官方并不推荐所以也不在此阐述,所以在实际开发中,我们一般只用XML来设置布局


 509
509

 被折叠的 条评论
为什么被折叠?


