


1. UI 组件
- render()函数放在另外一个单独的UI.js 文件和动作行为分开
- UI 上面所用的数据和函数, 通过父组件传递过来,用 this.props 来接收
- UI 组件下面:
import 'antd/dist/antd.css';
import { Input, Button, List } from 'antd';
import React, {Component} from 'react';

class TodoListUI extends Component {
    render(){
        return ( <div style={{ margin: '10px' }}>
        <div>
            <Input value={this.props.inputValue}
             style={{ width: '300px', marginRight: '10px' }}
             onChange={this.props.handleInputChange}
             />
            <Button type="primary"
            onClick={this.props.btnClick}
            >提交</Button>
        </div>
        <List
            bordered
            dataSource={this.props.list}
            renderItem={(item, index) => (<List.Item onClick={(index)=>{this.props.handledelete(index)}}>{item}</List.Item>)}
            style={{marginTop:'10px',width:'300px'}}
        />
    </div>)
    }
}

export default TodoListUI
父组件传递数据
 render() {
        return (
           <TodoListUI
           inputValue={this.state.inputValue}
           handleInputChange={this.handleInputChange}
           btnClick={this.btnClick}
           list={this.state.list}
           handledelete={this.handledelete}
           />
        )
    }
2. 无状态组件
- 当一个普通的组件只有render()函数的时候, 没有业务逻辑的时候它就是一个无状态组件, 类似没有业务逻辑的UI组件
- 无状态组件性能比较高, 因为它就是一个js, 一个普通组件既包含一个类还有render(), 性能差别就在这
- 下面是一个无状态组件
import 'antd/dist/antd.css';
import { Input, Button, List } from 'antd';
import React from 'react';

const TodoListUI = (props) => {
    return (
        <div style={{ margin: '10px' }}>
            <div>
                <Input value={props.inputValue}
                    style={{ width: '300px', marginRight: '10px' }}
                    onChange={props.handleInputChange}
                />
                <Button type="primary"
                    onClick={props.btnClick}
                >提交</Button>
            </div>
            <List
                bordered
                dataSource={props.list}
                renderItem={(item, index) => (<List.Item onClick={(index) => { props.handledelete(index) }}>{item}</List.Item>)}
                style={{ marginTop: '10px', width: '300px' }}
            />
        </div>
    )
}

export default TodoListUI
3. Redux 发送异步请求 (使用redux-thunk)
- 使用 axios
- 使用 redux-thunk 将异步函数写在redux/动作文件里面, 不用redux-thunk的话可以将ajax 回调放在组件的生命周期函数里面
但是,随着组件的内容增多, 组件可能相对的比较复杂, 所以建议还是使用中间件
生命周期函数直接提交函数
 componentDidMount(){
       const action = getTodoList();
       store.dispatch(action); // 当调用这个函数时, 异步函数会自动执行
    }
redux/action文件函数
export const getTodoList = () => {
   return (dispatch) => {
    axios.get('/list.json').then((res)=>{
        const data = res.data;
        const action = initListAction(data);
        dispatch(action);
    })
   }
};
store文件
import {
    createStore,
    applyMiddleware,
    compose
} from 'redux';
import thunk from 'redux-thunk';
import reducer from './reducer';

const composeEnhancers =
  typeof window === 'object' &&
  window.__REDUX_DEVTOOLS_EXTENSION_COMPOSE__ ?
    window.__REDUX_DEVTOOLS_EXTENSION_COMPOSE__({
      // Specify extension’s options like name, actionsBlacklist, actionsCreators, serialize...
    }) : compose;

const enhancer = composeEnhancers(
    applyMiddleware(thunk),
    // other store enhancers if any
);

const store = createStore(reducer,enhancer);

export default store;
ps : 如果不适用 redux-thunk, 直接在生命周期函数中使用(但是不建议)
 componentDidMount(){
        axios.get('/list.json').then((res)=>{
        const data = res.data;
        const action = initListAction(data);
        dispatch(action);
    })
    }
4. Redux 中间件
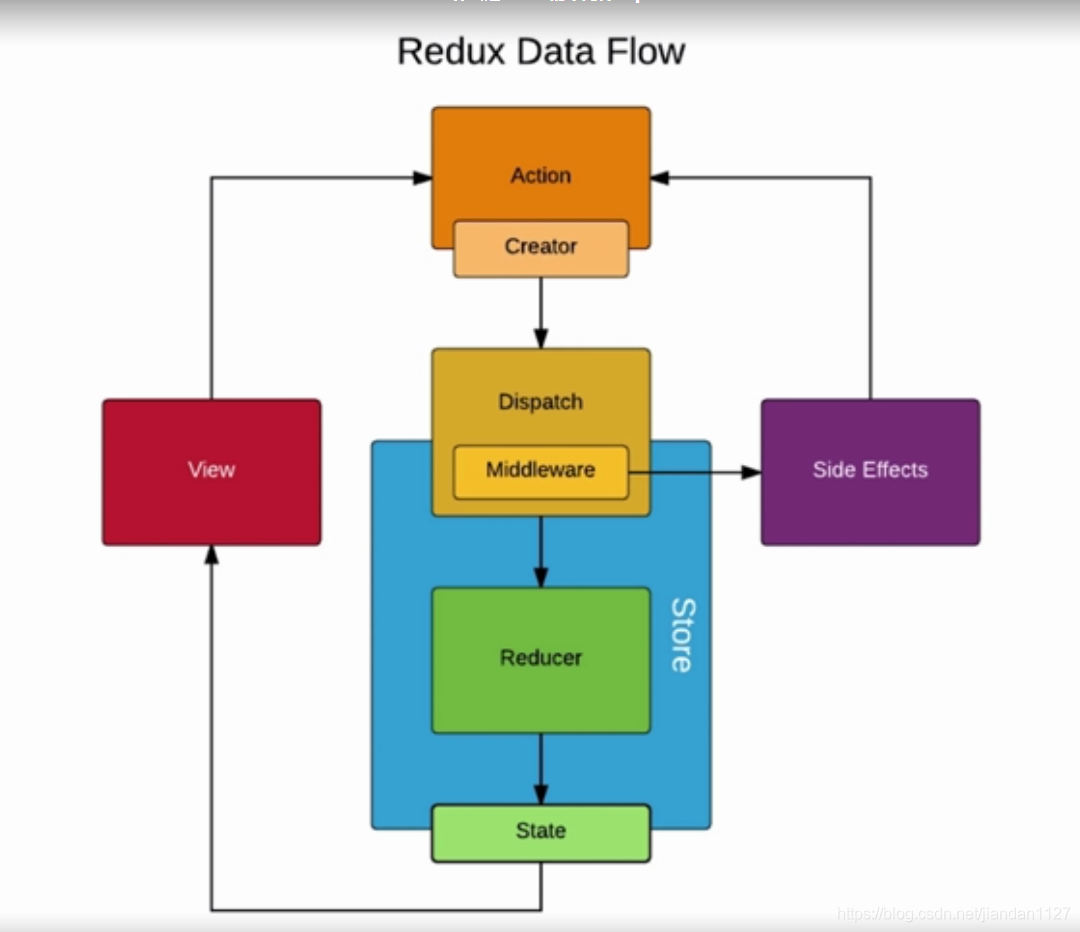
一般情况 : 在action通过 dispatch这个方法, 把对象发送给store
使用中间件: 中间件简单来说就是, 对store的dispatch方法进行升级, 允许传过来一个函数,而不是只能是对象. 在传过来的时候, 对传过来的action进行判断, 如果是函数,则先执行函数,再进行下一步的操作, 就好像这样,传递过来的函数立即执行, 这个函数默认参数是dispatch , 然后通过 dispatch 提交下一个action动作
使用的是redux-thunk中间件
export const getTodoList = () => {
   return (dispatch) => {
    axios.get('/list.json').then((res)=>{
        const data = res.data;
        const action = initListAction(data);
        dispatch(action);
    })
   }
};
ps : 只有redux才有中间件, 而不是react
5. Redux-saga 的基本使用
1. store/ index 下配置 (github上面有详细的配置)
import {
    createStore,
    applyMiddleware,
    compose
} from 'redux';
import createSagaMiddleware from 'redux-saga'
import reducer from './reducer';
import mySaga from './sagas'

const sagaMiddleware = createSagaMiddleware();
const composeEnhancers =
  typeof window === 'object' &&
  window.__REDUX_DEVTOOLS_EXTENSION_COMPOSE__ ?
    window.__REDUX_DEVTOOLS_EXTENSION_COMPOSE__({}) : compose;

const enhancer = composeEnhancers(
    applyMiddleware(sagaMiddleware)
);

const store = createStore(reducer,enhancer);
sagaMiddleware.run(mySaga);
export default store;
2.actionCreators.js 创建行为类型
export const getInitList = () => ({
    type: GET_INIT_LIST,
});
3. 执行步骤, 组件周期函数派发action
 componentDidMount(){
        const action = getInitList();
        store.dispatch(action)
}
4.sagas.js 接收action判断行为类型 (使用方法详见github)
saga就是组件派发action后, 拦截下来, 优先处理,该类型的函数,
但是与thunk不同的是, saga内置了一些方法可以处理异步函数
import {takeEvery, put} from 'redux-saga/effects';
import {GET_INIT_LIST} from './actionTypes';
import {initListAction} from './actionCreators';
import axios from 'axios';

function* getInitList() {
    try{ // 成功的时候
        const res = yield axios.get('/list.json');
        const action = initListAction(res.data);
        yield put(action)
    }catch(e){
        console.log('list.json 网络请求失败')
    }
}


// generator 函数
function* mySaga() {
    yield takeEvery(GET_INIT_LIST, getInitList); // 判断action类型,处理
}

export default mySaga;
5.saga 内置 put 方法继续提交action给reducer执行后面的步骤, 后面的就是redux常规的步骤
6. React-Redux
1. 文件格式
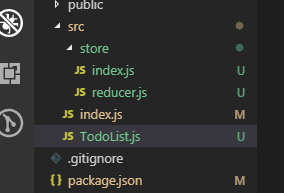
2. index.js 入口文件
import React from 'react';
import ReactDOM from 'react-dom';
import TodoList from './TodoList';
import {Provider} from 'react-redux';
import store from './store';

// 这个标签里面的所有组件都可以使用store里面的数据
// Provider 这组件可以把store提供给它含的所有组件
const App=(
    <Provider store={store}>
        <TodoList/>
    </Provider>
)

// JSX 语法
ReactDOM.render(App, document.getElementById('root'));
3. 组件
import React from 'react';
// import store from './store';
import { connect } from 'react-redux';

const TodoList =(props) => { // 无状态组件, 性能更佳

        const {inputValue,list,changeInputValue,putChange,delClick} = props
        return (

            <div>
                <div>
                    <input value={inputValue} onChange={changeInputValue} />
                    <button onClick={putChange}>提交</button>
                </div>
                <ul>
                    {list.map((item, index) => {
                       return <li key={index} onClick={delClick.bind(this, index)}>{item}</li>
                    })}

                </ul>
            </div>
        )

}

// mapStateToProps 箭头函数里面的state是和store里面的state对应的
const mapStateToProps = (state) => {
    return {
        inputValue: state.inputValue,
        list:state.list
    }
}

// mapDispatchToProps 箭头函数里面的state是和store里面的state对应的
// store.dispatch, props
const mapDispatchToProps = (dispatch) => {
    return {
        changeInputValue(e) {
            const action = {
                type: 'change_input_value',
                value: e.target.value
            }
            dispatch(action);
        },
        putChange() {
            const action = {
                type: 'put_change'
            }
            dispatch(action)
        },
        delClick(index){
            const action = {
                type: 'del_click',
                index: index
            }
            dispatch(action)
        }
    }
}


// connect(null, null) (TodoList)
// 这个语法的意思是, 和store链接
// 第一个参数是state映射
// 第二个参数是action映射
export default connect(mapStateToProps, mapDispatchToProps)(TodoList);
4. store/index.js
import {createStore} from 'redux';
import reducer from './reducer';

const store = createStore(reducer);

export default store;
5. store/reducer.js
const defaultState ={
    inputValue : 'hello',
    list : []
}

export default (state=defaultState,action) =>{
    if(action.type === 'change_input_value'){
        const newState = JSON.parse(JSON.stringify(state)); // 深拷贝
        newState.inputValue = action.value;
        return newState;
    }
    if(action.type==='put_change'){
        const newState = JSON.parse(JSON.stringify(state));
        newState.list.push(newState.inputValue);
        newState.inputValue = '';
        return newState;
    }
    if(action.type ==='del_click'){
        const newState = JSON.parse(JSON.stringify(state));
        newState.list.splice(action.index,1);
        return newState;
    }
    return state;
}


 251
251


 被折叠的 条评论
为什么被折叠?
被折叠的 条评论
为什么被折叠?
 到【灌水乐园】发言


