


首先说明,在java的web框架中,最难的一个步骤,就是设置配置文件,配置文件复杂繁多,而且特别容易配置错误,经过不懈努力,一步步配置好了。
1、文件目录
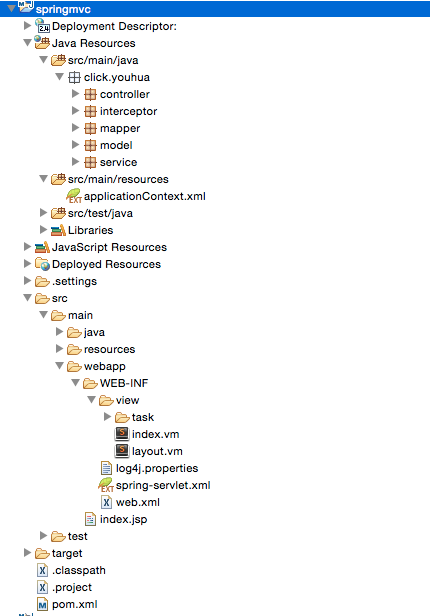
本工程是eclipse+maven的webapp工程
2、webx.xml配置
<?xml version="1.0" encoding="UTF-8"?>
<web-app version="3.0" xmlns="http://java.sun.com/xml/ns/javaee"
    xmlns:xsi="http://www.w3.org/2001/XMLSchema-instance"
    xsi:schemaLocation="http://java.sun.com/xml/ns/javaee
    http://java.sun.com/xml/ns/javaee/web-app_3_0.xsd">
    <display-name></display-name>
    <welcome-file-list>
        <welcome-file>index/list</welcome-file>
    </welcome-file-list>


    <!-- Spring的log4j监听器 -->
    <listener>
        <listener-class>org.springframework.web.util.Log4jConfigListener</listener-class>
    </listener>

    <!-- 核心控制器 -->
    <servlet>
        <servlet-name>book</servlet-name>
        <servlet-class>org.springframework.web.servlet.DispatcherServlet</servlet-class>
        <init-param>
            <param-name>contextConfigLocation</param-name>
            <param-value>/WEB-INF/spring-servlet.xml</param-value>
        </init-param>
        <load-on-startup>1</load-on-startup>
    </servlet>

    <!-- spring配置文件 -->
    <context-param>
        <param-name>contextConfigLocation</param-name>
        <param-value>classpath:applicationContext.xml</param-value>
    </context-param>

    <listener>
        <listener-class>org.springframework.web.context.ContextLoaderListener</listener-class>
    </listener>
    <servlet-mapping>
        <servlet-name>book</servlet-name>
        <url-pattern>/</url-pattern>
    </servlet-mapping>

</web-app>
3、spring-servlet.xml
<?xml version="1.0" encoding="UTF-8"?>
<beans xmlns="http://www.springframework.org/schema/beans"
       xmlns:aop="http://www.springframework.org/schema/aop"
       xmlns:context="http://www.springframework.org/schema/context"
       xmlns:mvc="http://www.springframework.org/schema/mvc"
       xmlns:tx="http://www.springframework.org/schema/tx"
       xmlns:xsi="http://www.w3.org/2001/XMLSchema-instance"
       xsi:schemaLocation="http://www.springframework.org/schema/aop
        http://www.springframework.org/schema/aop/spring-aop-3.0.xsd
        http://www.springframework.org/schema/beans
        http://www.springframework.org/schema/beans/spring-beans-3.0.xsd
        http://www.springframework.org/schema/context
        http://www.springframework.org/schema/context/spring-context-3.0.xsd
        http://www.springframework.org/schema/mvc
        http://www.springframework.org/schema/mvc/spring-mvc-3.0.xsd
        http://www.springframework.org/schema/tx
        http://www.springframework.org/schema/tx/spring-tx-3.0.xsd">

    <!-- 自动扫描包 -->
    <mvc:annotation-driven />
    <context:component-scan base-package="click.youhua.*" />

    <!-- velocity模板引擎 -->
    <bean id="velocityConfigurer" class="org.springframework.web.servlet.view.velocity.VelocityConfigurer">
    <property name="resourceLoaderPath" value="WEB-INF/view"/>
    <property name="velocityProperties">
        <props>
            <prop key="input.encoding">utf-8</prop>
            <prop key="output.encoding">utf-8</prop>
        </props>
    </property>
    </bean>
    <bean id="velocityViewResolver" class="org.springframework.web.servlet.view.velocity.VelocityViewResolver">
    <property name="suffix" value=".vm"/>
    <property name="contentType" value="text/html;charset=utf-8"/>
    </bean>

    <!-- 拦截器 -->
    <mvc:interceptors>
        <!-- 使用bean定义一个Interceptor,直接定义在mvc:interceptors根下面的Interceptor将拦截所有的请求 -->
        <mvc:interceptor>
        <mvc:mapping path="/index.do/**"/>
        <!-- 定义在mvc:interceptor下面的表示是对特定的请求才进行拦截的 -->
        <bean class="click.youhua.interceptor.LoginInterceptor"/>
        </mvc:interceptor>
    </mvc:interceptors>


</beans>
4、applicationContext.xml
<?xml version="1.0" encoding="UTF-8"?>
<beans xmlns="http://www.springframework.org/schema/beans"
    xmlns:xsi="http://www.w3.org/2001/XMLSchema-instance" xmlns:context="http://www.springframework.org/schema/context"
    xmlns:tx="http://www.springframework.org/schema/tx" xmlns:jdbc="http://www.springframework.org/schema/jdbc"
    xmlns:p="http://www.springframework.org/schema/p" xmlns:aop="http://www.springframework.org/schema/aop"
    xsi:schemaLocation="http://www.springframework.org/schema/beans
    http://www.springframework.org/schema/beans/spring-beans-3.0.xsd
    http://www.springframework.org/schema/context
    http://www.springframework.org/schema/context/spring-context-3.0.xsd
    http://www.springframework.org/schema/tx
    http://www.springframework.org/schema/tx/spring-tx-3.0.xsd
    http://www.springframework.org/schema/jdbc
    http://www.springframework.org/schema/jdbc/spring-jdbc-3.0.xsd
    http://www.springframework.org/schema/aop http://www.springframework.org/schema/aop/spring-aop-3.0.xsd">


    <!-- 配置数据源 -->
    <bean id="dataSource" class="org.springframework.jdbc.datasource.DriverManagerDataSource">
        <property name="driverClassName" value="com.mysql.jdbc.Driver" />
        <property name="url" value="jdbc:mysql://121.40.55.231:3306/youhua" />
        <property name="username" value="root" />
        <property name="password" value="123456" />
    </bean>

    <!-- 配置事务管理器 -->
    <bean id="transactionManager"
        class="org.springframework.jdbc.datasource.DataSourceTransactionManager">
        <property name="dataSource" ref="dataSource"></property>
    </bean>

    <bean id="sqlSessionFactory" class="org.mybatis.spring.SqlSessionFactoryBean">
        <property name="dataSource" ref="dataSource" />
        <!-- configLocation:用于指定Mybatis的配置文件位置 -->
    </bean>

    <context:annotation-config />


    <tx:annotation-driven />

    <!--
    自动扫描和注册Mapper接口
    basePackage是用来指定Mapper接口文件所在的基包,
    在这个基包或其所有子包下面的Mapper接口都将被搜索到。
    多个基包之间可以使用逗号或者分号进行分隔
     -->
    <bean class="org.mybatis.spring.mapper.MapperScannerConfigurer">
        <property name="basePackage" value="
          click.youhua.mapper
        " />
        <property name="sqlSessionFactoryBeanName" value="sqlSessionFactory" />
    </bean>

</beans>
配置完成后,再加上对于各种model controller的设置,就可以正常访问到velocity的页面。
4、task/list.vm
#foreach($data in $list)
                <tr>
                  <td>$data.id</td>
                  <td>$data.article_name</td>
                  <td>ipsum</td>
                  <td>dolor</td>
                  <td>sit</td>
                </tr>
                #end
5、结果
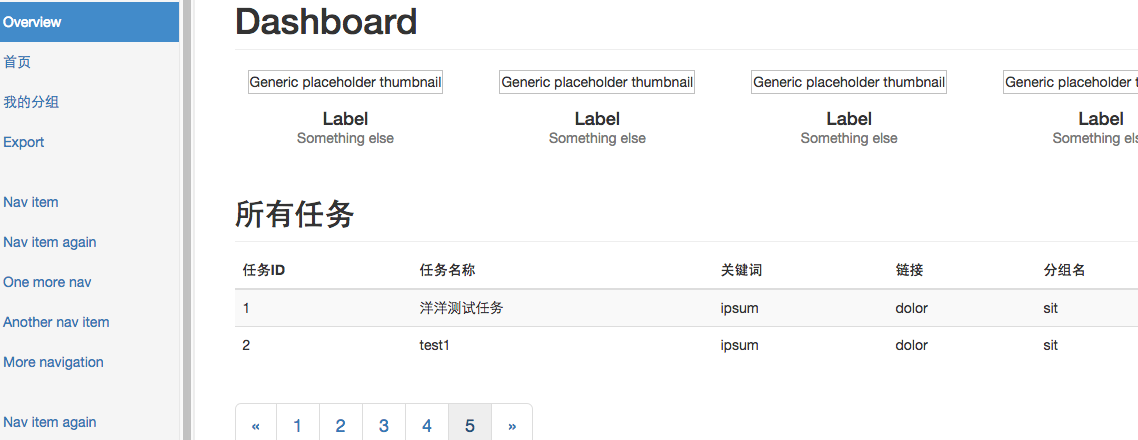
其中任务名称就是循环出来的结果。


 1155
1155

 被折叠的 条评论
为什么被折叠?
被折叠的 条评论
为什么被折叠?
 到【灌水乐园】发言


