


转载自: http://blog.csdn.net/lisdye2/article/details/51942511
依赖注入就是将调用者需要的另一个对象实例不在调用者内部实现,而是通过一定的方式从外部传入实例,解决了各个类之间的耦合。
那么这个外部,到底指的是哪里,如果指的是另一个类,那么,另一个类内部不就耦合了。能不能有一种方式,将这些构造的对象放到一个容器中,具体需要哪个实例时,就从这个容器中取就行了。那么,类的实例和使用就不在有联系了,而是通过一个容器将他们联系起来。实现了解耦。这个容器,便是Dagger2。
Dagger2是Google出的依赖注入框架。肯定有小伙伴疑问,为什么会有个 2 呢。该框架是基于square开发的dagger基础上开发的。
Dagger2的原理是在编译期生成相应的依赖注入代码。这也是和其他依赖注入框架不同的地方,其他框架是在运行时期反射获取注解内容,影响了运行效率。
导入Dagger2
使用Dagger2之前需要一些配置,该配置是在Android Studio中进行操作。
在工程的build.gradle文件中添加android-apt插件(该插件后面介绍)
在app的中的build.gradle文件中添加配置
- 1
- 2
- 3
- 4
- 5
- 6
- 7
- 8
- 9
- 10
- 11
- 12
- 13
- 14
- 15
- 16
- 17
- 18
- 19
- 20
- 21
- 22
- 23
- 24
- 25
- 26
- 27
- 28
- 29
- 30
- 31
- 32
- 33
- 34
- 35
- 1
- 2
- 3
- 4
- 5
- 6
- 7
- 8
- 9
- 10
- 11
- 12
- 13
- 14
- 15
- 16
- 17
- 18
- 19
- 20
- 21
- 22
- 23
- 24
- 25
- 26
- 27
- 28
- 29
- 30
- 31
- 32
- 33
- 34
- 35
以上两个配置就可以了。
android-apt是Gradle编译器的插件,根据其官方文档,主要两个目的:
-
编译时使用该工具,最终打包时不会将该插件打入到apk中。
-
能够根据设置的源路径,在编译时期生成相应代码。
在导入类库时,
dagger
是主要的工具类库。
dagger-compiler
为编译时期生成代码等相关的类库。
在android-apt的文档中,也推荐使用这种方式。因为,编译时期生成代码的类库在运行期并不需要,那么将其分为两个库,(运行类库dagger)和(编译器生成代码类库(dagger-compiler)),那么在打包时,就不需要将dagger-compiler打入其中(用不到),减小APK 的大小。
Dagger2的简单使用
Dagger2
的使用,需要大量的学习成本,不是很能够容易的上手并使用。该博客将从简单入手,尽可能的使用简单的例子演示
Dagger2
的功能。
一个东西需要先会用,然后才更好的学习原理。该篇博客的目的主要是讲解如何使用。后面会有专门的分析源码的博客。
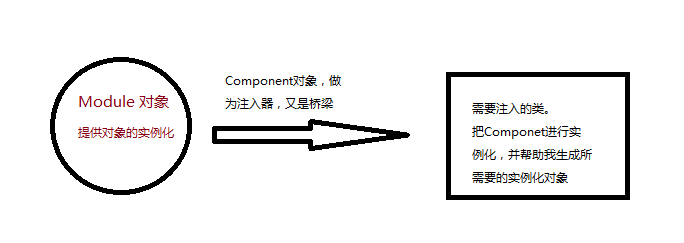
在之前的分析中,通过Dagger2的目的是将程序分为三个部分。
- 实例化部分:对象的实例化。类似于容器,将类的实例放在容器里。
- 调用者:需要实例化对象的类。
- 沟通桥梁:利用Dagger2中的一些API 将两者联系。
先看实例化部分(容器),在此处是Module。
- 1
- 2
- 3
- 4
- 5
- 6
- 7
- 8
- 9
- 10
- 11
- 12
- 13
- 1
- 2
- 3
- 4
- 5
- 6
- 7
- 8
- 9
- 10
- 11
- 12
- 13
沟通部分Component
- 1
- 2
- 3
- 4
- 5
- 6
- 7
- 8
- 1
- 2
- 3
- 4
- 5
- 6
- 7
- 8
使用者Actvity中调用。
- 1
- 2
- 3
- 4
- 5
- 6
- 7
- 8
- 9
- 10
- 11
- 12
- 13
- 14
- 15
- 16
- 17
- 18
- 1
- 2
- 3
- 4
- 5
- 6
- 7
- 8
- 9
- 10
- 11
- 12
- 13
- 14
- 15
- 16
- 17
- 18
看一下Person类
- 1
- 2
- 3
- 4
- 5
- 6
- 7
- 8
- 9
- 1
- 2
- 3
- 4
- 5
- 6
- 7
- 8
- 9
最后结果不在演示。其过程如下:
- 创建
Component(桥梁),并调用注入方法。
- 1
- 2
- 3
- 4
- 5
- 1
- 2
- 3
- 4
- 5
- 查找当前类中带有
@Inject的成员变量。
- 1
- 2
- 3
- 1
- 2
- 3
- 根据成员变量的类型从
Module中查找哪个有@Provides注解的方法返回值为当前类型。
- 1
- 2
- 3
- 4
- 5
- 6
- 1
- 2
- 3
- 4
- 5
- 6
在使用过程出现了很多注解:
@Module:作为实例对象的容器。@Provides:标注能够提供实例化对象的方法。@Component:作为桥梁,注入对象的通道。@Inject:需要注入的方法
如上使用有一种变通,修改MainModule和Person类。
- 1
- 2
- 3
- 4
- 5
- 6
- 7
- 8
- 9
- 10
- 11
- 12
- 13
- 14
- 15
- 1
- 2
- 3
- 4
- 5
- 6
- 7
- 8
- 9
- 10
- 11
- 12
- 13
- 14
- 15
- 1
- 2
- 3
- 4
- 5
- 6
- 7
- 8
- 9
- 1
- 2
- 3
- 4
- 5
- 6
- 7
- 8
- 9
将Module中的providePerson()方法注释,在Person中添加@Inject注解,依然能够实现。
- 5
- 6
- 7
- 8
- 9
逻辑如下:
- 先判断
Module
中是否有提供该对象实例化的方法。
- 如果有则返回。结束。
- 如果没有,则查找该类的构造方法,是否有带有
@Inject
的方法。如过存在,则返回。
@Singleton 单例注解
假如,对于同一个对象,我们需要注入两次,如下方式
- 1
- 2
- 3
- 4
- 5
- 6
- 7
- 8
- 9
- 10
- 11
- 12
- 13
- 14
- 15
- 16
- 17
- 18
- 19
- 20
- 21
- 22
- 23
- 1
- 2
- 3
- 4
- 5
- 6
- 7
- 8
- 9
- 10
- 11
- 12
- 13
- 14
- 15
- 16
- 17
- 18
- 19
- 20
- 21
- 22
- 23
看一下结果:
- 1
- 2
- 1
- 2
可见两个对象不一致。也就是说创建了两个对象。
可以在提供实例化对象的方法上添加@Singleton注解
- 1
- 2
- 3
- 4
- 5
- 6
- 7
- 1
- 2
- 3
- 4
- 5
- 6
- 7
同时,对于MainComponent也需要添加注解,不添加会无法编译
- 1
- 2
- 3
- 4
- 5
- 6
- 7
- 1
- 2
- 3
- 4
- 5
- 6
- 7
此时在Log,会发现两个对象的地址一样,可见是同一个对象。
- 1
- 1
那么不同的Activity之间,能否保持单例呢?
创建一个新的Activity,代码如下:
- 1
- 2
- 3
- 4
- 5
- 6
- 7
- 8
- 9
- 10
- 11
- 12
- 13
- 14
- 15
- 16
- 17
- 18
- 19
- 20
- 1
- 2
- 3
- 4
- 5
- 6
- 7
- 8
- 9
- 10
- 11
- 12
- 13
- 14
- 15
- 16
- 17
- 18
- 19
- 20
结果如下:
- 1
- 2
- 3
- 4
- 1
- 2
- 3
- 4
可见,@Singleton只对一个Component有效,即其单例所依赖Component对象。
需要参数的实例化对象
Person的构造方法发生了变化,需要传入一个Context,代码如下:
- 1
- 2
- 3
- 4
- 5
- 6
- 7
- 8
- 9
- 10
- 11
- 1
- 2
- 3
- 4
- 5
- 6
- 7
- 8
- 9
- 10
- 11
这样的话,我们需要修改MainModule
- 1
- 2
- 3
- 4
- 5
- 6
- 7
- 8
- 9
- 10
- 11
- 12
- 13
- 14
- 15
- 16
- 17
- 18
- 19
- 20
- 21
- 22
- 23
- 24
- 25
- 26
- 1
- 2
- 3
- 4
- 5
- 6
- 7
- 8
- 9
- 10
- 11
- 12
- 13
- 14
- 15
- 16
- 17
- 18
- 19
- 20
- 21
- 22
- 23
- 24
- 25
- 26
- 修改
providerPerson方法,传入Context对象。 - 添加
providesContext(),用以提供Context对象。
看一下使用
- 1
- 2
- 3
- 4
- 5
- 6
- 1
- 2
- 3
- 4
- 5
- 6
逻辑:
- 根据
@Inject注解,查找需要依赖注入的对象。 - 从
MainModule中根据返回值,找到providerPerson(Context context)对象。 - 发现其需要传入参数
Context,找到moudule中具有返回值为Context的方法providesContext()。 - 最后就成功的构建了实例化对象。
可能会有疑问,我既然module中已经保存了Context对象,那么为什么不直接使用Context对象呢,因为解耦,如果使用了保存的对象,会导致下次Context获取发生变化时,需要修改providerPerson(Context context)中的代码。
在编写Module中,不能出现传入参数和返回参数一致的情况,会导致死循环。
很容易理解,需要的和获取的是同一个方法,循环调用。
依赖一个组件
在使用中,往往会有依赖另一个组件的情况。比如,在AppMoudle中能够提供Context对象,如下:
- 1
- 2
- 3
- 4
- 5
- 6
- 7
- 8
- 9
- 10
- 11
- 12
- 13
- 14
- 15
- 16
- 17
- 1
- 2
- 3
- 4
- 5
- 6
- 7
- 8
- 9
- 10
- 11
- 12
- 13
- 14
- 15
- 16
- 17
而在另一个Module中需要依赖Context对象,那么怎么写呢?
首先编写当前AppModule的Component类
- 1
- 2
- 3
- 4
- 5
- 6
- 7
- 8
- 9
- 10
- 11
- 12
- 13
- 1
- 2
- 3
- 4
- 5
- 6
- 7
- 8
- 9
- 10
- 11
- 12
- 13
在此种,因为Module中需要向下层提供Context对象,而其与下层的联系时通过Component
,所以需要在这里声明一个其所提供对象的方法。以便下层Module获取。
- 1
- 2
- 3
- 4
- 5
- 6
- 7
- 8
- 9
- 10
- 11
- 12
- 13
- 14
- 15
- 16
- 1
- 2
- 3
- 4
- 5
- 6
- 7
- 8
- 9
- 10
- 11
- 12
- 13
- 14
- 15
- 16
- 1
- 2
- 3
- 4
- 5
- 6
- 7
- 8
- 9
- 10
- 11
- 1
- 2
- 3
- 4
- 5
- 6
- 7
- 8
- 9
- 10
- 11
在子Component中,有一句关键的注解dependencies = AppComponent.class,添加了上层依赖。
看一下使用
- 1
- 2
- 3
- 4
- 5
- 6
- 7
- 8
- 9
- 10
- 11
- 1
- 2
- 3
- 4
- 5
- 6
- 7
- 8
- 9
- 10
- 11
在其中使用过程中,有很重的两点。
- 父依赖的
Component中需要添加提供对象的接口。 - 子依赖的
Component中的注解中添加dependencies = AppComponent.class。
@Qualifier 自定义标记
在使用中,会出现两个方法返回对象相同时的情况,那么如何区分呢。
Person对象具有两个构造方法,根据不同的参数值构造不同的方法。
- 1
- 2
- 3
- 4
- 5
- 6
- 7
- 8
- 9
- 10
- 11
- 12
- 13
- 14
- 1
- 2
- 3
- 4
- 5
- 6
- 7
- 8
- 9
- 10
- 11
- 12
- 13
- 14
ActivityModule中添加@Named标记
- 1
- 2
- 3
- 4
- 5
- 6
- 7
- 8
- 9
- 10
- 11
- 12
- 13
- 14
- 15
- 16
- 17
- 18
- 19
- 1
- 2
- 3
- 4
- 5
- 6
- 7
- 8
- 9
- 10
- 11
- 12
- 13
- 14
- 15
- 16
- 17
- 18
- 19
使用时,也需要添加此标记
- 1
- 2
- 3
- 4
- 5
- 6
- 7
- 8
- 9
- 10
- 11
- 12
- 13
- 14
- 15
- 16
- 17
- 18
- 19
- 20
- 21
- 22
- 23
- 24
- 25
- 26
- 27
- 28
- 29
- 30
- 31
- 32
- 33
- 1
- 2
- 3
- 4
- 5
- 6
- 7
- 8
- 9
- 10
- 11
- 12
- 13
- 14
- 15
- 16
- 17
- 18
- 19
- 20
- 21
- 22
- 23
- 24
- 25
- 26
- 27
- 28
- 29
- 30
- 31
- 32
- 33
使用时,使用者的@Inject上,必须要加入注解@Named("xxx"),不然编译期会报错。
这样使用过程中,虽然解决了问题,但是通过字符串标记一个对象,容易导致前后不匹配,可以通过自定义注解的方式解决。
添加两个注解,分别对应Context和name。
- 1
- 2
- 3
- 4
- 5
- 1
- 2
- 3
- 4
- 5
- 1
- 2
- 3
- 4
- 5
- 1
- 2
- 3
- 4
- 5
在使用@Named("")的地方替换为上面的注解
- 1
- 2
- 3
- 4
- 5
- 6
- 7
- 8
- 9
- 10
- 11
- 12
- 13
- 14
- 15
- 1
- 2
- 3
- 4
- 5
- 6
- 7
- 8
- 9
- 10
- 11
- 12
- 13
- 14
- 15
注入时:
Scope
在前面中提到@Singleton注解,该注解能够使同一个Component中的对象保持唯一,即单例。
回忆一下,如下方式:
- 1
- 2
- 3
- 4
- 5
- 6
- 1
- 2
- 3
- 4
- 5
- 6
Module中,对应方法中添加@Singleton注解,同时其所在的Component中,类生命上也需要添加注解
- 1
- 2
- 3
- 4
- 5
- 1
- 2
- 3
- 4
- 5
如果我们看这个意思,感觉其内部应该做了很多的实现,用以达到单例。其实,没我们想的那么复杂。
看一下@Singleton的实现
- 1
- 2
- 3
- 4
- 5
- 1
- 2
- 3
- 4
- 5
通过@Scope定义的一个新的注解。
在之前的,我们知道该单例是依托于他所在的Component组件。那么我们是否可以这样理解,因为方法上添加的@Scope标记的注解和Component上添加的@Scope标记的注解相同(确实相同,同为@Singleton),就表明了该方法提供的实例对象在Component保持唯一。保持唯一的条件是通过@Scope标记的注解相同。
通过在上面的依赖层级上,Android中通常定义两个生命周期。
全局的生命周期PerApp
- 1
- 2
- 3
- 4
- 5
- 6
- 7
- 8
- 9
- 10
- 1
- 2
- 3
- 4
- 5
- 6
- 7
- 8
- 9
- 10
在使用中完全和@Singleton相同。
- 1
- 2
- 3
- 4
- 5
- 6
- 7
- 8
- 9
- 10
- 11
- 12
- 13
- 14
- 15
- 16
- 17
- 18
- 1
- 2
- 3
- 4
- 5
- 6
- 7
- 8
- 9
- 10
- 11
- 12
- 13
- 14
- 15
- 16
- 17
- 18
- 1
- 2
- 3
- 4
- 5
- 6
- 7
- 8
- 1
- 2
- 3
- 4
- 5
- 6
- 7
- 8
因为单例的依托于他所在的Component中,所以需要在Application中进行实例化。
- 1
- 2
- 3
- 4
- 5
- 6
- 7
- 8
- 9
- 10
- 11
- 12
- 13
- 14
- 15
- 16
- 1
- 2
- 3
- 4
- 5
- 6
- 7
- 8
- 9
- 10
- 11
- 12
- 13
- 14
- 15
- 16
为什么可以使用静态的,因为该AppComponent对象的生命周期是整个App。那么在使用中,其所在Module中的实例化对象,可以保持全局单例。
一个Activity的生命周期PerActivity
有全局的单例,而对于一个Activity,他也有些对象需要保持单例。我们需要定义该注解。
- 1
- 2
- 3
- 4
- 5
- 6
- 7
- 8
- 9
- 1
- 2
- 3
- 4
- 5
- 6
- 7
- 8
- 9
会发现,除了定义名不一样,其余都和PerApp一样。在前面,说过这样一句话:保持唯一的条件是通过@Scope标记的注解相同。
- 1
- 2
- 3
- 4
- 5
- 6
- 7
- 8
- 9
- 10
- 11
- 12
- 13
- 14
- 1
- 2
- 3
- 4
- 5
- 6
- 7
- 8
- 9
- 10
- 11
- 12
- 13
- 14
- 1
- 2
- 3
- 4
- 5
- 6
- 7
- 8
- 9
- 1
- 2
- 3
- 4
- 5
- 6
- 7
- 8
- 9
使用方式,因为其所保持的单例是在Activity中,具体使用如下。
- 1
- 2
- 3
- 4
- 5
- 6
- 7
- 8
- 9
- 10
- 11
- 12
- 13
- 14
- 15
- 16
- 17
- 18
- 19
- 20
- 21
- 22
- 23
- 24
- 25
- 26
- 27
- 28
- 29
- 30
- 31
- 32
- 33
- 34
- 1
- 2
- 3
- 4
- 5
- 6
- 7
- 8
- 9
- 10
- 11
- 12
- 13
- 14
- 15
- 16
- 17
- 18
- 19
- 20
- 21
- 22
- 23
- 24
- 25
- 26
- 27
- 28
- 29
- 30
- 31
- 32
- 33
- 34
对于具有依赖关系的Component,不能使用相同的Scope,如果使用相同的会带来语意不明
懒加载Lazy和强制重新加载Provider
- 1
- 2
- 3
- 4
- 5
- 6
- 7
- 8
- 9
- 10
- 11
- 12
- 13
- 14
- 15
- 16
- 17
- 18
- 19
- 20
- 21
- 22
- 23
- 24
- 25
- 26
- 27
- 28
- 29
- 30
- 31
- 32
- 33
- 34
- 35
- 36
- 37
- 38
- 39
- 40
- 41
- 42
- 1
- 2
- 3
- 4
- 5
- 6
- 7
- 8
- 9
- 10
- 11
- 12
- 13
- 14
- 15
- 16
- 17
- 18
- 19
- 20
- 21
- 22
- 23
- 24
- 25
- 26
- 27
- 28
- 29
- 30
- 31
- 32
- 33
- 34
- 35
- 36
- 37
- 38
- 39
- 40
- 41
- 42
该博客中使用的代码已经上传到github,有需要者请移步。https://github.com/AlexSmille/alex_mahao_sample/tree/master/architecture
- 1
- 2
- 3
- 4
- 5
- 6
- 7
- 8
- 9
- 10
- 11
- 12
- 13
- 1
- 2
- 3
- 4
- 5
- 6
- 7
- 8
- 9
- 10
- 11
- 12
- 13
沟通部分Component


 2万+
2万+

 被折叠的 条评论
为什么被折叠?
被折叠的 条评论
为什么被折叠?
 到【灌水乐园】发言


