


文章目录
一、创建项目
通过 git clone https://github.com/googlecodelabs/android-compose-codelabs 下载原始代码,打开 MigrationCodelab 项目,在 build.gradle 中添加如下依赖:
android {
    ...
    kotlinOptions {
        jvmTarget = '1.8'
        useIR = true
    }
    buildFeatures {
        ...
        compose true
    }
    composeOptions {
        kotlinCompilerExtensionVersion rootProject.composeVersion
    }
}

dependencies {
    ...
    // Compose
    implementation "androidx.compose.runtime:runtime:$rootProject.composeVersion"
    implementation "androidx.compose.ui:ui:$rootProject.composeVersion"
    implementation "androidx.compose.foundation:foundation:$rootProject.composeVersion"
    implementation "androidx.compose.foundation:foundation-layout:$rootProject.composeVersion"
    implementation "androidx.compose.material:material:$rootProject.composeVersion"
    implementation "androidx.compose.runtime:runtime-livedata:$rootProject.composeVersion"
    implementation "androidx.compose.ui:ui-tooling:$rootProject.composeVersion"
    implementation "com.google.android.material:compose-theme-adapter:$rootProject.composeVersion"
    ...
}
二、使用 Compose 布局
在 layout/fragment_plant_detail.xml 中,移除 NestedScrollView 中的 ConstraintLayout 代码和嵌套的 TextView,替换成 ComposeView,代码如下:
        <androidx.core.widget.NestedScrollView
            android:id="@+id/plant_detail_scrollview"
            android:layout_width="match_parent"
            android:layout_height="match_parent"
            android:clipToPadding="false"
            android:paddingBottom="@dimen/fab_bottom_padding"
            app:layout_behavior="@string/appbar_scrolling_view_behavior">

            <androidx.compose.ui.platform.ComposeView
                android:id="@+id/compose_view"
                android:layout_width="match_parent"
                android:layout_height="match_parent" />
        </androidx.core.widget.NestedScrollView>
然后,在 PlantDetailFragment 的 onCreateView() 中用 Compose 的方式填充布局,代码如下:
class PlantDetailFragment : Fragment() {
    ...
    override fun onCreateView(...): View? {
        composeView.setContent {
            MaterialTheme {
                PlantDetailDescription()
            }
        }
    }
}
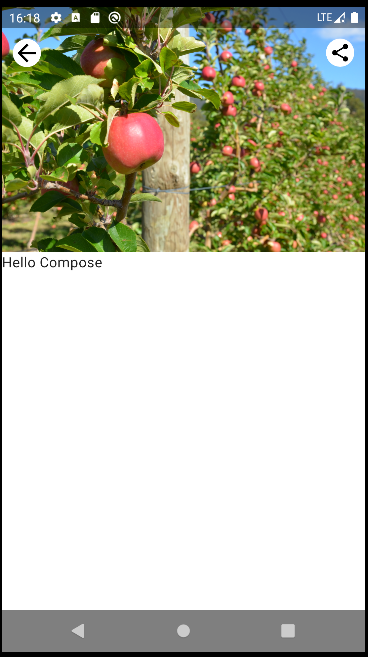
运行后,Compose 已被使用了,效果如下:
三、用 xml 创建 @Composable
在 PlantDetailDescription.kt 中用 @Composable 描述布局,代码如下:
@Composable
fun PlantDetailDescription() {
    Surface {
        PlantName("Apple")
    }
}

@Composable
fun PlantName(name: String) {
    Text(
        text = name, style = MaterialTheme.typography.h5,
        modifier = Modifier
            .fillMaxWidth()
            .padding(horizontal = dimensionResource(R.dimen.margin_small))
            .wrapContentWidth(Alignment.CenterHorizontally)
    )
}
运行后,效果如下:

效果其实和下述 xml 描述是相同的:
<TextView
    android:id="@+id/plant_detail_name"
    ...
    android:layout_marginStart="@dimen/margin_small"
    android:layout_marginEnd="@dimen/margin_small"
    android:gravity="center_horizontal"
    android:text="@{viewModel.plant.name}"
    android:textAppearance="?attr/textAppearanceHeadline5"
    ... />
其中:
- Text 的样式为 MaterialTheme.typography.h5,它从 XML 代码映射到 - textAppearanceHeadline5。
- 修饰符会修饰 Text,以将其调整为类似于 XML 版本:
- fillMaxWidth 修饰符对应于 XML 代码中的 android:layout_width=“match_parent”。
- margin_small 的水平 padding,其值是使用 dimensionResource 辅助函数从 View 系统获取的。
- wrapContentWidth 水平对齐 Text。
Compose 提供了从 dimens.xml 和 strings.xml 文件获取值的简单方法,即 dimensionResource(id) 和 stringResource(id)。因此可以将 View 系统视为可信来源。
四、ViewModel 和 LiveData
在 PlantDetailDescription.kt 中接收 ViewModel 参数,代码如下:
@Composable
fun PlantDetailDescription(plantDetailViewModel: PlantDetailViewModel) {
    ...
}
再在PlantDetailFragment.kt 调用此可组合项时传递 ViewModel 实例,代码如下:
class PlantDetailFragment : Fragment() {
    ...
    override fun onCreateView(...): View? {
        ...
        composeView.setContent {
            MaterialTheme {
                PlantDetailDescription(plantDetailViewModel)
            }
        }
    }
}
如需从可组合项观察 LiveData,请使用 LiveData.observeAsState() 函数,该函数开始观察 LiveData,并通过 State 对象表示它的值。每次向 LiveData 发布一个新值时,返回的 State 都会更新,这会导致所有 State.value 用法重组。
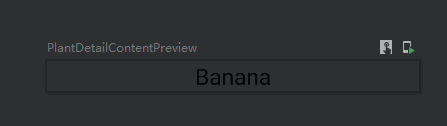
由于 LiveData 发出的值可以为 null,因此您需要将其用法封装在 null 检查中。有鉴于此,以及为了实现可重用性,最好将 LiveData 的使用和监听拆分到不同的可组合项中。因此,请创建一个名为 PlantDetailContent 的新可组合项,用于显示 Plant 信息,代码如下:
@Composable
fun PlantDetailDescription(plantDetailViewModel: PlantDetailViewModel) {
    // observe viewModel 的 LiveData<Plant> 属性
    val plant by plantDetailViewModel.plant.observeAsState()
    plant?.let {
        PlantDetailContent(it)
    }
}

@Composable
fun PlantDetailContent(plant: Plant) {
    PlantName(name = plant.name)
}

@Preview
@Composable
fun PlantDetailContentPreview() {
    val plant = Plant("id", "Banana", "description", 3, 30, "")
    MaterialTheme {
        PlantDetailContent(plant)
    }
}

@Composable
fun PlantName(name: String) {
    Text(
        text = name, style = MaterialTheme.typography.h5,
        modifier = Modifier
            .fillMaxWidth()
            .padding(horizontal = dimensionResource(R.dimen.margin_small))
            .wrapContentWidth(Alignment.CenterHorizontally)
    )
}
预览后,效果如下:
五、更多 xml 代码迁移到 Compose
现在,我们可以更轻松地将界面中缺少的内容补充完整:浇水信息和植物说明。
@Composable
fun PlantWatering(wateringInterval: Int) {
    Column(Modifier.fillMaxWidth()) {
        val centerWithPaddingModifier = Modifier
            .padding(horizontal = dimensionResource(R.dimen.margin_small))
            .align(Alignment.CenterHorizontally)
        val normalPadding = dimensionResource(R.dimen.margin_normal)
        Text(
            text = stringResource(R.string.watering_needs_prefix),
            color = MaterialTheme.colors.primaryVariant,
            fontWeight = FontWeight.Bold,
            modifier = centerWithPaddingModifier.padding(top = normalPadding)
        )

        val wateringIntervalText = LocalContext.current.resources.getQuantityString(
            R.plurals.watering_needs_suffix, wateringInterval, wateringInterval
        )
        Text(
            text = wateringIntervalText,
            modifier = centerWithPaddingModifier.padding(bottom = normalPadding)
        )
    }
}
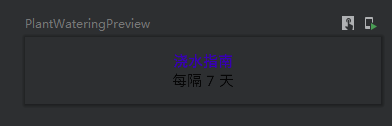
组合后,代码如下:
@Composable
fun PlantDetailContent(plant: Plant) {
    Surface {
        Column(Modifier.padding(dimensionResource(R.dimen.margin_normal))) {
            PlantName(plant.name)
            PlantWatering(plant.wateringInterval)
        }
    }
}
效果如下:
六、Compose 中使用 View
@Composable
private fun PlantDescription(description: String) {
// Remembers the HTML formatted description. Re-executes on a new description
val htmlDescription = remember(description) {
HtmlCompat.fromHtml(description, HtmlCompat.FROM_HTML_MODE_COMPACT)
}
// Displays the TextView on the screen and updates with the HTML description when inflated
// Updates to htmlDescription will make AndroidView recompose and update the text
AndroidView(
factory = { context ->
TextView(context).apply {
movementMethod = LinkMovementMethod.getInstance()
}
},
update = {
it.text = htmlDescription
}
)
}
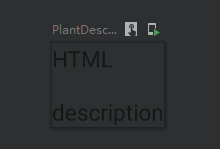
@Preview
@Composable
private fun PlantDescriptionPreview() {
MaterialTheme {
PlantDescription("HTML<br><br>description")
}
}
效果如下:
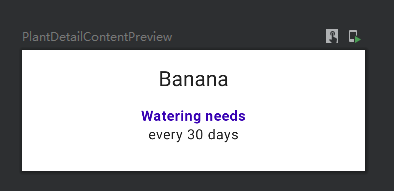
将各 @Composable 组合在一起后,代码如下:
@Composable
fun PlantDetailContent(plant: Plant) {
Surface {
Column(Modifier.padding(dimensionResource(R.dimen.margin_normal))) {
PlantName(plant.name)
PlantWatering(plant.wateringInterval)
PlantDescription(plant.description)
}
}
}
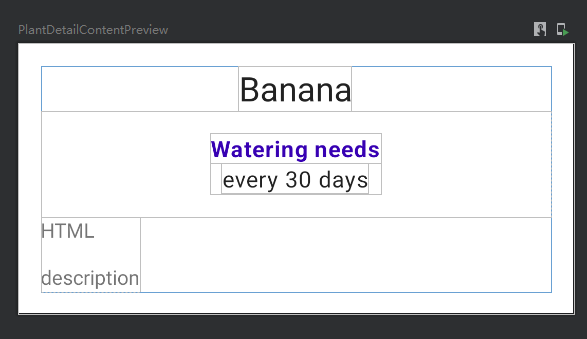
@Preview
@Composable
fun PlantDetailContentPreview() {
val plant = Plant("id", "Banana", "HTML<br><br>description", 3, 30, "")
MaterialTheme {
PlantDetailContent(plant)
}
}
预览后,效果如下:
现在,运行 app,即可成功显示 html 文档页了,效果如下:
七、ViewCompositionStrategy
组合必须遵循 fragment 的视图生命周期,Compose 界面 View 类型才能保存状态,并且在发生过渡或窗口过渡时让 Compose 界面元素保留在界面上。在过渡期间,ComposeView 本身仍然可见,即使其与窗口分离也是如此。
因此我们需要确保 ComposeView 使用 DisposeOnViewTreeLifecycleDestroyed 策略,只要是在 fragment 中使用 ComposeView,最好都设置此策略。
import androidx.compose.ui.platform.ViewCompositionStrategy
...

class PlantDetailFragment : Fragment() {
    ...
    override fun onCreateView(...): View? {
        val binding = DataBindingUtil.inflate<FragmentPlantDetailBinding>(
            inflater, R.layout.fragment_plant_detail, container, false
        ).apply {
            ...
            composeView.apply {
                // Dispose the Composition when the view's LifecycleOwner
                // is destroyed
                setViewCompositionStrategy(
                    ViewCompositionStrategy.DisposeOnViewTreeLifecycleDestroyed
                )
                setContent {
                    MaterialTheme {
                        PlantDetailDescription(plantDetailViewModel)
                    }
                }
            }
        }
        ...
    }
}


 1225
1225


 被折叠的 条评论
为什么被折叠?
被折叠的 条评论
为什么被折叠?
 到【灌水乐园】发言


