第1步.为测试代码创建一个Visual Studio工程。
在Microsoft Visual Studio .NET中,让我们开始创建一个新的工程。选择Visual C#工程作为工程类型,Class Library作为模板。将工程命名为
NUnitQuickStart.图4-1是一个描述本步骤的Visual Studio .NET。

图 4-1: 创建第一个NUnit工程
第2步.增加一个NUnit框架引用
在Microsoft Visual Studio .NET里创建这个例子时,你需要增加一个
NUnit.framework.dll引用,如下:
在Solution Explorer右击引用,然后选择增加引用
NUnit.framework组件,在Add Reference对话框中按Select和OK按钮。
图4-2 描述了这步:
第3步.为工程加一个类.
为工程加一个
NumbersFixture类。这里是这个例子的代码。
1
 using
System;
2 using
NUnit.Framework;
3
4 namespace
NUnitQuickStart
5

 {
{
6 [TestFixture]
7 public class NumersFixture
8

 {
{
9 [Test]
10 public void AddTwoNumbers()
11

 {
{
12 int a=1;
13 int b=2;
14 int sum=a+b;
15 Assert.AreEqual(sum,3);
16 }
}
17 }
}
18 }
}
19
 using
System;
 2
 using
NUnit.Framework;
 3

4
 namespace
NUnitQuickStart
 5


 {
{ 6
 [TestFixture]
 7
 public class NumersFixture
 8


 {
{ 9
 [Test]
 10
 public void AddTwoNumbers()
 11


 {
{ 12
 int a=1;
 13
 int b=2;
 14
 int sum=a+b;
 15
 Assert.AreEqual(sum,3);
 16
 }
} 17
 }
} 18
 }
}
19

第4步.建立你的Visual Studio 工程,使用NUnit-Gui测试
从程序->NUnit2.2打开NUnit-gui,加载本本工程编译的程序集.
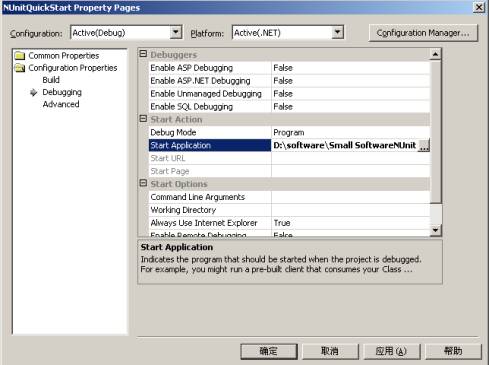
为了在Visual Studio .NET中自动运行NUnit-Gui,你需要建立NUnit-Gui作为你的启动程序:
在 Solution Explorer里右击你的NunitQuickStart工程。
在弹出菜单中选择属性。
在显示的对话框的左面,点击Configuration Properties夹
选择出现在Configuration Properties夹下的Debugging。
在属性框右边的Start Action部分,选择下拉框的Program作为Debug Mode值。
按Apply按钮
设置NUnit-gui.exe
作为Start Application。,你既可以键入nunit-gui.exe的全路径,也可使用浏览按钮来指向它。
图4-3 帮助描述本步骤:

![]()


图 4-3:
将NUnit-Gui 作为工程的测试运行器
第5步.编译运行测试.
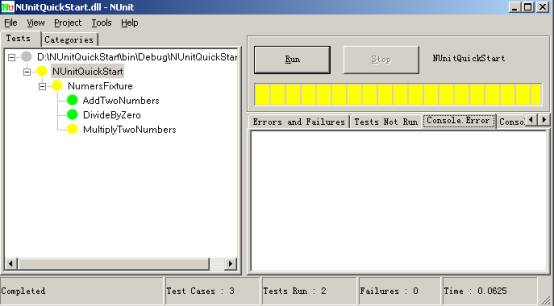
现在编译solution。成功编译后,开始应用程序。NUnit-Gui测试运行器出现。当你第一次开始NUnit-Gui,它打开时没有测试加载。从File菜单选择Oprn,浏览
NUnitQuickStart.
dll的路径。当你加载了测试的程序集,测试运行器为加载的程序集的测试产生一个可见的表现。在例子中,测试程序集仅有一个测试,测试程序集的结构如图4-4所示:
按Run按钮。树的节点变为绿色,而且测试运行器窗口上的进度条变绿,绿色代表成功通过。
4.其他的一些核心概念
上面的例子介绍了基本的NUnit特性和功能.
TestFixture,
Test, 和
Assert是3个最基本的特征,我们可以用这些特性进行程序员测试了.但是有的时候,你觉得这3个远远不够,比如有的时候打开一个数据库连接多次,有没有只让它打开一次的方法呢?如果我想把测试分类,应该怎样实现呢?如果我想忽略某些测试,又应该如何去完成呢?不用担心,NUnit已经有这样的功能了.
下面我们一一作出回答.
SetUp/TearDown 属性
在早期给的test fixture定义里,我们说test fixture的测试是一组常规运行时资源.在测试完成之后,或是在测试执行种,或是释放或清除之前,这些常规运行时资源在一确定的方式上可能需要获取和初始化.NUnit使用2个额外的属性:
SetUp 和
TearDown,就支持这种常规的初始化/清除.我们上面的例子来描述这个功能.让我们增加乘法.
1
 using
System;
2 using
NUnit.Framework;
3
4 namespace
NUnitQuickStart
5

 {
{
6 [TestFixture]
7 public class NumersFixture
8

 {
{
9 [Test]
10 public void AddTwoNumbers()
11

 {
{
12 int a=1;
13 int b=2;
14 int sum=a+b;
15 Assert.AreEqual(sum,3);
16 }
}
17 [Test]
18 public void MultiplyTwoNumbers()
19

 {
{
20 int a = 1;
21 int b = 2;
22 int product = a * b;
23 Assert.AreEqual(2, product);
24 }
}
25
26 }
}
27 }
}
28
 using
System;
 2
 using
NUnit.Framework;
 3

4
 namespace
NUnitQuickStart
 5


 {
{ 6
 [TestFixture]
 7
 public class NumersFixture
 8


 {
{ 9
 [Test]
 10
 public void AddTwoNumbers()
 11


 {
{ 12
 int a=1;
 13
 int b=2;
 14
 int sum=a+b;
 15
 Assert.AreEqual(sum,3);
 16
 }
} 17
 [Test]
 18
 public void MultiplyTwoNumbers()
 19


 {
{ 20
 int a = 1;
 21
 int b = 2;
 22
 int product = a * b;
 23
 Assert.AreEqual(2, product);
 24
 }
} 25

26
 }
} 27
 }
}
28

1
 using
System;
2 using
NUnit.Framework;
3
4 namespace
NUnitQuickStart
5

 {
{
6 [TestFixture]
7 public class NumersFixture
8

 {
{
9 private int a;
10 private int b;
11 [SetUp]
12 public void InitializeOperands()
13

 {
{
14 a = 1;
15 b = 2;
16 }
}
17
18 [Test]
19 public void AddTwoNumbers()
20

 {
{
21 int sum=a+b;
22 Assert.AreEqual(sum,3);
23 }
}
24 [Test]
25 public void MultiplyTwoNumbers()
26

 {
{
27 int product = a * b;
28 Assert.AreEqual(2, product);
29 }
}
30
31 }
}
32 }
}
33
 using
System;
 2
 using
NUnit.Framework;
 3

4
 namespace
NUnitQuickStart
 5


 {
{ 6
 [TestFixture]
 7
 public class NumersFixture
 8


 {
{ 9
 private int a;
 10
 private int b;
 11
 [SetUp]
 12
 public void InitializeOperands()
 13


 {
{ 14
 a = 1;
 15
 b = 2;
 16
 }
} 17

18
 [Test]
 19
 public void AddTwoNumbers()
 20


 {
{ 21
 int sum=a+b;
 22
 Assert.AreEqual(sum,3);
 23
 }
} 24
 [Test]
 25
 public void MultiplyTwoNumbers()
 26


 {
{ 27
 int product = a * b;
 28
 Assert.AreEqual(2, product);
 29
 }
} 30

31
 }
} 32
 }
}
33

这样NUnit将在执行每个测试前执行标记SetUp属性的方法.在本例中就是执行InitializeOperands()方法.记住,这里这个方法必须为public,不然就会有以下错误:Invalid Setup or TearDown method signature
ExpectedException
这里是一个验证这个假设的测试.有的时候,我们知道某些操作会有异常出现,例如, 在实例中增加除法,某个操作被0除,抛出的异常和.NET文档描述的一样.参看以下源代码.
1[Test]
2[ExpectedException( typeof (DivideByZeroException))]
3public void DivideByZero()
4
{
5int zero = 0;
6int infinity = a/zero;
7Assert.Fail("Should have gotten an exception");
8}
9
除了[Test]属性之外,
DivideByZero方法有另外一个客户属性:
ExpectedException.在这个属性里,你可以在执行过程中捕获你期望的异常类型,例如在本例就是DivideByZeroException.如果这个方法在没有抛出期望异常的情况下完成了,这个测试失败.使用这个属性帮助我们写程序员测试验证边界条件(Boundary Conditions).
Ignore 属性
由于种种原因,有一些测试我们不想运行.当然,这些原因可能包括你认为这个测试还没有完成,这个测试正在重构之中,这个测试的需求不是太明确.但你有不想破坏测试,不然进度条可是红色的哟.怎么办?使用
Ignore属性.你可以保持测试,但又不运行它们.让我们标记
MultiplyTwoNumbers测试方法为
Ignore属性:
1[Test]
2[Ignore( " Multiplication is ignored " )]
3public void MultiplyTwoNumbers()
4
{
5int product = a * b;
6Assert.AreEqual(2, product);
7}
运行测试,现在产生了下面的输出(在图5-1显示):

图 5-1: 在一个程序员测试中使用 Ignore属性
Ignore属性可以附加到一个独立的测试方法,也可以附加到整个测试类(TestFixture).如果
Ignore属性附加到
TestFixture,所有在fixture的测试都被忽略.
TestFixtureSetUp/TestFixtureTearDown
有时,一组测试需要的资源太昂贵.例如,数据库连接可能是一个关键资源,在一个test fixture的每个测试中,打开/关闭数据库连接可能非常慢.这就是我在开始提到的问题.如何解决?NUnit有一对类似于前面讨论的
SetUp/
TearDown的属性:
TestFixtureSetUp/
TestFixtureTearDown.正如他们名字表明的一样,这些属性用来标记为整个test fixture初始化/释放资源方法一次的方法.
例如,如果你想为所有test fixture的测试共享相同的数据库连接对象,我们可以写一个打开数据库连接的方法,标记为
TestFixtureSetUp属性,编写另外一个关闭数据库连接的方法,标记为
TestFixtureTearDown属性.这里是描述这个的例子.
1using NUnit.Framework;
2
3[TestFixture]
4public class DatabaseFixture
5
{
6[TestFixtureSetUp]
7public void OpenConnection()
8
{
9//open the connection to the database
10}
11
12[TestFixtureTearDown]
13public void CloseConnection()
14
{
15//close the connection to the database
16}
17
18[SetUp]
19public void CreateDatabaseObjects()
20
{
21//insert the records into the database table
22}
23
24[TearDown]
25public void DeleteDatabaseObjects()
26
{
27//remove the inserted records from the database table
28}
29
30[Test]
31public void ReadOneObject()
32
{
33//load one record using the open database connection
34}
35
36[Test]
37public void ReadManyObjects()
38
{
39//load many records using the open database connection
40}
41}
42
43
Test Suite
Test Suite是test case或其他test suite的集合. 合成(Composite)
,模式描述了test case和test suite之间的关系.
参考来自NUnit的关于Suite的代码
Suite Attribute
1
 namespace
NUnit.Tests
2


 {
{
3 using System;
4 using NUnit.Framework;
5
6
7
8 public class AllTests
9

 {
{
10 [Suite]
11 public static TestSuite Suite
12

 {
{
13 get
get
14

 {
{
15 TestSuite suite = new TestSuite("All Tests");
16 suite.Add(new OneTestCase());
17 suite.Add(new Assemblies.AssemblyTests());
18 suite.Add(new AssertionTest());
19 return suite;
20 }
}
21 }
}
22 }
}
23 }
}
24
 Category属性
1
 namespace
NUnit.Tests
2

 {
{
3 using System;
4 using NUnit.Framework;
5
6
7
8 public class AllTests
9

 {
{
10 [Suite]
11 public static TestSuite Suite
12

 {
{
13 get
get
14

 {
{
15 TestSuite suite = new TestSuite("All Tests");
16 suite.Add(new OneTestCase());
17 suite.Add(new Assemblies.AssemblyTests());
18 suite.Add(new AssertionTest());
19 return suite;
20 }
}
21 }
}
22 }
}
23 }
}
24
 namespace
NUnit.Tests
namespace
NUnit.Tests2


 {
{3
 using System;
4
 using NUnit.Framework;
5

6

7

8
 public class AllTests
9


 {
{10
 [Suite]
11
 public static TestSuite Suite
12


 {
{13
 get
get14


 {
{15
 TestSuite suite = new TestSuite("All Tests");
16
 suite.Add(new OneTestCase());
17
 suite.Add(new Assemblies.AssemblyTests());
18
 suite.Add(new AssertionTest());
19
 return suite;
20
 }
}21
 }
}22
 }
}23
 }
}
24

对于测试来说,你有的时候需要将之分类,此属性正好就是用来解决这个问题的。
你可以选择你需要运行的测试类目录,也可以选择除了这些目录之外的测试都可以运行。在命令行环境里 /include 和/exclude来实现。在GUI环境下,就更简单了,选择左边工作域里的Catagories Tab,选择Add和Remove既可以了。
在上面的例子上做了一些改善,代码如下:
1using System;
2using NUnit.Framework;
3
4namespace NUnitQuickStart
5
{
6[TestFixture]
7public class NumersFixture
8
{
9private int a;
10private int b;
11[SetUp]
12public void InitializeOperands()
13
{
14a = 1;
15b = 2;
16}
17
18[Test]
19[Category("Numbers")]
20public void AddTwoNumbers()
21
{
22int sum=a+b;
23Assert.AreEqual(sum,3);
24}
25
26[Test]
27[Category("Exception")]
28[ExpectedException(typeof(DivideByZeroException))]
29public void DivideByZero()
30
{
31int zero = 0;
32int infinity = a/zero;
33Assert.Fail("Should have gotten an exception");
34}
35[Test]
36[Ignore("Multiplication is ignored")]
37[Category("Numbers")]
38public void MultiplyTwoNumbers()
39
{
40int product = a * b;
41Assert.AreEqual(2, product);
42}
43
44}
45
NUnit-GUI界面如图5-2:
图5-2:使用Catagories属性的界面
Explicit属性
本属性忽略一个test和test fixture,直到它们显式的选择执行。如果test和test fixture在执行的过程中被发现,就忽略他们。所以,这样一来进度条显示为黄色,因为有test或test fixture忽略了。
例如:
1

2 [Test,Explicit]
3 [Category(
"
Exception
"
)]
4 [ExpectedException(
typeof
(DivideByZeroException))]
5 public
void
DivideByZero()
6

 {
{
7 int zero = 0;
8 int infinity = a/zero;
9 Assert.Fail("Should have gotten an exception");
10 }
}
11

2
 [Test,Explicit]
 3
 [Category(
"
Exception
"
)]
 4
 [ExpectedException(
typeof
(DivideByZeroException))]
 5
 public
void
DivideByZero()
 6


 {
{ 7
 int zero = 0;
 8
 int infinity = a/zero;
 9
 Assert.Fail("Should have gotten an exception");
 10
 }
}
11

Expected Exception属性
期望在运行时抛出一个期望的异常,如果是,则测试通过,否则不通过。
参看下面的例子:
1
 [Test]
2 [ExpectedException(typeofInvalidOperationException))]
3 public
void
ExpectAnException()
4

 {
{
5 int zero = 0;
6 int infinity = a/zero;
7 Assert.Fail("Should have gotten an exception");
8
9 }
}
10
 [Test]
 2
 [ExpectedException(typeofInvalidOperationException))]
 3
 public
void
ExpectAnException()
 4


 {
{ 5
 int zero = 0;
 6
 int infinity = a/zero;
 7
 Assert.Fail("Should have gotten an exception");
 8

9
 }
}
10

5 . 测试生命周期合约
如果记得test case的定义,其中一个属性是测试的独立性或隔离性.
SetUp/TearDown方法提供达到测试隔离性的目的.
SetUp确保共享的资源在每个测试运行前正确初始化,
TearDown确保没有运行测试产生的遗留副作用.
TestFixtureSetUp/
TestFixtureTearDown同样提供相同的目的,但是却在test fixture范围里,我们刚才描述的内容组成了测试框架的运行时容器(test runner)和你写的测试之间的生命周期合约(
life-cycle contract).
为了描述这个合约,我们写一个简单的测试来说明什么方法调用了,怎么合适调用的.这里是代码:
1using System;
2using NUnit.Framework;
3[TestFixture]
4public class LifeCycleContractFixture
5
{
6[TestFixtureSetUp]
7public void FixtureSetUp()
8
{
9Console.Out.WriteLine("FixtureSetUp");
10}
11
12[TestFixtureTearDown]
13public void FixtureTearDown()
14
{
15Console.Out.WriteLine("FixtureTearDown");
16}
17
18[SetUp]
19public void SetUp()
20
{
21Console.Out.WriteLine("SetUp");
22}
23
24[TearDown]
25public void TearDown()
26
{
27Console.Out.WriteLine("TearDown");
28}
29
30[Test]
31public void Test1()
32
{
33Console.Out.WriteLine("Test 1");
34}
35
36[Test]
37public void Test2()
38
{
39Console.Out.WriteLine("Test 2");
40}
41
42}
43
44
当编译和运行这个测试,可以在
System.Console窗口看到下面的输出:
   FixtureSetUp

SetUp

Test

   1


TearDown

SetUp

Test

   2


TearDown

FixtureTearDown

可以看到,
SetUp/
TearDown方法调用在每个测试方法的前后.
整个fixture调用一次
TestFixtureSetUp/
TestFixtureTearDown方法.
3)本文的源代码
下载


 2560
2560

 被折叠的 条评论
为什么被折叠?


