


1、创建Hibernate的配置文件 ##
在开发第一个例子之前,首先要创建hibernate.cfg.xml配置文件
<1.1>创建好一个java项目,在该项目下的src源文件夹下—>new—>other—>hibernate—>hibernate configtion file (cfg.xml)

然后就是对该文件的配置了,直接看代码:
<?xml version="1.0" encoding="UTF-8"?>
<!DOCTYPE hibernate-configuration PUBLIC
        "-//Hibernate/Hibernate Configuration DTD 3.0//EN"
        "http://hibernate.sourceforge.net/hibernate-configuration-3.0.dtd">
<hibernate-configuration>
<!-- hibernate配置文件 -->
    <session-factory>
        <!-- 配置连接数据库的基本信息 -->
        <property name="connection.username">root</property>
        <property name="connection.password">lijin123456</property>
        <property name="connection.driver_class">com.mysql.jdbc.Driver</property>
        //数据库的名称,也可写成jdbc:mysql://localhost/hibernate
        <property name="connection.url">jdbc:mysql:///hibernate</property>

        <!-- 配置hibernate的基本信息 -->
        <!-- hibernate所使用的数据库方言 -->
        <property name="dialect">org.hibernate.dialect.MySQLDialect</property>

        <!-- 执行操作时是否在控制台打印sql -->
        <property name="show_sql">true</property>

        <!-- 是否对sql进行格式化 -->
        <property name="format_sql">true</property>

        <!-- 指定自动生成数据表的策略-->
        <property name="hbm2ddl.auto">create</property>
         <!--指定关联的 .hbm.xml -->
        <mapping resource="one/Students.hbm.xml"/>
    </session-factory>
</hibernate-configuration>
2、创建持久化类
这里的持久化类也就是我们说的一个利用Hibernate来将对象写进数据库中的那个对象所属的类。比如:我们创建了学生类,就是要之后直接封装student这个对象,将对象的信息写入数据库,这个持久化类有如下要求:
1.共有类
2.提供共有的带参数的构造方法
3.属性私有
4.set/get方法封装
直接看代码:
package one;

import java.util.Date;

//持久化类
public class Students {
    /**
     * 1.共有类
     * 2.提供共有的带参数的构造方法
     * 3.属性私有
     * 4.set/get方法封装
     */
    private int sid;
    private String sname;
    private String gender;
    private Date birthday;
    private String address;

    public Students() {

    }

    public Students(int sid, String sname, String gender, Date birthday, String address) {
        super();
        this.sid = sid;
        this.sname = sname;
        this.gender = gender;
        this.birthday = birthday;
        this.address = address;
    }

    public int getSid() {
        return sid;
    }

    public void setSid(int sid) {
        this.sid = sid;
    }

    public String getSname() {
        return sname;
    }

    public void setSname(String sname) {
        this.sname = sname;
    }

    public String getGender() {
        return gender;
    }

    public void setGender(String gender) {
        this.gender = gender;
    }

    public Date getBirthday() {
        return birthday;
    }

    public void setBirthday(Date birthday) {
        this.birthday = birthday;
    }

    public String getAddress() {
        return address;
    }

    public void setAddress(String address) {
        this.address = address;
    }

    @Override
    //toString方法只是为了测试用
    public String toString() {
        return "Students [sid=" + sid + ", sname=" + sname + ", gender=" + gender + ", birthday=" + birthday
                + ", address=" + address + "]";
    }

}
3、创建对象/关系映射文件
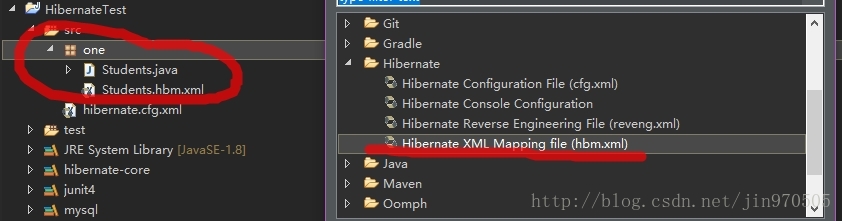
<3.1>在刚建好的持久化类所在的包下面,new—>other—>Hibernate XML Mapping file
<3.2>建好映射文件后,我们要在之前的Hibernate配置文件里添加上:
 <!--指定关联的 .hbm.xml  注意这里的路径用反斜杠来间隔-->
    <mapping resource="one/Students.hbm.xml"/>
<3.3>配置该文件(其实在创建的时候自己就生成了):
<?xml version="1.0"?>
<!DOCTYPE hibernate-mapping PUBLIC "-//Hibernate/Hibernate Mapping DTD 3.0//EN"
"http://hibernate.sourceforge.net/hibernate-mapping-3.0.dtd">
<!-- Generated 2017-11-26 20:48:18 by Hibernate Tools 3.4.0.CR1 -->
<hibernate-mapping>
    <class name="one.Students" table="STUDENTS">
        <id name="sid" type="int">
            <column name="SID" />
            <!-- 制定主键的生成方法,native:使用数据库本地模式 -->
            <generator class="native" />
        </id>
        <property name="sname" type="java.lang.String">
            <column name="SNAME" />
        </property>
        <property name="gender" type="java.lang.String">
            <column name="GENDER" />
        </property>
        <property name="birthday" type="java.util.Date">
            <column name="BIRTHDAY" />
        </property>
        <property name="address" type="java.lang.String">
            <column name="ADDRESS" />
        </property>
    </class>
</hibernate-mapping>
4、通过Hibernate API来编写操作数据库的代码
首先我们看一下junit4单元测试框架是什么?具体参考一下这一篇:junit4入门
我们建一个java文件用来测试:
package onetest;

import java.util.Date;

import org.hibernate.Session;
import org.hibernate.SessionFactory;
import org.hibernate.Transaction;
import org.hibernate.cfg.Configuration;
import org.hibernate.service.ServiceRegistry;
import org.hibernate.service.ServiceRegistryBuilder;
import org.junit.After;
import org.junit.Before;
import org.junit.Test;

import one.Students;

/*
使用Junit进行测试
要使用到的标签:
@Test:要测试的方法。
@Before:初始化方法(表示在测试前会先执行before方法进行初始化)。
@After:释放资源。
执行次序:@before标签下的方法——>@test方法——>@after释放资源。
*/
public class StudentsTest {
    private SessionFactory sessionFactory;
    private Session session;
    private Transaction transaction;

        @Before
        public void init(){
            //创建配置对象
            Configuration config = new Configuration().configure();
            //创建服务注册对象
            ServiceRegistry serviceRegistry = new ServiceRegistryBuilder().applySettings(config.getProperties()).buildServiceRegistry();
            //创建会话工厂对象
            sessionFactory = config.buildSessionFactory(serviceRegistry);
            //创建会话对象
            session = sessionFactory.openSession();
            //开启事务
            transaction = session.beginTransaction();
        }
        @After
        public void destory(){
            //提交事务
            transaction.commit();
            //关闭会话
            session.close();
            //关闭会话工厂
            sessionFactory.close();
        }
        @Test
        public void testStudents(){
            //生成学生对象
            Students s = new Students(1,"jinjin","男",new Date(),"山科");
            session.save(s);//保存对象到数据库

        }
}
5、测试
在写完的Test类中,右键单击—>run as —>junit test,我们看看之后的运行结果:

左边的控制台显示绿色和下面的控制台显示了具体的运行过程,这就成功了,而我们也把一条信息加到了hibernate数据库里。


 5万+
5万+


 被折叠的 条评论
为什么被折叠?
被折叠的 条评论
为什么被折叠?
 到【灌水乐园】发言


