


 本文全面介绍了Fragment的概念、作用及生命周期,解析了Fragment与Activity的关系,并详细演示了两种常用的Fragment使用方法。
前言
Fragment在Android开发中非常常用- 今天,我将讲解关于
Fragment的使用
目录
1. 定义
Activity界面中的一部分,可理解为模块化的Activity
Fragment不能独立存在,必须嵌入到Activity中Fragment具有自己的生命周期,接收它自己的事件,并可以在Activity运行时被添加或删除Fragment的生命周期直接受所在的Activity的影响。如:当Activity暂停时,它拥有的所有Fragment们都暂停
2. 作用
支持动态、灵活的界面设计
Fragment从Android 3.0后引入- 在低版本
Android 3.0前使用Fragment,需要采用android-support-v4.jar兼容包
3. 生命周期解析
- 先来看官方说明图
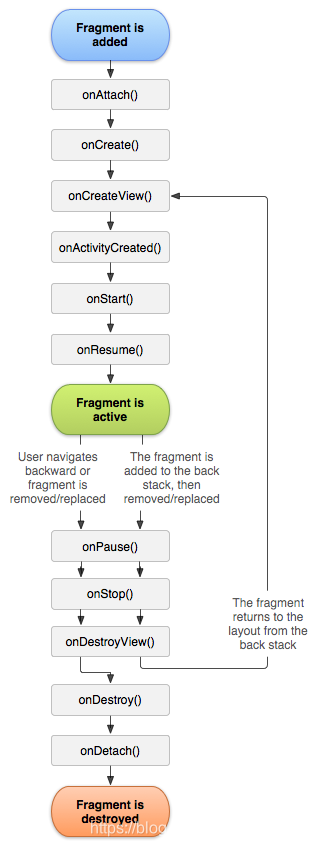
详解每个方法的调用场景
- onAttach方法
Fragment和Activity建立关联的时候调用(获得activity的传递的值) - onCreateView方法
为Fragment创建视图(加载布局)时调用(给当前的fragment绘制UI布局,可以使用线程更新UI) - onActivityCreated方法
当Activity中的onCreate方法执行完后调用(表示activity执行oncreate方法完成了的时候会调用此方法) - onDestroyView方法
Fragment中的布局被移除时调用(表示fragment销毁相关联的UI布局) - onDetach方法
Fragment和Activity解除关联的时候调用(脱离activity)
Fragment生命周期解析
-
当一个fragment被创建的时候:
onAttach()
onCreate()
onCreateView()
onActivityCreated() -
当这个fragment对用户可见的时候,它会经历以下状态。
onStart()
onResume()
1.2可以理解为从创建到显示(或切换)
-
当这个fragment进入“后台模式”的时候,它会经历以下状态。
onPause()
onStop() -
当这个fragment被销毁了(或者持有它的activity被销毁了):
onPause()
onStop()
onDestroyView()
onDestroy()
onDetach() -
就像Activity一样,在以下的状态中,可以使用Bundle对象保存一个fragment的对象。
onCreate()
onCreateView()
onActivityCreated()
其他场景的调用
-
屏幕灭掉
onPause() onSaveInstanceState() onStop() -
屏幕解锁
onStart() onResume() -
切换到其他Fragment
onPause() onStop() onDestroyView() -
切换回本身的Fragment
onCreateView() onActivityCreated() onStart() onResume() -
回到桌面
onPause() onSaveInstanceState() onStop() -
回到应用
onStart() onResume() -
退出应用
onPause() onStop() onDestroyView() onDestroy() onDetach()
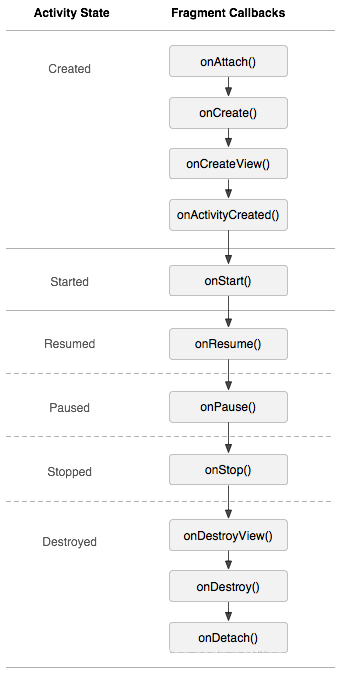
Fragment和Activity的生命周期很相似,以下是对比图
4. 具体使用
- 由于
Fragment作为Activity一部分,所以Fragment的使用一般是添加到Activity中 - 将
Fragment添加到Activity中一般有2种方法:- 在
Activity的layout.xml布局文件中静态添加 - 在
Activity的.java文件中动态添加
- 在
方法1:在Activity的layout.xml布局文件中静态添加
Activity的布局文件
fragment_layout_test.xml
<LinearLayout xmlns:android="http://schemas.android.com/apk/res/android"
    xmlns:tools="http://schemas.android.com/tools"
    android:layout_width="match_parent"
    android:layout_height="match_parent"
    android:orientation="vertical" >

// 该fragment类定义在包名为"com.skywang.app"中的FragmentLayoutTest类的内部类ExampleFragment中
   <fragment android:name="com.skywang.app.FragmentLayoutTest$ExampleFragment"
        android:id="@+id/list"
        android:layout_weight="1"
        android:layout_width="match_parent"
        android:layout_height="match_parent"/>

</LinearLayout>Fragment的布局文件
example_fragment.xml
<LinearLayout xmlns:android="http://schemas.android.com/apk/res/android"
    xmlns:tools="http://schemas.android.com/tools"
    android:layout_width="match_parent"
    android:layout_height="match_parent"
    android:orientation="vertical" >

    <TextView
        android:text="@string/example_fragment"
        android:layout_width="wrap_content"
        android:layout_height="wrap_content"/>

</LinearLayout>
Activity的.java文件
FragmentLayoutTest.java
// 在Activity使用Fragment时,需要考虑版本兼容问题
// 1. Android 3.0后,Activity可直接继承自Activity,并且在其中嵌入使用Fragment
// 2. Android 3.0前,Activity需FragmentActivity(其也继承自Activity),同时需要导入android-support-v4.jar兼容包,这样在Activity中才能嵌入Fragment

public class FragmentLayoutTest extends Activity {

    @Override
    protected void onCreate(Bundle savedInstanceState) {
        super.onCreate(savedInstanceState);
        setContentView(R.layout.fragment_layout_test);
        // 设置上述布局文件
    }

    // 继承自Fragment
    // 布局文件中的Fragment通过该FragmentLayoutTest的内部类ExampleFragment实现
    public static class ExampleFragment extends Fragment {
        @Override
        public View onCreateView(LayoutInflater inflater, ViewGroup container,
                                 Bundle savedInstanceState) {

            return inflater.inflate(R.layout.example_fragment, container, false);
             // 将example_fragment.xml作为该Fragment的布局文件
            // 即相当于FragmentLayoutTest直接调用example_fragment.xml来显示到Fragment中
        }
    }
}
至此,方法1讲解完毕。
方法2:在Activity的.java文件中动态添加
- 步骤1:在
Activity的布局文件定义1占位符(FrameLayout)
这样做的好处是:可动态在Activity中添加不同的Fragment,更加灵活
fragment_transaction_test.xml
<LinearLayout xmlns:android="http://schemas.android.com/apk/res/android"
    android:layout_width="match_parent"
    android:layout_height="match_parent"
    android:orientation="vertical" >

    <FrameLayout
        android:id="@+id/about_fragment_container"
        android:layout_width="match_parent"
        android:layout_height="match_parent"/>

</LinearLayout>
- 步骤2:设置
Fragment的布局文件
example_fragment.xml
<LinearLayout xmlns:android="http://schemas.android.com/apk/res/android"
    xmlns:tools="http://schemas.android.com/tools"
    android:layout_width="match_parent"
    android:layout_height="match_parent"
    android:orientation="vertical" >

    <TextView
        android:text="@string/example_fragment"
        android:layout_width="wrap_content"
        android:layout_height="wrap_content"/>

</LinearLayout>
- 步骤3:在
Activity的.java文件中动态添加Fragment
FragmentTransactionTest
public class FragmentTransactionTest extends Activity {

    @Override
    protected void onCreate(Bundle savedInstanceState) {
        super.onCreate(savedInstanceState);
        setContentView(R.layout.fragment_transaction_test);

        // 步骤1:获取FragmentManager
        FragmentManager fragmentManager = getFragmentManager();

        // 步骤2:获取FragmentTransaction
        FragmentTransaction fragmentTransaction = fragmentManager.beginTransaction();

        // 步骤3:创建需要添加的Fragment :ExampleFragment
        ExampleFragment fragment = new ExampleFragment();

        // 步骤4:动态添加fragment
        // 即将创建的fragment添加到Activity布局文件中定义的占位符中(FrameLayout)
        fragmentTransaction.add(R.id.about_fragment_container, fragment);
        fragmentTransaction.commit();
    }

    // 继承与Fragment
    public static class ExampleFragment extends Fragment {
        @Override
        public View onCreateView(LayoutInflater inflater, ViewGroup container,
                                 Bundle savedInstanceState) {

            return inflater.inflate(R.layout.example_fragment, container, false);
            // 将example_fragment.xml作为该Fragment的布局文件
        }
    }
}
至此,方法2讲解完毕
转自:Android:Fragment最全面介绍 & 使用方法解析


 3372
3372

 被折叠的 条评论
为什么被折叠?
被折叠的 条评论
为什么被折叠?
 到【灌水乐园】发言


