


1.什么是工作流审批
根据本人的理解,就是审批流程管理。
2.什么是flowable
官方解释如下:
Flowable 项目提供了一套核心的开源业务流程引擎,这些引擎紧凑且高效。它们为开发人员、系统管理员和业务用户提供工作流和业务流程管理 (BPM) 平台。
它的核心是一个闪电般快速、久经考验的动态 BPMN 流程引擎,伴随着 DMN 决策表和 CMMN 案例管理引擎,所有这些引擎都是用 Java 编写的。它们是 Apache 2.0 许可的开放源代码,拥有一个承诺社区。
所有引擎都可以嵌入在 Java 应用程序中运行,也可以作为服务器、集群和云中的服务运行。它们可以作为独立的引擎或服务运行,也可以集成在一起为业务流程管理提供丰富的套件。它们与 Spring 完美集成。凭借丰富的 Java 和 REST API,它们是编排人工或机器人自动化处理的理想基础。它们启用微服务编排或软连接微服务本身。
对于flowable是什么以及关于此框架的具体信息可以参看此项目的官方文档:https://www.flowable.org/docs/userguide/index.html
官网对于此项目如何使用有非常详细的描述,只是目前还没有对应的中文文档。
Flowable is a light-weight business process engine written in Java.这是官网文档对此框架的完美解释:Flowable是一个用java语言写的轻量级工作流引擎。
在简单了解flowable后与activiti框架相比的第一感觉就是开发方便快速,易与springBoot等各种框架快速整合。如果项目中需要快速实现一些工作流的相关功能那么用此框架是一个不错的选择。
这里总结一下:
- 目的是管理业务审批工作流
- 使用BPMN技术
- 可方便嵌套在Spring体系中
3.什么是BPMN
1.解释BPMN
官方解释如下:
标准的业务流程模型和符号 (BPMN) 将为企业提供以图形符号理解其内部业务程序的能力,并使组织能够以标准方式交流这些程序。此外,图形符号将有助于理解组织之间的绩效协作和业务交易。这将确保企业了解自身和业务参与者,并使组织能够快速适应新的内部和 B2B 业务环境。
这里总结一下:
- BPMN开发了一套标准的业务流程建模符号。如下图就是建模的符号。
- BPMN定义了一个流程图,该流程图使用上述符号编写。如下图就是通过BPMN规则绘画的图。
说白了如上图规则的图就BPMN流程图。
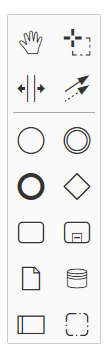
2.BPMN常用符号
1.开始节点
表明从此处开始流程。
2.任务节点
其中包含了很多种任务,如图。其中最常用的就是用户任务。指定审批人都需要此选项。
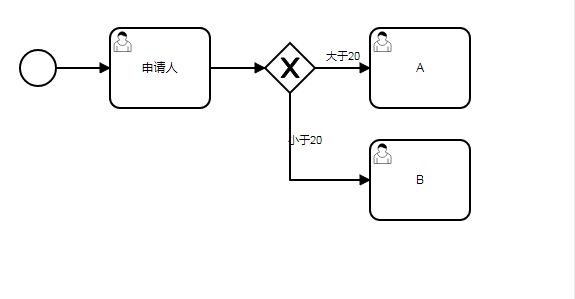
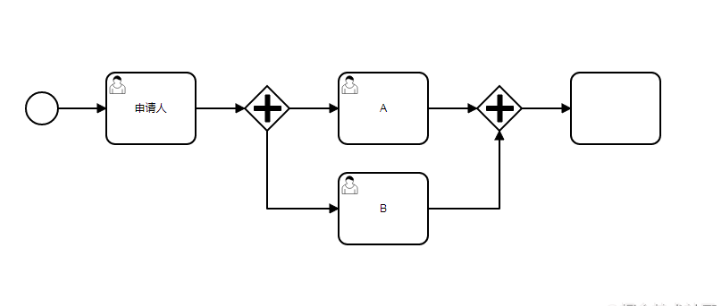
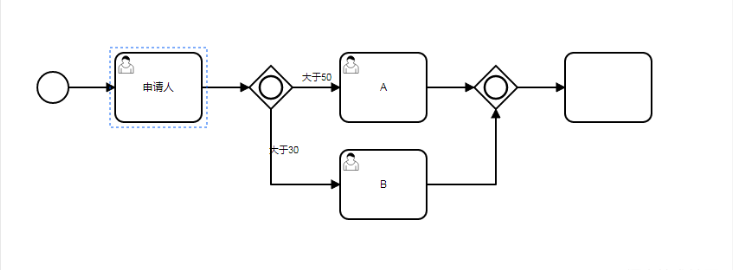
3.网关组件
网关相当于判断(与,或,非),最常用的三种网关分别是互斥/排他网关,并行网关,相容网关。
- 互斥网关:相当于判断,举例说明,如果输入值大于20走A节点,小于20走B节点。
- 并行网关:相容网关成对出现,表示网关中的人全部同意才能够进入下一节点。
- 包容网关:互斥网关与并行网关的结合体,如果满足A,B都满足条件,则都需要流转,如果只有一个满足,那么只流转满足条件的。
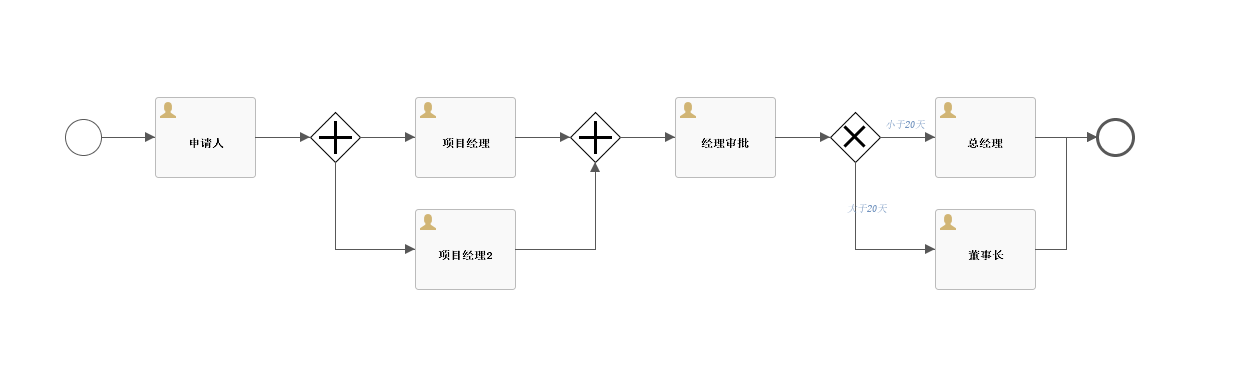
3.来个例子
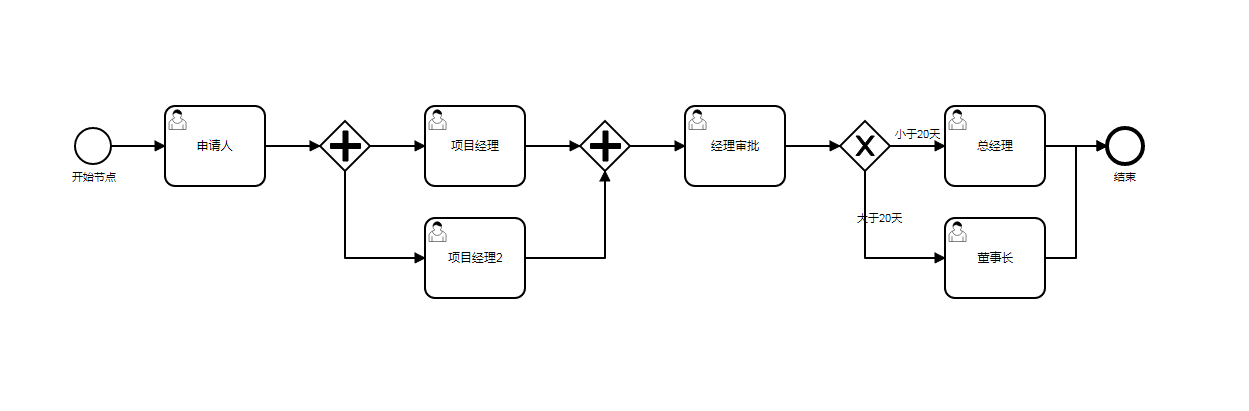
说明如下:
- 当审批申请人提交完成后进入审批阶段
- 两位项目经理进行审批,需要两人都同意后进入下一节点。
- 经理进行审批,此处业务为经理职位(manager)的人都可以执行审批。
- 此处总经理/董事长审批,如果大于20天需要董事长审批,如果小于20天总经理审批。
4.为什么选择Flowable
目前Flowable已经修复了activiti6很多的bug,可以实现零成本从activiti迁移到flowable。
flowable目前已经支持加签、动态增加实例中的节点、支持cmmn、dmn规范。这些都是activiti6目前版本没有的。
1、flowable已经支持所有的历史数据使用mongdb存储,activiti没有。
2、flowable支持事务子流程,activiti没有。
3、flowable支持多实例加签、减签,activiti没有。
4、flowable支持httpTask等新的类型节点,activiti没有。
5、flowable支持在流程中动态添加任务节点,activiti没有。
6、flowable支持历史任务数据通过消息中间件发送,activiti没有。
7、flowable支持java11,activiti没有。
8、flowable支持动态脚本,,activiti没有。
9、flowable支持条件表达式中自定义juel函数,activiti没有。
10、flowable支持cmmn规范,activiti没有。
11、flowable修复了dmn规范设计器,activit用的dmn设计器还是旧的框架,bug太多。
12、flowable屏蔽了pvm,activiti6也屏蔽了pvm(因为6版本官方提供了加签功能,发现pvm设计的过于臃肿,索性直接移除,这样加签实现起来更简洁、事实确实如此,如果需要获取节点、连线等信息可以使用bpmnmodel替代)。
13、flowable与activiti提供了新的事务监听器。activiti5版本只有事件监听器、任务监听器、执行监听器。
14、flowable对activiti的代码大量的进行了重构。
15、activiti以及flowable支持的数据库有h2、hsql、mysql、oracle、postgres、mssql、db2。其他数据库不支持的。使用国产数据库的可能有点失望了,需要修改源码了。
16、flowable支持jms、rabbitmq、mongodb方式处理历史数据,activiti没有。
5.flowable-6.7.0 官方运行 demo
- 从官网下载 flowable-6.7.0 : https://flowable.com/open-source/downloads/
下载完,解压后,打开目录 wars
- 找个干净的 tomcat8
把 wars 文件目录里面的
flowable-rest.war flowable-ui.war
共 2 个 war包放到tomact的 webapps 目录
- 然后找到 tomcat / bin / startup.bat 启动 tomcat
会等待一段时间,所有war包都解压后
- 找到每个项目中的
比如:\webapps\flowable-ui\WEB-INF\classes flowable-default.properties 这样的配置文件
修改:改成自己的数据库链接地址,数据库名flowable67 自己创建,从flowable-6.7.0.zip里面database下面的creat/all 下的sql 脚本执行去建表 79张表
spring.datasource.driver-class-name=com.mysql.jdbc.Driver
spring.datasource.url=jdbc:mysql://127.0.0.1:3306/flowable67?useUnicode=true&characterEncoding=UTF-8&serverTimezone=UTC&useSSL=false
spring.datasource.username=root
spring.datasource.password=root
主要就是修改数据库链接上,改成mysql的
- 几个项目的都修改完,关闭之前运行的tomcat ,重新启动
都正常启动后,需要时间久点
访问 http://127.0.0.1:8080/flowable-ui 用户名 admin 密码 text
5.1 表结构介绍
5.1.1 表的命名规则和作用
看到刚才创建的表,我们发现Flowable的表都以 ACT_ 开头。
第二部分是表示表的用途的两个字母标识。 用途也和服务的 API 对应。ACT_RE :'RE'表示 repository。 这个前缀的表包含了流程定义和流程静态资源 (图片,规则,等等)。ACT_RU:'RU'表示 runtime。 这些运行时的表,包含流程实例,任务,变量,异步任务,等运行中的数据。 Flowable只在流程实例执行过程中保存这些数据, 在流程结束时就会删除这些记录。 这样运行时表可以一直很小速度很快。ACT_HI:'HI'表示 history。 这些表包含历史数据,比如历史流程实例, 变量,任务等等。 ACT_GE : GE 表示 general。 通用数据, 用于不同场景下
5.1.2 Flowable数据表介绍
| 表分类 | 表名 | 解释 |
| 一般数据 | ||
| [ACT_GE_BYTEARRAY] | 通用的流程定义和流程资源 | |
| [ACT_GE_PROPERTY] | 系统相关属性 | |
| 流程历史记录 | ||
| [ACT_HI_ACTINST] | 历史的流程实例 | |
| [ACT_HI_ATTACHMENT] | 历史的流程附件 | |
| [ACT_HI_COMMENT] | 历史的说明性信息 | |
| [ACT_HI_DETAIL] | 历史的流程运行中的细节信息 | |
| [ACT_HI_IDENTITYLINK] | 历史的流程运行过程中用户关系 | |
| [ACT_HI_PROCINST] | 历史的流程实例 | |
| [ACT_HI_TASKINST] | 历史的任务实例 | |
| [ACT_HI_VARINST] | 历史的流程运行中的变量信息 | |
| 流程定义表 | ||
| [ACT_RE_DEPLOYMENT] | 部署单元信息 | |
| [ACT_RE_MODEL] | 模型信息 | |
| [ACT_RE_PROCDEF] | 已部署的流程定义 | |
| 运行实例表 | ||
| [ACT_RU_EVENT_SUBSCR] | 运行时事件 | |
| [ACT_RU_EXECUTION] | 运行时流程执行实例 | |
| [ACT_RU_IDENTITYLINK] | 运行时用户关系信息,存储任务节点与参与者的相关信息 | |
| [ACT_RU_JOB] | 运行时作业 | |
| [ACT_RU_TASK] | 运行时任务 | |
| [ACT_RU_VARIABLE] | 运行时变量表 |
6.搭建SpringBoot的Flowable工作流环境
1.搭建环境
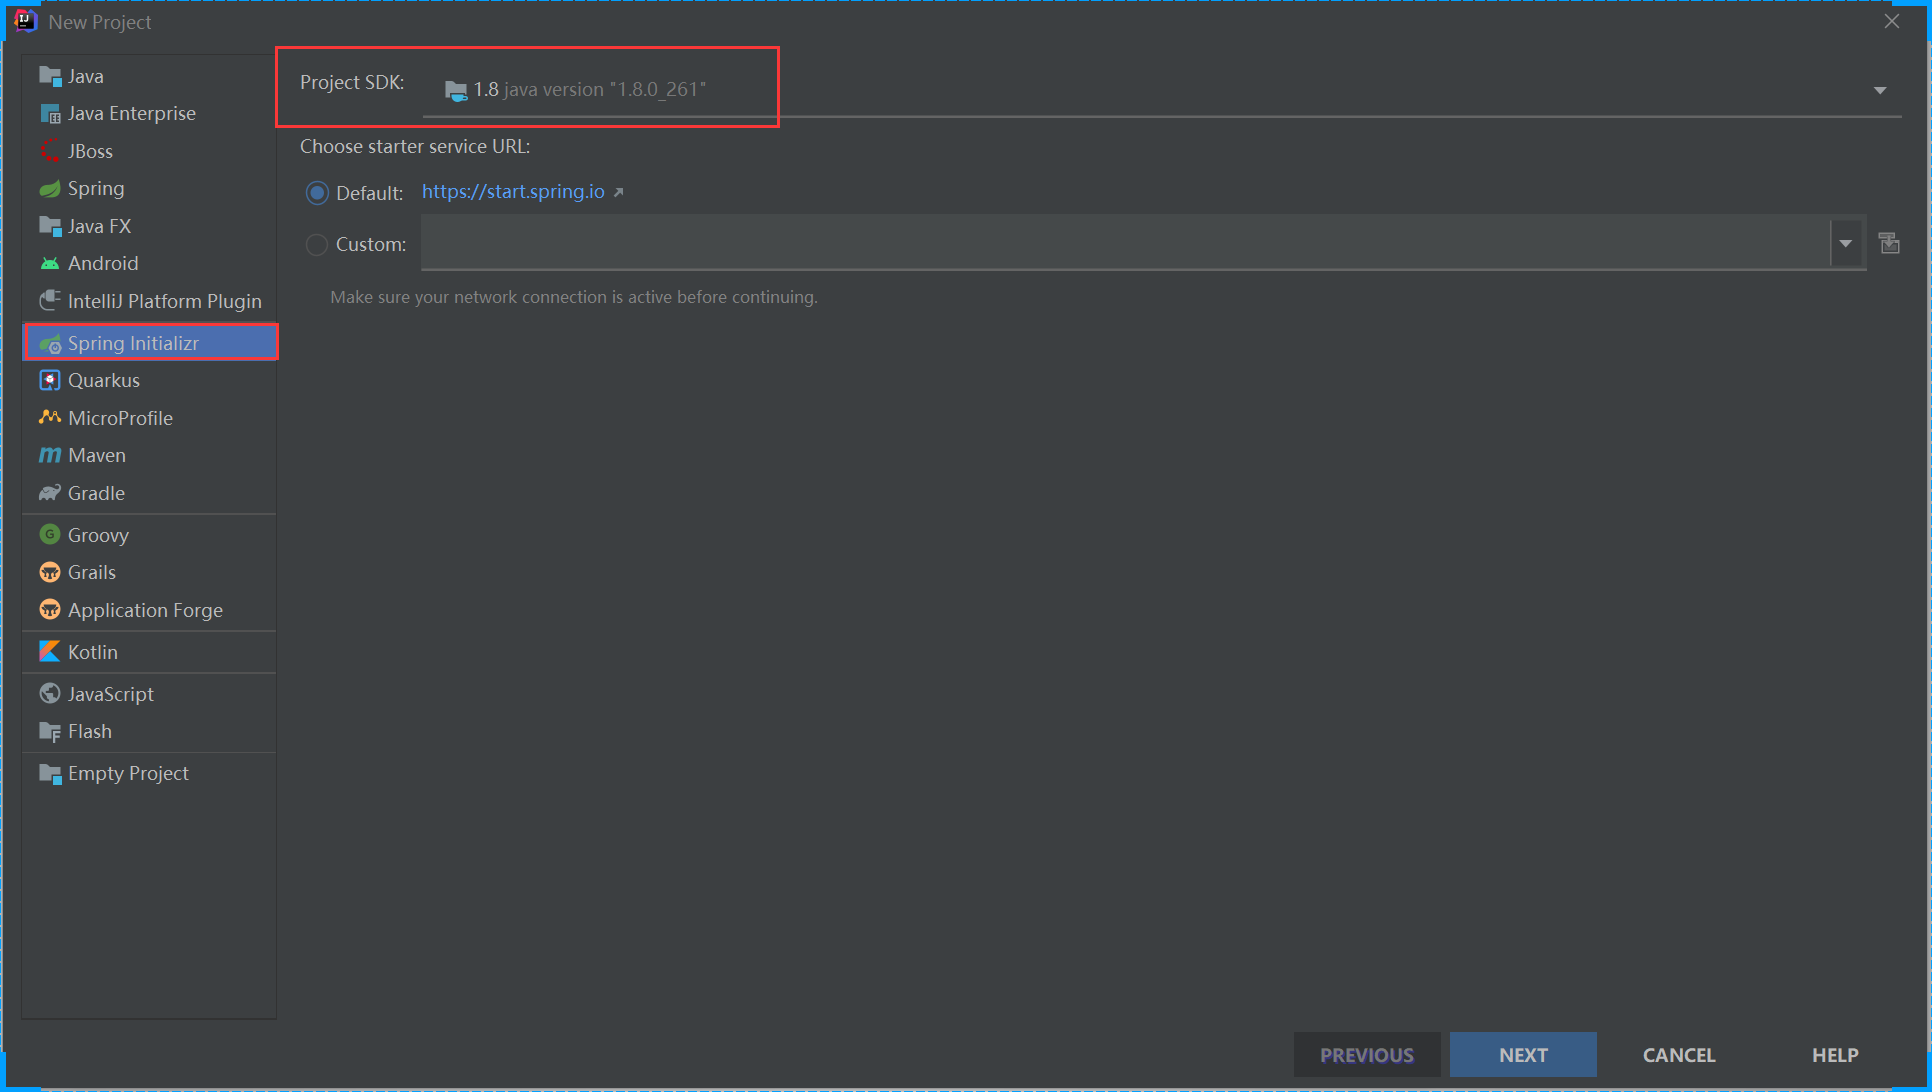
点击next
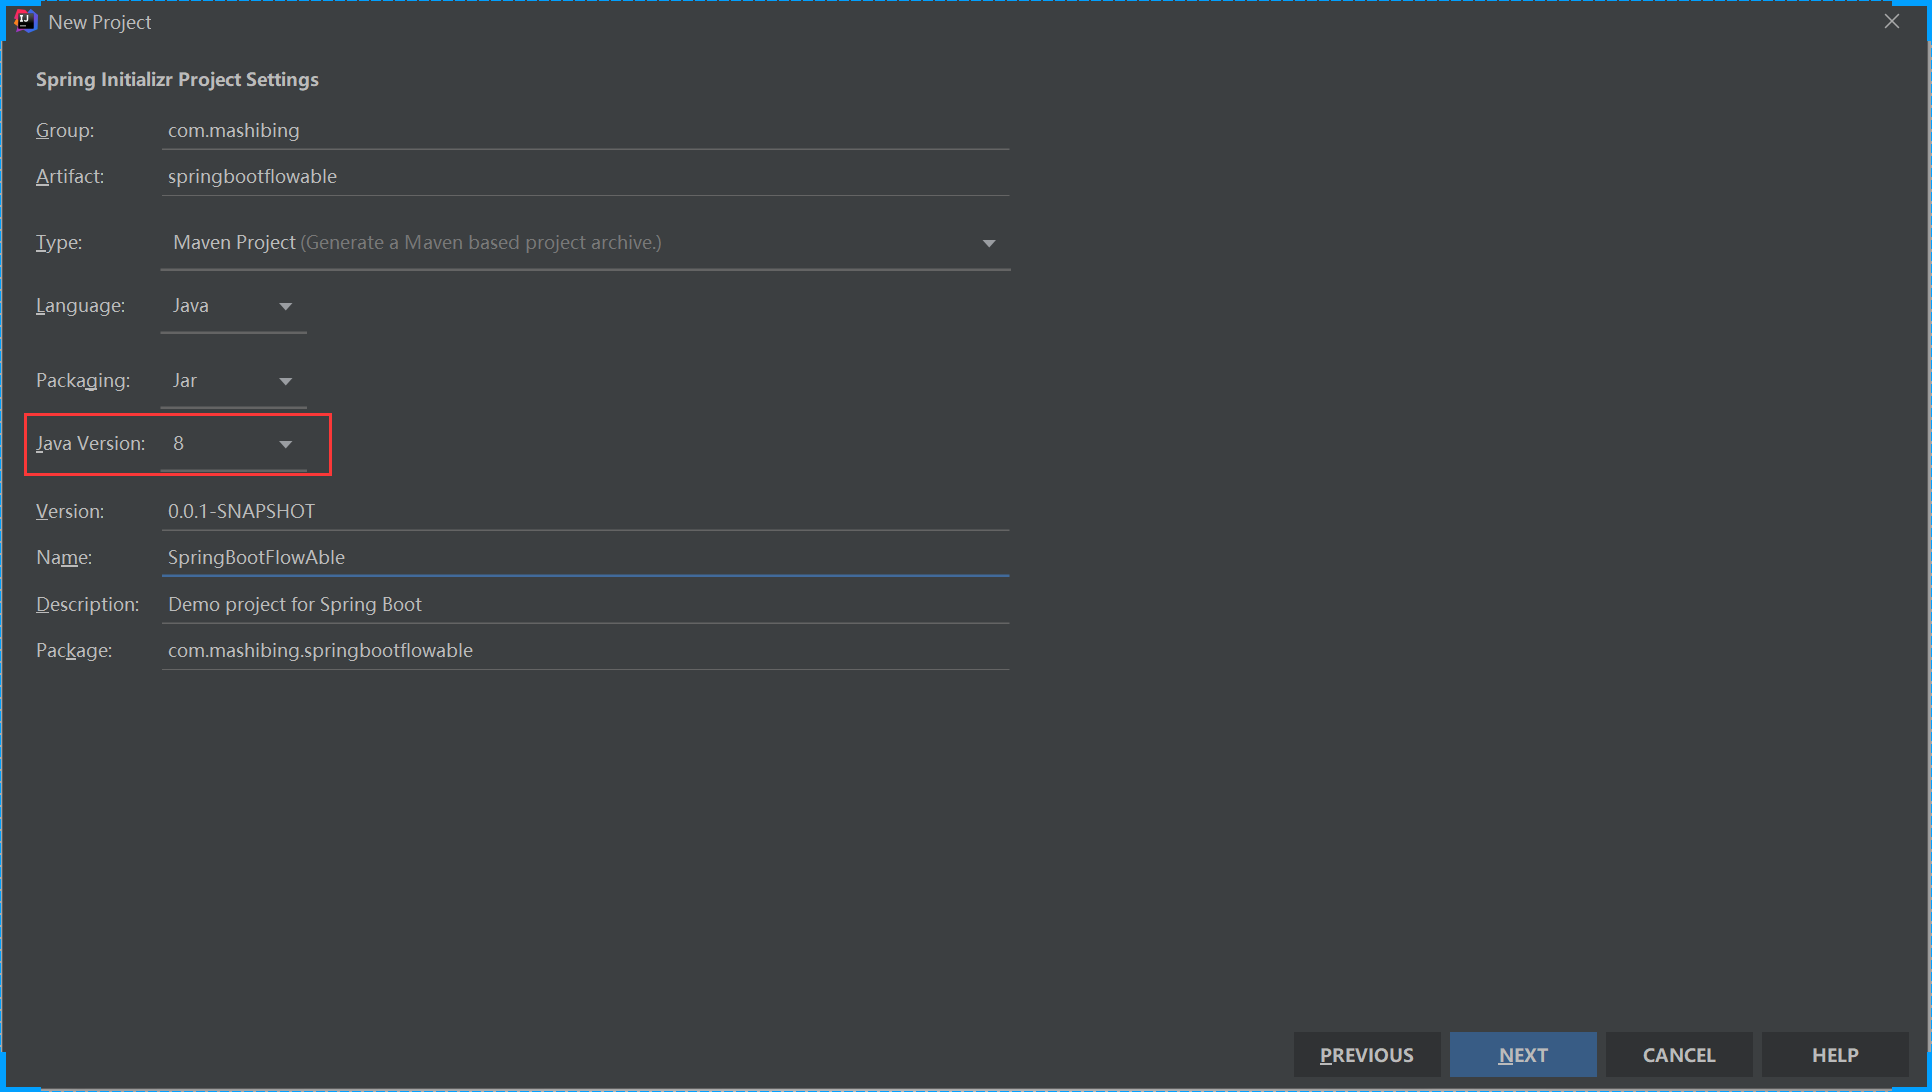
点击next,点击Finish
2.添加依赖
将flowable的依赖加入到POM中即可,flowable使用需要一个数据库,这里为了方便我选择mysql
<dependency>
                <groupId>org.springframework.boot</groupId>
                <artifactId>spring-boot-starter-web</artifactId>
            </dependency>
            <!--flowable工作流依赖-->
            <dependency>
                <groupId>org.flowable</groupId>
                <artifactId>flowable-spring-boot-starter</artifactId>
                <version>6.3.0</version>
            </dependency>
            <!--mysql依赖-->
            <dependency>
                <groupId>mysql</groupId>
                <artifactId>mysql-connector-java</artifactId>
                <scope>runtime</scope>
            </dependency>
3.配置application.yml
测试flowable配置为默认的即可。为了测试时方便看日志信息,我这里将flowable的定时job功能暂时关闭,其他的都用默认的
当然记得要添加一个数据源,我这里添加的mysql,并且记得建好对应的mysql库,如果没有建就自己建一个吧
spring:
  datasource:
    url: jdbc:mysql://127.0.0.1:3306/flowable_test?useUnicode=true&characterEncoding=utf8 &nullCatalogMeansCurrent=true&useSSL=false&useLegacyDatetimeCode=false&serverTimezone=UTC
    username: root
    password: root
flowable:
  #关闭定时任务JOB
  async-executor-activate: false
这样操作后,flowable与springBoot的整合就完成了! 个人感觉非常方便!
然后就可以运行了,如果指定的数据库中还未创建过flowable的相关数据表的话,初次运行时flowable会将自动执行flowable中的初始化脚本完成工作流所需要的数据表的建立。
7.定义流程文件
上面已经完成了flowable与springboot的整合了,接下来就可以使用此框架进行流程需要开发了!
同样在flowable官方文档中对于流程文件它有这样的建议:
flowable建议采用业界标准BPMN2.0的XML来描述需要定义的工作流。
为了方便测试,这里采用一个开源项目中的流程文件,其描述如下:
<?xml version="1.0" encoding="UTF-8"?>
<definitions xmlns="http://www.omg.org/spec/BPMN/20100524/MODEL" xmlns:xsi="http://www.w3.org/2001/XMLSchema-instance"
             xmlns:flowable="http://flowable.org/bpmn" xmlns:bpmndi="http://www.omg.org/spec/BPMN/20100524/DI"
             xmlns:omgdc="http://www.omg.org/spec/DD/20100524/DC" xmlns:omgdi="http://www.omg.org/spec/DD/20100524/DI"
             typeLanguage="http://www.w3.org/2001/XMLSchema" expressionLanguage="http://www.w3.org/1999/XPath"
             targetNamespace="http://www.flowable.org/processdef">
    <process id="Expense" name="ExpenseProcess" isExecutable="true">
        <documentation>报销流程</documentation>
        <startEvent id="start" name="开始"></startEvent>
        <userTask id="fillTask" name="出差报销" flowable:assignee="${taskUser}">
            <extensionElements>
                <modeler:initiator-can-complete xmlns:modeler="http://flowable.org/modeler">
                    <![CDATA[false]]></modeler:initiator-can-complete>
            </extensionElements>
        </userTask>
        <exclusiveGateway id="judgeTask"></exclusiveGateway>
        <userTask id="directorTak" name="经理审批">
            <extensionElements>
                <flowable:taskListener event="create"
                                       class="com.mashibing.springbootflowable.handler.ManagerTaskHandler"></flowable:taskListener>
            </extensionElements>
        </userTask>
        <userTask id="bossTask" name="老板审批">
            <extensionElements>
                <flowable:taskListener event="create"
                                       class="com.mashibing.springbootflowable.handler.BossTaskHandler"></flowable:taskListener>
            </extensionElements>
        </userTask>
        <endEvent id="end" name="结束"></endEvent>
        <sequenceFlow id="directorNotPassFlow" name="驳回" sourceRef="directorTak" targetRef="fillTask">
            <conditionExpression xsi:type="tFormalExpression"><![CDATA[${outcome=='驳回'}]]></conditionExpression>
        </sequenceFlow>
        <sequenceFlow id="bossNotPassFlow" name="驳回" sourceRef="bossTask" targetRef="fillTask">
            <conditionExpression xsi:type="tFormalExpression"><![CDATA[${outcome=='驳回'}]]></conditionExpression>
        </sequenceFlow>
        <sequenceFlow id="flow1" sourceRef="start" targetRef="fillTask"></sequenceFlow>
        <sequenceFlow id="flow2" sourceRef="fillTask" targetRef="judgeTask"></sequenceFlow>
        <sequenceFlow id="judgeMore" name="大于500元" sourceRef="judgeTask" targetRef="bossTask">
            <conditionExpression xsi:type="tFormalExpression"><![CDATA[${money > 500}]]></conditionExpression>
        </sequenceFlow>
        <sequenceFlow id="bossPassFlow" name="通过" sourceRef="bossTask" targetRef="end">
            <conditionExpression xsi:type="tFormalExpression"><![CDATA[${outcome=='通过'}]]></conditionExpression>
        </sequenceFlow>
        <sequenceFlow id="directorPassFlow" name="通过" sourceRef="directorTak" targetRef="end">
            <conditionExpression xsi:type="tFormalExpression"><![CDATA[${outcome=='通过'}]]></conditionExpression>
        </sequenceFlow>
        <sequenceFlow id="judgeLess" name="小于500元" sourceRef="judgeTask" targetRef="directorTak">
            <conditionExpression xsi:type="tFormalExpression"><![CDATA[${money <= 500}]]></conditionExpression>
        </sequenceFlow>
    </process>


    <!-- 如果使用图形化建模工具,实际的XML文件还将包含“可视化部分”,用于描述图形信息,
    如流程定义中各个元素的坐标(所有的图形化信息包含在XML的BPMNDiagram标签中,作为definitions标签的子元素)  -->

    <bpmndi:BPMNDiagram id="BPMNDiagram_Expense">
        <bpmndi:BPMNPlane bpmnElement="Expense" id="BPMNPlane_Expense">
            <bpmndi:BPMNShape bpmnElement="start" id="BPMNShape_start">
                <omgdc:Bounds height="30.0" width="30.0" x="285.0" y="135.0"></omgdc:Bounds>
            </bpmndi:BPMNShape>
            <bpmndi:BPMNShape bpmnElement="fillTask" id="BPMNShape_fillTask">
                <omgdc:Bounds height="80.0" width="100.0" x="405.0" y="110.0"></omgdc:Bounds>
            </bpmndi:BPMNShape>
            <bpmndi:BPMNShape bpmnElement="judgeTask" id="BPMNShape_judgeTask">
                <omgdc:Bounds height="40.0" width="40.0" x="585.0" y="130.0"></omgdc:Bounds>
            </bpmndi:BPMNShape>
            <bpmndi:BPMNShape bpmnElement="directorTak" id="BPMNShape_directorTak">
                <omgdc:Bounds height="80.0" width="100.0" x="735.0" y="110.0"></omgdc:Bounds>
            </bpmndi:BPMNShape>
            <bpmndi:BPMNShape bpmnElement="bossTask" id="BPMNShape_bossTask">
                <omgdc:Bounds height="80.0" width="100.0" x="555.0" y="255.0"></omgdc:Bounds>
            </bpmndi:BPMNShape>
            <bpmndi:BPMNShape bpmnElement="end" id="BPMNShape_end">
                <omgdc:Bounds height="28.0" width="28.0" x="771.0" y="281.0"></omgdc:Bounds>
            </bpmndi:BPMNShape>
            <bpmndi:BPMNEdge bpmnElement="flow1" id="BPMNEdge_flow1">
                <omgdi:waypoint x="315.0" y="150.0"></omgdi:waypoint>
                <omgdi:waypoint x="405.0" y="150.0"></omgdi:waypoint>
            </bpmndi:BPMNEdge>
            <bpmndi:BPMNEdge bpmnElement="flow2" id="BPMNEdge_flow2">
                <omgdi:waypoint x="505.0" y="150.16611295681062"></omgdi:waypoint>
                <omgdi:waypoint x="585.4333333333333" y="150.43333333333334"></omgdi:waypoint>
            </bpmndi:BPMNEdge>
            <bpmndi:BPMNEdge bpmnElement="judgeLess" id="BPMNEdge_judgeLess">
                <omgdi:waypoint x="624.5530726256983" y="150.44692737430168"></omgdi:waypoint>
                <omgdi:waypoint x="735.0" y="150.1392757660167"></omgdi:waypoint>
            </bpmndi:BPMNEdge>
            <bpmndi:BPMNEdge bpmnElement="directorNotPassFlow" id="BPMNEdge_directorNotPassFlow">
                <omgdi:waypoint x="785.0" y="110.0"></omgdi:waypoint>
                <omgdi:waypoint x="785.0" y="37.0"></omgdi:waypoint>
                <omgdi:waypoint x="455.0" y="37.0"></omgdi:waypoint>
                <omgdi:waypoint x="455.0" y="110.0"></omgdi:waypoint>
            </bpmndi:BPMNEdge>
            <bpmndi:BPMNEdge bpmnElement="bossPassFlow" id="BPMNEdge_bossPassFlow">
                <omgdi:waypoint x="655.0" y="295.0"></omgdi:waypoint>
                <omgdi:waypoint x="771.0" y="295.0"></omgdi:waypoint>
            </bpmndi:BPMNEdge>
            <bpmndi:BPMNEdge bpmnElement="judgeMore" id="BPMNEdge_judgeMore">
                <omgdi:waypoint x="605.4340277777778" y="169.56597222222223"></omgdi:waypoint>
                <omgdi:waypoint x="605.1384083044983" y="255.0"></omgdi:waypoint>
            </bpmndi:BPMNEdge>
            <bpmndi:BPMNEdge bpmnElement="directorPassFlow" id="BPMNEdge_directorPassFlow">
                <omgdi:waypoint x="785.0" y="190.0"></omgdi:waypoint>
                <omgdi:waypoint x="785.0" y="281.0"></omgdi:waypoint>
            </bpmndi:BPMNEdge>
            <bpmndi:BPMNEdge bpmnElement="bossNotPassFlow" id="BPMNEdge_bossNotPassFlow">
                <omgdi:waypoint x="555.0" y="295.0"></omgdi:waypoint>
                <omgdi:waypoint x="455.0" y="295.0"></omgdi:waypoint>
                <omgdi:waypoint x="455.0" y="190.0"></omgdi:waypoint>
            </bpmndi:BPMNEdge>
        </bpmndi:BPMNPlane>
    </bpmndi:BPMNDiagram>


</definitions>
其中的两个代理类为:
import org.flowable.engine.delegate.TaskListener;
import org.flowable.task.service.delegate.DelegateTask;

public class ManagerTaskHandler implements TaskListener {

    @Override
    public void notify(DelegateTask delegateTask) {
        delegateTask.setAssignee("经理");
    }

}
public class BossTaskHandler implements TaskListener {
@Override
public void notify(DelegateTask delegateTask) {
delegateTask.setAssignee("老板");
}
}为了方便,也可以去掉这两个JAVA类,将其对应的task改写为如下的形式:
<userTask id="holidayApprovedTask" name="Holiday approved" flowable:assignee="${employee}"/>尽管上面的BPMN文件很长,但放心,毕竟那是通过相关的工具生成出来的,对于核心的逻辑部分也很少(主要在process 标签内 ) ,如需要详细了解的可自行学习下BPMN的标签即可!当然,在flowable的使用文档中也有相关的描述,详见:
https://www.flowable.org/docs/userguide/index.html
中文版:
https://tkjohn.github.io/flowable-userguide/#_task_list_and_completing_a_task
如上定义好一个流程文件后,将其命令为ExpenseProcess.bpmn20.xml 并将其放于项目中的resource目录下的processes(如此目录不存在自行创建)目录下就可以了。
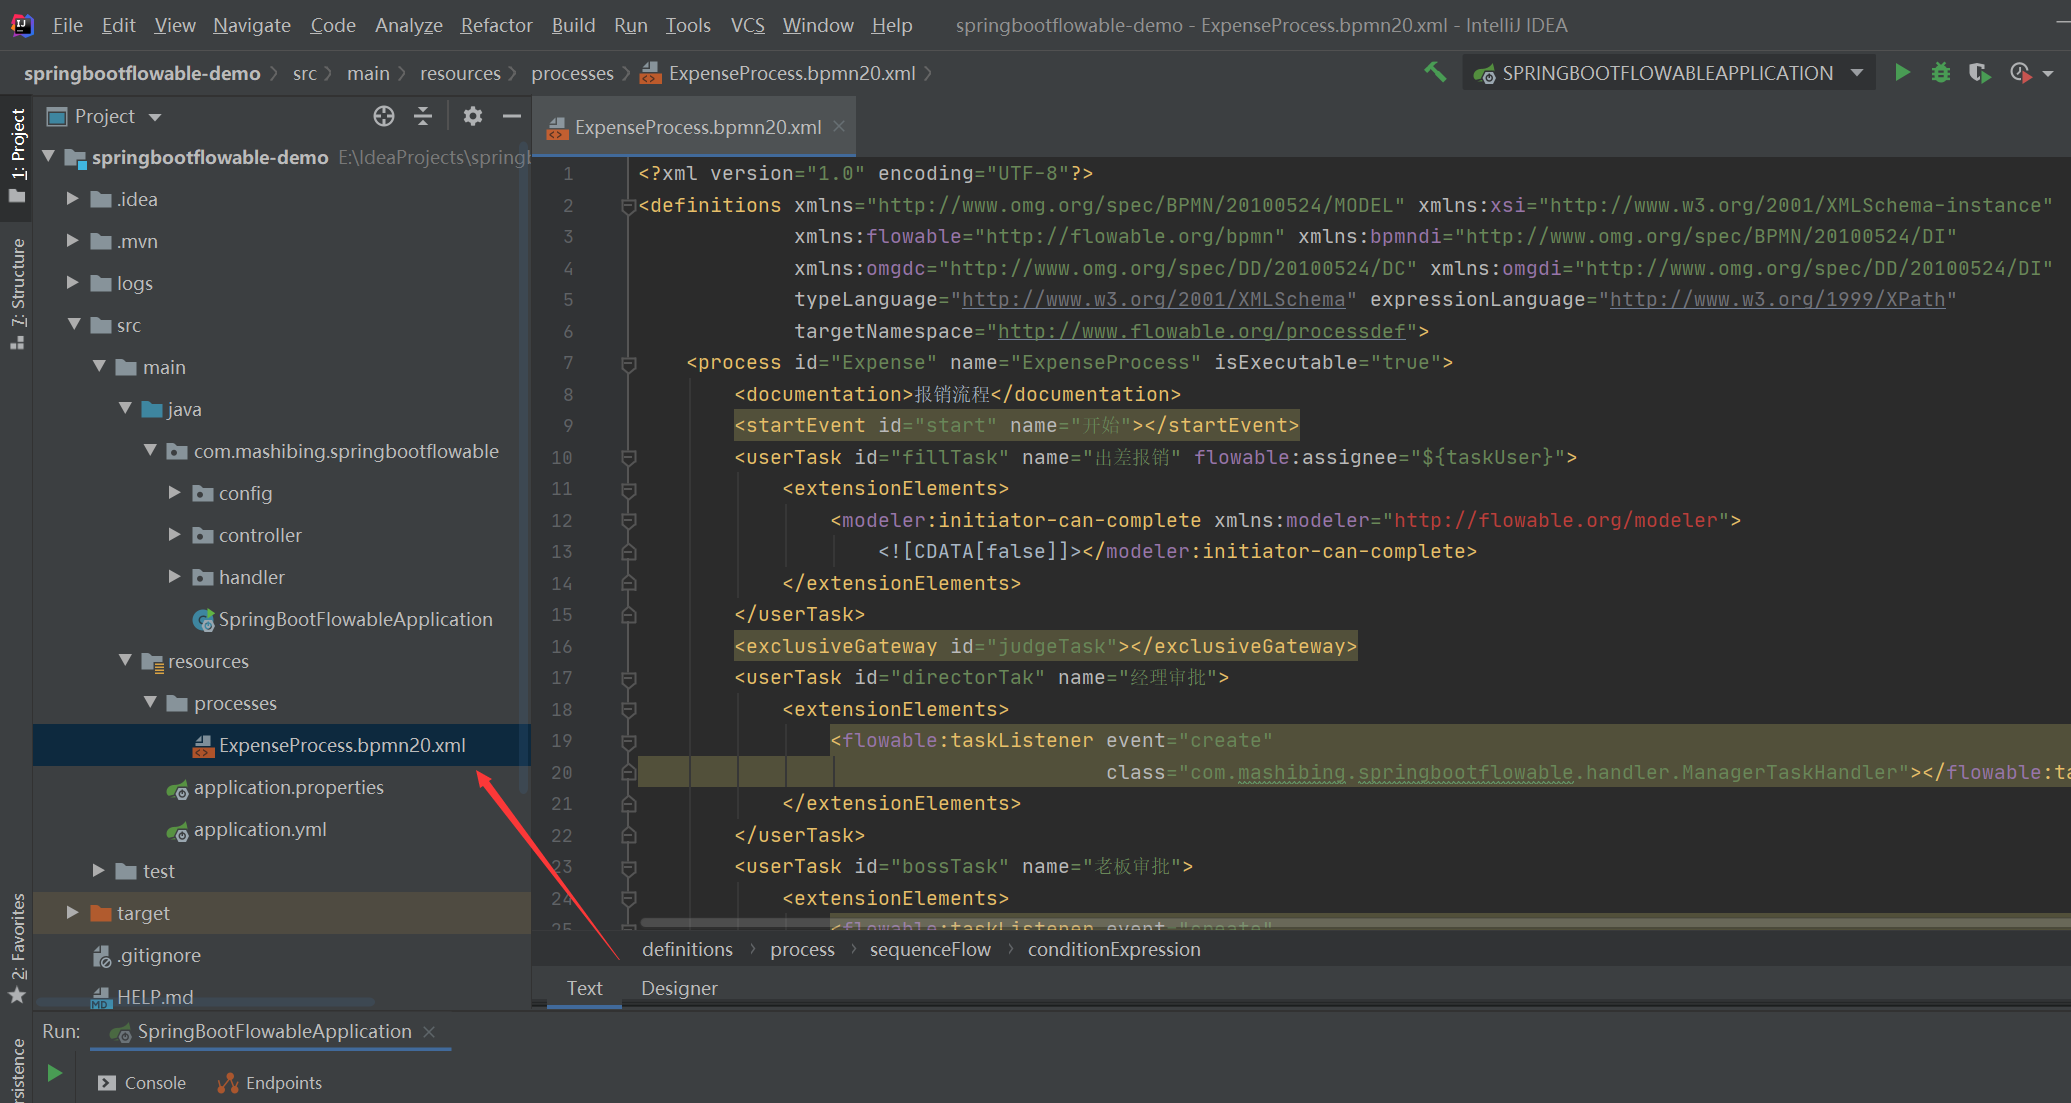
这样当此框架启动的时候它会默认加载resource目录下的processes时就可以将此流程配置加载到数据库进行持久化了
8.测试Controller
为了方便这里通过一个controller来完成此DEMO的快速编写
@Controller
@RequestMapping(value = "expense")
public class ExpenseController {
    @Autowired
    private RuntimeService runtimeService;
    @Autowired
    private TaskService taskService;
    @Autowired
    private RepositoryService repositoryService;
    @Autowired
    private ProcessEngine processEngine;

/***************此处为业务代码******************/
}
写一个controller,并注入由flowable框架启动时自动注册的几个bean,下面的功能将会用到!
开始流程
/**
     * 添加报销
     *
     * @param userId    用户Id
     * @param money     报销金额
     * @param descption 描述
     */
    @RequestMapping(value = "add")
    @ResponseBody
    public String addExpense(String userId, Integer money, String descption) {
        //启动流程
        HashMap<String, Object> map = new HashMap<>();
        map.put("taskUser", userId);
        map.put("money", money);
        ProcessInstance processInstance = runtimeService.startProcessInstanceByKey("Expense", map);
        return "提交成功.流程Id为:" + processInstance.getId();
    }
上面的代码通过接收用户的一个请求传入用户的ID和金额以及描述信息来开启一个报销流程,并返回给用户这个流程的Id
查询流程列表,待办列表
/**
     * 获取审批管理列表
     */
    @RequestMapping(value = "/list")
    @ResponseBody
    public Object list(String userId) {
        List<Task> tasks = taskService.createTaskQuery().taskAssignee(userId).orderByTaskCreateTime().desc().list();
        for (Task task : tasks) {
            System.out.println(task.toString());
        }
        return tasks.toArray().toString();
    }
通过上面的代码获取出此用户需要处理的流程
批准,同意
/**
     * 批准
     *
     * @param taskId 任务ID
     */
    @RequestMapping(value = "apply")
    @ResponseBody
    public String apply(String taskId) {
        Task task = taskService.createTaskQuery().taskId(taskId).singleResult();
        if (task == null) {
            throw new RuntimeException("流程不存在");
        }
        //通过审核
        HashMap<String, Object> map = new HashMap<>();
        map.put("outcome", "通过");
        taskService.complete(taskId, map);
        return "processed ok!";
    }
过前端传入的任务ID来对此流程进行同意处理
拒绝,不同意
/**
     * 拒绝
     */
    @ResponseBody
    @RequestMapping(value = "reject")
    public String reject(String taskId) {
        HashMap<String, Object> map = new HashMap<>();
        map.put("outcome", "驳回");
        taskService.complete(taskId, map);
        return "reject";
    }
生成当前流程图表
/**
     * 生成流程图
     *
     * @param processId 任务ID
     */
    @RequestMapping(value = "processDiagram")
    public void genProcessDiagram(HttpServletResponse httpServletResponse, String processId) throws Exception {
        ProcessInstance pi = runtimeService.createProcessInstanceQuery().processInstanceId(processId).singleResult();

        //流程走完的不显示图
        if (pi == null) {
            return;
        }
        Task task = taskService.createTaskQuery().processInstanceId(pi.getId()).singleResult();
        //使用流程实例ID,查询正在执行的执行对象表,返回流程实例对象
        String InstanceId = task.getProcessInstanceId();
        List<Execution> executions = runtimeService
                .createExecutionQuery()
                .processInstanceId(InstanceId)
                .list();

        //得到正在执行的Activity的Id
        List<String> activityIds = new ArrayList<>();
        List<String> flows = new ArrayList<>();
        for (Execution exe : executions) {
            List<String> ids = runtimeService.getActiveActivityIds(exe.getId());
            activityIds.addAll(ids);
        }

        //获取流程图
        BpmnModel bpmnModel = repositoryService.getBpmnModel(pi.getProcessDefinitionId());
        ProcessEngineConfiguration engconf = processEngine.getProcessEngineConfiguration();
        ProcessDiagramGenerator diagramGenerator = engconf.getProcessDiagramGenerator();
        InputStream in = diagramGenerator.generateDiagram(bpmnModel, "png", activityIds, flows, engconf.getActivityFontName(), engconf.getLabelFontName(), engconf.getAnnotationFontName(), engconf.getClassLoader(), 1.0);
        OutputStream out = null;
        byte[] buf = new byte[1024];
        int legth = 0;
        try {
            out = httpServletResponse.getOutputStream();
            while ((legth = in.read(buf)) != -1) {
                out.write(buf, 0, legth);
            }
        } finally {
            if (in != null) {
                in.close();
            }
            if (out != null) {
                out.close();
            }
        }
    }
通过传入流程ID生成当前流程的流程图给前端,如果流程中使用到中文且生成的图片是乱码的,则需要进配置下字体:
创建一个config文件夹,创建一个FlowableConfig.java文件
/**
* desc: flowable配置----为放置生成的流程图中中文乱码
*/
@Configuration
public class FlowableConfig implements EngineConfigurationConfigurer<SpringProcessEngineConfiguration> {
@Override
public void configure(SpringProcessEngineConfiguration engineConfiguration) {
engineConfiguration.setActivityFontName("宋体");
engineConfiguration.setLabelFontName("宋体");
engineConfiguration.setAnnotationFontName("宋体");
}
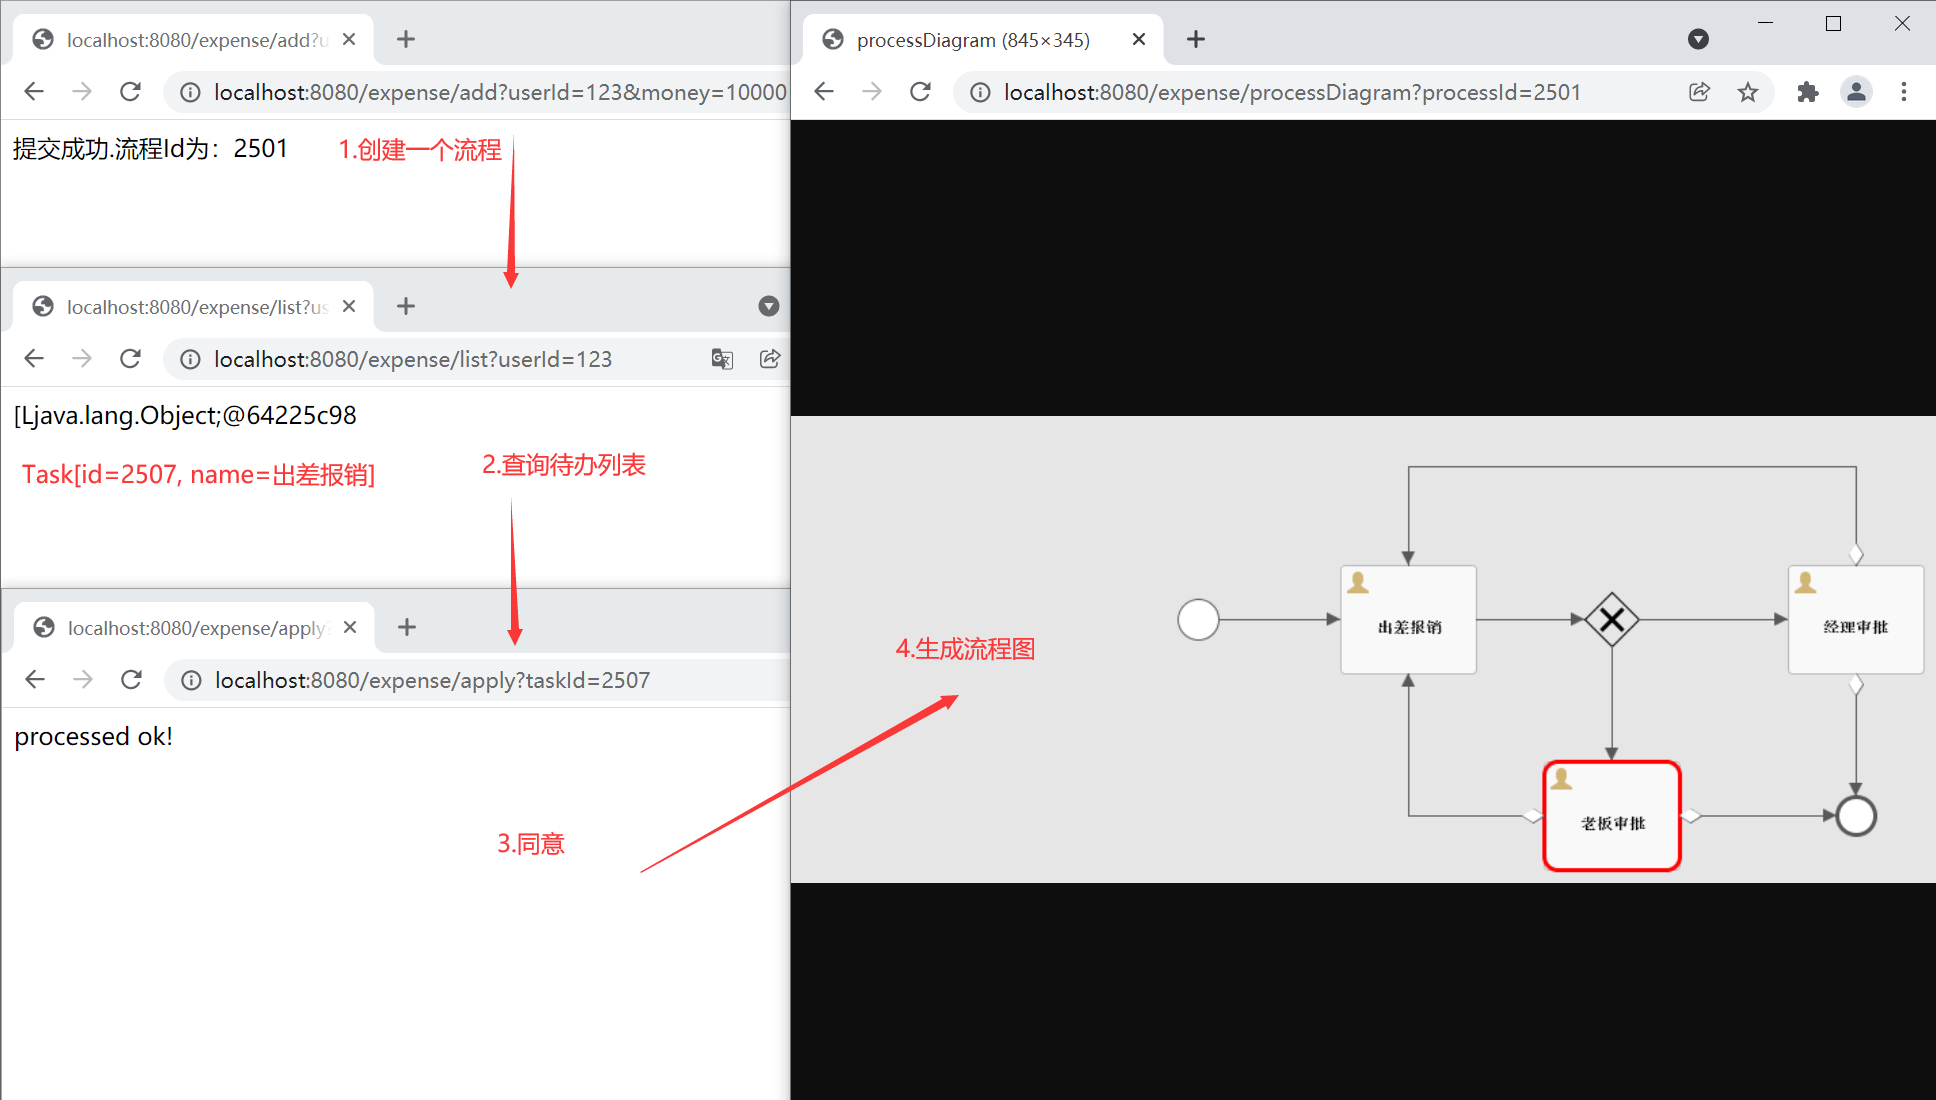
}9.整体演示
上面的代码写好后就可以演示下整体流程了
1.先启动好此项目,然后创建一个流程:
访问:http://localhost:8080/expense/add?userId=123&money=10000
返回:提交成功.流程Id为:2501
2.查询待办列表:
访问:http://localhost:8080/expense/list?userId=123
输出:Task[id=2507, name=出差报销]
3.同意:
访问:http://localhost:8080/expense/apply?taskId=2507
返回:processed ok!
4.生成流程图:
访问:http://localhost:8080/expense/processDiagram?processId=2501
整体流程截图如下:


 被折叠的 条评论
为什么被折叠?
被折叠的 条评论
为什么被折叠?
 到【灌水乐园】发言


