


 本文详细介绍了Android中的Service概念,包括Service的工作机制、生命周期管理、与Activity的通信方式,以及如何创建和使用Service。重点阐述了Service在后台运行的特性、优先级分配、与Activity间的交互机制,同时还提供了Service的创建示例和关键方法解析。
这篇文章主要介绍android中的service
首先我们要弄清楚service到底是什么东西,它是android用于提供后台服务的,注意service(IntentService)不是进程,也不是线程,是依赖于应用程序的主线程的。Android的后台就是指,它的运行是完全不依赖UI的。即使Activity被销毁,或者程序被关闭,只要进程还在,Service就可以继续运行。我们在使用service的时候,一般使用要在其内部开启一个线程来处理操作,同时我们也要注意,不要在service里面处理耗时操作,否则会引起ANR
但是service也有它的用处,拥有service的进程具有较高的优先级
2. 如果当 前service已经被启动(start),拥有它的进程则比那些用户可见的进程优先级低一些,但是比那些不可见的进程更重要,这就意味着service一般不会被killed.
3. 如果 客户端已经连接到service (bindService),那么拥有Service的进程则拥有最高的优先级,可以认为service是可见的。
4. 如果 service可以使用startForeground(int, Notification)方法来将service设置为前台状态,那么系统就认为是对用户可见的,并不会在内存不足时killed。
接下来我们先来创建一个简单service,需要继承service这个抽象类
import android.app.Service;
import android.content.Intent;
import android.os.IBinder;


public class MyService extends Service {

	/**
	 * 在服务创建是调用
	 */
	@Override
	public void onCreate() {
		super.onCreate();
	}

	/**
	 * 在每次服务启动时调用
	 * 如果我们希望服务一旦启动就去执行这个动作,就可以在这里实现
	 */
	@Override
	public int onStartCommand(Intent intent, int flags, int startId) {
		return super.onStartCommand(intent, flags, startId);
	}

        /**
        * 在onStartCommand后调用
        */
        @Override
        public void onStart(Intent intent, int startId) {
               // TODO Auto-generated method stub
               super.onStart(intent, startId);
        }

	/**
	 * 服务销毁时调用,用于回收资源
	 */
	@Override
	public void onDestroy() {
		super.onDestroy();
	}

	/**
	 * 抽象方法,必须实现
	 */
	@Override
	public IBinder onBind(Intent intent) {
		return null;
	}

}
然后我们在AndroidManifest.xml文件里面进行注册 ,我们应该注意到 android的四大组件,都必须在AndroidManifest.xml文件里面注册才生效
<service android:name=".Myservice"></service>接下来是在Activity启动和停止服务,其实过程和启动Activity类似,另外还有一个关闭
import android.app.Activity;
import android.content.Intent;
import android.os.Bundle;


public class MyActivity extends Activity{
	@Override
	protected void onCreate(Bundle savedInstanceState) {
		super.onCreate(savedInstanceState);
		//启动service
		Intent startIntent = new Intent(this,MyService.class);
		startService(startIntent);

		//关闭service
		Intent stopIntent = new Intent(this,MyService.class);
		stopService(startIntent);
	}
}
另外在service中,我还有调用
stopSelf()方法
这里要注意onCreate()和onStartCommand()的执行时间问题,当我们第一次创建服务时,这两个方法都会调用,以后我们启动服务,就不会在调用oncreate方法了,而是直接调用onStartCommand(),它的本质是调用了onStart()方法
接下来要说service跟activty的通信问题
要使用通信,必须使用另外一种启动service的方法
//绑定并启动service
		Intent bindIntent = new Intent(this,MyService.class);
bindService(bindIntent,connection,BIND_AUTO_CREATE);此后,如果再次使用bindService绑定服务,系统不会创建新的Service实例,也不会再调用onBind方法;
如果我们需要解除与这个服务的绑定,可使用unbindService方法,此时onUnbind方法和onDestroy方法会被调用。
这里要说一下startService()方法与bindService()方法的不同:
startService模式下调用者与服务无必然联系,即使调用者结束了自己的生命周期,只要没有使用stopService方法停止这个服务,服务仍会运行;
通常情况下,bindService模式下服务是与调用者生死与共的,在绑定结束之后,一旦调用者被销毁,服务也就立即终止,所以一旦要在activty的finish之前解除绑定!
通信过程如下:
bindService()中传入一个ServiceConnection,这个ServiceConnection有两个方法分别在service绑定与解绑定的时候调用,在绑定方法中,我们可以获得service里面的binder对象(由service的onBinder()方法提供),这样activity就知道了来自service的信息了。注意IBinder是一个接口,Binder是一个实现IBinder的类
这里onBind()方法返回的IBinder对象,相当于Service的代理,Activity通过这个代理来访问Service的数据
import android.app.Service;
import android.content.Intent;
import android.os.Binder;
import android.os.IBinder;


public class MyService extends Service {


	private MyIBinder myIBinder = new MyIBinder();
	class MyIBinder extends Binder{
		//这里提供一些接口函数
	};

	/**
	 * 抽象方法,必须实现
	 */
	@Override
	public IBinder onBind(Intent intent) {
		return myIBinder;
	}

        /**
        * 程序调用unbindService()以后调用
        * 之后才执行destory()
       */
       @Override
       public boolean onUnbind(Intent intent) {
           // TODO Auto-generated method stub
           return super.onUnbind(intent);
       }
 }
import android.app.Activity;
import android.content.ComponentName;
import android.content.Intent;
import android.content.ServiceConnection;
import android.os.Bundle;
import android.os.IBinder;


public class MyActivity extends Activity{

	ServiceConnection connection = new ServiceConnection() {
		/**
		 * 解除绑定
		 */
		@Override
		public void onServiceDisconnected(ComponentName name) {

		}
		/**
		 * 绑定服务
		 * IBinder就是对于服务onBind()方法返回的对象
		 */
		@Override
		public void onServiceConnected(ComponentName name, IBinder service) {
		   //可以调用IBinder的方法了,也就是实现通信
		}
	};

	@Override
	protected void onCreate(Bundle savedInstanceState) {
		super.onCreate(savedInstanceState);
		//绑定并启动service
		Intent bindIntent = new Intent(this,MyService.class);
		bindService(bindIntent,connection,BIND_AUTO_CREATE);
	}
}
//解除绑定
unbindService(connection);即可,调用以后,会先触发onUnbind()方法,然后在触发onDestory()方法
另外还有提一句:onServiceDisconnected(ComponentName name)方法只有在service所在的宿主进程由于异常中止或者其他原因终止,导致该Service与访问者之间的连接断开时才会调用,而主动调用unBindService()方法断开service连接,是不会调用onServiceDisconnected(ComponentName name)方法的
综上所述有两种启动service的方法,但是如果我们两个都调用了,会出现什么情况呢?
要解决这个问题,我们先来看一下有两种方法启动的service生命周期
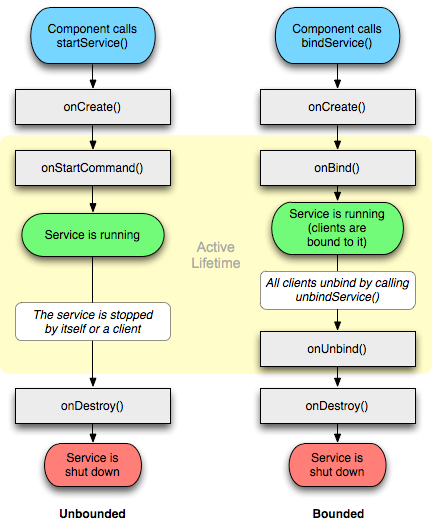
除了上述情况以外,我们再假设一种情况:
假设service先后调用了startService(),bindService(),在调用了unbindService,最后又调用了bindService()
这个过程生命周期如下:
onCreate()->onStartCommand()->onBind()->onUnbind()[重写改方法时返回true]->onRebind()
我们可以注意到,重新绑定时会调用onRebind()方法,但是前提是onUnbind()方法返回true
另外这个过程,没有调用ondestory()方法,因为Service不是由bindService()方法启动的,所以我们要调用stopService()才能停止改service
根据android系统的机制,一个服务只要被启动或者绑定以后,就会一直处于运行状态,必须让以上两种条件都不满足服务才能被销毁。上述情况,既要调用stopService()也要调用unbindService(),这样onDestory()方法才会执行
上述内容已经说明了service的基本使用,因为service的操作实际是在主线程执行的,为了避免阻塞,所以我们往往在service创建子线程
常见写法:
    @Override
    public int onStartCommand(Intent intent, int flags, int startId) {
        new Thread(new Runnable() {
            @Override
            public void run() {
                // 开始执行后台任务
            }
        }).start();
        return super.onStartCommand(intent, flags, startId);
    }

    class MyBinder extends Binder {

        public void startDownload() {
            new Thread(new Runnable() {
                @Override
                public void run() {
                    // 执行具体的下载任务
                }
            }).start();
        }

    }


 1474
1474

 被折叠的 条评论
为什么被折叠?
被折叠的 条评论
为什么被折叠?
 到【灌水乐园】发言


