


xxjob 2.3.0 部署
参考资料
docker安装xxl-job-admin步骤_JEECG低代码平台的技术博客_51CTO博客
run前准备
1 新建数据库  xxl_job
2 建表sql(可以直接使) https://github.com/xuxueli/xxl-job/blob/master/doc/db/tables_xxl_job.sql
建库sql
#
# XXL-JOB v2.4.0-SNAPSHOT
# Copyright (c) 2015-present, xuxueli.

CREATE database if NOT EXISTS `xxl_job` default character set utf8mb4 collate utf8mb4_unicode_ci;
use `xxl_job`;

SET NAMES utf8mb4;

CREATE TABLE `xxl_job_info` (
  `id` int(11) NOT NULL AUTO_INCREMENT,
  `job_group` int(11) NOT NULL COMMENT '执行器主键ID',
  `job_desc` varchar(255) NOT NULL,
  `add_time` datetime DEFAULT NULL,
  `update_time` datetime DEFAULT NULL,
  `author` varchar(64) DEFAULT NULL COMMENT '作者',
  `alarm_email` varchar(255) DEFAULT NULL COMMENT '报警邮件',
  `schedule_type` varchar(50) NOT NULL DEFAULT 'NONE' COMMENT '调度类型',
  `schedule_conf` varchar(128) DEFAULT NULL COMMENT '调度配置,值含义取决于调度类型',
  `misfire_strategy` varchar(50) NOT NULL DEFAULT 'DO_NOTHING' COMMENT '调度过期策略',
  `executor_route_strategy` varchar(50) DEFAULT NULL COMMENT '执行器路由策略',
  `executor_handler` varchar(255) DEFAULT NULL COMMENT '执行器任务handler',
  `executor_param` varchar(512) DEFAULT NULL COMMENT '执行器任务参数',
  `executor_block_strategy` varchar(50) DEFAULT NULL COMMENT '阻塞处理策略',
  `executor_timeout` int(11) NOT NULL DEFAULT '0' COMMENT '任务执行超时时间,单位秒',
  `executor_fail_retry_count` int(11) NOT NULL DEFAULT '0' COMMENT '失败重试次数',
  `glue_type` varchar(50) NOT NULL COMMENT 'GLUE类型',
  `glue_source` mediumtext COMMENT 'GLUE源代码',
  `glue_remark` varchar(128) DEFAULT NULL COMMENT 'GLUE备注',
  `glue_updatetime` datetime DEFAULT NULL COMMENT 'GLUE更新时间',
  `child_jobid` varchar(255) DEFAULT NULL COMMENT '子任务ID,多个逗号分隔',
  `trigger_status` tinyint(4) NOT NULL DEFAULT '0' COMMENT '调度状态:0-停止,1-运行',
  `trigger_last_time` bigint(13) NOT NULL DEFAULT '0' COMMENT '上次调度时间',
  `trigger_next_time` bigint(13) NOT NULL DEFAULT '0' COMMENT '下次调度时间',
  PRIMARY KEY (`id`)
) ENGINE=InnoDB DEFAULT CHARSET=utf8mb4;

CREATE TABLE `xxl_job_log` (
  `id` bigint(20) NOT NULL AUTO_INCREMENT,
  `job_group` int(11) NOT NULL COMMENT '执行器主键ID',
  `job_id` int(11) NOT NULL COMMENT '任务,主键ID',
  `executor_address` varchar(255) DEFAULT NULL COMMENT '执行器地址,本次执行的地址',
  `executor_handler` varchar(255) DEFAULT NULL COMMENT '执行器任务handler',
  `executor_param` varchar(512) DEFAULT NULL COMMENT '执行器任务参数',
  `executor_sharding_param` varchar(20) DEFAULT NULL COMMENT '执行器任务分片参数,格式如 1/2',
  `executor_fail_retry_count` int(11) NOT NULL DEFAULT '0' COMMENT '失败重试次数',
  `trigger_time` datetime DEFAULT NULL COMMENT '调度-时间',
  `trigger_code` int(11) NOT NULL COMMENT '调度-结果',
  `trigger_msg` text COMMENT '调度-日志',
  `handle_time` datetime DEFAULT NULL COMMENT '执行-时间',
  `handle_code` int(11) NOT NULL COMMENT '执行-状态',
  `handle_msg` text COMMENT '执行-日志',
  `alarm_status` tinyint(4) NOT NULL DEFAULT '0' COMMENT '告警状态:0-默认、1-无需告警、2-告警成功、3-告警失败',
  PRIMARY KEY (`id`),
  KEY `I_trigger_time` (`trigger_time`),
  KEY `I_handle_code` (`handle_code`)
) ENGINE=InnoDB DEFAULT CHARSET=utf8mb4;

CREATE TABLE `xxl_job_log_report` (
  `id` int(11) NOT NULL AUTO_INCREMENT,
  `trigger_day` datetime DEFAULT NULL COMMENT '调度-时间',
  `running_count` int(11) NOT NULL DEFAULT '0' COMMENT '运行中-日志数量',
  `suc_count` int(11) NOT NULL DEFAULT '0' COMMENT '执行成功-日志数量',
  `fail_count` int(11) NOT NULL DEFAULT '0' COMMENT '执行失败-日志数量',
  `update_time` datetime DEFAULT NULL,
  PRIMARY KEY (`id`),
  UNIQUE KEY `i_trigger_day` (`trigger_day`) USING BTREE
) ENGINE=InnoDB DEFAULT CHARSET=utf8mb4;

CREATE TABLE `xxl_job_logglue` (
  `id` int(11) NOT NULL AUTO_INCREMENT,
  `job_id` int(11) NOT NULL COMMENT '任务,主键ID',
  `glue_type` varchar(50) DEFAULT NULL COMMENT 'GLUE类型',
  `glue_source` mediumtext COMMENT 'GLUE源代码',
  `glue_remark` varchar(128) NOT NULL COMMENT 'GLUE备注',
  `add_time` datetime DEFAULT NULL,
  `update_time` datetime DEFAULT NULL,
  PRIMARY KEY (`id`)
) ENGINE=InnoDB DEFAULT CHARSET=utf8mb4;

CREATE TABLE `xxl_job_registry` (
  `id` int(11) NOT NULL AUTO_INCREMENT,
  `registry_group` varchar(50) NOT NULL,
  `registry_key` varchar(255) NOT NULL,
  `registry_value` varchar(255) NOT NULL,
  `update_time` datetime DEFAULT NULL,
  PRIMARY KEY (`id`),
  KEY `i_g_k_v` (`registry_group`,`registry_key`,`registry_value`)
) ENGINE=InnoDB DEFAULT CHARSET=utf8mb4;

CREATE TABLE `xxl_job_group` (
  `id` int(11) NOT NULL AUTO_INCREMENT,
  `app_name` varchar(64) NOT NULL COMMENT '执行器AppName',
  `title` varchar(12) NOT NULL COMMENT '执行器名称',
  `address_type` tinyint(4) NOT NULL DEFAULT '0' COMMENT '执行器地址类型:0=自动注册、1=手动录入',
  `address_list` text COMMENT '执行器地址列表,多地址逗号分隔',
  `update_time` datetime DEFAULT NULL,
  PRIMARY KEY (`id`)
) ENGINE=InnoDB DEFAULT CHARSET=utf8mb4;

CREATE TABLE `xxl_job_user` (
  `id` int(11) NOT NULL AUTO_INCREMENT,
  `username` varchar(50) NOT NULL COMMENT '账号',
  `password` varchar(50) NOT NULL COMMENT '密码',
  `role` tinyint(4) NOT NULL COMMENT '角色:0-普通用户、1-管理员',
  `permission` varchar(255) DEFAULT NULL COMMENT '权限:执行器ID列表,多个逗号分割',
  PRIMARY KEY (`id`),
  UNIQUE KEY `i_username` (`username`) USING BTREE
) ENGINE=InnoDB DEFAULT CHARSET=utf8mb4;

CREATE TABLE `xxl_job_lock` (
  `lock_name` varchar(50) NOT NULL COMMENT '锁名称',
  PRIMARY KEY (`lock_name`)
) ENGINE=InnoDB DEFAULT CHARSET=utf8mb4;

INSERT INTO `xxl_job_group`(`id`, `app_name`, `title`, `address_type`, `address_list`, `update_time`) VALUES (1, 'xxl-job-executor-sample', '示例执行器', 0, NULL, '2018-11-03 22:21:31' );
INSERT INTO `xxl_job_info`(`id`, `job_group`, `job_desc`, `add_time`, `update_time`, `author`, `alarm_email`, `schedule_type`, `schedule_conf`, `misfire_strategy`, `executor_route_strategy`, `executor_handler`, `executor_param`, `executor_block_strategy`, `executor_timeout`, `executor_fail_retry_count`, `glue_type`, `glue_source`, `glue_remark`, `glue_updatetime`, `child_jobid`) VALUES (1, 1, '测试任务1', '2018-11-03 22:21:31', '2018-11-03 22:21:31', 'XXL', '', 'CRON', '0 0 0 * * ? *', 'DO_NOTHING', 'FIRST', 'demoJobHandler', '', 'SERIAL_EXECUTION', 0, 0, 'BEAN', '', 'GLUE代码初始化', '2018-11-03 22:21:31', '');
INSERT INTO `xxl_job_user`(`id`, `username`, `password`, `role`, `permission`) VALUES (1, 'admin', 'e10adc3949ba59abbe56e057f20f883e', 1, NULL);
INSERT INTO `xxl_job_lock` ( `lock_name`) VALUES ( 'schedule_lock');

commit;
3 创建 挂载目录
mkdir -p /opt/xxjobData
docker run
docker run -e PARAMS="--spring.datasource.url=jdbc:mysql://124.222.227.132:3306/xxl_job?useUnicode=true&characterEncoding=UTF-8&autoReconnect=true&serverTimezone=UTC --spring.datasource.username=root --spring.datasource.password=数据库密码" -p 8090:8080 -v /opt/xxjobData:/data/applogs --name xxl-job-admin -d xuxueli/xxl-job-admin:2.3.0
运行结果
默认账号密码
admin
123456
开放防火墙
本地
开发防火墙
firewall-cmd --zone=public --add-port=8090/tcp --permanent
重启防火墙-使其开发端口号生效
firewall-cmd --reload
检查防火墙端口号是否开发成功!
firewall-cmd --list-ports

参数解释:
 zone =作用域(范围)
 permanent 永久生效
SpringBoot 快速集成 2.3.0
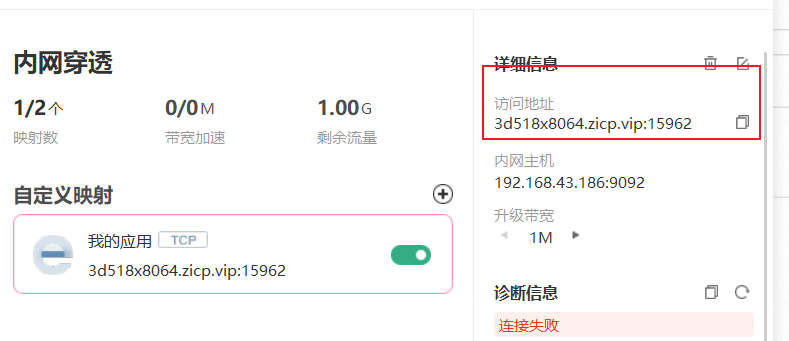
内网穿透设置(如果xxjob 部署到了云服务器-本地测试Job代码需要执行这步)
-
下载花生壳
-
外网映射配置

-
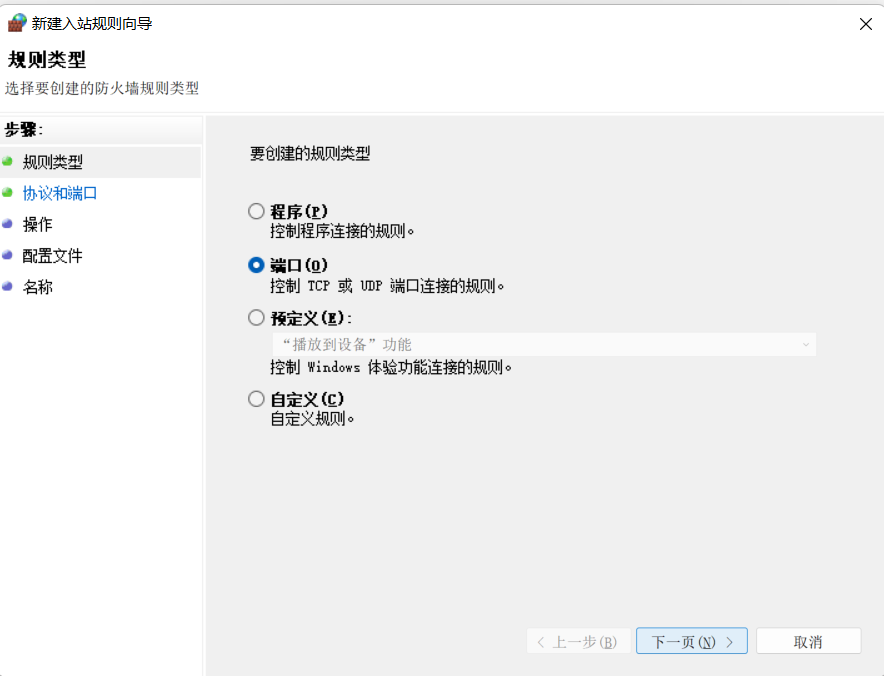
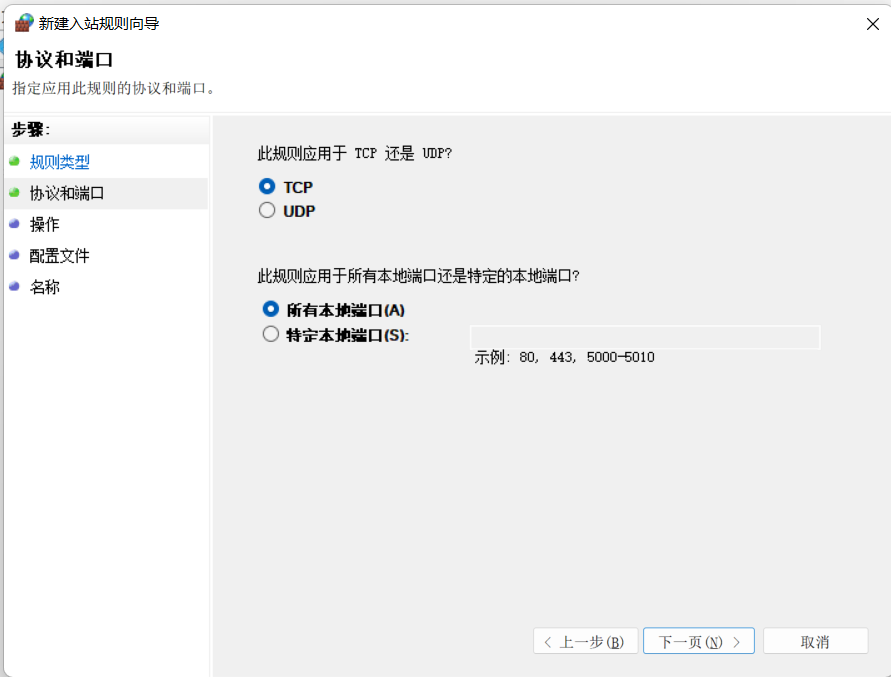
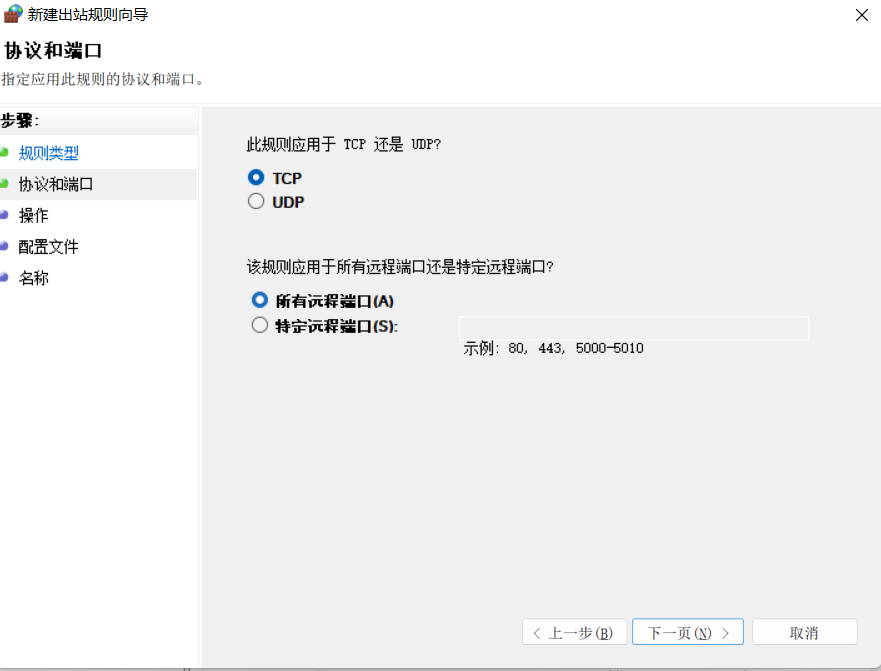
本地防火墙规则配置
-
入站规则
-
出站规则

-
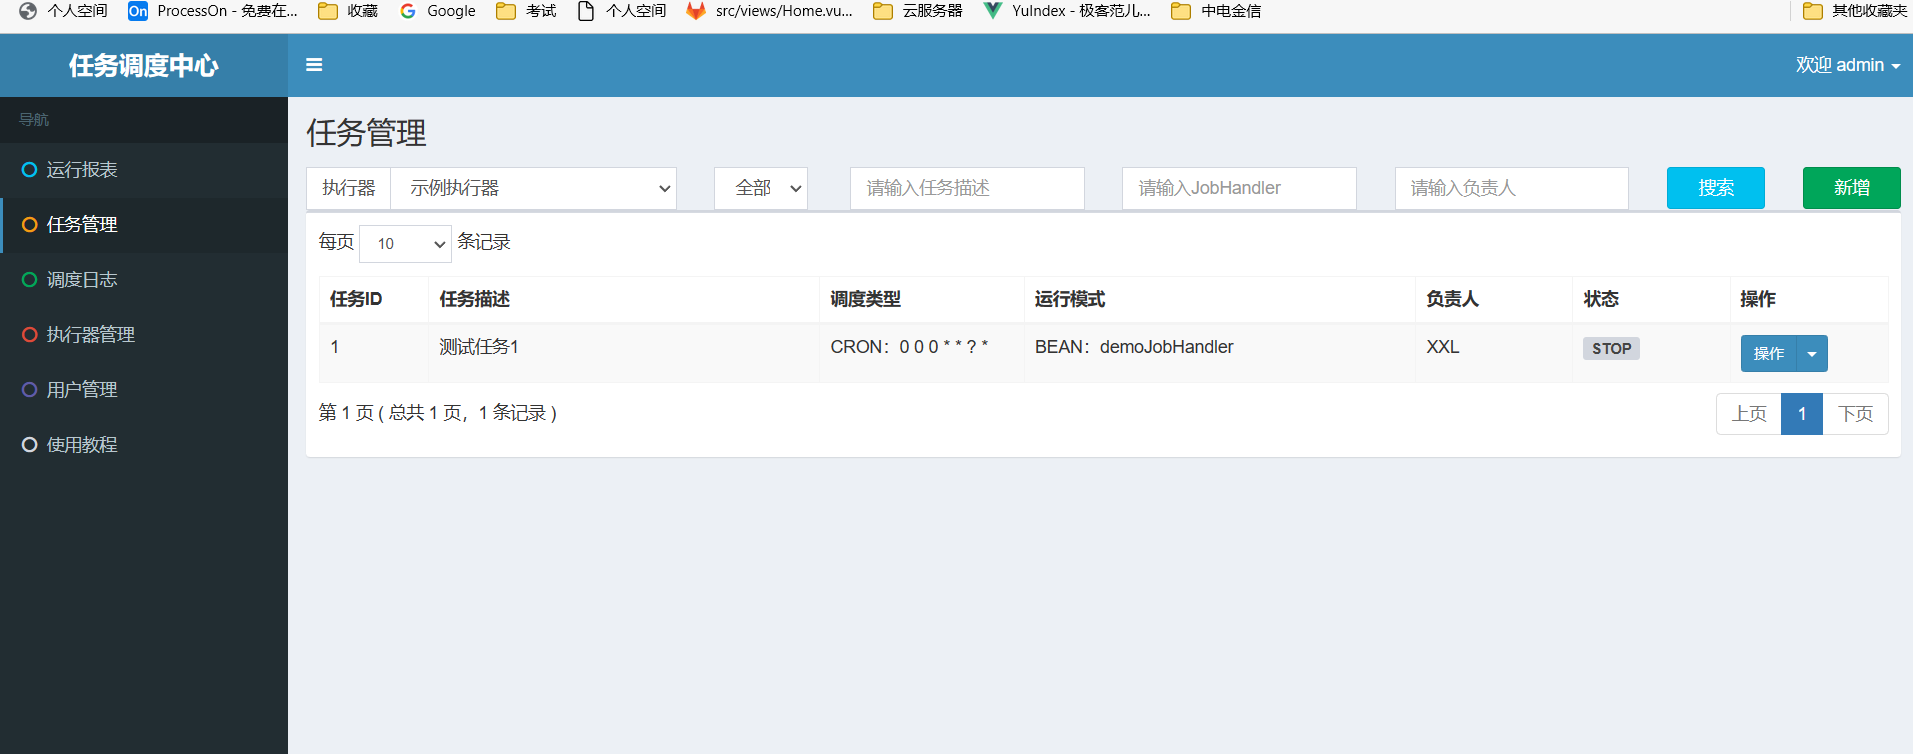
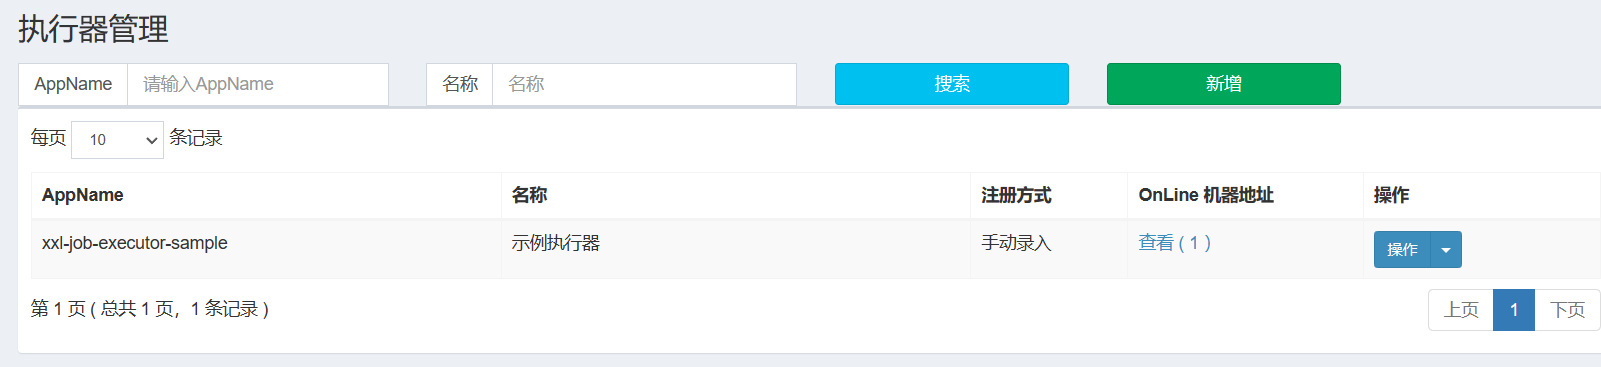
配置执行器(先使用默认的演示示例)
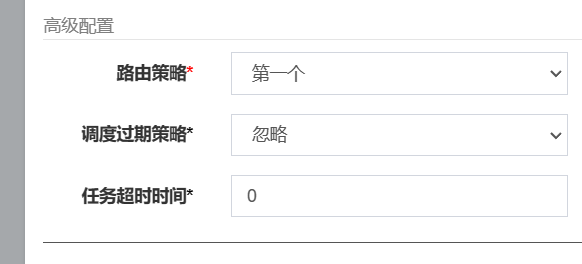
配置任务管理(先使用默认的演示示例)
- 简单的任务示例

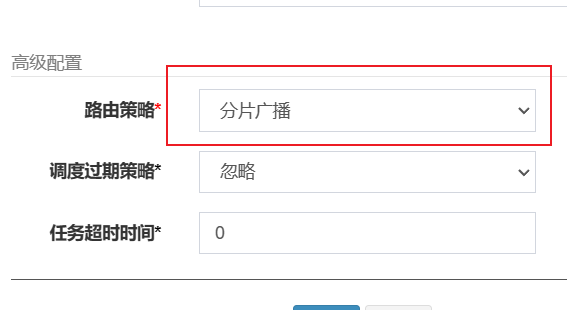
- 分片广播任务示例

代码集成
-
build.gradle
plugins { id 'java' id 'org.springframework.boot' version '2.7.8' id 'io.spring.dependency-management' version '1.0.15.RELEASE' } group = 'com.example' version = '0.0.1-SNAPSHOT' sourceCompatibility = '1.8' configurations { compileOnly { extendsFrom annotationProcessor } } repositories { mavenCentral() } dependencies { implementation 'org.springframework.boot:spring-boot-starter-web' compileOnly 'org.projectlombok:lombok' annotationProcessor 'org.projectlombok:lombok' testImplementation 'org.springframework.boot:spring-boot-starter-test' implementation 'com.xuxueli:xxl-job-core:2.3.0' implementation 'log4j:log4j:1.2.17' } tasks.named('test') { useJUnitPlatform() } -
application.properties
# xxjob 配置信息 xxl.job.admin.addresses=http://www.onlinecodeboy.cn:8090/xxl-job-admin/ xxl.job.admin.userName=admin xxl.job.admin.password=123456 xxl.job.executor.appname=xxl-job-executor-sample xxl.job.executor.port=9092 xxl.job.executor.logretentiondays=7 spring.main.allow-circular-references=true -
Config 类
package com.example.springbootxxjobdemo.config; import com.xxl.job.core.executor.impl.XxlJobSpringExecutor; import org.slf4j.Logger; import org.slf4j.LoggerFactory; import org.springframework.beans.factory.annotation.Value; import org.springframework.context.annotation.Bean; import org.springframework.context.annotation.Configuration; /** * @Description xxjob配置类 * @ClassName XxJobConfig * @Author 康世行 * @Date 11:29 2023/2/9 * @Version 1.0 **/ @Configuration public class XxJobConfig { Logger logger=LoggerFactory.getLogger(XxJobConfig.class); @Value("${xxl.job.admin.addresses}") private String adminAddresses; @Value("${xxl.job.executor.appname}") private String appname; @Value("${xxl.job.executor.port}") private int port; @Value("${xxl.job.executor.logretentiondays}") private int logRetentionDays; @Bean public XxlJobSpringExecutor xxlJobExecutor() { logger.info(">>>>>>>>>>> xxl-job config init."); XxlJobSpringExecutor xxlJobSpringExecutor = new XxlJobSpringExecutor(); xxlJobSpringExecutor.setAdminAddresses(adminAddresses); xxlJobSpringExecutor.setAppname(appname); // xxlJobSpringExecutor.setIp("http://3d518x8064.zicp.vip"); xxlJobSpringExecutor.setPort(port); //xxlJobSpringExecutor.setAccessToken(accessToken); //xxlJobSpringExecutor.setLogPath(logPath); xxlJobSpringExecutor.setLogRetentionDays(logRetentionDays); return xxlJobSpringExecutor; } } -
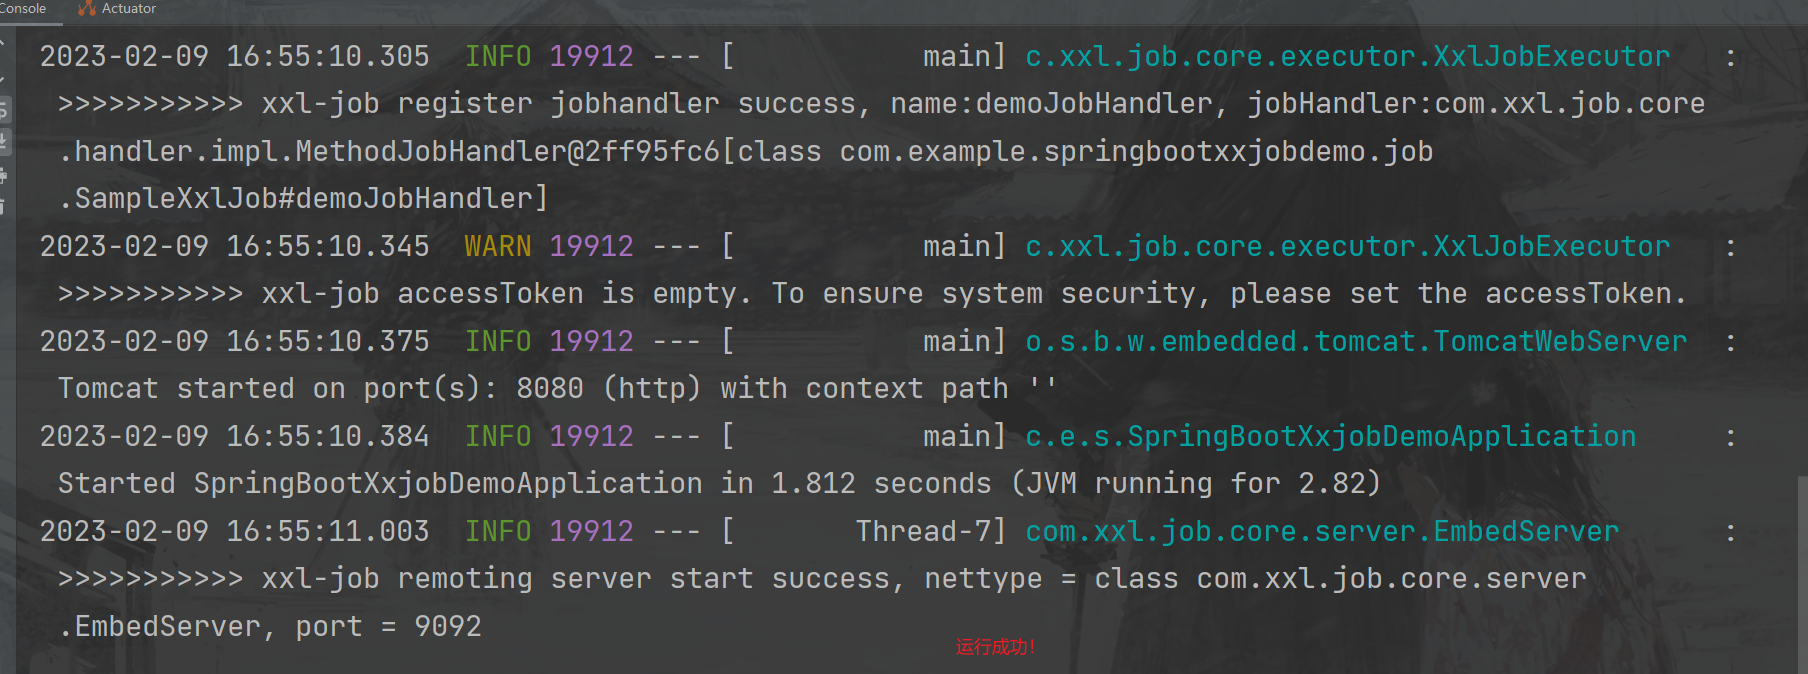
jobHandler
-
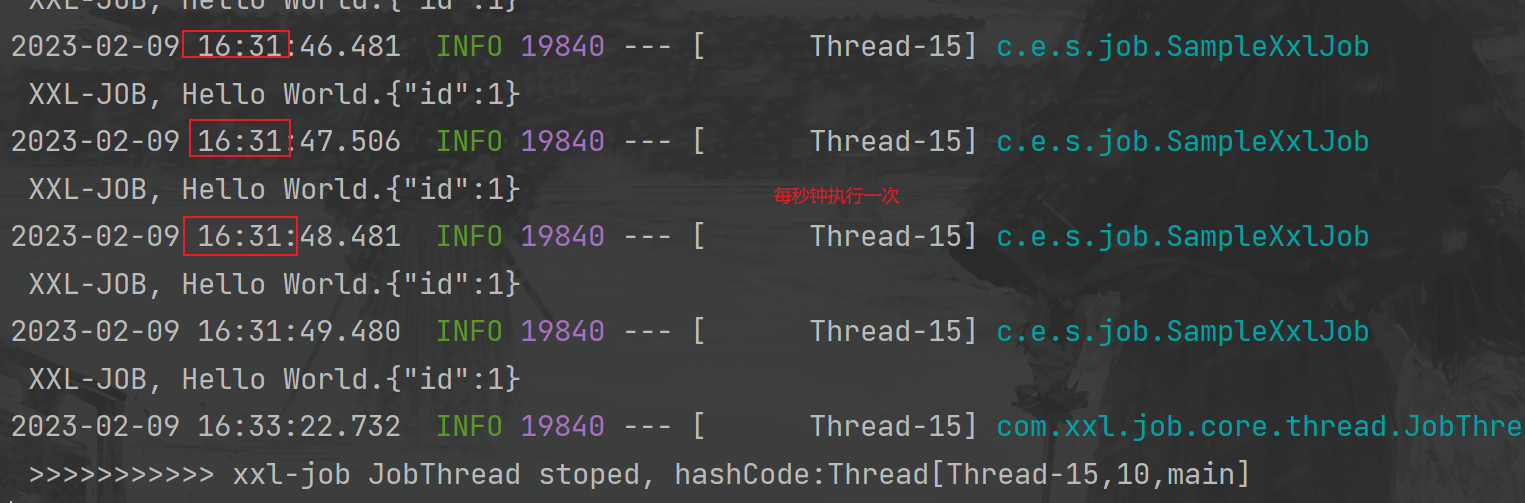
简单示例
package com.example.springbootxxjobdemo.job; import com.xxl.job.core.biz.model.ReturnT; import com.xxl.job.core.context.XxlJobHelper; import com.xxl.job.core.handler.IJobHandler; import com.xxl.job.core.handler.annotation.XxlJob; import groovy.util.logging.Slf4j; import org.slf4j.Logger; import org.slf4j.LoggerFactory; import org.springframework.stereotype.Component; /** * @Description XxlJob开发示例(Bean模式) * * 开发步骤: * * 1、任务开发:在Spring Bean实例中,开发Job方法; * * 2、注解配置:为Job方法添加注解 "@XxlJob(value="自定义jobhandler名称", init = "JobHandler初始化方法", destroy = "JobHandler销毁方法")",注解value值对应的是调度中心新建任务的JobHandler属性的值。 * * 3、执行日志:需要通过 "XxlJobHelper.log" 打印执行日志; * * 4、任务结果:默认任务结果为 "成功" 状态,不需要主动设置;如有诉求,比如设置任务结果为失败,可以通过 "XxlJobHelper.handleFail/handleSuccess" 自主设置任务结果; * @ClassName SampleXxlJob * @Author 康世行 * @Date 14:48 2023/2/9 * @Version 1.0 **/ @Component public class SampleXxlJob { private static Logger log= LoggerFactory.getLogger(SampleXxlJob.class); /** * 1、简单任务示例(Bean模式) */ @XxlJob("demoJobHandler") public void demoJobHandler() { String jobParam = XxlJobHelper.getJobParam(); log.info("XXL-JOB, Hello World."+jobParam); } } -
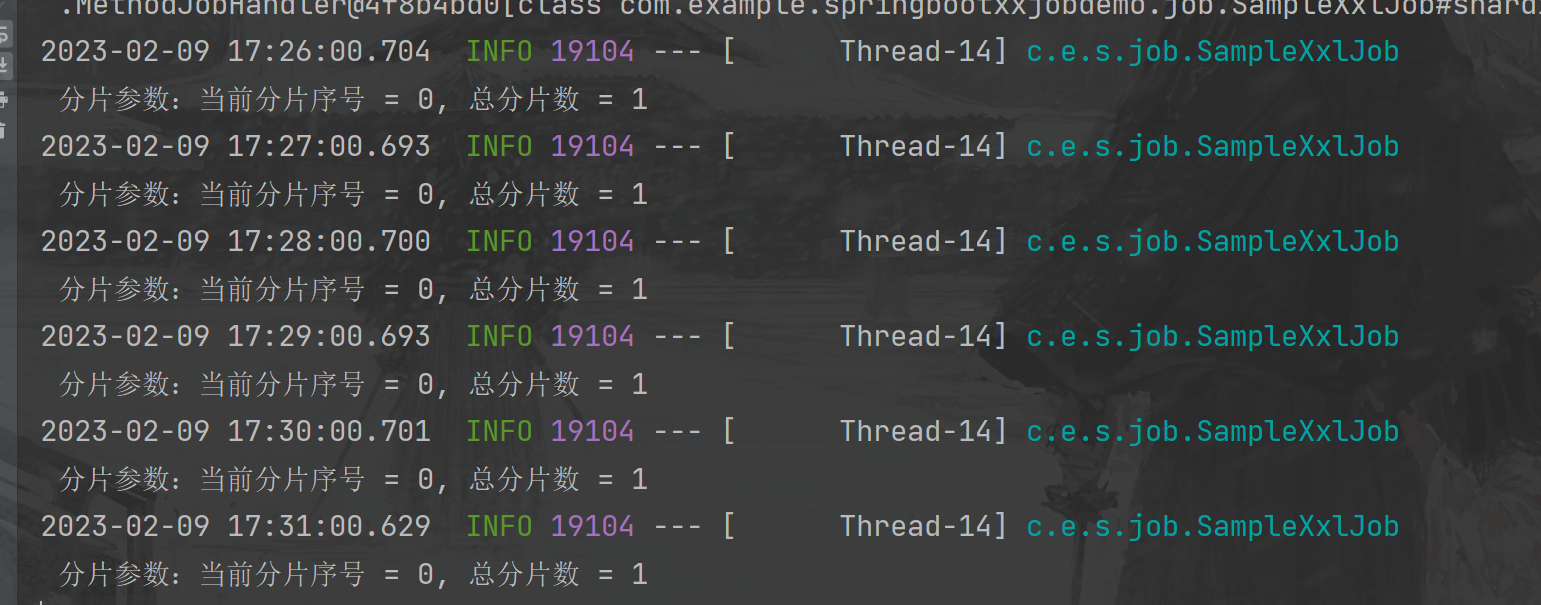
分片广播示例
/**
     * 2、分片广播任务
     */
    @XxlJob("shardingJobHandler")
    public void shardingJobHandler() throws Exception {

        // 分片参数
        int shardIndex = XxlJobHelper.getShardIndex();
        int shardTotal = XxlJobHelper.getShardTotal();

        log.info("分片参数:当前分片序号 = {}, 总分片数 = {}", shardIndex, shardTotal);
        XxlJobHelper.log("分片参数:当前分片序号 = {}, 总分片数 = {}", shardIndex, shardTotal);

        // 业务逻辑
        for (int i = 0; i < shardTotal; i++) {
            if (i == shardIndex) {
                XxlJobHelper.log("第 {} 片, 命中分片开始处理", i);
            } else {
                XxlJobHelper.log("第 {} 片, 忽略", i);
            }
        }

    }
-
-
启动成功
执行xxjob 任务
- 修改执行器-ip注册方式为手动注册(请勿自动注册,因为自动注册会把局域网地址注册上去,xxjob无法调通)
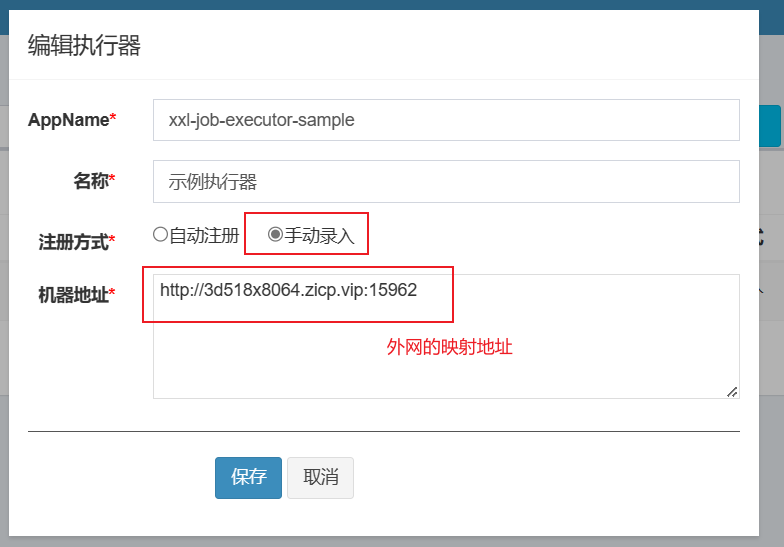
机器地址:外网映射之后生产的地址
执行结果
- 简单示例
- 分片广播示例
运行模式(BEAN)
本次演示使用的是BEAN模式
BEAN模式:任务以JobHandler方式维护在执行器端;需要结合 "JobHandler" 属性匹配执行器中任务;
        GLUE模式(Java):任务以源码方式维护在调度中心;该模式的任务实际上是一段继承自IJobHandler的Java类代码并 "groovy" 源码方式维护,它在执行器项目中运行,可使用@Resource/@Autowire注入执行器里中的其他服务;
        GLUE模式(Shell):任务以源码方式维护在调度中心;该模式的任务实际上是一段 "shell" 脚本;
        GLUE模式(Python):任务以源码方式维护在调度中心;该模式的任务实际上是一段 "python" 脚本;
        GLUE模式(PHP):任务以源码方式维护在调度中心;该模式的任务实际上是一段 "php" 脚本;
        GLUE模式(NodeJS):任务以源码方式维护在调度中心;该模式的任务实际上是一段 "nodejs" 脚本;
        GLUE模式(PowerShell):任务以源码方式维护在调度中心;该模式的任务实际上是一段 "PowerShell" 脚本;
    - JobHandler:运行模式为 "BEAN模式" 时生效,对应执行器中新开发的JobHandler类“@JobHandler”注解自定义的value值;
    - 执行参数:任务执行所需的参数;
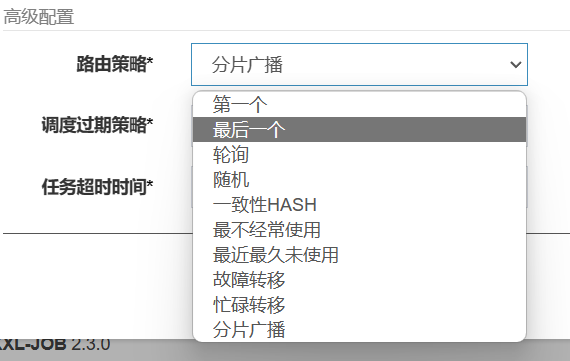
路由策略
如果本篇博客对您有一定的帮助,大家记得留言+点赞+收藏哦


 2528
2528


 到【灌水乐园】发言


