


目录
高速的C/C++编译工具——ccache :通用
ccache使用简介
Qt编译提速:针对 Qt
Integrating ccache into your build
distcc https://blog.csdn.net/King_weng/article/details/117415618
官方手册:Ccache manual (non-windows(e. linux) /Windows)
-----------------------------------------------
关联参考:
提高Qt Creator编译速度的7种方法,亲测可行(★firecat推荐★) https://blog.csdn.net/ken2232/article/details/132801671 << 方法1:工程.pro文件加入预编译机制,PRECOMPILED_HEADER << 实测:相比之下,最有效
https://blog.csdn.net/libaineu2004/article/details/89352224
提高Qt Creator编译速度的7种方法:Qt Creator 的编译如此之慢?(*****) https://blog.csdn.net/ken2232/article/details/131353608
要点:
1. 方法1:预编译头文件
工程.pro文件加入预编译机制,PRECOMPILED_HEADER
错误信息:
fatal error: iostream: No such file or directory
最主要原因就是:
iostream是c++的头文件,需要使用g++指令而不是gcc。
代码文件命名时,后缀名 .c 和 .cpp 是不一样的。会导致C++的库无法识别。
解决 1法:[Error] iostream.h: No such file or directory的解决办法:更改文件后缀 https://blog.csdn.net/cliukai/article/details/100081605
解决 2法:fatal error: iostream: 没有那个文件或目录 原因与解决方法:使用命名空间 https://www.fujieace.com/c-c/fatal-error-iostream.html
解决 3法:(实际用了这个)
#if defined __cplusplus
# include <iostream>
#endif //__cplusplus
2. 方法2:本文,ccache << 提速明显
从 Qt 5.9 开始,有一个更简单的方式:
load(ccache)
3. 测试如下,原因待分析
T1. clean,启动编译
Elapsed time: 01:27. << 第一次
Elapsed time: 00:21. << 紧接着,第二次.
T2. clean,只开启: load(ccache)
Elapsed time: 01:36.
Elapsed time: 00:00..
T3. clean,只开启: 预编译
# # Use Precompiled headers (PCH)
CONFIG += precompile_header
PRECOMPILED_HEADER = stable_header.h
HEADERS += stable_header.h #这句话是可有可无的,建议加上
Elapsed time: 01:00.
Elapsed time: 00:00..
T4. clean,同时开启: load(ccache)、预编译
Elapsed time: 01:00.
Elapsed time: 00:22.
Elapsed time: 00:00.
结论:
-----------------------------------------------
ccache 的用法
ccache 常用命令
sudo apt-get install ccache #安装
ccache -s #查看ccache的信息
ccache -C # 清除所有
ccache -M 128M #设置最大 128MB
ccache -M 256M #设置最大 256MBccache -M 2G #设置最大 2GB ?
在 .pro文件中设置:
load(ccache)
-------------------------------------------------
官网 ,及其他
Latest release
| Platform | Archive |
|---|---|
| All (source code release) | ccache-4.8.2.tar.gz (signature) ccache-4.8.2.tar.xz (signature) |
| Darwin (macOS) universal binary release | ccache-4.8.2-darwin.tar.gz (signature) |
| Linux x86_64 binary release | ccache-4.8.2-linux-x86_64.tar.xz (signature) |
| Windows i686 binary release Note: B-level support | ccache-4.8.2-windows-i686.zip (signature) |
| Windows x86_64 binary release Note: B-level support | ccache-4.8.2-windows-x86_64.zip (signature) |
See also the ccache 4.8.2 release notes.
Notes
You can also find older releases on the releases page on GitHub.
----------------------
存放的旧版本
https://www.samba.org//ftp/ccache/
-----------------------------------------------
Qt 出现 [debug/main.o] Error 2
Qt编译错误: [debug/main.o] Error 2 问题(ccache 造成)
在 linux上,正常。
在 win上,出现了上述的问题。
解决:
使用了ccache
QMAKE_CXX = ccache $$QMAKE_CXX
注释掉重新编译一遍。
问题,应该是 linux安装了 ccache;而 win上没有安装?????
-----------------------------------------------
参考:
高速的C/C++编译工具——ccache 使用简介:编译提速 (**) << 提速明显
https://blog.csdn.net/ken2232/article/details/131362000
为什么 Qt Creator 的编译如此之慢?
https://blog.csdn.net/ken2232/article/details/131353608
===========================
Ccache — a fast C/C++ compiler cache
https://ccache.dev/documentation.html
官方手册:Ccache manual (non-windows(e. linux) /Windows)
Configuration
Ccache’s default behavior can be overridden by options in configuration files, which in turn can be overridden by environment variables with names starting with CCACHE_. Ccache normally reads configuration from two files: first a system-level configuration file and secondly a cache-specific configuration file. The priorities of configuration options are as follows (where 1 is highest):
-
Command line settings in KEY=VALUE form. Example:
ccache debug=true compiler_check="%compiler% --version" gcc -c example.c
-
Environment variables.
-
The cache-specific configuration file (see below).
-
The system (read-only) configuration file
<sysconfdir>/ccache.conf(typically/etc/ccache.confor/usr/local/etc/ccache.conf). -
Compile-time defaults.
As a special case, if the environment variable CCACHE_CONFIGPATH is set it specifies the configuration file, and the system configuration file won’t be read.
Location of the configuration file
non-Windows OS
The location of the cache-specific configuration file is determined like this on non-Windows systems:
-
If
CCACHE_CONFIGPATHis set, use that path. -
Otherwise, if the environment variable
CCACHE_DIRis set then use$CCACHE_DIR/ccache.conf. -
Otherwise, if cache_dir is set in the system configuration file then use
<cache_dir>/ccache.conf. -
Otherwise, if there is a legacy
$HOME/.ccachedirectory then use$HOME/.ccache/ccache.conf. -
Otherwise, if
XDG_CONFIG_HOMEis set then use$XDG_CONFIG_HOME/ccache/ccache.conf. -
Otherwise, use
$HOME/Library/Preferences/ccache/ccache.conf(macOS) or$HOME/.config/ccache/ccache.conf(other systems).
Windows OS
注:环境变量设置起来,好像有点麻烦?
个人电脑使用,将 ccache.exe 直接拷贝到:C:\Windows\System32 的目录下,就可以了。
windows下载的只是一个免安装的 exe文件,因此,需要用户自行设置。如路径等等。
On Windows, this is the method used to find the configuration file:
-
If
CCACHE_CONFIGPATHis set, use that path. -
Otherwise, if the environment variable
CCACHE_DIRis set then use%CCACHE_DIR%/ccache.conf. -
Otherwise, if cache_dir is set in the system configuration file then use
<cache_dir>\ccache.conf. The system-wide configuration on Windows is%ALLUSERSPROFILE%\ccache\ccache.confby default. TheALLUSERSPROFILEenvironment variable is usuallyC:\ProgramData. -
Otherwise, if there is a legacy
%USERPROFILE%\.ccachedirectory then use%USERPROFILE%\.ccache\ccache.conf. -
Otherwise, use
%LOCALAPPDATA%\ccache\ccache.confif it exists. -
Otherwise, use
%APPDATA%\ccache\ccache.conf.
See also the cache_dir configuration option for how the cache directory location is determined.
Configuration file syntax
Configuration files are in a simple “key = value” format, one option per line. Lines starting with a hash sign are comments. Blank lines are ignored, as is whitespace surrounding keys and values. Example:
# Set maximum cache size to 10 GB:
max_size = 10G
Boolean values
Some configuration options are boolean values (i.e. truth values). In a configuration file, such values must be set to the string true or false. For the corresponding environment variables, the semantics are a bit different:
-
A set environment variable means “true” (even if set to the empty string).
-
The following case-insensitive negative values are considered an error (instead of surprising the user): 0, false, disable and no.
-
An unset environment variable means “false”.
Each boolean environment variable also has a negated form starting with CCACHE_NO. For example, CCACHE_COMPRESS can be set to force compression and CCACHE_NOCOMPRESS can be set to force no compression.
===========================
Integrating ccache into your build
Using ccache together with qmake and QtCreator – Embedded bits and pixels
# TLDR? No there are better ways...
QMAKE_CXX = ccache $$QMAKE_CXX
ccache configuration
One can configure ccache in many different ways. The default config (on Ubuntu 18.04) seems to be a maximum cache size of 5 GB. This can easily be changed. More information can be found here.
Qt编译提速
背景:编译大型项目文件时,速度较慢,此前已经使用参数-J3使用3个CPU进行编程,但是效果一般,编译速度依旧很慢。
解决方法:使用ccache,是一个编译器缓存,ccache并不是真正去读取、理解并解释其内容,只是将最终的文本拷贝到文件中,使得它可以立即被编译。
步骤:
- 下载安装ccache,sudo apt-get install ccache
- ccache -M 6G ,划分6G空间给ccache使用。
- Qt中配置使用,如图。
CONFIG += ccache #在 .pro文件中添加,即可。
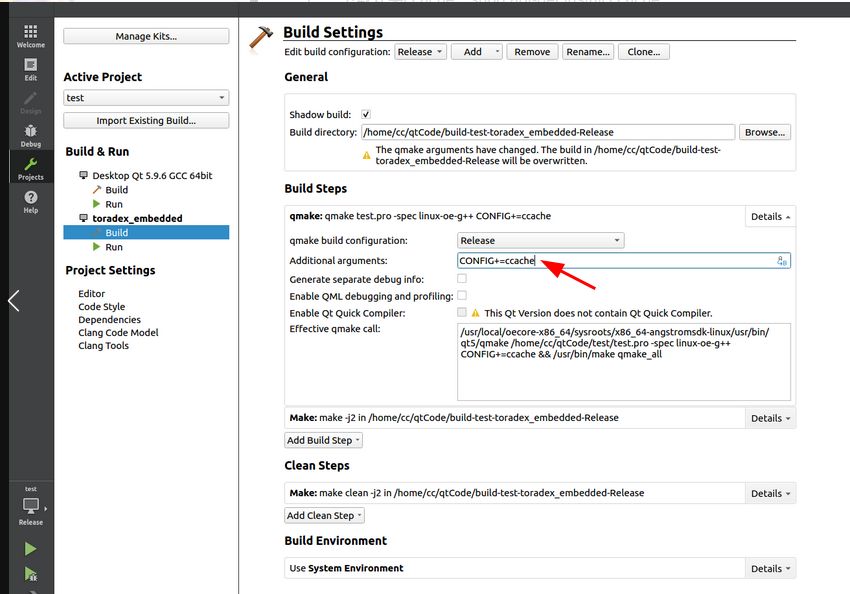 结果:第一次编译未见效果,第二次便速度飞起。
ccache --version #查看ccache版本信息
ccache -M 512M #可随时根据具体需求,来调整ccache的大小
ccache -s #查看ccache的信息
ccache -C #清除所有
————————————————
版权声明:本文为CSDN博主「雲烟」的原创文章,遵循CC 4.0 BY-SA版权协议,转载请附上原文出处链接及本声明。
原文链接:https://blog.csdn.net/baidu_33879812/article/details/109011436
掌握这个小技巧,让你的 C++ 编译速度提升 50 倍!
https://zhuanlan.zhihu.com/p/428560512
二、使用 ccache 编译器缓存
ccache(全称:compiler cache)是一个编译器缓存,该工具会高速缓存编译生成的信息,并在编译的特定部分使用高速缓存的信息,比如头文件,这样就节省了通常使用 cpp 解析这些信息所需要的时间。
▓ qmake 设置
打开 .pro,添加以下配置,ccache 就可以工作了:
QMAKE_CXX= ccache $$QMAKE_CXX
从 Qt 5.9 开始,有一个更简单的方式:
load(ccache)▓ cmake 配置
在 CMakeLists.txt 中添加以下配置,将 ccache 作为编译命令和链接命令的启动器:
find_program(CCACHE_FOUND ccache)
if(CCACHE_FOUND)
    set_property(GLOBAL PROPERTY RULE_LAUNCH_COMPILE ccache)
    set_property(GLOBAL PROPERTY RULE_LAUNCH_LINK ccache)
endif(CCACHE_FOUND)
如何加速Linux下的编译速度(加速make) (**)
总结一下:
- tmpfs: 解决IO瓶颈,充分利用本机内存资源
- make -j: 充分利用本机计算资源
- distcc: 利用多台计算机资源
- ccache: 减少重复编译相同代码的时间
这些工具的好处都在于布署的成本相对较低,综合利用这些工具,就可以轻轻松松的节省相当可观的时间。上面介绍的都是这些工具最基本的用法,更多的用法可以参考它们各自的man page。
-
distcc
一台机器的能力有限,可以联合多台电脑一起来编译。这在公司的日常开发中也是可行的,因为可能每个开发人员都有自己的开发编译环境,它们的编译器版本一般是一致的,公司的网络也通常具有较好的性能。这时就是distcc大显身手的时候了。
使用distcc,并不像想象中那样要求每台电脑都具有完全一致的环境,它只要求源代码可以用make -j并行编译,并且参与分布式编译的电脑系统中具有相同的编译器。因为它的原理只是把预处理好的源文件分发到多台计算机上,预处理、编译后的目标文件的链接和其它除编译以外的工作仍然是在发起编译的主控电脑上完成,所以只要求发起编译的那台机器具备一套完整的编译环境就可以了。
distcc安装后,可以启动一下它的服务:
/usr/bin/distccd --daemon --allow 10.64.0.0/16
默认的3632端口允许来自同一个网络的distcc连接。
然后设置一下DISTCC_HOSTS环境变量,设置可以参与编译的机器列表。通常localhost也参与编译,但如果可以参与编译的机器很多,则可以把localhost从这个列表中去掉,这样本机就完全只是进行预处理、分发和链接了,编译都在别的机器上完成。因为机器很多时,localhost的处理负担很重,所以它就不再“兼职”编译了。
export DISTCC_HOSTS="localhost 10.64.25.1 10.64.25.2 10.64.25.3"
然后与ccache类似把g++,gcc等常用的命令链接到/usr/bin/distcc上就可以了。
在make的时候,也必须用-j参数,一般是参数可以用所有参用编译的计算机CPU内核总数的两倍做为并行的任务数。
同样测试一下:
一台双核计算机,make -j4:23分16秒
两台双核计算机,make -j4:16分40秒
两台双核计算机,make -j8:15分49秒
跟最开始用一台双核时的23分钟相比,还是快了不少的。如果有更多的计算机加入,也可以得到更好的效果。
在编译过程中可以用distccmon-text来查看编译任务的分配情况。distcc也可以与ccache同时使用,通过设置一个环境变量就可以做到,非常方便。
如何提高工程编译速度 (**)
https://cloud.tencent.com/developer/article/1810796
Linux Qt 平台为例测试
编译总量 = 编译速度 * 编译时间
按照上面等式进行优化,则:
在编译总量不变的前提下,要减少编译时间,则可提升编译速度;
或在编译速度不变的情况下,较少编译总量;
再或者既减少编译总量又提高编译速度。
C/C++编译特点
C/C++ 编译单位是文件,无法进行跨模块优化,C++20可支持。
将.o文件链接在一起时很难并行。
预处理过程可并行进行。
提高编译速度
1 减小编译总量
包含大量头文件会导致预处理时间变长,针对此尽量使用前置声明。
Pimpl(Private Implementation)模式与不透明指针。
高内聚、低耦合,减少模块间的依赖。
删除不必要的头文件。
2 提高编译速度
在提升编译速度上,可以增加编译机器数量或者提高单机编译能力。针对整体工程。
2.1 提高单机编译能力
多核编译
make -j*
#减少重复编译相同代码的时间
ccache
解决IO瓶颈,充分利用内存资源,头文件非常多,预处理时需要反复从磁盘读取文件
tmpfs
2.2 使用多机进行
distcc :分布式编译,利用多台计算机资源共同编译一个程序,
可用于内核或者大型程序(**未做测试**),简单讲链接过程在主机进行。
icecc : distcc升级版
Qt多核编译与ccache使用具体操作流程
1 Qt 设置多核编译
Qt侧边栏 Projects -> Build -> Build Steps
使用ccache加速Qt编译过程 (****)
之前听说过ccache可以加快大型工程的编译速度,一直没时间使用,最近看到一篇关于加速Qt编译过程的文章,
就自己动手试了一下,因为Ubuntu版本是14.10 有点老,只能通过源码方式安装,下面只记载了安装过程中出现的问题
因为网上有很多安装教程,这里就不列了。
1. ccache的安装
去https://ccache.samba.org/下载最新的版本:
ccache依赖于asciidoc,ccache在安装时有2个问题:
xmllint和xsltproc会提示出错,参考这篇文章解决
https://groups.google.com/forum/#!topic/asciidoc/FC-eOwU8rYg
在我的机器上,当时xsltproc还是提示错,参考下面这篇文章后
https://github.com/obgm/libcoap/issues/26
发现是doc/MANUAL.xml的问题,当时这个文件大小是0,没有内容,删除之后,重新make install成功
2. ccache的使用
确定ccache的位置
#which ccache
/usr/local/bin/ccache
#cd /usr/local/bin/
root@vmw:/usr/local/bin# which gcc
/usr/bin/gcc 此时gcc还是原始的gcc,默认的gcc是在/usr/bin下,
#ln -s ccache /usr/local/bin/gcc
#ln -s ccache /usr/local/bin/g++
#ln -s ccache /usr/local/bin/cc
#ln -s ccache /usr/local/bin/c++
#export PATH="/usr/local/bin/ccache:$PATH"
通过如上命令设置过之后,系统就会使用/usr/local/bin下的gcc了,即包含了ccache封装的版本。原因是:
PATH环境变量中,/usr/local/bin在/usr/bin之前,所以会优先使用此gcc
declare -x PATH="/usr/local/bin/ccache:/opt/tools/docbook-xsl-1.76.0/tools/bin:/opt/hisi-linux/x86-arm/arm-hisiv500-linux/target/bin:/opt/kaifaban/i.mx28x/tools/gcc-4.4.4-glibc-2.11.1-multilib-1.0/arm-fsl-linux-gnueabi/bin:/opt/hisi-linux/x86-arm/arm-hisiv400-linux/target/bin:/opt/hisi-linux/x86-arm/arm-hisiv300-linux/target/bin:/opt/tools/qt5.5/Tools/QtCreator/bin:/opt/hisi-linux/x86-arm/arm-hisiv200-linux/target/bin:/opt/hisi-linux/x86-arm/arm-hisiv100-linux/target/bin:/usr/local/sbin:/usr/local/bin:/usr/sbin:/usr/bin:/sbin:/bin"
#which gcc
/usr/local/bin/gcc 此时的gcc已经是ccache封装的版本
交叉编译Qt时,需要修改qmake.conf中对应的:
QMAKE_CC = ccache arm-hisiv200-linux-gcc
QMAKE_CXX = ccache arm-hisiv200-linux-g++
QMAKE_LINK = ccache arm-hisiv200-linux-g++QMAKE_LINK_SHLIB = ccache arm-hisiv200-linux-g++
测试时,第一次编译Qt编译时间还是很长,查询编译日志可以发现ccache的身影,
make clean之后再编,奇迹发生了,日志的打印速度变得飞快,编译时间和之前不是一个数量级的。
后面会尝试编译Android。
————————————————
版权声明:本文为CSDN博主「wuqingwei」的原创文章,遵循CC 4.0 BY-SA版权协议,转载请附上原文出处链接及本声明。
原文链接:https://blog.csdn.net/wuqingwei/article/details/79582836
参考:
linux运行qt速度慢,Linux下QT Creator 编译|构建源代码速度慢|加速的问题
https://mp.csdn.net/mp_blog/creation/editor/131362000
QMAKE_CXX = ccache g++
===============================
ccache实际运行测试
需要设置 6GB吗?ccache -M 6G ,划分6G空间给ccache使用。
实际上,测试结果如下:
对于这个具体的测试代码来说,可能 128M 就可以了 ?
#设置为 256M
$ ccache -M 256M
Set cache size limit to 256.0 MB
#设置完成的初始状态
abc@abc:~
$ ccache -s
cache directory /home/abc/.cache/ccache
primary config /home/abc/.config/ccache/ccache.conf
secondary config (readonly) /etc/ccache.conf
stats updated Sat Jun 24 03:31:03 2023
cache hit (direct) 0
cache hit (preprocessed) 0
cache miss 43
cache hit rate 0.00 %
called for link 3
called for preprocessing 1
cleanups performed 16
files in cache 0
cache size 0.0 kB
max cache size 256.0 MB
#运行了一次构建 Build之后的状态状态
$ ccache -s
cache directory /home/abc/.cache/ccache
primary config /home/abc/.config/ccache/ccache.conf
secondary config (readonly) /etc/ccache.conf
stats updated Sat Jun 24 03:43:05 2023
cache hit (direct) 0
cache hit (preprocessed) 0
cache miss 80
cache hit rate 0.00 %
called for link 4
called for preprocessing 2
cleanups performed 17
files in cache 69
cache size 8.2 MB
max cache size 256.0 MB
ccache 语法:官方文档
$ ccache -h
Usage:
ccache [options]
ccache compiler [compiler options]
compiler [compiler options] (via symbolic link)
Common options:
-c, --cleanup delete old files and recalculate size counters
(normally not needed as this is done
automatically)
-C, --clear clear the cache completely (except configuration)
--config-path PATH operate on configuration file PATH instead of the
default
-d, --directory PATH operate on cache directory PATH instead of the
default
--evict-older-than AGE remove files older than AGE (unsigned integer
with a d (days) or s (seconds) suffix)
-F, --max-files NUM set maximum number of files in cache to NUM (use
0 for no limit)
-M, --max-size SIZE set maximum size of cache to SIZE (use 0 for no
limit); available suffixes: k, M, G, T (decimal)
and Ki, Mi, Gi, Ti (binary); default suffix: G
-X, --recompress LEVEL recompress the cache to level LEVEL (integer or
"uncompressed") using the Zstandard algorithm;
see "Cache compression" in the manual for details
-o, --set-config KEY=VAL set configuration item KEY to value VAL
-x, --show-compression show compression statistics
-p, --show-config show current configuration options in
human-readable format
-s, --show-stats show summary of configuration and statistics
counters in human-readable format
-z, --zero-stats zero statistics counters-h, --help print this help text
-V, --version print version and copyright information
Options for scripting or debugging:
--checksum-file PATH print the checksum (64 bit XXH3) of the file at
PATH
--dump-manifest PATH dump manifest file at PATH in text format
--dump-result PATH dump result file at PATH in text format
--extract-result PATH extract data stored in result file at PATH to the
current working directory
-k, --get-config KEY print the value of configuration key KEY
--hash-file PATH print the hash (160 bit BLAKE3) of the file at
PATH
--print-stats print statistics counter IDs and corresponding
values in machine-parsable formatSee also the manual on <https://ccache.dev/documentation.html>.
===============================
高速的C/C++编译工具——ccache
1、简介
ccache(“compiler cache”的缩写)是一个编译器缓存,该工具会高速缓存编译生成的信息,并在编译的特定部分使用高速缓存的信息, 比如头文件,这样就节省了通常使用 cpp 解析这些信息所需要的时间。如果某头文件中包含对其他头文件的引用,ccache会用那个文件的 cpp-parsed版本来取代include声明,不是真正去读取、理解并解释其内容,ccache 只是将最终的文本拷贝到文件中,使得它可以立即被编译。ccache是以空间换取速度,ccache非常适合经常make clean(或删除out目录)后重新编译的情况。
2、安装与配置
(1)安装
apt-get install ccache
(2)查看安装位置
which ccache
(3)配置环境变量
在~/.bashrc(或/etc/profile)中添加:
#ccache
export USE_CCACHE=1
export CCACHE_SLOPPINESS=file_macro,include_file_mtime,time_macros
export CCACHE_UMASK=002

注:设置cache位置
默认情况下cache(缓存)会保存在~/.ccache目录下,如果要设置主目录位于NFS或其他非本地文件系统上,可获得更高的速度,如存储器支持,速度可提高10%到25%。在配置中添加如下配置:
# home/XXXXXX/.ccache XXXXXX是你的用户名
export CCACHE_DIR=<path-to-your-cache-directory>
(4)使配置生效
source .bashrc
(5)设置ccache大小
ccache -M 50G
ccache的大小是一个动态的值,每次改变.ccache文件的位置,max cache size都会被初始化。该设置会保存到CCACHE_DIR中,且该命令是长效的,不会因系统重启而失效。使用ccache第一次编译后能够明显提高make clean以后再次的编译速度。
(6)查看ccache版本信息
ccache --version
(7)查看ccache的信息
ccache -s
另:清除所有:ccache -C
ccache -C
3、使用ccache
ccache 主要是用来优化编译的。有两种方式使用ccache:
(1)选择性使用ccache:
使用"ccache gcc"或"ccache g++"代替"gcc"或"g++" ,以 gcc 为第一个参数调用 ccache,而不是调用gcc。例如,要在命令行中编译一个文件,您通常会使用:
$ gcc foo.c
要使用 ccache,您应该输入:
$ ccache gcc foo.c
像这样对一个文件进行单独的编译,尤其是第一次使用 ccache 编译那个文件时,您将不会看到有任何的帮助,因为编译信息还没有被高速缓存。
(2)ccache加入环境变量,取代C编译器:
设置 CC 环境变量的值,配置makepkg,进入到你的/etc/makepkg.conf中加入下面几行:
export CC="ccache gcc"
export CPP="ccache cpp"
export CXX="ccache g++"
或者直接在命令行输入:
$ export set CC='ccache gcc'
注:makepkg的更多配置参考:https://wiki.archlinux.org/index.php/Makepkg
(3)配置 ccache 永久地取代主要编译器:
vim ~/.bash_profile
把/usr/lib/ccache/bin路径加到PATH下:
PATH=/usr/lib/ccache/bin:$PATH
这只是对ccache所自带的gcc起作用,有时候我们需要使用交叉编译工具,这时,仅仅通过以上操作是无法执行ccache编译的,通常会提示xxx路径没有这个编译工具,这时需要这样做:
(a)查看安装路径
$ which ccache
(b)创建文件夹
$ mkdir ~/.bin
(c)设置链接
$ cd ~/.bin/
$ ln -s /usr/bin/ccache gcc
$ ln -s /usr/bin/ccache g++
$ ln -s /usr/bin/ccache arm-linux-gcc
$ ln -s /usr/bin/ccache arm-linux-g++
同理,其他编译工具类似方式指定。
(d)PATH设置
将~/.bin/放在 arm-linux-gcc等的PATH的前面。如:
// 原:
PATH=$PATH:$HOME/bin
// 现:
PATH=/home/用户名/.bin:$PATH:/home/用户名/ccache/bin
然后重启即可
(e)$ which arm-linux-gcc
/home//.bin/arm-linux-gcc 确认
这样每次启动g++的时候都会启动/usr/lib/ccache/bin/g++,而不会启动/usr/bin/g++,效果跟使用命令行ccache g++效果一样。每次用户登录时,使用g++编译器时会自动启动ccache。
如果您只是想为一个项目启用 ccache,比如说编译 Perl 等第三方工具时,那么您或者可以使用第二种方式,或者可以告知配置脚本或 make 命令使用哪个C编译器。
4、控制高速缓存
默认情况下cache(缓存)会保存在~/.ccache目录下。此目录可自行修改。下面列举了一些选项让您可以更深入地控制高速缓存设置:
CCACHE_LOGFILE :定义了使用高速缓存时生成的日志文件所处的位置;
ccache -s:获得关于高速缓存性能的统计数据
ccache -M:该命令行选项来设置高速缓存的最大大小。默认是 1GB。高速缓存的设置会写入到高速缓存目录,所以您可以让不同的用户和组在不同的位置拥有不同大小的高速缓存。
ccache -F:该选项设置高速缓存目录的最大文件数目,按 16 进制舍入。和 -M 相同,只是当您希望改变配置的时候才需要使用它。
ccache -c:该选项清空缓存。您通常不需要使用这个选项,因为 ccache 在执行过程中会更新信息,但是,如果您要重用一个没有为某个文件所使用的高速缓存目录,那么就应该尝试使用这个选项。
ccache -C:该选项完全清空高速缓存。
5、组合 ccache 和 distcc
discc是Samba小组开发的一个工具,它让您可以将编译过程分布到多台机器上。只需要为 make 添加多任务选项(使用 -j 命令行选项),它就可以有效地提高同步编译的数目。distcc系统的工作方式是,每台主机上有一个后台进程,接收最终预解析格式的源文件,然后在本地进行编译,返回生成的对象文件。
如果使用得当,在每加入一个新的同样节点时,编译时间通常应该会以稍微低于线性的比率下降,不过您将只会在那些远不只一个源文件的项目上看到这样的影响,因为 distcc 只是分布全部源文件。
由于 distcc 所分布的是解析过的文件,所以您可以组合 ccache,它可以加速 C 预处理过程部分,同时distcc 可以完成到对象代码的实际编译。要以这种方式来使用 distcc 和 ccache,需要在主机上配置distcc,在主要的开发机器上配置 distcc 和 ccache。
使用 ccache 和 distcc 所需要的环境变量:
export set DISTCC_HOSTS='localhost atuin nautilus pteppic kernel'
export set CCACHE_DIR=/Data/Cache/CCache
export set CCACHE_PREFIX=distcc
export set CCACHE_LOGFILE=/Data/Cache/CCache.log
export set CC='ccache gcc'
环境变量定义如下:
DISTCC_HOSTS 指定了将工作分布到哪些主机。
CCACHE_DIR 指定了高速缓存目录的位置。
CCACHE_PREFIX 定义了当 ccache 调用真实的编译器来编译源文件(预处理之后)时所使用的前缀。
CC 设置首先使用的 C 编译器的名称(ccache)。
现在,当运行 make 时,如果使用了 -j 选项来指定要执行的同步编译的数目,则首先使用 ccache 解析文件(如果需要,使用高速缓存),然后将其分布到某个 distcc 主机。
尽管 distcc 加速了编译过程,但是它没有改变环境的基本限制。例如,您不应该将 make 执行的同步作业的数目设置得大于可用 CPU 数目的两倍。例如,如果您有四台两路机器,那么将作业值设置为超过 16 的值时将不再会观察到有多大改善。
参考:
https://ccache.dev/
https://wiki.archlinux.org/index.php/Makepkg
————————————————
版权声明:本文为CSDN博主「king_weng」的原创文章,遵循CC 4.0 BY-SA版权协议,转载请附上原文出处链接及本声明。
原文链接:https://blog.csdn.net/King_weng/article/details/117415618


 1995
1995

 被折叠的 条评论
为什么被折叠?
被折叠的 条评论
为什么被折叠?
 到【灌水乐园】发言


