


这部分实现登录功能,使用系统自带的AccountManager,该类用于管理账户中的用户凭证。基本原理是:一旦用户输入用户凭证,用户信息会被保存到账户中,具备USE_CREDENTIALS权限的应用程序可以通过AccountManager查询到账户信息,进而获取保存在账户中的身份验证令牌或者其他可以用于服务器身份验证的必要信息。
登录功能会在以下情况中用到:
1. 应用程序启动时还没有账户信息创建。
2. 用户在“账户&同步”菜单中点击“新建账户”
3. 同步适配器尝试同步数据时出现身份验证错误
1. 首先把启动页改了,改成
BootStrapActivity
public class BootStrapActivity extends Activity {

     private static final int NEW_ACCOUNT = 0;
     private static final int EXISTING_ACCOUNT = 1;
     private AccountManager accountManager;

     @Override
     protected void onCreate(Bundle savedInstanceState) {
            super.onCreate(savedInstanceState);

            accountManager = AccountManager. get(this);
            // 根据类型获取账户列表
           Account[] accounts = accountManager
                     .getAccountsByType(AuthenticatorActivity. PARAM_ACCOUNT_TYPE);

            if (accounts. length == 0) {
                 // 创建新账户
                Intent intent = new Intent( this, AuthenticatorActivity.class);
                intent.setFlags(Intent. FLAG_ACTIVITY_CLEAR_WHEN_TASK_RESET);
                startActivityForResult(intent, NEW_ACCOUNT);
           } else {
                String pwd = accountManager.getPassword(accounts[0]);
                 if (pwd == null) {
                      // 输入密码
                     Intent intent = new Intent( this, AuthenticatorActivity.class);
                     intent.putExtra(AuthenticatorActivity. PARAM_USER,
                                accounts[0]. name);
                     startActivityForResult(intent, EXISTING_ACCOUNT);
                } else {
                      // 切换到MainActivity
                     startActivity( new Intent( this, MainActivity.class));
                     finish();
                }
           }
     }

     @Override
     protected void onActivityResult( int requestCode, int resultCode, Intent data) {
            super.onActivityResult(requestCode, resultCode, data);
            if (resultCode == AuthenticatorActivity. RESULT_OK) {
                 // 切换到MainActivity
                startActivity( new Intent( this, MainActivity.class));
                finish();
           }
     }
}
2. 登录或者输入密码的界面
AuthenticatorActivity
public class AuthenticatorActivity extends Activity {
     public static final int RESULT_OK = 0;
     public static final int RESULT_ERROR = 1;
     // 这个accountType要和xml中的authenticator.xml中配置的type一直,否则会报SecurityException
     public static final String PARAM_ACCOUNT_TYPE = AuthenticatorActivity.class
                .getCanonicalName();

     public static final String PARAM_AUTHTOKEN_TYPE = "authtokentype";
     public static final String PARAM_AUTHTOKEN = "authtoken";
     public static final String PARAM_USER = "user";
     public static final String PARAM_CONFIRMCREDENTIALS = "confirmcredentials";

     private AccountManager mAccountManager;

     private String mAuthTokenType;
     private String mAuthToken;

     private final Handler mHandler = new Handler() {
            public void handleMessage(android.os.Message msg) {
                 switch (msg. what) {
                 case RESULT_OK:
                     anAuthenticationResult( true);
                      break;
                 case RESULT_ERROR:
                     anAuthenticationResult( false);
                      break;
                }
           };
     };

     // 是否请求新数据
     protected boolean mRequestNewAccount = false;

     private String mUsername, mPassword;
     private EditText mUsernameEdit, mPasswordEdit;
     private Button button;
     private ProgressDialog dialog;

     @Override
     protected void onCreate(Bundle savedInstanceState) {
            super.onCreate(savedInstanceState);
           setContentView(R.layout. activity_authenticator);

            mUsernameEdit = (EditText) findViewById(R.id. name);
            mPasswordEdit = (EditText) findViewById(R.id.password);
            button = (Button) findViewById(R.id. button);

            button.setOnClickListener( new OnClickListener() {

                 @Override
                 public void onClick(View v) {
                     handleLogin();
                }
           });

           Intent intent = getIntent();
           String mUsername = intent.getStringExtra( PARAM_USER);
            if (TextUtils. isEmpty(mUsername)) {
                 mRequestNewAccount = true;
           } else {
                 mRequestNewAccount = false;
           }

            // 设置-账户中添加而来
            mAuthTokenType = intent.getStringExtra(PARAM_AUTHTOKEN_TYPE );
            mAuthToken = intent.getStringExtra( PARAM_AUTHTOKEN);
            mAccountManager = AccountManager. get(this);

     }

     private void handleLogin() {
            if ( mRequestNewAccount) {
                 mUsername = mUsernameEdit.getText().toString();
           }
            mPassword = mPasswordEdit.getText().toString();

            if (TextUtils. isEmpty(mUsername) || TextUtils.isEmpty(mPassword)) {
                 // 为null,提示用户
                Toast. makeText(this, "用户名或密码不能为空!!!" , 0).show();
           }

           showProgress();
            // 请求后台
            new Thread( new Runnable() {

                 @Override
                 public void run() {
                      mHandler.sendEmptyMessage( RESULT_OK);
                }
           }).start();
     }

     private void showProgress() {
            dialog = new ProgressDialog( this);
            dialog.show();
     }

     // 请求后台返回的操作
     public void anAuthenticationResult(Boolean result) {
           hideProgress();
            if (result) {
                finishLogin();
           } else {
                 // 提示错误
                Toast. makeText(this, "网络错误", 0).show();
           }
     }

     private void finishLogin() {
           Account account = new Account( mUsername, PARAM_ACCOUNT_TYPE);
            if ( mRequestNewAccount) {
                 // 创建新账户
                 mAccountManager.addAccountExplicitly(account, mPassword, null);
           } else {
                 // 设置新密码
                 mAccountManager.setPassword(account, mPassword);
           }

           Intent intent = new Intent();
           intent.putExtra(AccountManager. KEY_ACCOUNT_NAME, mUsername);
           intent.putExtra(AccountManager. KEY_ACCOUNT_TYPE, PARAM_ACCOUNT_TYPE);
            // 从设置-账户中而来
            if ( mAuthTokenType != null && mAuthToken.equals( PARAM_AUTHTOKEN_TYPE)) {
                intent.putExtra(AccountManager. KEY_AUTHTOKEN, mAuthToken);
           }
            // 设置结果
           setResult( RESULT_OK, intent);
           finish();
     }

     private void hideProgress() {
            dialog.dismiss();
     }

}
3. 这样创建新账户就可以实现了,下面讲如何使“设置”中的“账户”也可以添加账户,首先需要实现一个
AbstractAccountAuthenticator类的子类。
/**
 * 在设置中通过“账户&同步”菜单创建新账户,需要添加一个继承自AbstractAccountAuthenticator类。、
 * 该类是用于创建帐号认证器(AccountAuthenticator)的基类,要提供一个新的认证器,必须继承该类并实现其抽象方法。
 * 此外,还需要创建一个service,当通过action为accountmanager.action_authenticator_intent的intent激活时
 * ,需要在service的 onbind方法中返回getIBinder()方法的结果
 * 用不到的方法返回null即可,重要的是addAcount方法和getAuthToken方法。
 *
 * @author Administrator
 *
 */
public class Authenticator extends AbstractAccountAuthenticator {

     private final Context mContext;

     public Authenticator(Context context) {
            super(context);
            mContext = context;
     }

     // 该方法创建了一个intent,AccountManager会使用该Intent创建新账户
     @Override
     public Bundle addAccount(AccountAuthenticatorResponse response,
                String accountType, String authTokenType,
                String[] requiredFeatures, Bundle options)
                 throws NetworkErrorException {
           Intent intent = new Intent( mContext, AuthenticatorActivity.class);
          intent.putExtra(AuthenticatorActivity. PARAM_AUTHTOKEN_TYPE, accountType);
          intent.putExtra(AccountManager. KEY_ACCOUNT_AUTHENTICATOR_RESPONSE, response);

           Bundle bundle = new Bundle();
           bundle.putParcelable(AccountManager. KEY_INTENT, intent);
            return bundle;
     }

     // 当需要使用账户中存储的用户凭证信息登录服务器时,该方法就会被调用。
     @Override
     public Bundle getAuthToken(AccountAuthenticatorResponse response,
                Account account, String authTokenType, Bundle options)
                 throws NetworkErrorException {
            // 检查请求的令牌是否相同
            if (!authTokenType.equals( "type")) {
                Bundle result = new Bundle();
                result.putString(AccountManager. KEY_ERROR_MESSAGE,
                            "invalid authTokenType");
                 return result;
           }
            // 通过AccountManager获取密码
           AccountManager am = AccountManager. get(mContext );
           String password = am.getPassword(account);
            if (password != null) {
                 // 获取到密码,以此密码登录服务器
                 boolean verified = false;
                String loginResponse = null;
                 // 登录服务器

                 if (verified) {
                      // 登录成功,返回结果
                     Bundle result = new Bundle();
                     result.putString(AccountManager. KEY_ACCOUNT_NAME, account.name);
                     result.putString(AccountManager. KEY_ACCOUNT_TYPE, "type");
                      return result;
                }
           }
            // 登录不成功,返回intent,通过intent告诉调用方启动哪个activity让用户重新登录,当密码改变或者用户凭证失效会出现这种情况
           Intent intent = new Intent( mContext, AuthenticatorActivity.class);
           intent.putExtra( "user", account. name);
           intent.putExtra( "type", authTokenType);
          intent.putExtra(AccountManager. KEY_ACCOUNT_AUTHENTICATOR_RESPONSE,
                     response);

           Bundle bundle = new Bundle();
           bundle.putParcelable(AccountManager. KEY_INTENT, intent);

            return bundle;
     }

     @Override
     public Bundle confirmCredentials(AccountAuthenticatorResponse response,
                Account account, Bundle options) throws NetworkErrorException {
            return null;
     }

      //下面无用的方法都已省略,均是必须重写且返回值为null的方法

}
4. 上一段中提到的服务,要在清单文件中声明
<service android:name= ".auth.AuthenticationService" >
// 该服务返回一个帐号验证器
     <intent-filter >
         <action android:name= "android.accounts.AccountAuthenticator" />
     </intent-filter >
// 附加信息,如账户中显示的icon、label等
     <meta-data
         android:name= "android.accounts.AccountAuthenticator"
         android:resource= "@xml/authenticator" />
 </ service>
5. 实例化的service类中,只需在
onBind中把Authenticator的
Ibinder
返回即可
public class AuthenticationService extends Service {
     Authenticator authenticator;

     @Override
     public IBinder onBind(Intent intent) {
            // onBind中把Authenticator的Ibinder返回即可
            if (intent.getAction().equals(
                     android.accounts.AccountManager. ACTION_AUTHENTICATOR_INTENT)) {

                 return getAuthenticator().getIBinder();
           }
            return null;
     }

     private Authenticator getAuthenticator() {

            if ( authenticator == null)

                 authenticator = new Authenticator( this);

            return authenticator;

     }
6. xml中的
authenticator
<?xml version="1.0" encoding= "utf-8"?>
<account-authenticator xmlns:android="http://schemas.android.com/apk/res/android"
    android:accountType="qingfengmy.todo.AuthenticatorActivity"
    android:icon="@drawable/xxx"
    android:label="@string/app_name"
    android:smallIcon="@drawable/xxx" />
accountType一定要和代码中写的一致。
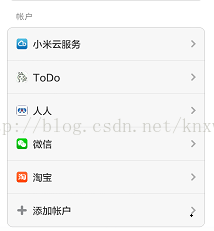
7. 附效果图


 1915
1915


 被折叠的 条评论
为什么被折叠?
被折叠的 条评论
为什么被折叠?
 到【灌水乐园】发言


