


 本文详细介绍了在机器学习中如何进行数据预处理,特别是针对不平衡数据集。讲解了分层抽样(StratifiedKFold)确保类别比例一致,以及随机抽样、分层抽样、整群抽样的基本概念。此外,还探讨了过采样和下采样的多种策略,如SMOTE、BorderlineSMOTE、ADASYN、RandomOverSampler、RandomUnderSampler等,旨在解决类别不平衡问题,提高模型性能。最后,提到了过采样与下采样结合的策略,如SMOTE+ENN和SMOTE+Tomek,以优化数据集的类别分布。
20210114
def dataset_split(data):
    # 数据拆分  第二步
    try:
        # data = shuffle(data)
        # train = data.iloc[0:int(data.shape[0] * 0.7), :]
        # test= data.iloc[int(data.shape[0] * 0.7):, :]
        x_data=data.iloc[:,0]

        y_data=data['product']

        from sklearn.model_selection import StratifiedKFold
        sfd=StratifiedKFold(n_splits=4,random_state=1,shuffle=True).split(x_data,y_data)
        train_=''
        test_=''
        i=0
        for train_index, test_index in sfd: #用这种方式的时候 里面用data.index 不要用x_data.index
             x_train, x_test = x_data.iloc[train_index,:], x_data.iloc[test_index,:]
            y_train, y_test = y_data.iloc[train_index,:],y_data.iloc[test_index,:]
   train_index 是一个索引列表 只有 iloc 支持了
多标签的分层抽样
data['index']=range(data.shape[0])
cols = data.columns.tolist()
# aa=cols.index('index')
# bb=cols.pop(cols.index('index'))
# aa=[1,2,3]
# aa.insert(0,5)
# aa.pop(0)
insert_col=cols.pop(cols.index('index'))
cols.insert(0,insert_col)
data=data[cols]
x_data=data.iloc[:,0]
y_data=data[['index']]  #利用index抽样
y_real_data=data.iloc[:,2:]

from sklearn.model_selection import StratifiedKFold
sfd=StratifiedKFold(n_splits=4,random_state=1,shuffle=True).split(x_data,y_data)
train=''
test=''
for train_index, test_index in sfd:
    x_train, x_test = x_data[train_index], x_data[test_index]
    y_train, y_test = y_real_data[train_index],y_real_data[test_index]

    train=pd.concat([x_train,y_train],axis=0)
    test=pd.concat([x_test,y_test],axis=0)

多标签分层抽样
20201204
StratifiedKFold实现分层抽样
当你要处理一个任务,比如说分类,手上就会有一批训练集和一批测试集,测试集使用来最终的评测。为了能更好的训练一个model并进行有效评估,首先要做的是将手头上的训练集划分出一个验证集,用以验证模型
之前的k折交叉验证没有考虑到标签分布的问题,或者干脆就random一批验证集,其实这样最终的模型会有隐患,科学的做法是:可以利用分层抽样进行划分,能够确保生成的训练集和验证集中的各个类别比例同原始训练集中保持一致,这样就不会产生生成的数据分布紊乱问题,大家可以借鉴使用。API用sklearn的:
from sklearn.model_selection import StratifiedKFold

sfolder = StratifiedKFold(n_splits=3,random_state=24,shuffle=True)
import numpy as np
from sklearn.model_selection import StratifiedKFold
X = np.array([[1, 2], [3, 4], [1, 2], [3, 4]])
y = np.array([0, 0, 1, 1])
skf = StratifiedKFold(n_splits=2).split(X, y)
#c= skf.get_n_splits(X, y)

for train_index, test_index in skf:
     print("TRAIN:", train_index, "TEST:", test_index)
     X_train, X_test = X[train_index], X[test_index]
     y_train, y_test = y[train_index], y[test_index]
TRAIN: [1 3] TEST: [0 2]
TRAIN: [0 2] TEST: [1 3]
import numpy as np
from sklearn.model_selection import StratifiedKFold
X = np.array([[1, 2], [3, 4], [1, 2], [3, 4]])
y = np.array([0, 0, 1, 1])
skf = StratifiedKFold(n_splits=2).split(X, y)

print(list(skf))
[(array([1, 3]), array([0, 2])), (array([0, 2]), array([1, 3]))]

随机抽样—总体个数较少
每个抽样单元被抽中的概率相同,并且可以重现。随机抽样常常用于总体个数较少时,它的主要特征是从总体中逐个抽取。

1、抽签法
2、随机数法:随机数表、随机数骰子或计算机产生的随机数。
分层抽样——总体存在差异且对结果有影响
分层抽样是指在抽样时,将总体分成互不相交的层,然后按照一定的比例,从各层独立地抽取一定数量的个体,将各层取出的个体合在一起作为样本的方法。层内变异越小越好,层间变异越大越好。
分层以后,在每一层进行简单随机抽样,不同群体所抽取的个体个数,一般有三种方法:
(1)等数分配法,即对每一层都分配同样的个体数;
(2)等比分配法,即让每一层抽得的个体数与该类总体的个体数之比都相同;
(3)最优分配法,即各层抽得的样本数与所抽得的总样本数之比等于该层方差与各类方差之和的比。
import  pandas as pd
import random as rd
import numpy as np
import math as ma

def typeicalSampling(group, typeicalFracDict):
    name = group.name
    frac = typeicalFracDict[name]
    return group.sample(frac=frac)

def group_sample(data_set,lable,typeicalFracDict):
    #分层抽样
    #data_set数据集
    #lable分层变量名
    #typeicalFracDict:分类抽样比例
    gbr=data_set.groupby(by=[lable])
    result=data_set.groupby(lable,group_keys=False).apply(typeicalSampling,typeicalFracDict)
    return result

data = pd.DataFrame({'id': [3566841, 6541227, 3512441, 3512441, 3512441,3512441, 3512441, 3512441, 3512441, 3512441],
                   'sex': ['male', 'Female', 'Female','male', 'Female', 'Female','male', 'Female','male', 'Female'],
                   'level': ['high', 'low', 'middle','high', 'low', 'middle','high', 'low', 'middle','middle']})

data_set=data
label='sex'
typicalFracDict = {
    'male': 0.8,
    'Female': 0.2
}
result=group_sample(data_set,label,typicalFracDict)
print(result)
整体抽样
整群抽样又称聚类抽样,是将总体中各单位归并成若干个互不交叉、互不重复的集合,称之为群;然后以群为抽样单位抽取样本的一种抽样方式。应用整群抽样时,要求各群有较好的代表性,即群内各单位的差异要大,群间差异要小。
实施步骤
先将总体分为i个群,然后从i个群中随即抽取若干个群,对这些群内所有个体或单元均进行调查。抽样过程可分为以下几个步骤:
(1)确定分群的标注
(2)总体(N)分成若干个互不重叠的部分,每个部分为一群。
(3)据各样本量,确定应该抽取的群数。
(4)采用简单随机抽样或系统抽样方法,从i群中抽取确定的群数。
系统抽样——总体多
系统抽样亦称为机械抽样、等距抽样。 [4] 当总体中的个体数较多时,采用简单随机抽样显得较为费事。这时,可将总体分成均衡的几个部分,然后按照预先定出的规则,从每一部分抽取一个个体,得到所需要的样本,这种抽样叫做系统抽样。 [1]

def SystematicSampling(dataMat,number):
       length=len(dataMat)
       k=int(length/number)
       sample=[]
       i=0
       if k>0 :
         while len(sample)!=number:
            sample.append(dataMat[0+i*k])
            i+=1
         return sample
       else :
         return RandomSampling(dataMat,number)
过采样
参考文献:https://www.cnblogs.com/massquantity/p/9382710.html
1、RandomOverSampler
原理:从样本少的类别中随机抽样,再将抽样得来的样本添加到数据集中。
缺点:重复采样往往会导致严重的过拟合
主流过采样方法是通过某种方式人工合成一些少数类样本,从而达到类别平衡的目的,而这其中的鼻祖就是SMOTE。
from imblearn.over_sampling import RandomOverSampler
ros = RandomOverSampler(sampling_strategy={0: 700,1:200,2:150 },random_state=0)
X_resampled, y_resampled = ros.fit_sample(X, y)
print(Counter(y_resampled))
2、SMOTE
原理:在少数类样本之间进行插值来产生额外的样本。对于少数类样本a, 随机选择一个最近邻的样本b, 从a与b的连线上随机选取一个点c作为新的少数类样本;
具体地,对于一个少数类样本xi使用K近邻法(k值需要提前指定),求出离xi距离最近的k个少数类样本,其中距离定义为样本之间n维特征空间的欧氏距离。然后从k个近邻点中随机选取一个,使用下列公式生成新样本:
在这里插入图片描述在这里插入图片描述

SMOTE会随机选取少数类样本用以合成新样本,而不考虑周边样本的情况,这样容易带来两个问题:
1)如果选取的少数类样本周围也都是少数类样本,则新合成的样本不会提供太多有用信息。
2)如果选取的少数类样本周围都是多数类样本,这类的样本可能是噪音,则新合成的样本会与周围的多数类样本产生大部分重叠,致使分类困难。
总的来说我们希望新合成的少数类样本能处于两个类别的边界附近,这样往往能提供足够的信息用以分类。而这就是下面的 Border-line SMOTE 算法要做的事情。
3、BorderlineSMOTE
这个算法会先将所有的少数类样本分成三类,如下图所示:
“noise” : 所有的k近邻个样本都属于多数类
“danger” : 超过一半的k近邻样本属于多数类
“safe”: 超过一半的k近邻样本属于少数类

Border-line SMOTE算法只会从处于”danger“状态的样本中随机选择,然后用SMOTE算法产生新的样本。处于”danger“状态的样本代表靠近”边界“附近的少数类样本,而处于边界附近的样本往往更容易被误分类。因而 Border-line SMOTE 只对那些靠近”边界“的少数类样本进行人工合成样本,而 SMOTE 则对所有少数类样本一视同仁。
Border-line SMOTE 分为两种: Borderline-1 SMOTE 和 Borderline-2 SMOTE。 Borderline-1 SMOTE 在合成样本时式中的x^
是一个少数类样本,而 Borderline-2 SMOTE 中的x^则是k近邻中的任意一个样本。
from imblearn.over_sampling import BorderlineSMOTE
smo = BorderlineSMOTE(kind='borderline-1',sampling_strategy={0: 700,1:200,2:150 },random_state=42) #kind='borderline-2'
X_smo, y_smo = smo.fit_sample(X, y)
print(Counter(y_smo))
4、ADASYN
原理:采用某种机制自动决定每个少数类样本需要产生多少合成样本,而不是像SMOTE那样对每个少数类样本合成同数量的样本。先确定少数样本需要合成的样本数量(与少数样本周围的多数类样本数呈正相关),然后利用SMOTE合成样本。
缺点:ADASYN的缺点是易受离群点的影响,如果一个少数类样本的K近邻都是多数类样本,则其权重会变得相当大,进而会在其周围生成较多的样本。
from imblearn.over_sampling import ADASYN
ana = ADASYN(sampling_strategy={0: 800,2:300,1:400 },random_state=0)
X_ana, y_ana = ana.fit_sample(X, y)
多数类样本越多,则算法会为其生成越多的样本,从图中也可以看到生成的样本大都来自于原来与多数类比较靠近的那些少数类样本。
5、KMeansSMOTE
原理:在使用SMOTE进行过采样之前应用KMeans聚类。
KMeansSMOTE包括三个步骤:聚类、过滤和过采样。在聚类步骤中,使用k均值聚类为k个组。过滤选择用于过采样的簇,保留具有高比例的少数类样本的簇。然后,它分配合成样本的数量,将更多样本分配给少数样本稀疏分布的群集。最后,过采样步骤,在每个选定的簇中应用SMOTE以实现少数和多数实例的目标比率。
from imblearn.over_sampling import KMeansSMOTE
kms = KMeansSMOTE(sampling_strategy={0: 800,2:300,1:400 },random_state=42)
X_kms, y_kms = kms.fit_sample(X, y)
print(Counter(y_kms))
6、SMOTENC
可处理分类特征的SMOTE
from imblearn.over_sampling import SMOTENC
sm = SMOTENC(random_state=42, categorical_features=[18, 19])
7、SVMSMOTE
使用支持向量机分类器产生支持向量然后再生成新的少数类样本,然后使用SMOTE合成样本
from imblearn.over_sampling import SVMSMOTE
svmm = SVMSMOTE(sampling_strategy={0: 800,2:300,1:400 },random_state=42)
X_svmm, y_svmm = svmm.fit_sample(X, y)
print(Counter(y_kms))
下采样
1、RandomUnderSampler(可控制欠采样数量)
原理:从多数类样本中随机选取一些剔除掉。
缺点:被剔除的样本可能包含着一些重要信息,致使学习出来的模型效果不好。
from imblearn.under_sampling import RandomUnderSampler
cc = RandomUnderSampler(sampling_strategy={0: 50,2:100,1:100 },random_state=0)
X_resampled, y_resampled = cc.fit_sample(X, y)
print(sorted(Counter(y_resampled).items()))
2、NearMiss(可控制欠采样数量)
原理:从多数类样本中选取最具代表性的样本用于训练,主要是为了缓解随机欠采样中的信息丢失问题。
NearMiss采用一些启发式的规则来选择样本,根据规则的不同可分为3类,通过设定version参数来确定:
NearMiss-1:选择到最近的K个少数类样本平均距离最近的多数类样本
NearMiss-2:选择到最远的K个少数类样本平均距离最近的多数类样本
NearMiss-3:对于每个少数类样本选择K个最近的多数类样本,目的是保证每个少数类样本都被多数类样本包围
NearMiss-1和NearMiss-2的计算开销很大,因为需要计算每个多类别样本的K近邻点。另外,NearMiss-1易受离群点的影响,
from imblearn.under_sampling import NearMiss
nm1 = NearMiss(sampling_strategy={0: 50,2:100,1:100 },random_state=0, version=1)
X_resampled_nm1, y_resampled = nm1.fit_sample(X, y)
print(sorted(Counter(y_resampled).items()))
3、ClusterCentroids(可控制欠采样数量)
原理:利用kmeans将对各类样本分别聚类,利用质心替换整个簇的样本。
from imblearn.under_sampling import ClusterCentroids
cc = ClusterCentroids(sampling_strategy={0: 700,1:100,2:90 },random_state=0)
X_resampled, y_resampled = cc.fit_sample(X, y)
print(sorted(Counter(y_resampled).items()))
4、TomekLinks(数据清洗方法,无法控制欠采样数量)
原理:Tomek Link表示不同类别之间距离最近的一对样本,即这两个样本互为最近邻且分属不同类别。这样如果两个样本形成了一个Tomek Link,则要么其中一个是噪音,要么两个样本都在边界附近。这样通过移除Tomek Link就能“清洗掉”类间重叠样本,使得互为最近邻的样本皆属于同一类别,从而能更好地进行分类。
from imblearn.under_sampling import TomekLinks
nm1 = TomekLinks(sampling_strategy='all',random_state=0)
X_resampled_nm1, y_resampled = nm1.fit_sample(X, y)
print(sorted(Counter(y_resampled).items()))
TomekLinks函数中的auto参数控制Tomek’s links中的哪些样本被剔除. 默认的ratio=‘auto’ 移除多数类的样本, 当ratio='all’时, 两个样本均被移除.
5、EditedNearestNeighbours(数据清洗方法,无法控制欠采样数量)
原理:对于属于多数类的一个样本,如果其K个近邻点有超过一半(kind_sel=‘mode’)或全部(kind_sel=‘all’)都不属于多数类,则这个样本会被剔除。
from imblearn.under_sampling import EditedNearestNeighbours
renn = EditedNearestNeighbours(kind_sel='all')
X_res, y_res = renn.fit_resample(X, y)
print(sorted(Counter(y_res).items()))
6、RepeatedEditedNearestNeighbours (数据清洗方法,无法控制欠采样数量)
原理:重复EditedNearestNeighbours多次(参数max_iter控制迭代次数)
#下采样RepeatedEditedNearestNeighbours接口
from imblearn.under_sampling import RepeatedEditedNearestNeighbours
renn = RepeatedEditedNearestNeighbours(kind_sel='all',max_iter=101)
X_res, y_res = renn.fit_resample(X, y)
print(sorted(Counter(y_res).items()))
7、ALLKNN(数据清洗方法,无法控制欠采样数量)
from imblearn.under_sampling import AllKNN
renn = AllKNN(kind_sel='all')
X_res, y_res = renn.fit_resample(X, y)
print(sorted(Counter(y_res).items()))
8、CondensedNearestNeighbour (数据清洗方法,无法控制欠采样数量)
使用近邻的方法来进行迭代, 来判断一个样本是应该保留还是剔除, 具体的实现步骤如下:
1)集合C: 所有的少数类样本;
2)选择一个多数类样本(需要下采样)加入集合C, 其他的这类样本放入集合S;
3)使用集合S训练一个1-NN的分类器, 对集合S中的样本进行分类;
4)将集合S中错分的样本加入集合C;
5)重复上述过程, 直到没有样本再加入到集合C.
from imblearn.under_sampling import CondensedNearestNeighbour
renn = CondensedNearestNeighbour(random_state=0)
X_res, y_res = renn.fit_resample(X, y)
print(sorted(Counter(y_res).items()))
CondensedNearestNeighbour方法对噪音数据是很敏感的, 也容易加入噪音数据到集合C中.
9、OneSidedSelection (数据清洗方法,无法控制欠采样数量)
原理:在CondensedNearestNeighbour的基础上使用 TomekLinks 方法来剔除噪声数据(多数类样本).
from imblearn.under_sampling import OneSidedSelection
oss = OneSidedSelection(random_state=0)
X_resampled, y_resampled = oss.fit_sample(X, y)
print(sorted(Counter(y_resampled).items()))
10、NeighbourhoodCleaningRule (数据清洗方法,无法控制欠采样数量)

from sklearn.linear_model import LogisticRegression
from imblearn.under_sampling import InstanceHardnessThreshold
iht = InstanceHardnessThreshold(random_state=0,
                                estimator=LogisticRegression())
X_resampled, y_resampled = iht.fit_sample(X, y)
print(sorted(Counter(y_resampled).items()))
11、InstanceHardnessThreshold(数据清洗方法,无法控制欠采样数量)
在数据上运用一种分类器, 然后将概率低于阈值的样本剔除掉.

12、EasyEnsemble(可控制数量)
从多数类样本中随机抽样成子集,该子集的数量等于少数类样本的数量。接着将该子集与少数类样本结合起来训练一个模型,迭代n次。这样虽然每个子集的样本少于总体样本,但集成后总信息量并不减少。
from imblearn.ensemble import EasyEnsemble
ee = EasyEnsemble(sampling_strategy={0: 500,1:199,2:89 },random_state=0, n_subsets=10)
X_resampled, y_resampled = ee.fit_sample(X, y)
print(X_resampled.shape)
print(y_resampled.shape)
print(sorted(Counter(y_resampled[0]).items()))
有两个很重要的参数:
(i) n_subsets 控制的是子集的个数
(ii) replacement 决定是有放回还是无放回的随机采样.
13、BalanceCascade(可控制数量)
在第n轮训练中,将从多数类样本中抽样得来的子集与少数类样本结合起来训练一个基学习器H,训练完后多数类中能被H正确分类的样本会被剔除。在接下来的第n+1轮中,从被剔除后的多数类样本中产生子集用于与少数类样本结合起来训练。
同样, n_max_subset 参数控制子集的个数, 以及可以通过设置bootstrap=True来使用bootstraping(自助法).
from imblearn.ensemble import BalanceCascade
from sklearn.linear_model import LogisticRegression
bc = BalanceCascade(random_state=0,
                    estimator=LogisticRegression(random_state=0),
                    n_max_subset=4)
X_resampled, y_resampled = bc.fit_sample(X, y)
print(X_resampled.shape)
print(sorted(Counter(y_resampled[0]).items()))
过采样与下采样结合
SMOTE算法的缺点是生成的少数类样本容易与周围的多数类样本产生重叠难以分类,而数据清洗技术恰好可以处理掉重叠样本,所以可以将二者结合起来形成一个pipeline,先过采样再进行数据清洗。主要的方法是 SMOTE + ENN 和 SMOTE + Tomek ,其中 SMOTE + ENN 通常能清除更多的重叠样本.
1、SMOTEENN
from imblearn.combine import SMOTEENN
smote_enn = SMOTEENN(random_state=0)
X_resampled, y_resampled = smote_enn.fit_sample(X, y)

print(sorted(Counter(y_resampled).items()))
2、 SMOTETomek
from imblearn.combine import SMOTETomek
smote_tomek = SMOTETomek(sampling_strategy={0: 700,1:300,2:200 },random_state=0)
X_resampled, y_resampled = smote_tomek.fit_sample(X, y)
print(sorted(Counter(y_resampled).items()))
在Python里面,使用Pandas里面的DataFrame来存放数据的时候想要把数据集进行shuffle会许多的方法,本文介绍两种比较常用而且简单的方法。
应用情景:
我们有下面以个DataFrame
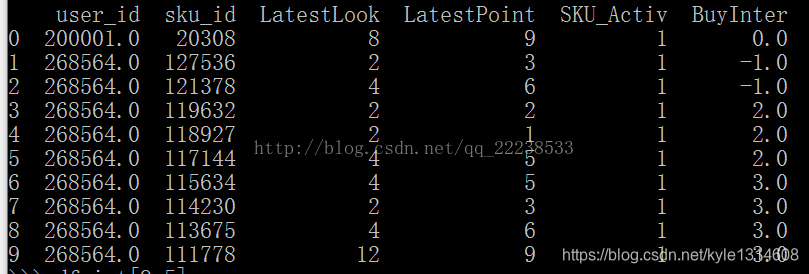
我们可以看到BuyInter的数值是按照0,-1,-1,2,2,2,3,3,3,3这样排列的,我们希望不保持这个次序,但是同时列属性又不能改变,即如下效果:
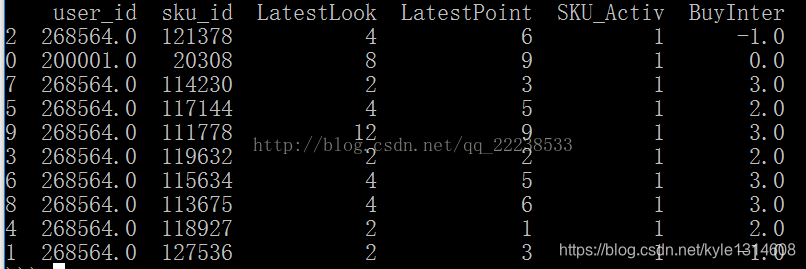
实现方法:
最简单的方法就是采用pandas中自带的 sample这个方法。
假设df是这个DataFrame
df.sample(frac=1)
这样对可以对df进行shuffle。其中参数frac是要返回的比例,比如df中有10行数据,我只想返回其中的30%,那么frac=0.3。
有时候,我们可能需要打混后数据集的index(索引)还是按照正常的排序。我们只需要这样操作
df.sample(frac=1).reset_index(drop=True)
-------------------------------------分割线--------------------------------------------------------------
其实,sklearn(机器学习的库)中也有shuffle的方法。
from sklearn.utils import shuffle
df = shuffle(df)
另外,numpy库中也有进行shuffle的方法(不建议)
df.iloc[np.random.permutation(len(df))]


 被折叠的 条评论
为什么被折叠?
被折叠的 条评论
为什么被折叠?
 到【灌水乐园】发言


