


转载地址:http://blog.csdn.net/liucoding/article/details/52857863
关于WebSocket的例子貌似不多,但最好的例子已经有了。偶然间发现tomcat的自带的例子中,已经有了基于WebSocket实现的聊天室例子。这里就不献丑,直接拿来用了。
首先,服务端的实现ChatAnnotation.Java
- /*
- * Licensed to the Apache Software Foundation (ASF) under one or more
- * contributor license agreements. See the NOTICE file distributed with
- * this work for additional information regarding copyright ownership.
- * The ASF licenses this file to You under the Apache License, Version 2.0
- * (the "License"); you may not use this file except in compliance with
- * the License. You may obtain a copy of the License at
- *
- * http://www.apache.org/licenses/LICENSE-2.0
- *
- * Unless required by applicable law or agreed to in writing, software
- * distributed under the License is distributed on an "AS IS" BASIS,
- * WITHOUT WARRANTIES OR CONDITIONS OF ANY KIND, either express or implied.
- * See the License for the specific language governing permissions and
- * limitations under the License.
- */
- package websocket.chat;
- import java.io.IOException;
- import java.util.Set;
- import java.util.concurrent.CopyOnWriteArraySet;
- import java.util.concurrent.atomic.AtomicInteger;
- import javax.websocket.OnClose;
- import javax.websocket.OnError;
- import javax.websocket.OnMessage;
- import javax.websocket.OnOpen;
- import javax.websocket.Session;
- import javax.websocket.server.ServerEndpoint;
- @ServerEndpoint(value = "/chat")
- public class ChatAnnotation {
- private static final String GUEST_PREFIX = "Guest";
- private static final AtomicInteger connectionIds = new AtomicInteger(0);
- private static final Set<ChatAnnotation> connections =
- new CopyOnWriteArraySet<>();
- private final String nickname;
- private Session session;
- public ChatAnnotation() {
- nickname = GUEST_PREFIX + connectionIds.getAndIncrement();
- }
- @OnOpen
- public void start(Session session) {
- this.session = session;
- connections.add(this);
- String message = String.format("* %s %s", nickname, "has joined.");
- broadcast(message);
- }
- @OnClose
- public void end() {
- connections.remove(this);
- String message = String.format("* %s %s",
- nickname, "has disconnected.");
- broadcast(message);
- }
- @OnMessage
- public void incoming(String message) {
- // Never trust the client
- // TODO: 过滤输入的内容
- broadcast(message);
- }
- @OnError
- public void onError(Throwable t) throws Throwable {
- System.out.println("Chat Error: " + t.toString());
- }
- private static void broadcast(String msg) {
- for (ChatAnnotation client : connections) {
- try {
- synchronized (client) {
- client.session.getBasicRemote().sendText(msg);
- }
- } catch (IOException e) {
- System.out.println("Chat Error: Failed to send message to client");
- connections.remove(client);
- try {
- client.session.close();
- } catch (IOException e1) {
- // Ignore
- }
- String message = String.format("* %s %s",
- client.nickname, "has been disconnected.");
- broadcast(message);
- }
- }
- }
- }
稍微解释下上面这段代码。
@ServerEndpoint(value = "/websocket/chat")定义一个WebSocket服务端。value即访问地址。这个例子中:客户端通过 ws://{domain}/{context}/chat 来进行连接
Set<ChatAnnotation> connections用于存储聊天室中的连接实例
@OnPen,连接创建时调用的方法
@OnClose,连接关闭时调用的方法
@OnMessage,传输信息过程中调用的方法
@OnError,发生错误时调用的方法
broadcast(String msg),通过connections,对所有其他用户推送信息的方法
客户端的实现chat.xhtml
- <?xml version="1.0" encoding="UTF-8"?>
- <!--
- Licensed to the Apache Software Foundation (ASF) under one or more
- contributor license agreements. See the NOTICE file distributed with
- this work for additional information regarding copyright ownership.
- The ASF licenses this file to You under the Apache License, Version 2.0
- (the "License"); you may not use this file except in compliance with
- the License. You may obtain a copy of the License at
- http://www.apache.org/licenses/LICENSE-2.0
- Unless required by applicable law or agreed to in writing, software
- distributed under the License is distributed on an "AS IS" BASIS,
- WITHOUT WARRANTIES OR CONDITIONS OF ANY KIND, either express or implied.
- See the License for the specific language governing permissions and
- limitations under the License.
- -->
- <html xmlns="http://www.w3.org/1999/xhtml" xml:lang="en">
- <head>
- <title>Apache Tomcat WebSocket Examples: Chat</title>
- <style type="text/css"><![CDATA[
- input#chat {
- width: 410px
- }
- #console-container {
- width: 400px;
- }
- #console {
- border: 1px solid #CCCCCC;
- border-right-color: #999999;
- border-bottom-color: #999999;
- height: 170px;
- overflow-y: scroll;
- padding: 5px;
- width: 100%;
- }
- #console p {
- padding: 0;
- margin: 0;
- }
- ]]></style>
- <script type="application/javascript"><![CDATA[
- "use strict";
- var Chat = {};
- Chat.socket = null;
- Chat.connect = (function(host) {
- if ('WebSocket' in window) {
- Chat.socket = new WebSocket(host);
- } else if ('MozWebSocket' in window) {
- Chat.socket = new MozWebSocket(host);
- } else {
- Console.log('Error: WebSocket is not supported by this browser.');
- return;
- }
- Chat.socket.onopen = function () {
- Console.log('Info: WebSocket connection opened.');
- document.getElementById('chat').onkeydown = function(event) {
- if (event.keyCode == 13) {
- Chat.sendMessage();
- }
- };
- };
- Chat.socket.onclose = function () {
- document.getElementById('chat').onkeydown = null;
- Console.log('Info: WebSocket closed.');
- };
- Chat.socket.onmessage = function (message) {
- Console.log(message.data);
- };
- });
- Chat.initialize = function() {
- if (window.location.protocol == 'http:') {
- Chat.connect('ws://' + window.location.host + '/websocket/chat');
- } else {
- Chat.connect('wss://' + window.location.host + '/websocket/chat');
- }
- };
- Chat.sendMessage = (function() {
- var message = document.getElementById('chat').value;
- if (message != '') {
- Chat.socket.send(message);
- document.getElementById('chat').value = '';
- }
- });
- var Console = {};
- Console.log = (function(message) {
- var console = document.getElementById('console');
- var p = document.createElement('p');
- p.style.wordWrap = 'break-word';
- p.innerHTML = message;
- console.appendChild(p);
- while (console.childNodes.length > 25) {
- console.removeChild(console.firstChild);
- }
- console.scrollTop = console.scrollHeight;
- });
- Chat.initialize();
- document.addEventListener("DOMContentLoaded", function() {
- // Remove elements with "noscript" class - <noscript> is not allowed in XHTML
- var noscripts = document.getElementsByClassName("noscript");
- for (var i = 0; i < noscripts.length; i++) {
- noscripts[i].parentNode.removeChild(noscripts[i]);
- }
- }, false);
- ]]></script>
- </head>
- <body>
- <div class="noscript"><h2 style="color: #ff0000">Seems your browser doesn't support Javascript! Websockets rely on Javascript being enabled. Please enable
- Javascript and reload this page!</h2></div>
- <div>
- <p>
- <input type="text" placeholder="type and press enter to chat" id="chat" />
- </p>
- <div id="console-container">
- <div id="console"/>
- </div>
- </div>
- </body>
- </html>
客户端的代码也是很简单,就是载入页面的时候,创建跟服务器的WebSocket连接。
- Chat.connect('ws://' + window.location.host + '/websocket/chat');
然后就是发送信息,接收信息了。
完成上述代码之后,就可以部署了。这里我使用的servlet容器是tomcat 8。以下是我的配置:
- <Context path="/websocket" docBase="/Users/cevin/Documents/workspace/tomcat_websocket_chat/web" reloadable="true"/>
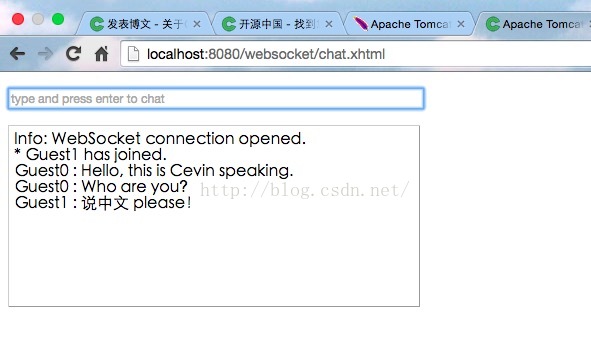
部署结束,启动tomcat,访问:http://localhost:8080/websocket/chat.xhtml,见到下面这个页面,说明部署成功了。
基本上,通过这个例子就可以知道如何使用WebSocket来进行开发了。这么强大的WebSocket,想一想都觉得兴奋!
转自【http://www.open-open.com/lib/view/open1425526066775.html】via http://my.oschina.NET/cevin15/blog/382582


 766
766


 被折叠的 条评论
为什么被折叠?
被折叠的 条评论
为什么被折叠?
 到【灌水乐园】发言


