


目录
引言
接着上篇:Spring Batch ItemWriter组件,了解Spring Batch ItemWriter处理组件后,接下来一起学习一下Spring Batch 高级功能-多线程步骤
概念
默认的情况下,步骤基本上在单线程中执行,那能不能在多线程环境执行呢?答案肯定是yes,但是也要注意,多线程环境步骤执行一定要慎重。原因:多线程环境下,步骤是要设置不可重启。
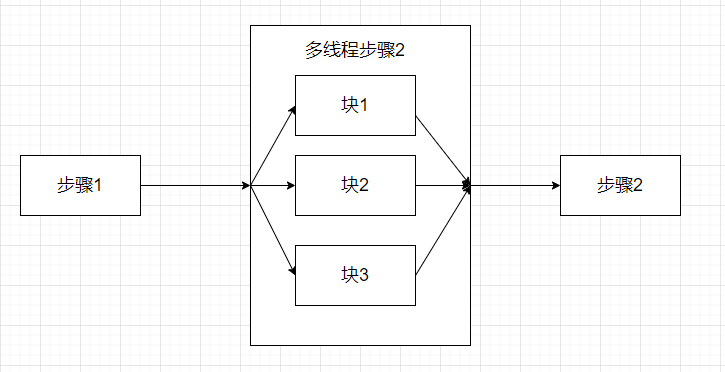
Spring Batch 的多线程步骤是使用Spring 的 TaskExecutor(任务执行器)实现的。约定每一个块开启一个线程独立执行。
案例
需求:分5个块处理user-thread.txt文件
1>编写user-thread.txt文件
1#dafei#18
2#xiaofei#16
3#laofei#20
4#zhongfei#19
5#feifei#15
6#zhangsan#14
7#lisi#13
8#wangwu#12
9#zhaoliu#11
10#qianqi#10
2>定义实体对象
@Getter
@Setter
@ToString
public class User {
    private Long id;
    private String name;
    private int age;
}
3>完整代码
package com.langfeiyes.batch._35_step_thread;


import org.springframework.batch.core.Job;
import org.springframework.batch.core.Step;
import org.springframework.batch.core.configuration.annotation.EnableBatchProcessing;
import org.springframework.batch.core.configuration.annotation.JobBuilderFactory;
import org.springframework.batch.core.configuration.annotation.StepBuilderFactory;
import org.springframework.batch.item.ItemWriter;
import org.springframework.batch.item.file.FlatFileItemReader;
import org.springframework.batch.item.file.builder.FlatFileItemReaderBuilder;
import org.springframework.beans.factory.annotation.Autowired;
import org.springframework.boot.SpringApplication;
import org.springframework.boot.autoconfigure.SpringBootApplication;
import org.springframework.context.annotation.Bean;
import org.springframework.core.io.ClassPathResource;
import org.springframework.core.task.SimpleAsyncTaskExecutor;

import java.util.List;

@SpringBootApplication
@EnableBatchProcessing
public class ThreadStepJob {
    @Autowired
    private JobBuilderFactory jobBuilderFactory;
    @Autowired
    private StepBuilderFactory stepBuilderFactory;

    @Bean
    public FlatFileItemReader<User> userItemReader(){

        System.out.println(Thread.currentThread());

        FlatFileItemReader<User> reader = new FlatFileItemReaderBuilder<User>()
                .name("userItemReader")
                .saveState(false) //防止状态被覆盖
                .resource(new ClassPathResource("user-thread.txt"))
                .delimited().delimiter("#")
                .names("id", "name", "age")
                .targetType(User.class)
                .build();

        return reader;
    }

    @Bean
    public ItemWriter<User> itemWriter(){
        return new ItemWriter<User>() {
            @Override
            public void write(List<? extends User> items) throws Exception {
                items.forEach(System.err::println);
            }
        };
    }

    @Bean
    public Step step(){
        return stepBuilderFactory.get("step1")
                .<User, User>chunk(2)
                .reader(userItemReader())
                .writer(itemWriter())
                .taskExecutor(new SimpleAsyncTaskExecutor())
                .build();

    }

    @Bean
    public Job job(){
        return jobBuilderFactory.get("thread-step-job")
                .start(step())
                .build();
    }
    public static void main(String[] args) {
        SpringApplication.run(ThreadStepJob.class, args);
    }
}
4>结果
User(id=2, name=xiaofei, age=16)
User(id=5, name=feifei, age=15)
User(id=4, name=zhongfei, age=19)
User(id=7, name=lisi, age=13)
User(id=1, name=dafei, age=18)
User(id=6, name=zhangsan, age=14)
User(id=3, name=laofei, age=20)
User(id=8, name=wangwu, age=12)
User(id=9, name=zhaoliu, age=11)
User(id=10, name=qianqi, age=10)
解析
1:userItemReader() 加上saveState(false) Spring Batch 提供大部分的ItemReader是有状态的,作业重启基本通过状态来确定作业停止位置,而在多线程环境中,如果对象维护状态被多个线程访问,可能存在线程间状态相互覆盖问题。所以设置为false表示关闭状态,但这也意味着作业不能重启了。
2:step() 方法加上.taskExecutor(new SimpleAsyncTaskExecutor()) 为作业步骤添加了多线程处理能力,以块为单位,一个块一个线程,观察上面的结果,很明显能看出输出的顺序是乱序的。改变 job 的名字再执行,会发现输出数据每次都不一样。
到这,本篇就结束了,欲知后事如何,请听下回分解~
转视频版
看文字不过瘾可以切换视频版:Spring Batch高效批处理框架实战


 7279
7279


 被折叠的 条评论
为什么被折叠?
被折叠的 条评论
为什么被折叠?
 到【灌水乐园】发言


