


原创文章,转载请注明: 转载自pagefault
本文链接地址: nginx的启动流程分析(一)
这篇我们会主要来分析配置文件相关的一些初始化,而在下一篇我们会详细分析http协议相关,以及socket的初始化信息。
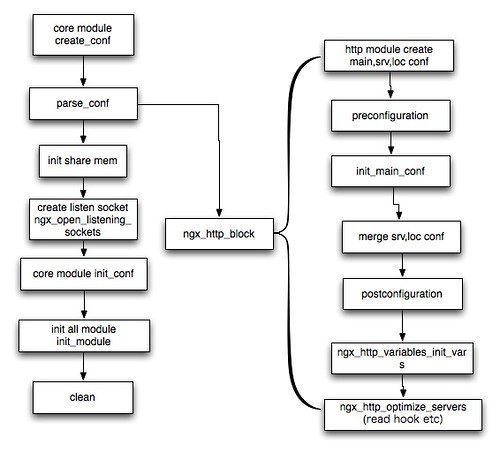
nginx启动最重要的部分是在ngx_init_cycle中,我们接下来就会详细的分析这个函数,以及相关的函数.
下面就是ngx_init_cycle的流程图
首先先来看几个相关的数据结构。 在nginx中,模块的结构是这样子的,首先所有的模块都是用ngx_module_t来表示,而模块又分为三类,分别是ngx_core_module_t和ngx_http_module_t,而在ngx_module_t中会包含这两个结构,只不过不同类的模块包含不同的结构。一般来说这部分就叫做ctx,我们写模块都会先定义一个ctx,然后包含到ngx_module_t中。这里有个type域用来标识模块的类型。
|
1
2
3
4
5
6
7
8
9
10
11
12
13
14
15
16
17
18
19
20
21
22
23
24
|
struct
ngx_module_s {
void
****conf_ctx;
//ctx索引
ngx_uint_t ctx_index;
ngx_uint_t index;
........................................................
ngx_uint_t version;
//ctx
void
*ctx;
ngx_command_t *commands;
ngx_uint_t type;
ngx_int_t (*init_master)(ngx_log_t *
log
);
ngx_int_t (*init_module)(ngx_cycle_t *cycle);
ngx_int_t (*init_process)(ngx_cycle_t *cycle);
ngx_int_t (*init_thread)(ngx_cycle_t *cycle);
void
(*exit_thread)(ngx_cycle_t *cycle);
void
(*exit_process)(ngx_cycle_t *cycle);
void
(*exit_master)(ngx_cycle_t *cycle);
.............................................................
};
|
这里看到有两个index,分别是ctx_index和index,他们的区别是这样子的,ctx_index保存了每一个http module的config的索引,而所有的http module config是分别保存在nginx_conf_t的ctx数组中的.而index保存了每一个core module的config,而每个core module的config都是保存在cycle的conf_ctx中的,下面的代码能够很明显看出他们的不同。
|
1
2
3
4
|
#define ngx_http_conf_get_module_main_conf(cf, module) \
((ngx_http_conf_ctx_t *) cf->ctx)->main_conf[module.ctx_index]
#define ngx_get_conf(conf_ctx, module) conf_ctx[module.index]
|
ngx_core_module_t都包括(log, event, event_openssl, http, mail,google perftools),可以看到http module本身也是一个core module。这里要注意还有一个conf module,只不过它也是用core module这个数据结构。
|
1
2
3
4
5
|
typedef
struct
{
ngx_str_t name;
void
*(*create_conf)(ngx_cycle_t *cycle);
char
*(*init_conf)(ngx_cycle_t *cycle,
void
*conf);
} ngx_core_module_t;
|
ngx_http_module_t包括所有src/http/下面的模块,它就包含了所有的http module,它们都从属于http core模块。
|
1
2
3
4
5
6
7
8
9
10
11
12
13
|
typedef
struct
{
ngx_int_t (*preconfiguration)(ngx_conf_t *cf);
ngx_int_t (*postconfiguration)(ngx_conf_t *cf);
void
*(*create_main_conf)(ngx_conf_t *cf);
char
*(*init_main_conf)(ngx_conf_t *cf,
void
*conf);
void
*(*create_srv_conf)(ngx_conf_t *cf);
char
*(*merge_srv_conf)(ngx_conf_t *cf,
void
*prev,
void
*conf);
void
*(*create_loc_conf)(ngx_conf_t *cf);
char
*(*merge_loc_conf)(ngx_conf_t *cf,
void
*prev,
void
*conf);
} ngx_http_module_t;
|
然后我们看到在ngx_module_t中还有一个很重要的域,那就是ngx_command_t,这个域对应了当前的模块所包含的所有指令,这个域主要是供nginx解析配置文件时使用,设置相关的数据结构。
|
1
2
3
4
5
6
7
8
9
|
struct
ngx_command_s {
ngx_str_t name;
ngx_uint_t type;
//指令对应的回调函数。
char
*(*set)(ngx_conf_t *cf, ngx_command_t *cmd,
void
*conf);
ngx_uint_t conf;
ngx_uint_t offset;
void
*post;
};
|
上面只是简单的介绍几个数据结构,接下来配合代码,我们会看到这些结构中的回调函数,域都是如何被调用,以及调用顺序是如何的。
来看ngx_init_cycle,这个函数比较长,我们只分析我们关心的部分。这里要注意,下面的代码是完全按照顺序进行分析的,因为这里我们非常关注这些回调函数什么的顺序。
下面这段代码片段主要是创建所有core module的configure.它通过调用每个core module的create_conf方法,来创建对应的conf,然后将这个conf对象保存在全局的conf_ctx中,这样后面如果想取得这个config对象,则之需要通过简单的索引就能得到。
|
1
2
3
4
5
6
7
8
9
10
11
12
13
14
15
16
17
|
for
(i = 0; ngx_modules[i]; i++) {
if
(ngx_modules[i]->type != NGX_CORE_MODULE) {
continue
;
}
//得到core module
module = ngx_modules[i]->ctx;
//如果create_conf存在,则直接创建config.
if
(module->create_conf) {
rv = module->create_conf(cycle);
if
(rv == NULL) {
ngx_destroy_pool(pool);
return
NULL;
}
//保存config.
cycle->conf_ctx[ngx_modules[i]->index] = rv;
}
}
|
当所有的core module的config都创建完毕后,就要开始解析配置文件了,解析配置文件它会一行行读取,然后如果遇到指令,则会查找到对应的ngx_command_t对象,然后执行对应的回调set方法。这里所有动作都在ngx_conf_parse这个函数中进行.
这里要注意一个东西,那就是commands是分两种类型的,一种是一般的命令,这里之需要直接调用set进行设置,而另外一种就是命令本身包括大括号的,比如types, geo,http 这些,这些命令的话,nginx这里是通过在命令本身的set函数里面设置conf的hand来做的,我们来看下types的set回调ngx_http_core_types。
他的代码很简单,就是设置对应的handler,保存当前的cf,然后调用ngx_conf_parse继续解析下面的,最后解析完毕(也就是当前的命令结束),恢复conf。
|
1
2
3
4
5
6
7
8
9
10
11
12
13
14
15
16
17
18
19
|
static
char
*
ngx_http_core_types(ngx_conf_t *cf, ngx_command_t *cmd,
void
*conf)
{
ngx_http_core_loc_conf_t *clcf = conf;
char
*rv;
ngx_conf_t save;
...............................
//保存conf
save = *cf;
//设置handler
cf->handler = ngx_http_core_type;
cf->handler_conf = conf;
//继续解析
rv = ngx_conf_parse(cf, NULL);
//恢复conf
*cf = save;
return
rv;
}
|
然后在ngx_conf_parse会判断cf是否有handler回调,如果有的话,优先调用handler回调,如果没有,则会进入ngx_conf_handler进行一般处理。
|
1
2
3
4
5
6
7
8
9
10
11
12
13
14
15
16
|
//如果handler存在,则调用handler
if
(cf->handler) {
/*
* the custom handler, i.e., that is used in the http's
* "types { ... }" directive
*/
rv = (*cf->handler)(cf, NULL, cf->handler_conf);
if
(rv == NGX_CONF_OK) {
continue
;
}
goto
failed;
}
//否则进入一般的处理,
rc = ngx_conf_handler(cf, rc);
|
下面就是ngx_conf_handler的片段,代码很简单,就是遍历模块的command,比较名字,然后调用回调函数set。
|
1
2
3
4
5
6
7
8
9
10
11
12
13
14
15
16
17
18
19
20
21
22
23
|
for
(i = 0; ngx_modules[i]; i++) {
/* look up the directive in the appropriate modules */
if
(ngx_modules[i]->type != NGX_CONF_MODULE
&& ngx_modules[i]->type != cf->module_type)
{
continue
;
}
cmd = ngx_modules[i]->commands;
if
(cmd == NULL) {
continue
;
}
for
(
/* void */
; cmd->name.len; cmd++) {
................................................
//调用set。
rv = cmd->set(cf, cmd, conf);
if
(rv == NGX_CONF_OK) {
return
NGX_OK;
}
|
ok,接下来或许有个疑问,那就是前面只是创建了core module的config,然后解析配置文件的时候会保存http module的config的一些东西,那么http module相关的config在那里创建呢?
http module相关的config是在ngx_http_block中创建的,在ngx_http_block中会创建,初始化,合并config,以及整个http handler phase的初始化等等。
首先是初始化所有的http module的ctx_index.
|
1
2
3
4
5
6
7
8
|
ngx_http_max_module = 0;
for
(m = 0; ngx_modules[m]; m++) {
if
(ngx_modules[m]->type != NGX_HTTP_MODULE) {
continue
;
}
//每个模块都有自己对应的索引值.
ngx_modules[m]->ctx_index = ngx_http_max_module++;
}
|
然后就是创建http module的对应的main,srv,loc config,这里很简单就是调用对应的create_xxx_conf回调函数。这里可以看到所有的http module相关的config都是保存在ngx_http_conf_ctx_t中。ngx_http_conf_ctx_t这个结构很简单,就是保存了三个数组,分别是main,srv,loc 的conf,其中每个都保存了所有的http module的对应的conf。
|
1
2
3
4
5
|
typedef
struct
{
void
**main_conf;
void
**srv_conf;
void
**loc_conf;
} ngx_http_conf_ctx_t;
|
接下来来看ngx_http_block剩下的代码。
|
1
2
3
4
5
6
7
8
9
10
11
12
13
14
15
16
17
18
19
20
21
22
23
24
25
26
27
28
29
30
31
32
33
34
|
ngx_http_conf_ctx_t *ctx;
//开始初始化,可以看到默认会分配max个config
ctx->main_conf = ngx_pcalloc(cf->pool,
sizeof
(
void
*) * ngx_http_max_module);
if
(ctx->main_conf == NULL) {
return
NGX_CONF_ERROR;
}
//下面省略了srv和loc的创建
.......................................
//开始遍历
for
(m = 0; ngx_modules[m]; m++) {
if
(ngx_modules[m]->type != NGX_HTTP_MODULE) {
continue
;
}
//得到对应的module上下文
module = ngx_modules[m]->ctx;
//得到对应的索引
mi = ngx_modules[m]->ctx_index;
//如果有对应的回调,则调用回调函数,然后将返回的模块config设置到ctx的对应的conf列表中。
if
(module->create_main_conf) {
ctx->main_conf[mi] = module->create_main_conf(cf);
if
(ctx->main_conf[mi] == NULL) {
return
NGX_CONF_ERROR;
}
}
if
(module->create_srv_conf) {
ctx->srv_conf[mi] = module->create_srv_conf(cf);
if
(ctx->srv_conf[mi] == NULL) {
return
NGX_CONF_ERROR;
}
}
//下面省略了loc的调用。
}
|
而当创建完毕之后,真正初始化模块之前需要调用preconfiguration来进行一些操作。
|
1
2
3
4
5
6
7
8
9
10
11
12
13
14
15
|
cf->ctx = ctx;
for
(m = 0; ngx_modules[m]; m++) {
if
(ngx_modules[m]->type != NGX_HTTP_MODULE) {
continue
;
}
module = ngx_modules[m]->ctx;
//调用preconfiguration。
if
(module->preconfiguration) {
if
(module->preconfiguration(cf) != NGX_OK) {
return
NGX_CONF_ERROR;
}
}
}
|
然后就是继续parse config.
|
1
2
3
|
cf->module_type = NGX_HTTP_MODULE;
cf->cmd_type = NGX_HTTP_MAIN_CONF;
rv = ngx_conf_parse(cf, NULL);
|
当http block完全parse完毕之后,就需要merge(main和srv或者srv和loc)相关的config了。不过在每次merge之前都会首先初始化main conf。
|
1
2
3
4
5
6
7
8
9
10
11
12
13
14
15
16
17
18
19
20
21
22
|
for
(m = 0; ngx_modules[m]; m++) {
if
(ngx_modules[m]->type != NGX_HTTP_MODULE) {
continue
;
}
//和上面类似,首先取得模块以及对应索引。
module = ngx_modules[m]->ctx;
mi = ngx_modules[m]->ctx_index;
/* init http{} main_conf's */
//如果有init_main_conf,则首先初始化main conf.
if
(module->init_main_conf) {
rv = module->init_main_conf(cf, ctx->main_conf[mi]);
if
(rv != NGX_CONF_OK) {
goto
failed;
}
}
//然后开始merge config。
rv = ngx_http_merge_servers(cf, cmcf, module, mi);
if
(rv != NGX_CONF_OK) {
goto
failed;
}
}
|
所有的merge动作都在ngx_http_merge_servers中,这个函数这里就不分析了,他主要就是遍历所有的server,然后判断模块是否有merge回调函数,如果有的话,就调用回调函数。
这里对location的处理部分就不进行分析了,这里是一个很复杂的地方,以后会专门写一篇blog来分析这部分。
当merge完毕之后,然后就是初始化location tree,创建handler phase,调用postconfiguration,以及变量的初始化。
|
1
2
3
4
5
6
7
8
9
10
11
12
13
14
15
16
17
18
19
20
21
22
|
//初始化handler phase
if
(ngx_http_init_phases(cf, cmcf) != NGX_OK) {
return
NGX_CONF_ERROR;
}
//遍历模块,然后调用对应的postconfiguration.
for
(m = 0; ngx_modules[m]; m++) {
if
(ngx_modules[m]->type != NGX_HTTP_MODULE) {
continue
;
}
module = ngx_modules[m]->ctx;
//调用回调
if
(module->postconfiguration) {
if
(module->postconfiguration(cf) != NGX_OK) {
return
NGX_CONF_ERROR;
}
}
}
//开始初始化变量
if
(ngx_http_variables_init_vars(cf) != NGX_OK) {
return
NGX_CONF_ERROR;
}
|
当这些都做完之后,就开始初始化socket相关的东西,比如设置读写回调函数等等,这个会在下一篇详细分析。
|
1
2
3
4
|
/* optimize the lists of ports, addresses and server names */
if
(ngx_http_optimize_servers(cf, cmcf, cmcf->ports) != NGX_OK) {
return
NGX_CONF_ERROR;
}
|
再接着看ngx_cycle_init剩下的部分,当配置文件解析完毕后,就开始初始化core module的config
|
1
2
3
4
5
6
7
8
9
10
11
12
13
14
15
16
17
|
for
(i = 0; ngx_modules[i]; i++) {
if
(ngx_modules[i]->type != NGX_CORE_MODULE) {
continue
;
}
module = ngx_modules[i]->ctx;
//调用init_conf
if
(module->init_conf) {
if
(module->init_conf(cycle, cycle->conf_ctx[ngx_modules[i]->index])
== NGX_CONF_ERROR)
{
environ = senv;
ngx_destroy_cycle_pools(&conf);
return
NULL;
}
}
}
|
再紧接着就是初始化所有创建的共享内存。
|
1
2
3
4
5
6
7
8
9
10
11
|
if
(ngx_shm_alloc(&shm_zone[i].shm) != NGX_OK) {
goto
failed;
}
if
(ngx_init_zone_pool(cycle, &shm_zone[i]) != NGX_OK) {
goto
failed;
}
if
(shm_zone[i].init(&shm_zone[i], NULL) != NGX_OK) {
goto
failed;
}
|
然后是listen socket的初始化,这里还记得前面的http_block中也有socket的初始化,这里要注意,那边只是挂载对应的hook,这里才是创建并bind等操作。
|
1
2
3
|
if
(ngx_open_listening_sockets(cycle) != NGX_OK) {
goto
failed;
}
|
等这些都做完则是调用init_module对所有的模块进行初始化。
|
1
2
3
4
5
6
7
8
|
for
(i = 0; ngx_modules[i]; i++) {
if
(ngx_modules[i]->init_module) {
if
(ngx_modules[i]->init_module(cycle) != NGX_OK) {
/* fatal */
exit
(1);
}
}
}
|
然后ngx_init_cycle剩下就是一些清理工作了。


 3314
3314

 被折叠的 条评论
为什么被折叠?
被折叠的 条评论
为什么被折叠?
 到【灌水乐园】发言


