


在java日常开发中,工作流非常常见的业务需求,也有很多开源的工作流引擎,下面对flowable组件进行应用尝试。
一、使用flowable自带的flowable-ui制作流程图(bpmn20.xml)
分析flowable-6.6.0运行官方demo
1、下载地址为:
https://github.com/flowable/flowable-engine/releases/download/flowable-6.6.0/flowable-6.6.0.zip
2、将压缩包中路径下的flowable-6.6.0\wars\flowable-ui.war放到tomcat中运行
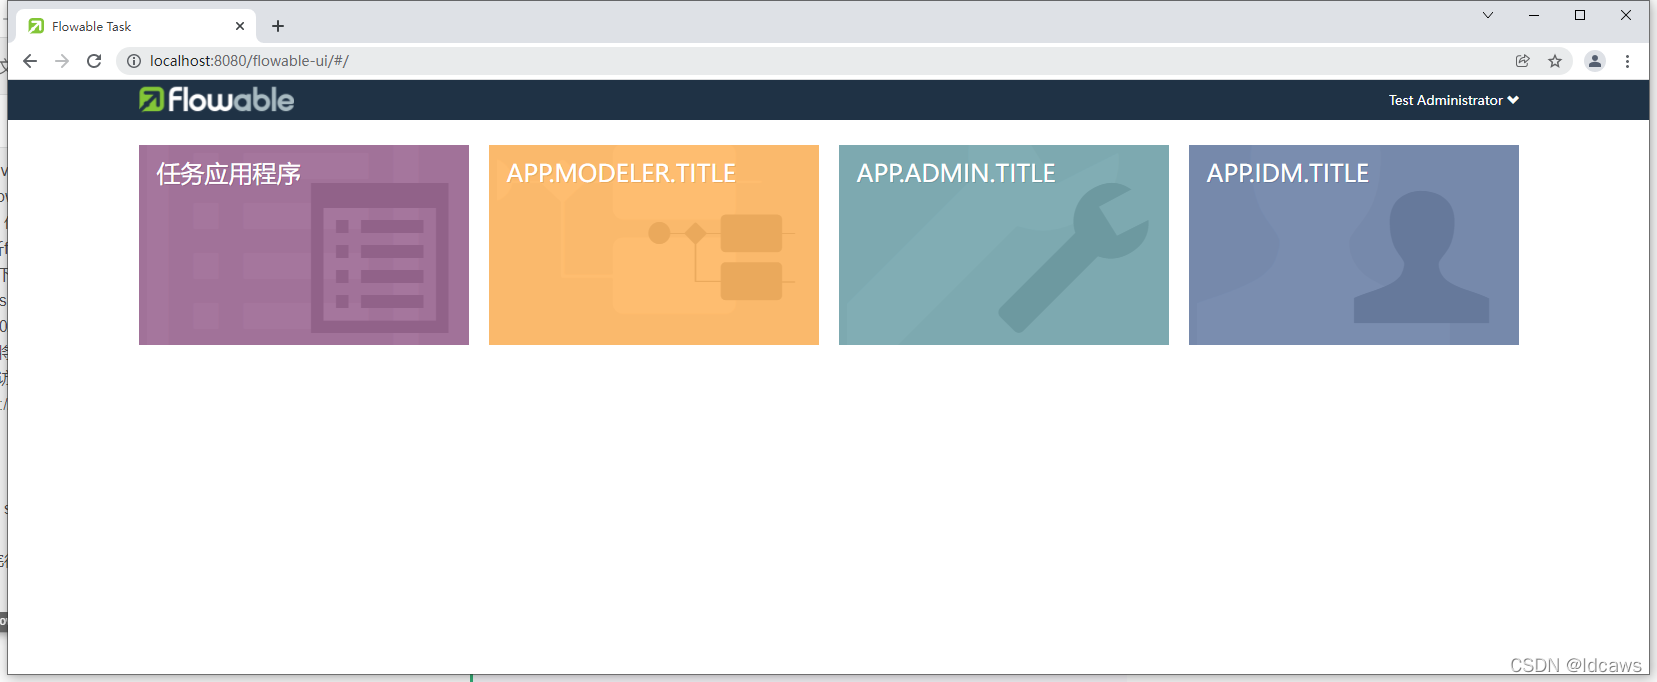
3、访问地址:
http://localhost:8080/flowable-ui,账号:admin/test,页面如下
4、配置webapps\flowable-ui\WEB-INF\classes\flowable-default.properties
将数据库配置修改为本地数据库
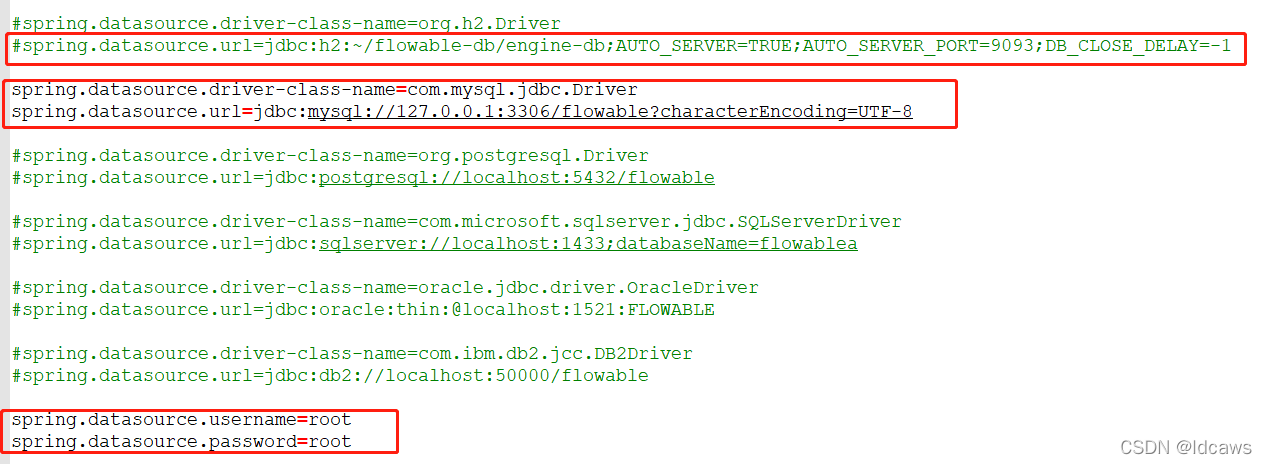
注意需将mysql的驱动jar复制到webapps\flowable-rest\WEB-INF\lib下,这样创建的流程后端程序可以直接使用。
5、绘制流程图

相关概念:
事件(event): 通常用于为流程生命周期中发生的事情建模,图里是【开始、结束】两个圈。
顺序流(sequence flow) :是流程中两个元素间的连接器。图里是【箭头线段】。
网关(gateway): 用于控制执行的流向。图里是【菱形(中间有X)】
用户任务(user task): 用于对需要人工执行的任务进行建模。图里是【矩形】。
创建完成工作流后可以导出bpmn20.xml文件,如下

文件内容如下:
<?xml version="1.0" encoding="UTF-8"?>
<definitions xmlns="http://www.omg.org/spec/BPMN/20100524/MODEL" xmlns:xsi="http://www.w3.org/2001/XMLSchema-instance" xmlns:xsd="http://www.w3.org/2001/XMLSchema" xmlns:flowable="http://flowable.org/bpmn" xmlns:bpmndi="http://www.omg.org/spec/BPMN/20100524/DI" xmlns:omgdc="http://www.omg.org/spec/DD/20100524/DC" xmlns:omgdi="http://www.omg.org/spec/DD/20100524/DI" typeLanguage="http://www.w3.org/2001/XMLSchema" expressionLanguage="http://www.w3.org/1999/XPath" targetNamespace="http://www.flowable.org/processdef">
  <process id="leave_approval" name="请假审批" isExecutable="true">
    <startEvent id="start" name="开始" flowable:initiator="startuser" flowable:formFieldValidation="true"></startEvent>
    <userTask id="student" name="学生" flowable:candidateGroups="student_group" flowable:formFieldValidation="true"></userTask>
    <userTask id="teacher" name="老师" flowable:candidateGroups="teacher_group" flowable:formFieldValidation="true"></userTask>
    <exclusiveGateway id="gateway1" name="网关1"></exclusiveGateway>
    <userTask id="header" name="校长" flowable:candidateGroups="header_group" flowable:formFieldValidation="true"></userTask>
    <exclusiveGateway id="gateway2" name="网关2"></exclusiveGateway>
    <endEvent id="end" name="结束"></endEvent>
    <sequenceFlow id="flow0" sourceRef="start" targetRef="student"></sequenceFlow>
    <sequenceFlow id="flow1" name="请假" sourceRef="student" targetRef="teacher"></sequenceFlow>
    <sequenceFlow id="flow2" name="审批" sourceRef="teacher" targetRef="gateway1"></sequenceFlow>
    <sequenceFlow id="flow2_1" name="同意" sourceRef="gateway1" targetRef="header">
      <conditionExpression xsi:type="tFormalExpression"><![CDATA[${command=='agree'}]]></conditionExpression>
    </sequenceFlow>
    <sequenceFlow id="flow2_2" name="拒绝" sourceRef="gateway1" targetRef="student">
      <conditionExpression xsi:type="tFormalExpression"><![CDATA[${command=='refuse'}]]></conditionExpression>
    </sequenceFlow>
    <sequenceFlow id="flow3" name="审批" sourceRef="header" targetRef="gateway2"></sequenceFlow>
    <sequenceFlow id="flow3_1" name="同意" sourceRef="gateway2" targetRef="end">
      <conditionExpression xsi:type="tFormalExpression"><![CDATA[${command=='agree'}]]></conditionExpression>
    </sequenceFlow>
    <sequenceFlow id="flow3_2" name="拒绝" sourceRef="gateway2"  targetRef="student">
      <conditionExpression xsi:type="tFormalExpression"><![CDATA[${command=='refuse'}]]></conditionExpression>
    </sequenceFlow>
  </process>
  <bpmndi:BPMNDiagram id="BPMNDiagram_leave_approval">

  </bpmndi:BPMNDiagram>
</definitions>
也可以直接编辑工作流文件。
二、springboot集成flowable实例
1、pom依赖
		<dependency>
            <groupId>org.springframework.boot</groupId>
            <artifactId>spring-boot-starter-web</artifactId>
        </dependency>
        <dependency>
            <groupId>org.mybatis.spring.boot</groupId>
            <artifactId>mybatis-spring-boot-starter</artifactId>
            <version>2.2.1</version>
        </dependency>
        <dependency>
            <groupId>org.flowable</groupId>
            <artifactId>flowable-spring-boot-starter</artifactId>
            <version>6.6.0</version>
        </dependency>
        <dependency>
            <groupId>mysql</groupId>
            <artifactId>mysql-connector-java</artifactId>
            <scope>runtime</scope>
        </dependency>
        <dependency>
            <groupId>org.projectlombok</groupId>
            <artifactId>lombok</artifactId>
            <optional>true</optional>
        </dependency>
2、application.yml
spring:
  datasource:
    url: jdbc:mysql://localhost:3306/flowable?useSSL=false&characterEncoding=UTF-8&serverTimezone=GMT%2B8
    driver-class-name: com.mysql.jdbc.Driver
    username:
    password:
3、数据库中表
Flowable的所有数据库表都以ACT_开头。第二部分是说明表用途的两字符标示符。服务API的命名也大致符合这个规则。
ACT_RE_: 'RE’代表repository。带有这个前缀的表包含“静态”信息,例如流程定义与流程资源(图片、规则等)。
ACT_RU_: 'RU’代表runtime。这些表存储运行时信息,例如流程实例(process instance)、用户任务(user task)、变量(variable)、作业(job)等。Flowable只在流程实例运行中保存运行时数据,并在流程实例结束时删除记录。这样保证运行时表小和快。
ACT_HI_: 'HI’代表history。这些表存储历史数据,例如已完成的流程实例、变量、任务等。
ACT_GE_: 通用数据。在多处使用。
1)通用数据表(2个)
act_ge_bytearray:二进制数据表,如流程定义、流程模板、流程图的字节流文件;
act_ge_property:属性数据表(不常用);
2)历史表(8个,HistoryService接口操作的表)
act_hi_actinst:历史节点表,存放流程实例运转的各个节点信息(包含开始、结束等非任务节点);
act_hi_attachment:历史附件表,存放历史节点上传的附件信息(不常用);
act_hi_comment:历史意见表;
act_hi_detail:历史详情表,存储节点运转的一些信息(不常用);
act_hi_identitylink:历史流程人员表,存储流程各节点候选、办理人员信息,常用于查询某人或部门的已办任务;
act_hi_procinst:历史流程实例表,存储流程实例历史数据(包含正在运行的流程实例);
act_hi_taskinst:历史流程任务表,存储历史任务节点;
act_hi_varinst:流程历史变量表,存储流程历史节点的变量信息;
3)用户相关表(4个,IdentityService接口操作的表)
act_id_group:用户组信息表,对应节点选定候选组信息;
act_id_info:用户扩展信息表,存储用户扩展信息;
act_id_membership:用户与用户组关系表;
act_id_user:用户信息表,对应节点选定办理人或候选人信息;
4)流程定义、流程模板相关表(3个,RepositoryService接口操作的表)
act_re_deployment:部属信息表,存储流程定义、模板部署信息;
act_re_procdef:流程定义信息表,存储流程定义相关描述信息,但其真正内容存储在act_ge_bytearray表中,以字节形式存储;
act_re_model:流程模板信息表,存储流程模板相关描述信息,但其真正内容存储在act_ge_bytearray表中,以字节形式存储;
5)流程运行时表(6个,RuntimeService接口操作的表)
act_ru_task:运行时流程任务节点表,存储运行中流程的任务节点信息,重要,常用于查询人员或部门的待办任务时使用;
act_ru_event_subscr:监听信息表,不常用;
act_ru_execution:运行时流程执行实例表,记录运行中流程运行的各个分支信息(当没有子流程时,其数据与act_ru_task表数据是一一对应的);
act_ru_identitylink:运行时流程人员表,重要,常用于查询人员或部门的待办任务时使用;
act_ru_job:运行时定时任务数据表,存储流程的定时任务信息;
act_ru_variable:运行时流程变量数据表,存储运行中的流程各节点的变量信息;
4、流程引擎API
1、RepositoryService很可能是使用Flowable引擎要用的第一个服务。这个服务提供了管理与控制部署(deployments)与查询流程定义(process definitions)的操作。

2、RuntimeService用于启动流程定义的新流程实例。

3、IdentityService很简单。它用于管理(创建,更新,删除,查询……)组与用户。

4、FormService是可选服务。也就是说Flowable没有它也能很好地运行,而不必牺牲任何功能。

5、HistoryService暴露Flowable引擎收集的所有历史数据。要提供查询历史数据的能力。

6、ManagementService通常在用Flowable编写用户应用时不需要使用。它可以读取数据库表与表原始数据的信息,也提供了对作业(job)的查询与管理操作。

7、DynamicBpmnService可用于修改流程定义中的部分内容,而不需要重新部署它。例如可以修改流程定义中一个用户任务的办理人设置,或者修改一个服务任务中的类名。
初次运行时flowable会将自动执行flowable中的初始化脚本完成工作流所需要的数据表的建立,如果指定的数据库中还未创建过flowable的相关数据表的话。
@Slf4j
@Service
public class LeaveApprovalFlowable {

    @Autowired
    private RepositoryService repositoryService;

    @Autowired
    private RuntimeService runtimeService;

    @Autowired
    private HistoryService historyService;

    @Autowired
    private org.flowable.engine.TaskService taskService;

    @Autowired
    private org.flowable.engine.IdentityService identityService;

    public void createDeploymentZip() {

        /*
         * Step 1: 部署xml(压缩到zip形式,直接xml需要配置相对路径,麻烦,暂不用)
         */
        try {
            File zipTemp = new File("D:\\...\\leave_approval.bpmn20.zip");
            ZipInputStream zipInputStream = new ZipInputStream(new FileInputStream(zipTemp));
            Deployment deployment = repositoryService
                    .createDeployment()
                    .addZipInputStream(zipInputStream)
                    .deploy();
            log.info("部署成功:{}", deployment.getId());
        } catch (FileNotFoundException e) {
            e.printStackTrace();
        }

        /*
         * Step 2: 查询部署的流程定义
         */
        List<ProcessDefinition> processDefinitions = repositoryService
                .createProcessDefinitionQuery()
                .processDefinitionKey("leave_approval")
                .list();
        List<ProcessDefinition> processDefinitionPages = repositoryService
                .createProcessDefinitionQuery()
                .processDefinitionKey("leave_approval")
                .listPage(1, 30);
        log.info("查询部署的流程定义{}",processDefinitions);

        /*
         * Step 3: 启动流程
         */
        // 流程定义的key,对应请假的流程图
        String processKey = "leave_approval";
        // 业务定义的key
        String businessKey = "leave";
        // 流程变量,可以自定义扩充
        Map<String, Object> variables = new HashMap<>();
        ProcessInstance processInstance = runtimeService.startProcessInstanceByKey(processKey, businessKey, variables);
        log.info("启动成功:{}", processInstance.getId());

        /*
         * Step 4: 查询指定流程所有启动的实例列表
         * 列表,或 分页 删除
         */
        List<Execution> executions = runtimeService
                .createExecutionQuery()
                .processDefinitionKey("leave_approval")
                .list();
        List<Execution> executionPages = runtimeService
                .createExecutionQuery()
                .processDefinitionKey("leave_approval")
                .listPage(1, 30);
        log.info("查询指定流程所有启动的实例列表{}",executions);
        // 删除实例
        //runtimeService.deleteProcessInstance(processInstanceId, deleteReason);

        /*
         * Step 5: 学生查询可以操作的任务,并完成任务
         */
        // 候选组 xml文件里面的 flowable:candidateGroups="student_group"
        String candidateGroup = "student_group";
        List<Task> studentTaskList = taskService
                .createTaskQuery()
                .taskCandidateGroup(candidateGroup)
                .orderByTaskCreateTime()
                .desc()
                .list();
        for (Task task : studentTaskList) {
            // 申领任务
            taskService.claim(task.getId(), "s1");
            // 完成
            taskService.complete(task.getId());
        }
        log.info("学生查询可以操作的任务,并完成任务{}",studentTaskList);

        /*
         * Step 6: 老师查询可以操作的任务,并完成任务
         */
        // 候选组 xml文件里面的 flowable:candidateGroups="teacher_group"
        String candidateGroupTe = "teacher_group";
        List<Task> teacherTaskList = taskService
                .createTaskQuery()
                .taskCandidateGroup(candidateGroupTe)
                .orderByTaskCreateTime()
                .desc()
                .list();
        for (Task task : teacherTaskList) {
            // 申领任务
            taskService.claim(task.getId(), "t1");
            // 完成
            Map<String, Object> map = new HashMap<>();
            // 携带变量,用于网关流程的条件判定,这里的条件是同意
            map.put("command","agree");
            taskService.complete(task.getId(), map);
        }
        log.info("老师查询可以操作的任务,并完成任务{}",teacherTaskList);

        /*
         * Step 7: 历史查询,因为一旦流程执行完毕,活动的数据都会被清空,上面查询的接口都查不到数据,但是提供历史查询接口
         */
        // 历史流程实例
        List<HistoricProcessInstance> historicProcessList = historyService
                .createHistoricProcessInstanceQuery()
                .processDefinitionKey("leave_approval")
                .list();
        // 历史任务
        List<HistoricTaskInstance> historicTaskList = historyService
                .createHistoricTaskInstanceQuery()
                .processDefinitionKey("leave_approval")
                .list();
        log.info("历史流程实例列表{},历史任务列表{}",historicProcessList,historicTaskList);
        // 实例历史变量
        HistoricVariableInstanceQuery historyProcessInstance = historyService
                .createHistoricVariableInstanceQuery()
                .processInstanceId("leave_approval");
        // 任务历史变量
        HistoricVariableInstanceQuery historyTask = historyService
                .createHistoricVariableInstanceQuery()
                .taskId("leave_approval");

        // *****************************************************分隔符********************************************************************

        // 如果在数据库配置了分组和用户,还会用到用户查询,用户id对应xml 里面配置的用户
        List<User> users = identityService.createUserQuery().list();
        // 分组查询,分组id对应xml 里面配置的分组 如 stu_group,te_group 在表里是id的值
        List<Group> groups = identityService.createGroupQuery().list();

    }
}
具体使用请去官网吧,目前只是进行集成,成熟应用还需继续研究。


 1015
1015


 被折叠的 条评论
为什么被折叠?
被折叠的 条评论
为什么被折叠?
 到【灌水乐园】发言


