


在此之前我们已经了解了Flutter,根据中文网的教程,我们来学习一下如何构建布局。
此Demo为中文网内提供的案例,在此进行总结。
主要内容
- Flutter的布局机制如何工作.
- 如何垂直和水平布局widget.
- 如何构建一个Flutter布局.
话不多说,先上图。
OK,推荐一个网址:https://flutterchina.club/tutorials/layout/
这是中文网此案例的链接。
因为这篇文章是一篇总结,更多详细内容请进进入网址学习。
在这之前说一句,学习一门新语言,新技术,官方绝对是首要选择。
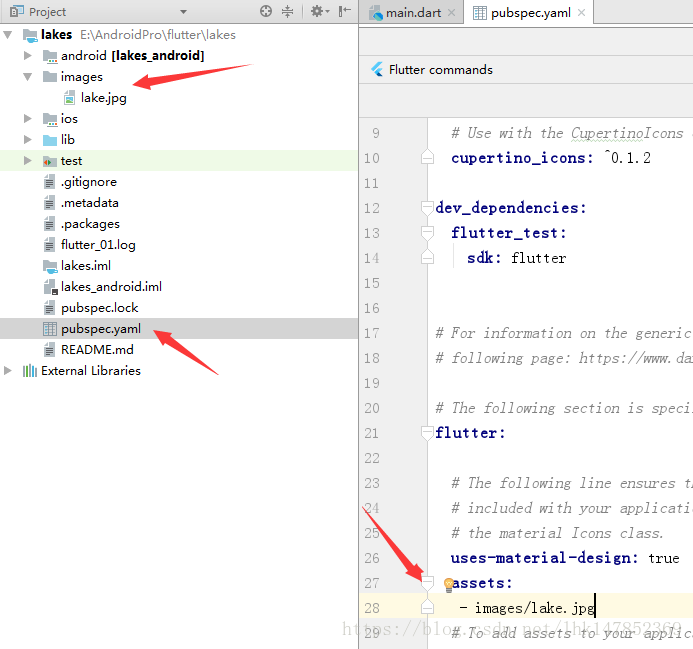
一、将我们的所需要的图片放置于项目中
- 在工程根目录创建一个
images文件夹. - 添加
lake.jpg. (请注意,wget不能保存此二进制文件。) - 更新
pubspec.yaml文件以包含assets标签. 这样才会使您的图片在代码中可用。
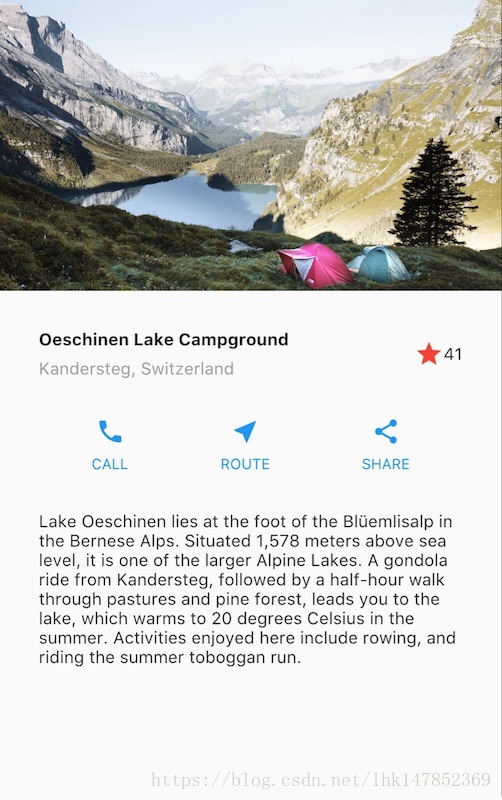
二、实现标题行
首先,构建标题部分左边栏。将Column(列)放入Expanded中会拉伸该列以使用该行中的所有剩余空闲空间。 设置crossAxisAlignment属性值为CrossAxisAlignment.start,这会将将列中的子项左对齐。
将第一行文本放入Container中,然后底部添加8像素填充。列中的第二个子项(也是文本)显示为灰色。
标题行中的最后两项是一个红色的星形图标和文字“41”。将整行放在容器中,并沿着每个边缘填充32像素
//dart2 相比于dart1   少了关键字new
class MyApp extends StatelessWidget {
  @override
  Widget build(BuildContext context) {
    Widget titleSection = new Container(
      //内边距32px
      padding: const EdgeInsets.all(32.0),
      child: new Row(
        children: [
          //如果布局太大而不适合设备
          //Expanded widget,可以将widget的大小设置为适和行或列
          new Expanded(
            //其他两个widget的两倍
//            flex: 2,
            child: new Column(
              //crossAxisAlignment属性值为CrossAxisAlignment.start,
               //这会将将列中的子项左对齐。
              crossAxisAlignment: CrossAxisAlignment.start,
              children: [
                new Container(
                  padding: const EdgeInsets.only(bottom: 8.0),
                  child: new Text(
                    'Oeschinen Lake Campground',
                    style: new TextStyle(
                      fontWeight: FontWeight.bold,
                    ),
                  ),
                ),
                new Text(
                  'Kandersteg, Switzerland',
                  style: new TextStyle(
                    color: Colors.grey[500],
                  ),
                ),
              ],
            ),
          ),
          new Icon(
            Icons.star,
            color: Colors.red[500],
          ),
          new Text('41'),
        ],
      ),
    );
  //...
}
三、实现按钮行
按钮部分包含3个使用相同布局的列 - 上面一个图标,下面一行文本。该行中的列平均分布行空间, 文本和图标颜色为主题中的primary color,它在应用程序的build()方法中设置为蓝色:
class MyApp extends StatelessWidget {
  @override
  Widget build(BuildContext context) {
    //...

    return new MaterialApp(
      title: 'Flutter Demo',
      theme: new ThemeData(
        primarySwatch: Colors.blue,
      ),

    //...
}
由于构建每个列的代码几乎是相同的,因此使用一个嵌套函数,如buildButtonColumn,它会创建一个颜色为primary color,包含一个Icon和Text的 Widget 列。
class MyApp extends StatelessWidget {
  @override
  Widget build(BuildContext context) {
    //...
    //一个颜色为primary color,包含一个Icon和Text的 Widget 列
    Column buildButtonColumn(IconData icon, String label) {
      Color color = Theme.of(context).primaryColor;

      return new Column(
        //mainAxisSize .min 聚集在一起
        mainAxisSize: MainAxisSize.min,
        mainAxisAlignment: MainAxisAlignment.center,
        children: [
          new Icon(icon, color: color),
          new Container(
            margin: const EdgeInsets.only(top: 8.0),
            child: new Text(
              label,
              style: new TextStyle(
                fontSize: 12.0,
                fontWeight: FontWeight.w400,
                color: color,
              ),
            ),
          ),
        ],
      );
    }
  //...
}
构建函数将图标直接添加到列(Column)中。将文本放入容器以在文本上方添加填充,将其与图标分开。
通过调用函数并传递icon和文本来构建这些列。然后在行的主轴方向通过 MainAxisAlignment.spaceEvenly 平均的分配每个列占据的行空间。
class MyApp extends StatelessWidget {
  @override
  Widget build(BuildContext context) {
    //...

    Widget buttonSection = new Container(
      child: new Row(
        //mainAxisAlignment和crossAxisAlignment属性来对齐其子项。
        // 对于行(Row)来说,主轴是水平方向,横轴垂直方向。
        // 对于列(Column)来说,主轴垂直方向,横轴水平方向
        //spaceEvenly它会在每个图像之间,之前和之后均匀分配空闲的水平空间
        mainAxisAlignment: MainAxisAlignment.spaceEvenly,
        children: [
          buildButtonColumn(Icons.call, 'CALL'),
          buildButtonColumn(Icons.near_me, 'ROUTE'),
          buildButtonColumn(Icons.share, 'SHARE'),
        ],
      ),
    );
  //...
}
四、实现文本部分
将文本放入容器中,以便沿每条边添加32像素的填充。softwrap属性表示文本是否应在软换行符(例如句点或逗号)之间断开。
class MyApp extends StatelessWidget {
  @override
  Widget build(BuildContext context) {
    //...

    Widget textSection = new Container(
      padding: const EdgeInsets.all(32.0),
      child: new Text(
        '''
Lake Oeschinen lies at the foot of the Blüemlisalp in the Bernese Alps. Situated 1,578 meters above sea level, it is one of the larger Alpine Lakes. A gondola ride from Kandersteg, followed by a half-hour walk through pastures and pine forest, leads you to the lake, which warms to 20 degrees Celsius in the summer. Activities enjoyed here include rowing, and riding the summer toboggan run.
        ''',
        //softwrap属性表示文本是否应在软换行符(例如句点或逗号)之间断开。
        softWrap: true,
      ),
    );
  //...
}
五、实现图像部分
直接在代码中引用
body: new ListView(
  children: [
    new Image.asset(
      'images/lake.jpg',
      height: 240.0,
//     BoxFit.cover 告诉框架,图像应该尽可能小,但覆盖整个渲染框
      fit: BoxFit.cover,
    ),
    // ...
  ],
)
六、整合
在最后一步,你将上面这些组装在一起。这些widget放置到ListView中,而不是列中,因为在小设备上运行应用程序时,ListView会自动滚动。
//...
body: new ListView(
  children: [
    new Image.asset(
      'images/lake.jpg',
      width: 600.0,
      height: 240.0,
      fit: BoxFit.cover,
    ),
    titleSection,
    buttonSection,
    textSection,
  ],
),
//...main.dart代码:https://raw.githubusercontent.com/flutter/website/master/_includes/code/layout/lakes/main.dart
图片资源:https://github.com/flutter/website/blob/master/_includes/code/layout/lakes/images/lake.jpg
以上代码中我已经添加了 很多的注释,方便自己理解以及加深印象
说句实在话,虽然已经懂得差不多了,但是自己并不会dart语言,而且刚开始学习flutter
所以希望大家,可以多学几遍,一遍不行就两遍。总会有你期待的一天。


 6408
6408


 被折叠的 条评论
为什么被折叠?
被折叠的 条评论
为什么被折叠?
 到【灌水乐园】发言


