一个ListView通常有两个职责。
(1)将数据填充到布局。
(2)处理用户的选择点击等操作。
第一点很好理解,ListView就是实现这个功能的。第二点也不难做到,在后面的学习中读者会发现,这非常简单。
一个ListView的创建需要3个元素。
(1)ListView中的每一列的View。
(2)填入View的数据或者图片等。
(3)连接数据与ListView的适配器。
也就是说,要使用ListView,首先要了解什么是适配器。适配器是一个连接数据和AdapterView(ListView就是一个典型的AdapterView,后面还会学习其他的)的桥梁,通过它能有效地实现数据与AdapterView的分离设置,使AdapterView与数据的绑定更加简便,修改更加方便
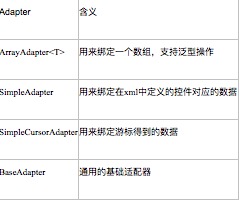
Android中提供了很多的Adapter,表4-5列出了常用的几个。

通用的基础适配器
其实适配器还有很多,要注意的是,各种Adapter只不过是转换的方式和能力不一样而已。下面就通过使用不同的Adapter来为ListView绑定数据(SimpleCursorAdapter暂且不讲,后面讲SQLite时会介绍)。
4.12.1 ListView使用ArrayAdapter
用ArrayAdapter可以实现简单的ListView的数据绑定。默认情况下,ArrayAdapter绑定每个对象的toString值到layout中预先定义的TextView控件上。ArrayAdapter的使用非常简单。
实例:
工程目录:EX_04_12
在布局文件中加入一个ListView控件。
<?xmlversion="1.0"encoding="utf-8"?> <LinearLayoutxmlns:android="
http://schemas.android.com/apk/res/android"     android:layout_width="fill_parent"
 android:layout_height="fill_parent"> <!-- 添加一个ListView控件 --> <ListView
    android:id="@+id/lv"     android:layout_width="fill_parent"     android:layout_height="fill_parent"/>
  </LinearLayout>
然后在Activity中初始化。
publicclass MyListView extends Activity {

privatestaticfinal String[] strs = new String[] {
    "first", "second", "third", "fourth", "fifth"
    };//定义一个String数组用来显示ListView的内容private ListView lv;/** Called when the activity is first created. */
 @Override
publicvoid onCreate(Bundle savedInstanceState) {super.onCreate(savedInstanceState);
        setContentView(R.layout.main);

lv = (ListView) findViewById(R.id.lv);//得到ListView对象的引用 /*为ListView设置Adapter来绑定数据*/
lv.setAdapter(new ArrayAdapter<String>(this,
                android.R.layout.simple_list_item_1, strs));

    }
}
分析一下使用的步骤。
(1)定义一个数组来存放ListView中item的内容。
(2)通过实现ArrayAdapter的构造函数来创建一个ArrayAdapter的对象。
(3)通过ListView的setAdapter()方法绑定ArrayAdapter。
其中第二步有必要说一下的是,ArrayAdapter有多个构造函数,例子中实现的是最常用的一种。第一个参数为上下文,第二个参数为一个包含TextView,用来填充ListView的每一行的布局资源ID。第三个参数为ListView的内容。其中第二个参数可以自定义一个layout,但是这个layout必须要有TextView控件。通常我们使用Android提供的资源,除了例子中所用的,常用的还有如下几种,可实现带RadioButton和CheckBox的ListView。
(1)通过指定android.R.layout.simple_list_item_checked这个资源,实现带选择框的ListView。需要用setChoiceMode()方法设定选择为多选还是单选,否则将不能实现选择效果,运行效果如图4-30所示。
实现代码如下:
lv.setAdapter(new ArrayAdapter<String>(this,
                android.R.layout.simple_list_item_checked, strs));
lv.setChoiceMode(ListView.CHOICE_MODE_MULTIPLE);
后面还有很多直接贴站在的网址了
http://www.cnblogs.com/zhengbeibei/archive/2013/05/14/3078805.html


 6621
6621

 被折叠的 条评论
为什么被折叠?


