


springBoot +nginx+redis 实现session共享
         <!--一个博主专栏付费入口结束-->
        <link rel="stylesheet" href="https://csdnimg.cn/release/phoenix/template/css/ck_htmledit_views-d284373521.css">
                                    <link rel="stylesheet" href="https://csdnimg.cn/release/phoenix/template/css/ck_htmledit_views-d284373521.css">
            <div class="htmledit_views" id="content_views">
                                        <p><strong>一、准备工作:</strong></p>
安装redis
网盘地址 windows 64位:
链接:https://pan.baidu.com/s/1CM7ohI8r_IFqsH9ofTahdw
提取码:i7au
redis桌面管理工具:
链接:https://pan.baidu.com/s/1GdQb1oqkLmBC6zJAlaWv9A
提取码:054r
redis在windows后台运行:
1. 进入 DOS窗口
2. 在进入redis的安装目录
3. 输入:redis-server --service-install redis.windows.conf --loglevel verbose ( 安装redis服务 )
4. 输入:redis-server --service-start ( 启动服务 )
5. 输入:redis-server --service-stop (停止服务)
参考博客:
https://blog.csdn.net/justinytsoft/article/details/54580919
安装nginx
网盘地址:
链接:https://pan.baidu.com/s/1BZ1kgJbt-zdcZtKOGlBvbQ
提取码:ig72
nginx相关操作 参考博客:https://blog.csdn.net/qq_15058425/article/details/63691767
nginx配置如下:
#user nobody;
worker_processes 1;
#error_log logs/error.log;
#error_log logs/error.log notice;
#error_log logs/error.log info;
#pid logs/nginx.pid;
events {
worker_connections 1024;
}
http {
include mime.types;
default_type application/octet-stream;
#log_format main '$remote_addr - $remote_user [$time_local] "$request" '
# '$status $body_bytes_sent "$http_referer" '
# '"$http_user_agent" "$http_x_forwarded_for"';
#access_log logs/access.log main;
sendfile on;
#tcp_nopush on;
#keepalive_timeout 0;
keepalive_timeout 65;
#gzip on;
upstream windy.com{
server localhost:8010 weight=1;
server localhost:8020 weight=2;
}
server {
listen 80;
server_name localhost;
#charset koi8-r;
#access_log logs/host.access.log main;
location / {
root html;
index index.html index.htm;
proxy_pass http://windy.com;
proxy_redirect default;
}
#error_page 404 /404.html;
# redirect server error pages to the static page /50x.html
#
error_page 500 502 503 504 /50x.html;
location = /50x.html {
root html;
}
# proxy the PHP scripts to Apache listening on 127.0.0.1:80
#
#location ~ \.php$ {
# proxy_pass http://127.0.0.1;
#}
# pass the PHP scripts to FastCGI server listening on 127.0.0.1:9000
#
#location ~ \.php$ {
# root html;
# fastcgi_pass 127.0.0.1:9000;
# fastcgi_index index.php;
# fastcgi_param SCRIPT_FILENAME /scripts$fastcgi_script_name;
# include fastcgi_params;
#}
# deny access to .htaccess files, if Apache's document root
# concurs with nginx's one
#
#location ~ /\.ht {
# deny all;
#}
}
# another virtual host using mix of IP-, name-, and port-based configuration
#
#server {
# listen 8000;
# listen somename:8080;
# server_name somename alias another.alias;
# location / {
# root html;
# index index.html index.htm;
# }
#}
# HTTPS server
#
#server {
# listen 443 ssl;
# server_name localhost;
# ssl_certificate cert.pem;
# ssl_certificate_key cert.key;
# ssl_session_cache shared:SSL:1m;
# ssl_session_timeout 5m;
# ssl_ciphers HIGH:!aNULL:!MD5;
# ssl_prefer_server_ciphers on;
# location / {
# root html;
# index index.html index.htm;
# }
#}
}
二、代码
package com.windy.atest;
import javax.servlet.http.HttpServletRequest;
import javax.servlet.http.HttpSession;
import org.mybatis.spring.annotation.MapperScan;
import org.springframework.boot.autoconfigure.EnableAutoConfiguration;
import org.springframework.boot.builder.SpringApplicationBuilder;
import org.springframework.boot.web.support.SpringBootServletInitializer;
import org.springframework.context.annotation.ComponentScan;
import org.springframework.session.data.redis.config.annotation.web.http.EnableRedisHttpSession;
import org.springframework.stereotype.Controller;
import org.springframework.ui.Model;
import org.springframework.web.bind.annotation.RequestMapping;
import org.springframework.web.bind.annotation.RequestMethod;
import org.springframework.web.bind.annotation.ResponseBody;
@ComponentScan(value = {"com.windy.atest"})
@Controller
@EnableRedisHttpSession //注意要添加该注解
@EnableAutoConfiguration
@MapperScan("com.windy")
public class Example extends SpringBootServletInitializer{
@RequestMapping(value ="/home", method = RequestMethod.GET)
@ResponseBody
public String home(){
return "你好,Spring Boot";
}
/**
* 写入session
* @return
*/
@RequestMapping(value ="/ifUser", method = RequestMethod.GET)
public String ifUser(Model model,HttpSession session,String secret,HttpServletRequest req){
String name="windy";
session.setAttribute("user",name);
return "/view/error";
}
//获取session的值
@RequestMapping(value ="/getUser", method = RequestMethod.GET)
public String getUser(Model model,HttpSession session,String secret,HttpServletRequest req){
String name=session.getAttribute("user").toString();
model.addAttribute("user", name);
return "/view/name";
}
// war启动
@Override
protected SpringApplicationBuilder configure(SpringApplicationBuilder builder) {
return builder.sources(Example.class);
}
}
配置文件:application.properties
# thymeleaf
spring.thymeleaf.prefix=classpath:/templates/
spring.thymeleaf.suffix=.html
#spring.thymeleaf.mode=HTML
spring.thymeleaf.encoding=UTF-8
spring.thymeleaf.content-type=text/html
spring.thymeleaf.mode=LEGACYHTML5
spring.thymeleaf.cache=false
spring.datasource.url=jdbc:mysql://192.168.99.101:3306/mq
spring.datasource.username=root
spring.datasource.password=123456
spring.datasource.driver-class-name=com.mysql.jdbc.Driver
spring.datasource.max-idle=1
spring.datasource.max-wait=500
spring.datasource.min-idle=1
spring.datasource.initial-size=1
server.port=8080
server.session.timeout=10
server.tomcat.uri-encoding=UTF-8
mybatis:
type-aliases-package: com.windy.model
mybatis.mapperLocations=classpath:mapper/*.xml
spring.redis.host=localhost
spring.redis.port=6379
spring.session.store-type=redis
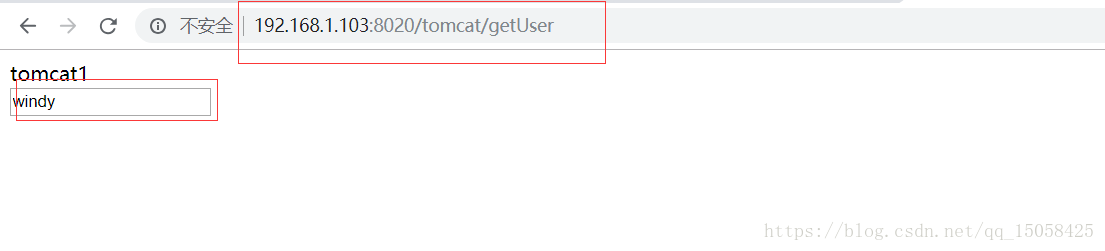
三、 将项目放到两个tomcat中启动:,端口号分别为http://192.168.1.103:8010和http://192.168.1.103:8020

在浏览器中先输入:http://192.168.1.103:8010/tomcat/ifUser,会将session.setAttribute("user",name);存到session中
然后在浏览器输入链接:http://192.168.1.103:8020/tomcat/getUser,可以看到用户名如下, 说明session共享成功:
完整项目代码:
链接:https://pan.baidu.com/s/1VugA__adQjqtjvEQCNVMzg
提取码:dujd


 355
355


 被折叠的 条评论
为什么被折叠?
被折叠的 条评论
为什么被折叠?
 到【灌水乐园】发言


