


引言
在Android的应用中,经常会见到底部菜单,例如微信的底部菜单如下所示:

而在企业级的Android应用中,也存在同样的需求,但与微信这些大众软件的区别在于企业级的Android应用由于UI页面很多,每个页面都需要有底部菜单,而且每个页面的底部菜单按钮还可能完全不一样,所以,为了使每个页面保持一致性并为UI页面制作时提供便利,针对底部菜单进行专门的设计封装,就显得特别重要。
设计选型
在设计底部菜单时,有下面两种思路:
一、单独定制底部菜单块,并将菜单块代码引入到每一个需要使用到底部菜单的layout.xml文件中,然后再在代码中定义需要使用的按钮。
此方法符合正常思维逻辑,缺点在于每个页面都要重复去引入,其实这个是可以省掉的。
二、Android中,可以将某块自定义的UI从layout.xml中实例化出来使用,使用的是LayoutInflater,基于该技术,我们可以换一种思路来解决这个问题:写页面layout文件的时候不用关心底部菜单。然后在展示的代码中,定义一个大的视图页面将页面的layout文件以及底部菜单的layout包含进来,过程如下图所示:

详细设计
1. 设计大的视图页面layout:bottom_menu_layout.xml,该页面用来包含以后自定义的业务页面,以及底部菜单。
| <?xml version="1.0"encoding="utf-8"?> <LinearLayout xmlns:android="http://schemas.android.com/apk/res/android" android:layout_width="fill_parent" android:layout_height="fill_parent" android:orientation="vertical">
<LinearLayout android:orientation="horizontal"android:layout_width="fill_parent" android:gravity="bottom" android:layout_height="wrap_content" android:id="@+id/bottom_menu_button_group_id"> </LinearLayout> </LinearLayout> |
2. 设计底部菜单按钮layout:bottom_menu_button_frame.xml,该页面用来定义每一个按钮的样式,一般需要包含一个位于上方的图片以及一个位于下方的按钮文字。
| <?xml version="1.0"encoding="utf-8"?> <LinearLayout xmlns:android="http://schemas.android.com/apk/res/android" android:orientation="vertical" android:layout_width="64px" android:layout_height="wrap_content" android:id="@+id/bottom_menu_template_button_id" android:background="@drawable/tab_one_normal"> <ImageView android:id="@+id/bottom_menu_template_img_id" android:paddingTop="5px"android:layout_gravity="center" android:layout_width="wrap_content" android:layout_height="wrap_content"android:src="@drawable/image" /> <TextView android:layout_width="wrap_content"android:id="@+id/bottom_menu_template_text_id" android:layout_height="wrap_content" android:layout_gravity="center" android:gravity="center" android:textSize="11sp"android:paddingBottom="5px" /> </LinearLayout> |
3. 自定义封装按钮的JAVA类:BottomButton,封装底部菜单按钮的基本信息:图片、文字、按钮事件、是否当前被选中的按钮等。
| public class BottomButton { // 按钮菜单文字 private String text;
// 按钮菜单图片 private int backgroundResource;
// 点击事件。 private View.OnClickListener clickListener;
// 是否当前已经选中的按钮,如果是则高亮,并且忽略点击事件。 private boolean isCurrent = false; } |
4. 自定义底部菜单Layout 类:BottomMenuLayout,该类继承自LinearLayout,用来处理按钮的展示,该类负责以下三件事情:
a) 将底部菜单layout加入到整个大视图页面中。
b) 绑定每一个菜单按钮。
c) 重新计算整个布局的大小,将菜单固定在底部。
| public class BottomMenuLayout extends LinearLayout {
//实例化layout使用的类 private LayoutInflater mInflater;
//保存菜单按钮的集合,每一个集合元素代表一个按钮,包含了按钮所需要的信息:图片,文字,按键处理事件。 private List<BottomButton> bottomButtons;
//封装菜单按钮的布局。 private View bottomMenuLayout;
public void processInitButton() { //初始化布局,将底部菜单layout加入到视图中。 initLayout(this.getContext());
//绑定每一个菜单按钮 bindingButton();
//重新计算整个布局的大小,使用整个屏幕的高度减去底部菜单的高度, //得出并设置中间页面部分的高度,就能够将菜单固定在底部。 resizeLayout(); } |
注:这里屏蔽了实现细节,具体参考附件代码。
5. 当以上每一个零散的部分都完成以后,就需要一个组装者,来负责将各个部分组装在一起,使之能够正常运作起来,这里定义一个继承自Activity的类:BaseBottomMenuActivity ,用来充当组装者的角色,开发业务时需要更改方式,原来直接继承自Activity的类改为继承该类。该类主要完成以下工作:
a) 创建出整个大视图页面。
b) 创建出中间内容部分页面,也就是由开发者定义的实际layout内容。并加到整个大视图的页面中来。
c) 创建出底部菜单,并将底部菜单加入到整个大视图的页面中来。
d) 需要得知子类继承该类后,具体使用的layout页面的ID,定义抽象方法由子类实现以提供该ID。
e) 需要得知子类继承该类后,具体需要哪些菜单按钮,定义抽象方法由子类实现以提供按钮的列表。
f) 需要得知子类继承该类后,还需要做哪些页面初始化的工作,定义抽象方法由子类实现以便在页面初始过程中调用。
| public abstract class BaseBottomMenuActivity extends Activity { private LayoutInflater mInflater; //实例化layout使用的类 protected BottomMenuLayout bottomMenuLayout; //底部菜单UI部分 protected View contentView; //页面中间UI部分
final protected void onCreate(Bundle savedInstanceState) { //a) 创建出整个大视图页面。 //b) 创建出中间内容部分页面,也就是由开发者定义的实际layout内容。并加到整个大视图的页面中来。 //c) 创建出底部菜单,并将底部菜单加入到整个大视图的页面中来。 }
/** * 子类实现后,在原来的onCreate方法中内容移到这里来操作。 * @paramsavedInstanceState */ protected abstract void onCreatOverride(Bundle savedInstanceState);
/** * 返回layout xml的ID * 原本在Activity的onCreate方法中调用的setContentView(R.layout.xxxxLayoutId); 现在从该方法返回。 * @return */ public abstract int getContentViewLayoutResId();
/** * 创建底部菜单,需要子类实现,在此方法中, * 创建多个BottomButton对象并放置到List中返回即可。 * 如果需要哪一个按钮当前被选中,则设置BottomButton的isCurrent属性为ture. * @param bottomButtons * @param bottomMenuLayout * @return */ public abstractList<BottomButton> getButtonList(); |
注:这里屏蔽了实现细节,具体参考附件代码。
实现及使用
具体实现代码见附件。
在上述设计的各部分都实现后,就可以进行使用了,使用时,与平常开发正常页面的步骤一样,首先画layout.xml,然后定义activity,进行绑定并配置AndroidManifest.xml文件,不同的地方在于定义的Activity需要继承BaseBottomMenuActivity。并且根据以下步骤开发该Activity:
| 1. 在子类中继承实现getButtonList方法,在方法中封装BottomButton对象返回,每一个BottomButton代表一个菜单项,具体属性见BottomButton定义。 2. 在子类中继承实现getContentViewLayoutResId方法,返回layout xml的ID。 3. 在子类中继承实现onCreatOverride方法,原先在onCreat方法中完成的事情挪到这里,super.onCreate(savedInstanceState);和setContentView就不需要调用了。 |
测试
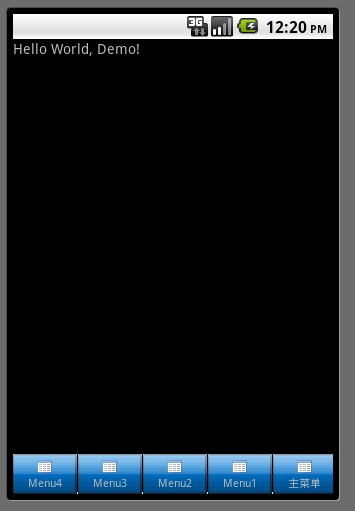
让我们来写一个简单的Demo来进行测试,该Demo中,除了底部菜单,只有一个TextView文本,该类继承了BaseBottomMenuActivity:
| public class Demo extends BaseBottomMenuActivity {
public List<BottomButton> getButtonList() { Map<String,String> buttonMaps = new HashMap<String,String>(); buttonMaps.put("Menu1", String.valueOf(R.drawable.home)); buttonMaps.put("Menu2", String.valueOf(R.drawable.home)); buttonMaps.put("Menu3", String.valueOf(R.drawable.home)); buttonMaps.put("Menu4", String.valueOf(R.drawable.home)); buttonMaps.put("主菜单", String.valueOf(R.drawable.home));
List<BottomButton>buttons = new ArrayList<BottomButton>(); Iterator<String> itKey =buttonMaps.keySet().iterator(); while(itKey.hasNext()) { Stringkey = itKey.next(); StringvalueRes = buttonMaps.get(key); BottomButtononeBottomButton = new BottomButton(); oneBottomButton.setText(key); oneBottomButton.setBackgroundResource(Integer.parseInt(valueRes)); buttons.add(oneBottomButton); } return buttons; }
public int getContentViewLayoutResId() { return R.layout.main; }
protected void onCreatOverride(Bundle savedInstanceState) { } } |
在返回按钮的getButtonList方法中,返回了5个按钮。
其布局文件如下:
| <?xml version="1.0"encoding="utf-8"?> <LinearLayout xmlns:android="http://schemas.android.com/apk/res/android" android:orientation="vertical" android:layout_width="fill_parent" android:layout_height="fill_parent" > <TextView android:layout_width="fill_parent" android:layout_height="wrap_content" android:text="@string/hello" /> </LinearLayout> |
结果程序效果如下图所示:


 887
887


 被折叠的 条评论
为什么被折叠?
被折叠的 条评论
为什么被折叠?
 到【灌水乐园】发言


