


转帖请注明本文出自xiaanming的博客(http://blog.csdn.net/xiaanming),请尊重他人的辛勤劳动成果,谢谢!
随着移动互联网的快速发展,它已经和我们的生活息息相关了,在公交地铁里面都能看到很多人的人低头看着自己的手机屏幕,从此“低头族”一词就产生了,作为一名移动行业的开发人员,我自己也是一名“低头族”,上下班时间在公交地铁上看看新闻来打发下时间,有时候也会看看那些受欢迎的App的一些界面效果,为什么人家的app那么受欢迎?跟用户体验跟UI设计也有直接的关系,最近在美团和大众点评的App看到如下效果,我感觉用户好,很人性化,所以自己也尝试着实现了下,接下来就讲解下实现思路!

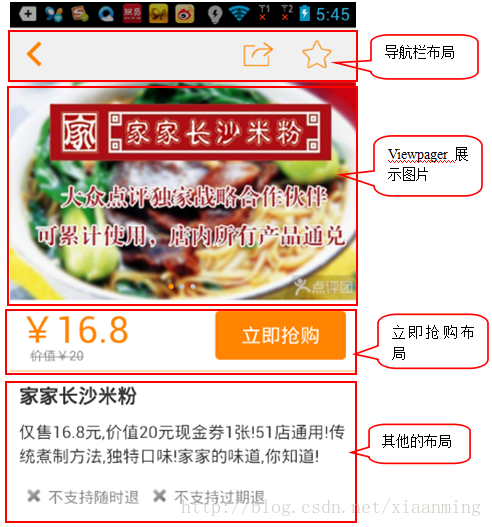
如上图(2)我们看到了,当立即抢购布局向上滑动到导航栏布局的时候,立即抢购布局就贴在导航栏布局下面,下面的其他的布局还是可以滑动,当我们向下滑动的时候,立即抢购的布局又随着往下滑动了,看似有点复杂,但是一说思路可能你就顿时恍然大悟了。
当我们向上滑动过程中,我们判断立即抢购的布局是否滑到导航栏布局下面,如果立即抢购的上面顶到了导航栏,我们新建一个立即抢购的悬浮框来显示在导航栏下面,这样子就实现了立即抢购贴在导航栏下面的效果啦,而当我们向下滑动的时候,当立即抢购布局的下面刚好到了刚刚新建的立即抢购悬浮框的下面的时候,我们就移除立即抢购悬浮框,可能说的有点拗口,既然知道了思路,接下来我们就来实现效果。
新建一个Android项目,取名MeiTuanDemo,先看立即抢购(buy_layout.xml)的布局,这里为了方便我直接从美团上面截去了图片
- <?xml version="1.0" encoding="UTF-8"?>
- <LinearLayout xmlns:android="http://schemas.android.com/apk/res/android"
- android:orientation="horizontal"
- android:layout_width="fill_parent"
- android:layout_height="wrap_content" >
- <ImageView
- android:id="@+id/buy_layout"
- android:layout_width="fill_parent"
- android:layout_height="wrap_content"
- android:background="@drawable/buy" />
- </LinearLayout>
立即抢购的布局实现了,接下来实现主界面的布局,上面是导航栏布局,为了方便还是直接从美团截取的图片,然后下面的ViewPager布局,立即抢购布局,其他布局 放在ScrollView里面,界面还是很简单的
- <LinearLayout xmlns:android="http://schemas.android.com/apk/res/android"
- xmlns:tools="http://schemas.android.com/tools"
- android:layout_width="match_parent"
- android:layout_height="match_parent"
- android:orientation="vertical" >
- <ImageView
- android:id="@+id/imageView1"
- android:scaleType="centerCrop"
- android:layout_width="match_parent"
- android:layout_height="45dip"
- android:src="@drawable/navigation_bar" />
- <com.example.meituandemo.MyScrollView
- android:id="@+id/scrollView"
- android:layout_width="fill_parent"
- android:layout_height="fill_parent" >
- <LinearLayout
- android:layout_width="match_parent"
- android:layout_height="wrap_content"
- android:orientation="vertical" >
- <ImageView
- android:id="@+id/iamge"
- android:layout_width="match_parent"
- android:layout_height="wrap_content"
- android:background="@drawable/pic"
- android:scaleType="centerCrop" />
- <include
- android:id="@+id/buy"
- layout="@layout/buy_layout" />
- <ImageView
- android:layout_width="match_parent"
- android:layout_height="wrap_content"
- android:background="@drawable/one"
- android:scaleType="centerCrop" />
- <ImageView
- android:layout_width="match_parent"
- android:layout_height="wrap_content"
- android:background="@drawable/one"
- android:scaleType="centerCrop" />
- <ImageView
- android:layout_width="match_parent"
- android:layout_height="wrap_content"
- android:background="@drawable/one"
- android:scaleType="centerCrop" />
- </LinearLayout>
- </com.example.meituandemo.MyScrollView>
- </LinearLayout>
你会发现上面的主界面布局中并不是ScrollView,而是自定义的一个MyScrollView,接下来就看看MyScrollView类中的代码
- package com.example.meituandemo;
- import android.content.Context;
- import android.os.Handler;
- import android.util.AttributeSet;
- import android.view.MotionEvent;
- import android.widget.ScrollView;
- /**
- * 博客地址:http://blog.csdn.net/xiaanming
- *
- * @author xiaanming
- *
- */
- public class MyScrollView extends ScrollView {
- private OnScrollListener onScrollListener;
- /**
- * 主要是用在用户手指离开MyScrollView,MyScrollView还在继续滑动,我们用来保存Y的距离,然后做比较
- */
- private int lastScrollY;
- public MyScrollView(Context context) {
- this(context, null);
- }
- public MyScrollView(Context context, AttributeSet attrs) {
- this(context, attrs, 0);
- }
- public MyScrollView(Context context, AttributeSet attrs, int defStyle) {
- super(context, attrs, defStyle);
- }
- /**
- * 设置滚动接口
- * @param onScrollListener
- */
- public void setOnScrollListener(OnScrollListener onScrollListener) {
- this.onScrollListener = onScrollListener;
- }
- /**
- * 用于用户手指离开MyScrollView的时候获取MyScrollView滚动的Y距离,然后回调给onScroll方法中
- */
- private Handler handler = new Handler() {
- public void handleMessage(android.os.Message msg) {
- int scrollY = MyScrollView.this.getScrollY();
- //此时的距离和记录下的距离不相等,在隔5毫秒给handler发送消息
- if (lastScrollY != scrollY) {
- lastScrollY = scrollY;
- handler.sendMessageDelayed(handler.obtainMessage(), 5);
- }
- if (onScrollListener != null) {
- onScrollListener.onScroll(scrollY);
- }
- };
- };
- /**
- * 重写onTouchEvent, 当用户的手在MyScrollView上面的时候,
- * 直接将MyScrollView滑动的Y方向距离回调给onScroll方法中,当用户抬起手的时候,
- * MyScrollView可能还在滑动,所以当用户抬起手我们隔5毫秒给handler发送消息,在handler处理
- * MyScrollView滑动的距离
- */
- @Override
- public boolean onTouchEvent(MotionEvent ev) {
- if (onScrollListener != null) {
- onScrollListener.onScroll(lastScrollY = this.getScrollY());
- }
- switch(ev.getAction()) {
- case MotionEvent.ACTION_UP:
- handler.sendMessageDelayed(handler.obtainMessage(), 5);
- break;
- }
- return super.onTouchEvent(ev);
- }
- /**
- *
- * 滚动的回调接口
- *
- * @author xiaanming
- *
- */
- public interface OnScrollListener {
- /**
- * 回调方法, 返回MyScrollView滑动的Y方向距离
- * @param scrollY
- */
- public void onScroll(int scrollY);
- }
- }
实现了对ScrollView滚动的Y值进行监听,接下来就简单了,我们只需要显示立即抢购悬浮框和移除悬浮框了,接下来看看主界面Activity的代码编写
- package com.example.meituandemo;
- import android.app.Activity;
- import android.content.Context;
- import android.graphics.PixelFormat;
- import android.os.Bundle;
- import android.view.Gravity;
- import android.view.LayoutInflater;
- import android.view.View;
- import android.view.WindowManager;
- import android.view.WindowManager.LayoutParams;
- import android.widget.LinearLayout;
- import com.example.meituandemo.MyScrollView.OnScrollListener;
- /**
- * 博客地址:http://blog.csdn.net/xiaanming
- *
- * @author xiaanming
- *
- */
- public class MainActivity extends Activity implements OnScrollListener {
- private MyScrollView myScrollView;
- private LinearLayout mBuyLayout;
- private WindowManager mWindowManager;
- /**
- * 手机屏幕宽度
- */
- private int screenWidth;
- /**
- * 悬浮框View
- */
- private static View suspendView;
- /**
- * 悬浮框的参数
- */
- private static WindowManager.LayoutParams suspendLayoutParams;
- /**
- * 购买布局的高度
- */
- private int buyLayoutHeight;
- /**
- * myScrollView与其父类布局的顶部距离
- */
- private int myScrollViewTop;
- /**
- * 购买布局与其父类布局的顶部距离
- */
- private int buyLayoutTop;
- @Override
- protected void onCreate(Bundle savedInstanceState) {
- super.onCreate(savedInstanceState);
- setContentView(R.layout.activity_main);
- myScrollView = (MyScrollView) findViewById(R.id.scrollView);
- mBuyLayout = (LinearLayout) findViewById(R.id.buy);
- myScrollView.setOnScrollListener(this);
- mWindowManager = (WindowManager) getSystemService(Context.WINDOW_SERVICE);
- screenWidth = mWindowManager.getDefaultDisplay().getWidth();
- }
- /**
- * 窗口有焦点的时候,即所有的布局绘制完毕的时候,我们来获取购买布局的高度和myScrollView距离父类布局的顶部位置
- */
- @Override
- public void onWindowFocusChanged(boolean hasFocus) {
- super.onWindowFocusChanged(hasFocus);
- if (hasFocus) {
- buyLayoutHeight = mBuyLayout.getHeight();
- buyLayoutTop = mBuyLayout.getTop();
- myScrollViewTop = myScrollView.getTop();
- }
- }
- /**
- * 滚动的回调方法,当滚动的Y距离大于或者等于 购买布局距离父类布局顶部的位置,就显示购买的悬浮框
- * 当滚动的Y的距离小于 购买布局距离父类布局顶部的位置加上购买布局的高度就移除购买的悬浮框
- *
- */
- @Override
- public void onScroll(int scrollY) {
- if (scrollY >= buyLayoutTop) {
- if (suspendView == null) {
- showSuspend();
- }
- } else if (scrollY <= buyLayoutTop + buyLayoutHeight) {
- if (suspendView != null) {
- removeSuspend();
- }
- }
- }
- /**
- * 显示购买的悬浮框
- */
- private void showSuspend() {
- if (suspendView == null) {
- suspendView = LayoutInflater.from(this).inflate(R.layout.buy_layout, null);
- if (suspendLayoutParams == null) {
- suspendLayoutParams = new LayoutParams();
- suspendLayoutParams.type = LayoutParams.TYPE_PHONE; //悬浮窗的类型,一般设为2002,表示在所有应用程序之上,但在状态栏之下
- suspendLayoutParams.format = PixelFormat.RGBA_8888;
- suspendLayoutParams.flags = LayoutParams.FLAG_NOT_TOUCH_MODAL
- | LayoutParams.FLAG_NOT_FOCUSABLE; //悬浮窗的行为,比如说不可聚焦,非模态对话框等等
- suspendLayoutParams.gravity = Gravity.TOP; //悬浮窗的对齐方式
- suspendLayoutParams.width = screenWidth;
- suspendLayoutParams.height = buyLayoutHeight;
- suspendLayoutParams.x = 0; //悬浮窗X的位置
- suspendLayoutParams.y = myScrollViewTop; 悬浮窗Y的位置
- }
- }
- mWindowManager.addView(suspendView, suspendLayoutParams);
- }
- /**
- * 移除购买的悬浮框
- */
- private void removeSuspend() {
- if (suspendView != null) {
- mWindowManager.removeView(suspendView);
- suspendView = null;
- }
- }
- }
上面的代码比较简单,根据ScrollView滑动的距离来判断显示和移除悬浮框,悬浮框的实现主要是通过WindowManager这个类来实现的,调用这个类的addView方法用于添加一个悬浮框,removeView用于移除悬浮框。
通过上述代码就实现了美团,大众点评的这种效果,在运行项目之前我们必须在AndroidManifest.xml中加入<uses-permission android:name="android.permission.SYSTEM_ALERT_WINDOW" />
我们运行下项目看下效果吧

好了,今天的讲解到此结束,有疑问的朋友请在下面留言


 144
144

 被折叠的 条评论
为什么被折叠?
被折叠的 条评论
为什么被折叠?
 到【灌水乐园】发言


