


之前做个几个大模型的应用,都是使用Python语言,后来有一个项目使用了Java,并使用了Spring AI框架。随着Spring AI不断地完善,最近它发布了1.0正式版,意味着它已经能很好的作为企业级生产环境的使用。对于Java开发者来说真是一个福音,其功能已经能满足基于大模型开发企业级应用。借着这次机会,给大家分享一下Spring AI框架。
注意:由于框架不同版本改造会有些使用的不同,因此本次系列中使用基本框架是 Spring AI-1.0.0,JDK版本使用的是19。
代码参考: https://github.com/forever1986/springai-study
上一章讲解了ImageModel,这一章关注AudioModels(音频模型)
1 Spring AI 中的音频模型
1.1 音频转文字
音频转文字顾名思义就是上传一段音频,返回一段音频中的文字。很遗憾,目前Spring AI 并没有通用的音频转文字模型,可以看看目前已经实现的OpenAI和Azure OpenAI其分别自己实现的 OpenAiAudioTranscriptionModel 和 AzureOpenAiAudioTranscriptionModel 都是集成于最底层的Model接口,只是为了继承call方法。而其内部实现都是不太一样。我估计是因为目前各个模型厂商对于音频的请求格式还没有做到统一,因此Spring AI并无法像ChatModel、EmbedingModel或者ImageModel一样定义通用的模型。另外一个问题就是目前只有2个模型在Spring AI 中实现了,其它音频模型都没有Spring AI插件,详细后续有了标准规范,就会补充上来。
1.2 文字转音频
文字转音频顾名思义就是通过一段文字,将其转换成音频,可以通过参数调节语速、风格等等。这个也很遗憾,虽然目前Spring AI中定义了 SpeechModel 和 StreamingSpeechModel 这两种模式的文字转音频,但是目前也只有实现了OpenAI一家。同样的目前各个模型厂商对于文字转音频的请求格式还没有做到统一,因此Spring AI也很难规范化。详细后续有了标准规范,就会补充上来。
2 示例演示
2.1 音频转文字演示
代码参考lesson19子模块
示例说明:很多用户可能无法访问OpenAI,这里我发现智谱的音频模型glm-asr的访问格式基本和OpenAI一致,因此利用Open-AI插件来访问智谱的模型。当然有2点需要注意:一个是智谱的glm-asr依旧是要付费的,因此保证账号里有钱;另外一个智谱的url与Open-AI的url不太一致,需要改一下插件源码
1)新建lesson19子模块,其pom引入如下:
<dependencies>
    <dependency>
        <groupId>org.springframework.boot</groupId>
        <artifactId>spring-boot-starter-web</artifactId>
    </dependency>
    <dependency>
        <groupId>org.springframework.ai</groupId>
        <artifactId>spring-ai-starter-model-openai</artifactId>
    </dependency>
</dependencies>
2)配置application.properties文件
spring.ai.openai.api-key=你的智谱模型的API KEY
spring.ai.openai.base-url=https://open.bigmodel.cn/api/paas
3)创建演示类AudioTranscriptionController :
import org.springframework.ai.audio.transcription.AudioTranscriptionPrompt;
import org.springframework.ai.audio.transcription.AudioTranscriptionResponse;
import org.springframework.ai.openai.OpenAiAudioTranscriptionModel;
import org.springframework.ai.openai.OpenAiAudioTranscriptionOptions;
import org.springframework.ai.openai.api.OpenAiAudioApi;
import org.springframework.beans.factory.annotation.Autowired;
import org.springframework.core.io.ClassPathResource;
import org.springframework.core.io.Resource;
import org.springframework.web.bind.annotation.GetMapping;
import org.springframework.web.bind.annotation.RestController;

@RestController
public class AudioTranscriptionController {

    private final OpenAiAudioTranscriptionModel openAiAudioTranscriptionModel;

    @Autowired
    public AudioTranscriptionController(OpenAiAudioTranscriptionModel openAiAudioTranscriptionModel) {
        this.openAiAudioTranscriptionModel = openAiAudioTranscriptionModel;
    }

    @GetMapping("/ai/audioTranscription")
    public String generate() {

        // 返回翻译之后的格式,VTT是一种字幕文件格式,你可以选择其它的,比如json、text、srt等
        OpenAiAudioApi.TranscriptResponseFormat responseFormat = OpenAiAudioApi.TranscriptResponseFormat.VTT;

        // 配置语音的属性,包括语言、提示文字、温度等
        OpenAiAudioTranscriptionOptions transcriptionOptions = OpenAiAudioTranscriptionOptions.builder()
                .model("glm-asr")
                .language("中文")
                .prompt("请将语音附件访问为文字。")
                .temperature(0f)
                .responseFormat(responseFormat)
                .build();
        // 语音文件
        Resource resource = new ClassPathResource("data/output.wav");
        // 组织提示请求参数
        AudioTranscriptionPrompt transcriptionRequest = new AudioTranscriptionPrompt(resource, transcriptionOptions);
        // 转文字
        AudioTranscriptionResponse response = openAiAudioTranscriptionModel.call(transcriptionRequest);

        return response.getResult().getOutput();
    }
}
4)准备一段语音:不能超过25M且长度在60秒以内

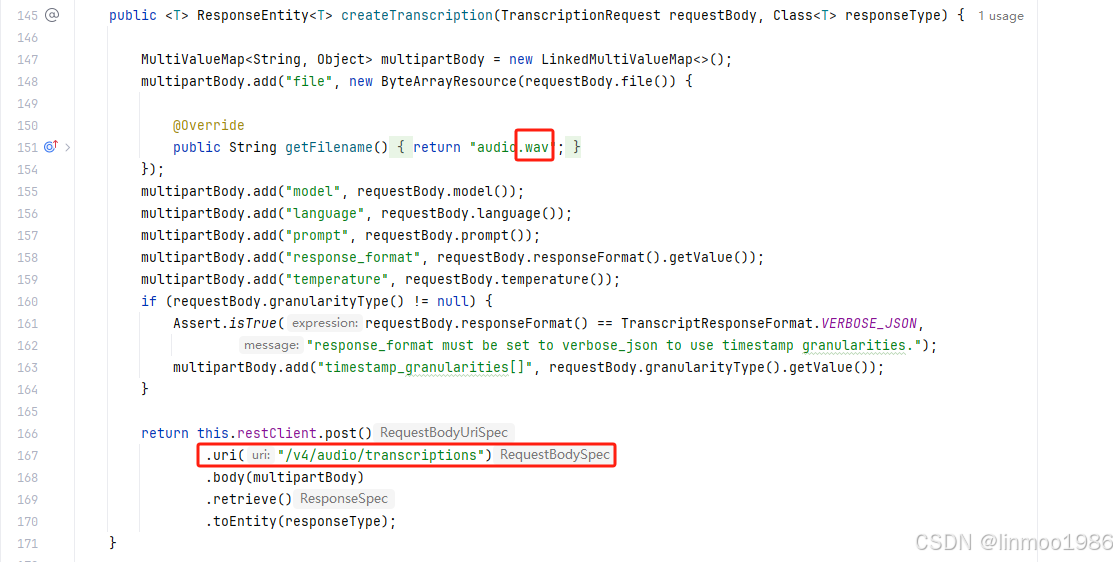
5)改动Open-AI插件的OpenAiAudioApi类源码(见lesson19的代码,这里就不贴)
说明:这里教教大家一个重写源码,但是不用重新编译jar的方法。就是写一个包名和类名与源码的类一致的类,它就会覆盖源码的类。这里复制OpenAiAudioApi类,在lesson19子模块中创建该类,该类所在的package一定要保证与OpenAiAudioApi一致。需要改动以下两个地方:
6)新建启动类Lesson19Application :
import org.springframework.boot.SpringApplication;
import org.springframework.boot.autoconfigure.SpringBootApplication;

@SpringBootApplication
public class Lesson19Application {

    public static void main(String[] args) {
        SpringApplication.run(Lesson19Application.class, args);
    }

}
7)演示效果
http://localhost:8080/ai/audioTranscription

2.2 文字转音频演示
代码参考lesson19子模块的AudioController
示例说明:本来也想使用智谱的文字转语音模型glm-voice,但是由于OpenAI的tts-1模型请求参数与glm-voice模型相差过大,因此不好改造。这里就简单写一下官方文档的参考代码,并无实际演示
import org.springframework.ai.openai.OpenAiAudioSpeechModel;
import org.springframework.ai.openai.OpenAiAudioSpeechOptions;
import org.springframework.ai.openai.api.OpenAiAudioApi;
import org.springframework.ai.openai.audio.speech.SpeechPrompt;
import org.springframework.ai.openai.audio.speech.SpeechResponse;
import org.springframework.beans.factory.annotation.Autowired;
import org.springframework.web.bind.annotation.GetMapping;
import org.springframework.web.bind.annotation.RequestParam;
import org.springframework.web.bind.annotation.RestController;

import java.io.File;
import java.io.FileOutputStream;
import java.io.IOException;

@RestController
public class AudioController {

    /**
     * 需要将application.properties里面的url和apikey改为openai
     */
    private final OpenAiAudioSpeechModel openAiAudioSpeechModel;

    @Autowired
    public AudioController(OpenAiAudioSpeechModel openAiAudioSpeechModel) {
        this.openAiAudioSpeechModel = openAiAudioSpeechModel;
    }

    @GetMapping("/ai/audio")
    public void generate(@RequestParam(value = "message", defaultValue = "你怎么这样凭空污人清白……窃书不能算偷……窃书!……读书人的事,能算偷么?") String message) {
        OpenAiAudioSpeechOptions speechOptions = OpenAiAudioSpeechOptions.builder()
                .model("tts-1")
                .voice(OpenAiAudioApi.SpeechRequest.Voice.ALLOY)
                .responseFormat(OpenAiAudioApi.SpeechRequest.AudioResponseFormat.MP3)
                .speed(1.0f)
                .build();

        SpeechPrompt speechPrompt = new SpeechPrompt(message, speechOptions);
        SpeechResponse speechResponse = openAiAudioSpeechModel.call(speechPrompt);
        File file = new File("output.wav");
        try (FileOutputStream fileOutputStream = new FileOutputStream(file)){
            fileOutputStream.write(speechResponse.getResult().getOutput());
            fileOutputStream.flush();
        }catch (IOException e){
            // do something
        }
    }
}
注意:如果要运行该段代码,需要申请Open-AI的key,同时要将lesson19的application.properties里面的url和apikey改为openai
结语:本章讲了Spring AI的AudioModels音频模型,很遗憾由于目前音频的各个模型厂商还没有形成一个统一规范,因此Spring AI也没有做出太多封装,而且目前接入的只有一个Open-AI音频模型。不过相信后面会越来越好。
Spring AI系列上一章:《Spring AI 系列之二十二 - ImageModel》
Spring AI系列下一章:《Spring AI 系列之二十四 - ModerationModel》


 被折叠的 条评论
为什么被折叠?
被折叠的 条评论
为什么被折叠?
 到【灌水乐园】发言


