


flex布局_常用控件案例
这是React Native 文档地址
http://reactnative.cn/docs/0.42/getting-started.html
然后是案例 做个这种效果
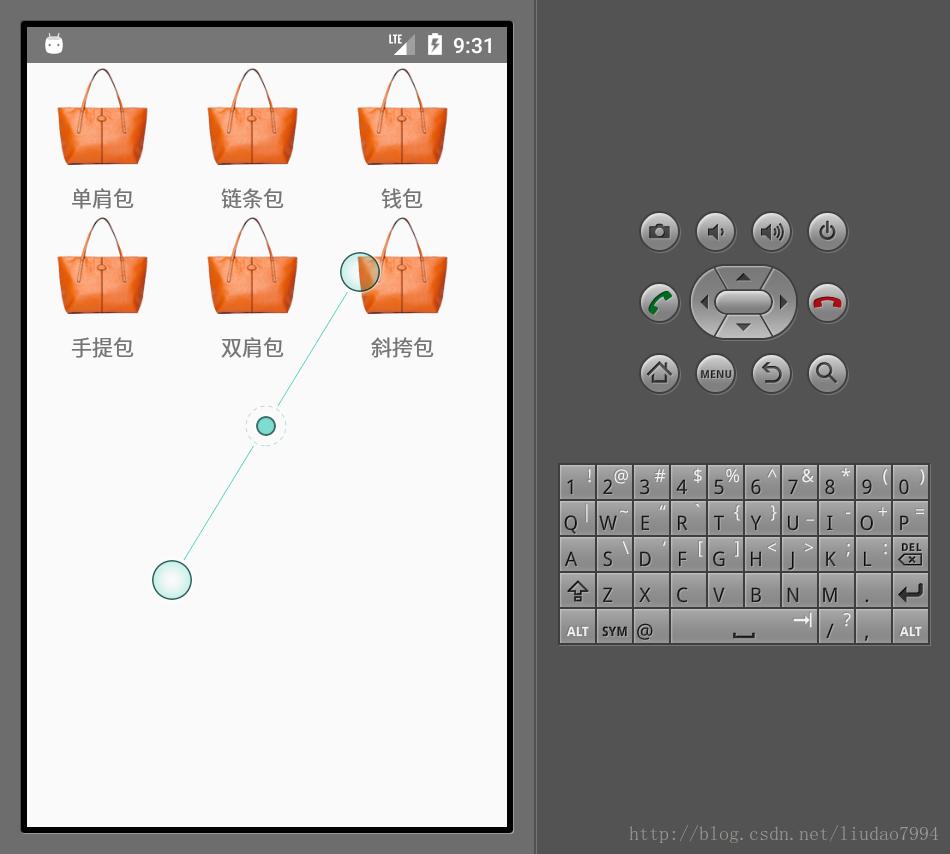
主要的js代码
/**
 * Created by liuml on 2017/5/10.
 */
import React, {Component} from "react";
import {
    StyleSheet,
    View,
    Text,
    Image

} from 'react-native'
//获取屏幕的宽度
var Dimensions = require('Dimensions');
var width = Dimensions.get('window').width;
var boxWidth = width / 3;
console.log(width);
//获取json数据
var JsonData = require('./test.json');
class BagView extends Component {

    renderBags = () => {
        return JsonData.data.map((item, i) => {
            return <View key={'wrap' + i} style={style.wrapperStyle}>
                <Image style={style.imageStyle} source={require('./images/danjianbao.png')}/>
                <Text >{item.title}</Text>
            </View>
        })
    }

    render() {
        return <View style={style.container}>
            {this.renderBags()}
        </View>;
    }
}


const style = StyleSheet.create({

    container: {
        flexDirection: 'row',
        flexWrap:'wrap' //换行
    },
    wrapperStyle: {
        flexDirection:'column', //主轴,垂直方向
        alignItems:'center', //交叉轴,居中对齐
        width: 100
    },
    imageStyle: {
        width: 80,
        height: 80

    }
});

module.exports = BagView;
然后是 调用的地方
/**
 * Sample React Native App
 * https://github.com/facebook/react-native
 * @flow
 */

import React, {Component} from 'react';
import {
    AppRegistry,
    StyleSheet,
    Text,
    View,
    Image
} from 'react-native';

/*export default class first extends Component {
 render() {
 return (
 <View style={styles.container}>
 {/!*<Text style={styles.textStyle}>*!/}
 {/!*按照数组做,按照后面的有限*!/}
 <Text style={[styles.textStyle, {width: 100, backgroundColor: '#0F0'}]}>
 文本1
 </Text>
 <Text style={[styles.textStyle, {width: 110}]}>
 文本2
 </Text>
 <Text style={[styles.textStyle, {width: 250}]}>
 文本3
 </Text>
 </View>
 );
 }
 }*/
/*export default class first extends Component {
 render() {
 return (
 <View style={styles.container}>
 {/!*<Text style={styles.textStyle}>*!/}
 {/!*按照数组做,按照后面的有限*!/}
 <Text style={[styles.textStyle, {width: 100, backgroundColor: '#0F0'}]}>
 文本1
 </Text>
 <Text style={[styles.textStyle, {width: 110, height: 30, alignSelf: 'flex-end'}]}>
 文本2
 </Text>
 <Text style={[styles.textStyle, {width: 80, height: 50, backgroundColor: '#00F'}]}>
 文本3
 </Text>
 </View>
 );
 }
 }*/


// var Dimensions = require('Dimensions');
// var width = Dimensions.get('window').width;
// var boxWidth = width / 3;
// var BagView = require('./BagView');

var BagView = require('./BagView');
var LoginView = require('./LoginView');
// export const BagView = require('./BagView');
export default class first extends Component {
    render() {
        return <BagView/>
    }
}


/*
 const styles = StyleSheet.create({
 container: {
 //flexDirection 主轴方向
 // flexDirection: 'column',// 竖
 // flexDirection:'column-reverse',//
 flexDirection: 'row',//横
 // flexDirection: 'row-reverse',
 backgroundColor: '#F5FCFF',
 flexWrap: 'wrap',
 //项目在主轴上的对齐方式
 justifyContent: 'flex-start',
 // alignItems: 'flex-start'
 // justifyContent:'flex-end'
 // justifyContent:'center'
 },
 textStyle: {
 width: 100,
 height: 30,
 backgroundColor: '#F00'

 }

 });
 */

AppRegistry.registerComponent('first', () => first);
接下来做一个登录的界面
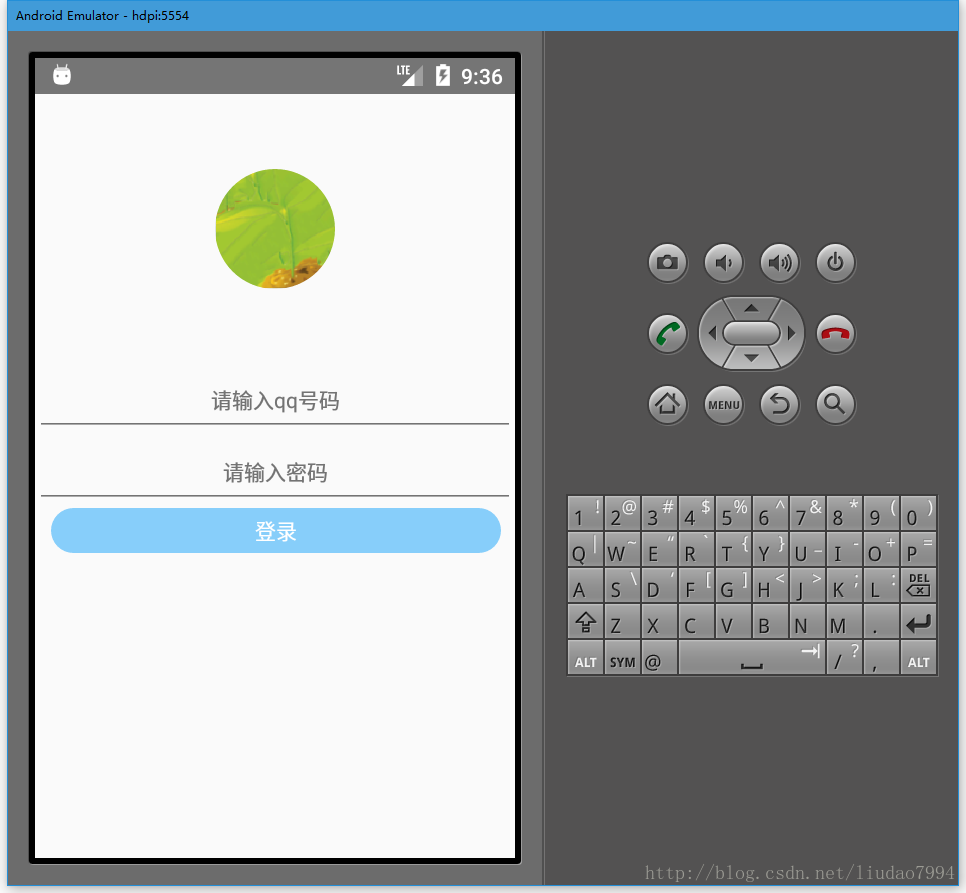
下面是主要的js代码
/**
 * Created by liuml on 2017/5/16.
 */
import React, {Component} from "react";
import {
    StyleSheet,
    View,
    Text,
    Image,
    TextInput,
    TouchableOpacity

} from 'react-native'

class LoginView extends Component {
    render() {
        return <View style={styles.container}>
            <Image source={require('./images/icon.png')} style={styles.iconStyle}></Image>
            <View style={styles.inputWarpperStyle}>
                <TextInput style={styles.inputStyle} textAlign="center" placeholder={'请输入qq号码'}></TextInput>
            </View>
            <View style={styles.inputWarpperStyle}>
                <TextInput style={styles.inputStyle} textAlign="center" secureTextEntry={true} keyboardType="numeric"
                           placeholder={'请输入密码'}></TextInput>
            </View>

            {/*可以用button 用Text尝试
             TouchableOpacity 透明度变化
             */}
            <TouchableOpacity
                activeOpacity={0.5}
            >
                <View style={styles.textWrapperStyle}>
                    <Text style={{color: '#FFFF', flex: 1, textAlign: 'center', alignSelf: 'center'}}>登录</Text>
                </View>
            </TouchableOpacity>
        </View>
    }
}

const styles = StyleSheet.create({

    container: {
        flexDirection: 'column',
        alignItems: 'center'
    },
    iconStyle: {
        width: 80,
        height: 80,
        borderRadius: 40,
        marginTop: 50,
        marginBottom: 50
    },
    inputWarpperStyle: {
        flexDirection: 'row'
    },
    inputStyle: {
        flex: 1//填满父容器
    },
    textWrapperStyle: {
        flexDirection: 'row',
        backgroundColor: '#87CEFA',
        marginLeft: 15,
        marginRight: 15,
        borderRadius: 20,
        height: 30,
        width: 300

    }
});
module.exports = LoginView;


 72
72


 被折叠的 条评论
为什么被折叠?
被折叠的 条评论
为什么被折叠?
 到【灌水乐园】发言


