


Volley
Volley简介:
我们平时在开发Android应用的时候不可避免地都需要用到网络技术,而多数情况下应用程序都会使用HTTP协议来发送和接收网络数据。Android系统中主要提供了两种方式来进行HTTP通信,HttpURLConnection和HttpClient,几乎在任何项目的代码中我们都能看到这两个类的身影,使用率非常高。
不过HttpURLConnection和HttpClient的用法还是稍微有些复杂的,如果不进行适当封装的话,很容易就会写出不少重复代码。于是乎,一些Android网络通信框架也就应运而生,比如说AsyncHttpClient,它把HTTP所有的通信细节全部封装在了内部,我们只需要简单调用几行代码就可以完成通信操作了。再比如Universal-Image-Loader,它使得在界面上显示网络图片的操作变得极度简单,开发者不用关心如何从网络上获取图片,也不用关心开启线程、回收图片资源等细节,Universal-Image-Loader已经把一切都做好了。
Android开发团队也是意识到了有必要将HTTP的通信操作再进行简单化,于是在2013年Google I/O大会上推出了一个新的网络通信框架——Volley。Volley可是说是把AsyncHttpClient和Universal-Image-Loader的优点集于了一身,既可以像AsyncHttpClient一样非常简单地进行HTTP通信,也可以像Universal-Image-Loader一样轻松加载网络上的图片。除了简单易用之外,Volley在性能方面也进行了大幅度的调整,它的设计目标就是非常适合去进行数据量不大,但通信频繁的网络操作,而对于大数据量的网络操作,比如说下载文件等,Volley的表现就会非常糟糕。
Volley原理
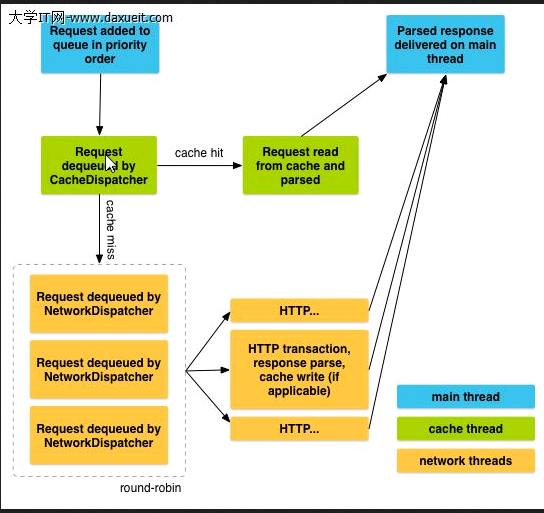
Volley的原理:在连接网络时,Volley会先在缓存中找,如果缓存中有这样的响应,就直接返回给UI,如果没有就去线程缓存池中找线程,在线程缓存池中的线程个数是有限的,如果没有线程,就新建立一个线程。如果有就等待这个线程完成任务,然后获得返回值信息。而不是新建一个线程。如下图所示:
Volley的导入:
android Studio在项目中右键——>open Modul Setting——>Depending——>‘+’——>files library 搜索Volley下载就可以了。
StringRequest的用法
1)建立一个响应队列
2)建立一个响应,第一个参数为;响应方法:POST,GET。第二个参数为Url,第三个为:响应成功时执行,第四个为失败时执行
3)将响应加入响应队列
注意:不要忘记导包:在项目中右键——>open Modul Setting——>Depending——>+——files library 搜索Volley下载就可以了。
4)如果是POST方法则建立一个StringRequest的匿名内部类,复写getParams()方法,在这个方法中建立一个map容器,将数据加载到map中,最后返回map就可以了。
代码如下:
GET方法:
RequestQueue queue = Volley.newRequestQueue(this);//建立一个相应队列
                //建立一个响应,第一个参数为;响应方法:POST,GET。第二个参数为Url,第三个为:响应成功时执行,第四个为失败时执行
                 StringRequest request = new StringRequest(Request.Method.GET, "http://360.com", new Response.Listener<String>() {
                    @Override
                    public void onResponse(String response) {
                            textView_Volley.setText(response);
                    }
                }, new Response.ErrorListener() {
                    @Override
                    public void onErrorResponse(VolleyError error) {
                        textView_Volley.setText("错误");
                    }
                });
                queue.add(request);//将响应加入响应队列
POST方法:
 RequestQueue queue = Volley.newRequestQueue(this);//建立一个相应队列
                //建立一个响应,第一个参数为;响应方法:POST,GET。第二个参数为Url,第三个为:响应成功时执行,第四个为失败时执行
                 StringRequest request = new StringRequest(Request.Method.POST, "http://192.168.0.43:8080/www/MyserverTest", new Response.Listener<String>() {
                    @Override
                    public void onResponse(String response) {
                            textView_Volley.setText(response);
                    }
                }, new Response.ErrorListener() {
                    @Override
                    public void onErrorResponse(VolleyError error) {
                        textView_Volley.setText("错误");
                    }
                }){
                     @Override
                     protected Map<String, String> getParams() throws AuthFailureError {
                        Map<String,String> map = new HashMap<>();
                         map.put("name","xiaoming");
                         map.put("password","123");
                         return map;
                     }
                 };
                queue.add(request);//将响应加入响应队列
单例设计模式
Volley可以避免建立许多的线程去请求网络,但它不能避免建立多个RequestQueue ,所以我们一般是用单例模式去创建RequestQueue 的实例。代码如下:
public class Mysinger {
        private static Mysinger mysinger;
        private static RequestQueue requestQueue;

        public static RequestQueue getRequestQueue() {
            return requestQueue;
        }

        private  Mysinger (Context context){
            requestQueue = Volley.newRequestQueue(context);
        }

        public static synchronized  Mysinger getInstance( Context context){
            if(mysinger==null){
                mysinger= new Mysinger(context);
            }

            return mysinger;


        }

}
下面这个也是单例模式程序:
public class MySingleton {
    private static MySingleton mInstance;//静态的方法里只能用到静态的变量
    private RequestQueue mRequestQueue;
    private ImageLoader mImageLoader;
    private static Context mCtx;

    private MySingleton(Context context) {
        mCtx = context;
        mRequestQueue = getRequestQueue();

        mImageLoader = new ImageLoader(mRequestQueue,
                new ImageLoader.ImageCache() {
                    private final LruCache<String, Bitmap>
                            cache = new LruCache<String, Bitmap>(20);

                    @Override
                    public Bitmap getBitmap(String url) {
                        return cache.get(url);
                    }

                    @Override
                    public void putBitmap(String url, Bitmap bitmap) {
                        cache.put(url, bitmap);
                    }
                });

    }

    public static synchronized MySingleton getInstance(Context context) {
    //静态方法可以直接用类名调用该方法,不需要new一个新对象了——MySingleton.getInstance(getApplicationContext()).addToRequestQueue(request);
        if (mInstance == null) {
            mInstance = new MySingleton(context);//创建一个实例
        }
        return mInstance;
    }

    public RequestQueue getRequestQueue() {
        if (mRequestQueue == null) {
            mRequestQueue = Volley.newRequestQueue(mCtx.getApplicationContext());
        }
        return mRequestQueue;
    }

    public <T> void addToRequestQueue(Request<T> req) {
        getRequestQueue().add(req);
    }

    public ImageLoader getImageLoader() {
        return mImageLoader;
    }

}
HttpUtils
HttpUtils也是连接网络的一种框架,也是分为POST方法和GET方法。
注意要导包,在android Studio在项目中右键——>open Modul Setting——>Depending——>‘+’——>files library 搜索xutils下载就可以了。有时还不起作用,运行一下就可以了。
代码如下:
HttpUtils client = new HttpUtils();
                client.send(HttpRequest.HttpMethod.GET, "http://www.baidu.com", new RequestCallBack<String>() {
                    @Override
                    public void onSuccess(ResponseInfo<String> responseInfo) {
                        utils_textView.setText(responseInfo.result);
                    }

                    @Override
                    public void onFailure(HttpException e, String s) {
                        utils_textView.setText("错误");
                    }
                });
POST方法:
HttpUtils client = new HttpUtils();
                RequestParams params = new RequestParams();
                params.addBodyParameter("name", "liujiaorui");
                params.addBodyParameter("password", "12qa");
                client.send(HttpRequest.HttpMethod.POST, "http://192.168.0.198:8080/MyAndroidServlet/MyServlet", params, new RequestCallBack<String>() {
                    @Override
                    public void onSuccess(ResponseInfo<String> responseInfo) {
                        mTextViewcontent.setText(responseInfo.result);
                    }

                    @Override
                    public void onFailure(HttpException e, String s) {
                        mTextViewcontent.setText("网络连接错误");
                    }
                });
省略findViewById()和点击事件的.setOnClickListener(this);
当我们导入xutils包后,可以利用注解机制省略很多代码,例如每个控件的findViewById()和点击事件的.setOnClickListener(this);
1)在Activity中给声明的控件加注解,例如:
 @ViewInject(R.id.util_button)
    private Button utils_button;
    @ViewInject(R.id.textView_utils)
    private TextView utils_textView;
这里@ViewInject(R.id.util_button)的util_button为XML中的控件的id。
2)如果想给控件加点击事件,则可以不用加.setOnClickListener(this);
而是在onCreat()加上
ViewUtils.inject(this);然后再 ViewUtils.inject(this);的上面加上要加控件点击事件的数组就可以了:
@OnClick({R.id.util_button,R.id.dd})这样就省略了很多的方法。
DbUtils
DbUtils主要用于对数据库的查询;
可以通过DbUtils实现轻松的数据库查询,
1)新建一个类,例如User。在类的上面@Table(name = “user”)。注意:user为要访问的表格的名称。
2)新建变量,这里的变量名与表格的字段名保持一致。必须在id字段的上面 @Column(column = “id”)这里的id也与表格的名字对应。
3)在Activity的点击事件的查询事件中。输入一下代码:
 //建立DbUtils对象,MY_BASE.db为数据库的名字
                DbUtils dbUtils= DbUtils.create(this,"MY_BASE.db");
                try {
                    //用DbUtils调用各种方法进行查询,并将查询的结果放到装User的List中。
                 List<User>  users=dbUtils.findAll(com.lidroid.xutils.db.sqlite.Selector.from(User.class));
                    //对查询的结果进行打印
                    for(User user:users){
                        Log.d("aaaaaaaaa","用户名"+user.getName()+"密码"+user.getPassword());
                    }

                } catch (DbException e) {
                    e.printStackTrace();
                }
User程序
/**
 * Created by Administrator on 2015/9/14.
 */
@Table(name="user")
public class User {
    @Column(column="id")
    private String id;
    private String name;
    private String password;

    public String getId() {
        return id;
    }

    public void setId(String id) {
        this.id = id;
    }

    public String getPassword() {
        return password;
    }

    public void setPassword(String password) {
        this.password = password;
    }

    public String getName() {
        return name;
    }

    public void setName(String name) {
        this.name = name;
    }
}在Java里面DbUtils的详细的用法——[点击查看](http://xace.iteye.com/blog/711123)


 690
690


 被折叠的 条评论
为什么被折叠?
被折叠的 条评论
为什么被折叠?
 到【灌水乐园】发言


