


一)日期选择器
日期选择器控件的使用很简单
new DatePickerDialog(ChooseDate.this, new OnDateSetListener() {
@Override
public void onDateSet(DatePicker view, int year, int monthOfYear, int dayOfMonth) {
String date=String.format("%d-%d-%d", year,monthOfYear+1,dayOfMonth);
btn.setText(date);
}
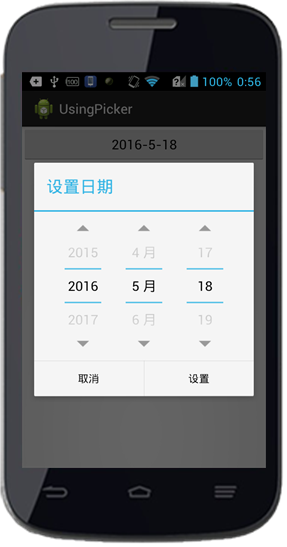
},2016, 4, 18).show();我们把这个时间的触发放在一个按钮点击事件里,当我们点击按钮后就会出现这样的日期选择器,我们选择好点击设置就会把时间显示在按钮上,代码里之所以把月份加以一,是因为如果点击5月,系统返回值会小一个月(从0算起),所以为了看的方便,加一更准确。
二)时间选择器
时间选择器的使用和日期选择器大同小异
new TimePickerDialog(ChooseDate.this, new TimePickerDialog.OnTimeSetListener() {

				@Override
				public void onTimeSet(TimePicker view, int hourOfDay, int minute) {
                       		String time=String.format("%d:%d",hourOfDay,minute);
                       		btn.setText(time);
				}
			}, 0, 0, true).show();
三)单项选择器
布局文件如下
<?xml version="1.0" encoding="utf-8"?>
<LinearLayout xmlns:android="http://schemas.android.com/apk/res/android"
android:layout_width="match_parent"
android:layout_height="match_parent"
android:orientation="vertical" >
<TextView
android:layout_width="match_parent"
android:layout_height="wrap_content"
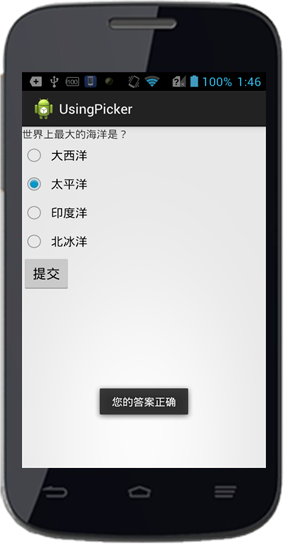
android:text="世界上最大的海洋是?">
</TextView>
<RadioGroup
android:id="@+id/radioGroup1"
android:layout_width="wrap_content"
android:layout_height="wrap_content" >
<RadioButton
android:id="@+id/radio0"
android:layout_width="wrap_content"
android:layout_height="wrap_content"
android:checked="true"
android:text="大西洋" />
<RadioButton
android:id="@+id/radioButton3"
android:layout_width="wrap_content"
android:layout_height="wrap_content"
android:text="太平洋" />
<RadioButton
android:id="@+id/radio1"
android:layout_width="wrap_content"
android:layout_height="wrap_content"
android:text="印度洋" />
<RadioButton
android:id="@+id/radio2"
android:layout_width="wrap_content"
android:layout_height="wrap_content"
android:text="北冰洋" />
</RadioGroup>
<Button
android:id="@+id/btn"
android:layout_width="wrap_content"
android:layout_height="wrap_content"
android:text="提交"/>
</LinearLayout>然后对正确答案判断一下
	if(rbtn.isChecked()){
				Toast.makeText(ChooseDate.this, "您的答案正确",Toast.LENGTH_SHORT).show();
			}
四)多项选择
一:多项选择器1)布局文件:添加了四个CheckBox选项,一个位于顶部的TextView用于显示问题,一个位于底部的TextView用于显示结果
<?xml version="1.0" encoding="utf-8"?><LinearLayout xmlns:android="http://schemas.android.com/apk/res/android"    android:orientation="vertical" android:layout_width="match_parent"    android:layout_height="match_parent">
   <TextView
 android:layout_width="wrap_content"
 android:layout_height="wrap_content"
 android:text="你最喜欢吃的食物是?"
 android:textSize="30dp"/>
<CheckBox
android:layout_width="wrap_content"
android:layout_height="wrap_content"
android:text="肉夹馍"
android:id="@+id/cb1"/>
<CheckBox
android:layout_width="wrap_content"
android:layout_height="wrap_content"
android:text="火龙果"
android:id="@+id/cb2"/>
<CheckBox
 android:layout_width="wrap_content"
 android:layout_height="wrap_content"
 android:text="炸鸡柳"
 android:id="@+id/cb3"/>
<CheckBox
android:layout_width="wrap_content"
android:layout_height="wrap_content"
android:text="柠檬水"
android:id="@+id/cb4"/>
<TextView
android:layout_width="wrap_content"
android:layout_height="wrap_content"
android:textSize="30dp"
android:text="结果"
android:id="@+id/btResult"/>
</LinearLayout>
2)引入CompoundButton.OnCheckedChangeListener接口,重写onCheckedChangedListener()
package demo.com.myapplication;import android.os.Bundle;
import android.support.v7.app.AppCompatActivity;import android.widget.Button;
import android.widget.CheckBox;import android.widget.CompoundButton;
import android.widget.TextView;
/** * Created by dell on 2016/5/7. */
public class MulChoose extends AppCompatActivity implements CompoundButton.OnCheckedChangeListener{ private CheckBox cb1,cb2,cb3,cb4;
private TextView tvResult;
@Override protected void onCreate(Bundle savedInstanceState) { super.onCreate(savedInstanceState);
setContentView(R.layout.mulchoose);
cb1= (CheckBox) findViewById(R.id.cb1);
cb2= (CheckBox) findViewById(R.id.cb2);
cb3= (CheckBox) findViewById(R.id.cb3);
cb4= (CheckBox) findViewById(R.id.cb4);
tvResult= (TextView) findViewById(R.id.btResult);
cb1.setOnCheckedChangeListener(this);
cb2.setOnCheckedChangeListener(this);
cb3.setOnCheckedChangeListener(this);
cb4.setOnCheckedChangeListener(this); }
@Override
public void onCheckedChanged(CompoundButton buttonView, boolean isChecked) {
String str="你喜欢";
if (cb1.isChecked()){ str+=cb1.getText()+","; }
if (cb2.isChecked()){ str+=cb2.getText()+","; }
if (cb3.isChecked()){ str+=cb3.getText()+","; }
if (cb4.isChecked()){ str+=cb4.getText()+"."; }
tvResult.setText(str);
}


 1653
1653

 被折叠的 条评论
为什么被折叠?
被折叠的 条评论
为什么被折叠?
 到【灌水乐园】发言


