


你是否在做一款游戏的时候想创造一些怪兽或者游戏主角,让它们移动到特定的位置,避开墙壁和障碍物呢?
如果是的话,请看这篇教程,我们会展示如何使用A星寻路算法来实现它!
在网上已经有很多篇关于A星寻路算法的文章,但是大部分都是提供给已经了解基本原理的高级开发者的。
本篇教程将从最基本的原理讲起。我们会一步步讲解A星寻路算法,幷配有很多图解和例子。
不管你使用的是什么编程语言或者操作平台,你会发现本篇教程很有帮助,因为它在非编程语言的层面上解释了算法的原理。稍后,会有一篇教程,展示如何在Cocos2D iPhone 游戏中实现A星算法。
现在找下到达一杯咖啡因饮料和美味的零食的最短路径,开始吧!:]
一只探路猫
让我们想象一下,有一款游戏,游戏中一只猫想要找到获取骨头的路线。
“为什么会有一只猫想要骨头?!”你可能会这么想。在本游戏中, 这是一只狡猾的猫,他想捡起骨头给狗,以防止被咬死!:]
现在想像一下下图中的猫想找到到达骨头的最短路径:

不幸的是,猫不能直接从它当前的位置走到骨头的位置,因为有面墙挡住了去路,而且它在游戏中不是一只幽灵猫!
游戏中的猫同样懒惰,它总是想找到最短路径,这样当他回家看望它的女朋友时不会太累:-)
但是我们如何编写一个算法计算出猫要选择的那条路径呢?A星算法拯救了我们!
简化搜索区域
寻路的第一步是简化成容易控制的搜索区域。
怎么处理要根据游戏来决定了。例如,我们可以将搜索区域划分成像素点,但是这样的划分粒度对于我们这款基于方块的游戏来说太高了(没必要)。
作为代替,我们使用方块(一个正方形)作为寻路算法的单元。其他的形状类型也是可能的(比如三角形或者六边形),但是正方形是最简单并且最适合我们需求的。
像那样去划分,我们的搜索区域可以简单的用一个地图大小的二维数组去表示。所以如果是25*25方块大小的地图,我们的搜索区域将会是一个有625个正方形的数组。如果我们把地图划分成像素点,搜索区域就是一个有640,000个正方形的数组了(一个方块是32*32像素)!
现在让我们基于目前的区域,把区域划分成多个方块来代表搜索空间(在这个简单的例子中,7*6个方块 = 42 个方块):

Open和Closed列表
既然我们创建了一个简单的搜索区域,我们来讨论下A星算法的工作原理吧。
除了懒惰之外,我们的猫没有好的记忆力,所以它需要两个列表:
- 一个记录下所有被考虑来寻找最短路径的方块(称为open 列表)
- 一个记录下不会再被考虑的方块(成为closed列表)
猫首先在closed列表中添加当前位置(我们把这个开始点称为点 “A”)。然后,把所有与它当前位置相邻的可通行小方块添加到open列表中。
下图是猫在某一位置时的情景(绿色代表open列表):

现在猫需要判断在这些选项中,哪项才是最短路径,但是它要如何去选择呢?
在A星寻路算法中,通过给每一个方块一个和值,该值被称为路径增量。让我们看下它的工作原理!
路径增量
我们将会给每个方块一个G+H 和值:
- G是从开始点A到当前方块的移动量。所以从开始点A到相邻小方块的移动量为1,该值会随着离开始点越来越远而增大。
- H是从当前方块到目标点(我们把它称为点B,代表骨头!)的移动量估算值。这个常被称为探视,因为我们不确定移动量是多少 – 仅仅是一个估算值。
你也许会对“移动量”感兴趣。在游戏中,这个概念很简单 – 仅仅是方块的数量。
然而,在游戏中你可以对这个值做调整。例如:
- 如果你允许对角线移动,你可以针对对角线移动把移动量调得大一点。
- 如果你有不同的地形,你可以将相应的移动量调整得大一点 – 例如针对一块沼泽,水,或者猫女海报:-)
这就是大概的意思 – 现在让我们详细分析下如何计算出G和H值。
关于G值
G是从开始点A到达当前方块的移动量(在本游戏中是指方块的数目)。
为了计算出G的值,我们需要从它的前继(上一个方块)获取,然后加1。所以,每个方块的G值代表了从点A到该方块所形成路径的总移动量。
例如,下图展示了两条到达不同骨头的路径,每个方块都标有它的G值:

关于H值
H值是从当前方块到终点的移动量估算值(在本游戏中是指方块的数目)。
移动量估算值离真实值越接近,最终的路径会更加精确。如果估算值停止作用,很可能生成出来的路径不会是最短的(但是它可能是接近的)。这个题目相对复杂,所以我们不会再本教程中讲解,但是我在教程的末尾提供了一个网络链接,对它做了很好的解释。
为了让它更简单,我们将使用“曼哈顿距离方法”(也叫“曼哈顿长”或者“城市街区距离”),它只是计算出距离点B,剩下的水平和垂直的方块数量,略去了障碍物或者不同陆地类型的数量。
例如,下图展示了使用“城市街区距离”,从不同的开始点到终点,去估算H的值(黑色字):

A星算法
既然你知道如何计算每个方块的和值(我们将它称为F,等于G+H), 我们来看下A星算法的原理。
猫会重复以下步骤来找到最短路径:
- 将方块添加到open列表中,该列表有最小的和值。且将这个方块称为S吧。
- 将S从open列表移除,然后添加S到closed列表中。
- 对于与S相邻的每一块可通行的方块T:
- 如果T在closed列表中:不管它。
- 如果T不在open列表中:添加它然后计算出它的和值。
- 如果T已经在open列表中:当我们使用当前生成的路径到达那里时,检查F 和值是否更小。如果是,更新它的和值和它的前继。
如果你对它的工作原理还有点疑惑,不用担心 – 我们会用例子一步步介绍它的原理!:]
猫的路径
让我们看下我们的懒猫到达骨头的行程例子。
在下图中,我根据以下内容,列出了公式F = G + H 中的每项值:
- F(方块的和值):左上角
- G(从A点到方块的移动量):左下角
- H(从方块到B点的估算移动量): 右下角
同时,箭头指示了到达相应方块的移动方向。
最后,在每一步中,红色方块表示closed列表,绿色方块表示open列表。
好的,我们开始吧!
第一步
第一步,猫会确定相对于开始位置(点A)的相邻方块,计算出他们的F和值,然后把他们添加到open列表中:

你会看到每个方块都列出了H值(有两个是6,一个是4)。我建议根据“城市街区距离”去计算方块的相关值,确保你理解了它的原理。
同时注意F值(在左上角)是G(左下角)值和H(右下脚)值的和。
第二步
在第二步中,猫选择了F和值最小的方块,把它添加到closed列表中,然后检索它的相邻方块的相关数值。

现在你将看到拥有最小增量的是F值为4的方块。猫尝试添加所有相邻的方块到open列表中(然后计算他们的和值),除了猫自身的方块不能添加以外(因为它已经被添加到了closed列表中)或者它是墙壁方块(因为它不能通行)。
注意被添加到open列表的两个新方块,他们的G值都增加了1,因为他们现在离开始点有2个方块远了。你也许需要再计算下“城市街区距离”以确保你理解了每个新方块的H值。
第三步
再次,我们选择了有最小F和值(5)的方块,继续重复之前的步骤:

现在,只有一个可能的方块被添加到open列表中了,因为已经有一个相邻的方块在close列表中,其他两个是墙壁方块。
第四步
现在我们遇到了一个有趣的情况。正如你之前看到的,有4个方块的F和值都为7 – 我们要怎么做呢?!
有几种解决方法可以使用,但是最简单(快速)的方法是一直跟着最近被添加到open列表中的方块。现在继续沿着最近被添加的方块前进。

这次有两个可通过的相邻方块了,我们还是像之前那样计算他们的和值。
第五步
接着我们选择了最小和值(7)的方块,继续重复之前的步骤:

我们越来越接近终点了!
第六步
你现在训练有素了!我打赌你能够猜出下一步是下面这样子了:

我们差不多到终点了,但是这次你看到有两条到达骨头的最短路径提供给我们选择:

在我们的例子中,有两条最短路径:
- 1-2-3-4-5-6
- 1-2-3-4-5-7
It doesn’t really matter which of these we choose, it comes down to the actual implementation in code.
选择哪一条其实没关系,现在到了真正用代码实现的时候了。
第七步
让我们从其中一块方块,再重复一遍步骤吧:

啊哈,骨头在open列表中了!
第八步
现在目标方块在open列表中了,算法会把它添加到closed列表中:

然后,算法要做的所有事情就是返回,计算出最终的路径!

一只有远见的猫
在上面的例子中,我们看到当猫在寻找最短路径时,它经常选择更好的方块(那个在它的未来最短路径上的方块)- 好像它是一只有远见的猫!
但是如果猫是盲目的,并且总是选择第一个添加到它的列表上的方块,会发生什么事情?
下图展示了所有在寻找过程中会被使用到的方块。你会看到猫在尝试更多的方块,但是它仍然找到了最短路径(不是之前的那条,而是另一条等价的):

图中的红色方块不代表最短路径,它们只是代表在某个时候被选择为“S”的方块。
我建议你看着上面的图,并且尝试过一遍步骤。这次无论你看到哪个相邻的方块,都选择“最坏”的方式去走。你会发现最后还是找到了最短路径!
所以你可以看到跟随一个“错误的”方块是没有问题的,你仍然会在多次重复尝试后找到最短路径。
所以在我们的实现中,我们会按照以下的算法添加方块到open列表中:
- 相邻的方块会返回这些顺序: 上面/左边/下面/右边。
- 当所有的方块都有相同的和值后,方块会被添加到open列表中(所以第一个被添加的方块是第一个被猫挑选的)。
下面是从原路返回的示意图:

最短的路径是从终点开始,一步步返回到起点构成的(例子:在终点我们可以看到箭头指向右边,所以该方块的前继在它的左边)。
总的来说,我们可以用下面的伪代码,合成猫的寻找过程。这是Objective-C写的,但是你可以用任何的语言去实现它:
- [openList add:originalSquare]; // start by adding the original position to the open list
- do {
- currentSquare = [openList squareWithLowestFScore]; // Get the square with the lowest F score
- [closedList add:currentSquare]; // add the current square to the closed list
- [openList remove:currentSquare]; // remove it to the open list
- if ([closedList contains:destinationSquare]) { // if we added the destination to the closed list, we've found a path
- // PATH FOUND
- break; // break the loop
- }
- adjacentSquares = [currentSquare walkableAdjacentSquares]; // Retrieve all its walkable adjacent squares
- foreach (aSquare in adjacentSquares) {
- if ([closedList contains:aSquare]) { // if this adjacent square is already in the closed list ignore it
- continue; // Go to the next adjacent square
- }
- if (![openList contains:aSquare]) { // if its not in the open list
- // compute its score, set the parent
- [openList add:aSquare]; // and add it to the open list
- } else { // if its already in the open list
- // test if using the current G score make the aSquare F score lower, if yes update the parent because it means its a better path
- }
- }
- } while(![openList isEmpty]); // Continue until there is no more available square in the open list (which means there is no path)
下面添加A星寻路算法到简单的Cocos2D游戏中!

在本篇教程中,你将学到如何在一款简单的cocos2D游戏中使用A星寻路算法。
在学习本篇教程之前,如果你先阅读A星寻路算法介绍将会有所帮助。该文章图文并茂的介绍了这个我们将要实现的算法的基本概念。
在学习本篇教程之前,如果你有Cocos2D的iOS开发经验,将会有所帮助。如果没有也没关系,因为你可以将这里讲解的例子迁移到其他的语言或者框架中。
找到到达你键盘的最短路径,开始吧!:]
![]()
Maze猫
首先介绍下我们将要在本篇教程中开发的简单游戏。
前往下载本篇教程的工程代码。编译运行工程,你将看到以下画面。

在这款游戏中,你扮演着一只小偷猫,在一个由危险的狗守护着的地牢里小心穿行。如果你试图穿过一只狗,他会把你吃掉 – 除非你可以用骨头去贿赂它!
所以在这款游戏中,你的任务是尝试以正确的顺序捡起骨头,然后 寻找路线 穿过狗逃离。
注意到猫只能水平或者垂直的移动(例如不能斜线移动),并且会从一个方块的中心点移动到另一个中心点。每个方块既可以是可通行的也可以是不可通行的。
尝试下这款游戏,看看你能否找到出路!建议你阅读代码以熟悉它的原理。这是一款相当普通的方块-地图式游戏,我们会在接下来的教程中修改它并使用上A星寻路算法。
Maze猫和A星概览
正如你所看到的,当你点击地图某处时,猫会沿着你点击的方向跳到相邻的方块上。
我们想对程序做修改,让猫持续的往你点击的方块方向前进,就像许多RPGs或者point-and-click冒险类游戏。
让我们看下控制触摸事件代码的工作原理。如果你打开HelloWorldLayer.m文件,你将看到像下面这样去实现触摸操作:
- - (void)registerWithTouchDispatcher {
- [[CCTouchDispatcher sharedDispatcher] addTargetedDelegate:self priority:0 swallowsTouches:YES];
- }
- - (BOOL)ccTouchBegan:(UITouch *)touch withEvent:(UIEvent *)event {
- if (_gameOver) return NO;
- CGPoint touchLocation = [_tileMap convertTouchToNodeSpace:touch];
- [_cat moveToward:touchLocation];
- return YES;
- }
我们现在要做的是修改在CatSprite.m文件中的以下方法,寻找到达该点的最短路径,并且开始前进:
- - (void)moveToward:(CGPoint)target {
- // Figure out the shortest path to the target, and start following it!
- }
创建ShortestPathStep类
我们开始创建一个内部类,代表路径上的一步操作。在这种情况下,它是一个方块和由A星算法计算出来的的F,G和H scores。
现在添加以下代码到CatSprite.m文件的顶部(在CatSprite的 @implementation上面):
- // A class that represents a step of the computed path
- @interface ShortestPathStep : NSObject
- {
- CGPoint position;
- int gScore;
- int hScore;
- ShortestPathStep *parent;
- }
- @property (nonatomic, assign) CGPoint position;
- @property (nonatomic, assign) int gScore;
- @property (nonatomic, assign) int hScore;
- @property (nonatomic, assign) ShortestPathStep *parent;
- - (id)initWithPosition:(CGPoint)pos;
- - (int)fScore;
- @end
- 方块的坐标
- G score(记住,这是开始点到当前点之间的方块数目)
- H score (记住,这是当前点到终点之间的方块估算值)
- ShortestPathStep是它自身的前继
- F score,是方块的score值(它是F和G的和).
现在我们在CatSprite.m文件中添加实现代码(在@end上面).
- @implementation ShortestPathStep
- @synthesize position;
- @synthesize gScore;
- @synthesize hScore;
- @synthesize parent;
- - (id)initWithPosition:(CGPoint)pos
- {
- if ((self = [super init])) {
- position = pos;
- gScore = 0;
- hScore = 0;
- parent = nil;
- }
- return self;
- }
- - (NSString *)description
- {
- return [NSString stringWithFormat:@"%@ pos=[%.0f;%.0f] g=%d h=%d f=%d", [super description], self.position.x, self.position.y, self.gScore, self.hScore, [self fScore]];
- }
- - (BOOL)isEqual:(ShortestPathStep *)other
- {
- return CGPointEqualToPoint(self.position, other.position);
- }
- - (int)fScore
- {
- return self.gScore + self.hScore;
- }
- @end
这方法的思路相当直接。我们重新定义了description方法,以方便debugging操作,然后创建了isEquals方法,当且仅当两个 ShortestPathSteps的CGPoint值相等时,它们相等(例如它们都代表同一个方块)。
创建Open和Closed列表
接下来我们使用两个NSMutableArray去记录open和closed列表。
你可能会奇怪为什么不使用NSMutableSet. 这里有两个原因:
- NSMutableSet 的内部项不是排序的,但是我们希望列表按照F score的值去排列,以便于快速搜索。
- NSMutableSet 不会在ShortestPathStep上调用isEqual方法去测试两个项是否相等(但是我们需要这么做)。
现在我们在CatSprite.h文件中添加那些数组的定义:
- @interface CatSprite : CCSprite {
- //...
- @private
- NSMutableArray *spOpenSteps;
- NSMutableArray *spClosedSteps;
- }
然后在CatSprite.m文件中做以下修改:
- // Add to top of file
- // Private properties and methods
- @interface CatSprite ()
- @property (nonatomic, retain) NSMutableArray *spOpenSteps;
- @property (nonatomic, retain) NSMutableArray *spClosedSteps;
- @end
- // Add after @implementation CatSprite
- @synthesize spOpenSteps;
- @synthesize spClosedSteps;
- // Add inside initWithLayer
- self.spOpenSteps = nil;
- self.spClosedSteps = nil;
- //Add dealloc method to CatSprite
- - (void)dealloc
- {
- [spOpenSteps release]; spOpenSteps = nil;
- [spClosedSteps release]; spClosedSteps = nil;
- [super dealloc];
- }
准备步骤结束了,现在重新实现moveToward方法吧。
首先我们在在方块坐标中获取当前位置(point A)和目标位置(point B)。然后检查是否需要去计算一条路径,最后测试目标位置是否可到达(目前只有墙壁是不可以通行的)。
现在用以下代码替换掉moveToward方法中的内容:
- - (void)moveToward:(CGPoint)target
- {
- // Get current tile coordinate and desired tile coord
- CGPoint fromTileCoord = [_layer tileCoordForPosition:self.position];
- CGPoint toTileCoord = [_layer tileCoordForPosition:target];
- // Check that there is a path to compute ;-)
- if (CGPointEqualToPoint(fromTileCoord, toTileCoord)) {
- NSLog(@"You're already there! :P");
- return;
- }
- // Must check that the desired location is walkable
- // In our case it's really easy, because only wall are unwalkable
- if ([_layer isWallAtTileCoord:toTileCoord]) {
- [[SimpleAudioEngine sharedEngine] playEffect:@"hitWall.wav"];
- return;
- }
- NSLog(@"From: %@", NSStringFromCGPoint(fromTileCoord));
- NSLog(@"To: %@", NSStringFromCGPoint(toTileCoord));
- }
编译运行,在地图上点击。如果你不是点击墙壁,在console界面你将看到“from”等于{24,0},这就是猫的位置。你同时将看到“to”的坐标是 (0,24),代表你在地图上点击的方块坐标。
实现A星算法
根据我们的算法,第一步是添加当前位置到open列表中。
我们还需要三个辅助方法:
- 一个方法是在open列表的恰当位置(由F scroe值控制排列)插入一个ShortestPathStep对象。
- 一个方法是计算从一个方块到相邻方块的移动数值。
- 一个方法是根据“city block”算法,计算一个方块的H score值。
我们打开CatSprite.m文件并作以下修改:
- // In "private properties and methods" section
- - (void)insertInOpenSteps:(ShortestPathStep *)step;
- - (int)computeHScoreFromCoord:(CGPoint)fromCoord toCoord:(CGPoint)toCoord;
- - (int)costToMoveFromStep:(ShortestPathStep *)fromStep toAdjacentStep:(ShortestPathStep *)toStep;
- // Add these new methods after moveToward
- // Insert a path step (ShortestPathStep) in the ordered open steps list (spOpenSteps)
- - (void)insertInOpenSteps:(ShortestPathStep *)step
- {
- int stepFScore = [step fScore]; // Compute the step's F score
- int count = [self.spOpenSteps count];
- int i = 0; // This will be the index at which we will insert the step
- for (; i < count; i++) {
- if (stepFScore // Compute the H score from a position to another (from the current position to the final desired position
- - (int)computeHScoreFromCoord:(CGPoint)fromCoord toCoord:(CGPoint)toCoord
- {
- // Here we use the Manhattan method, which calculates the total number of step moved horizontally and vertically to reach the
- // final desired step from the current step, ignoring any obstacles that may be in the way
- return abs(toCoord.x - fromCoord.x) + abs(toCoord.y - fromCoord.y);
- }
- // Compute the cost of moving from a step to an adjacent one
- - (int)costToMoveFromStep:(ShortestPathStep *)fromStep toAdjacentStep:(ShortestPathStep *)toStep
- {
- // Because we can't move diagonally and because terrain is just walkable or unwalkable the cost is always the same.
- // But it have to be different if we can move diagonally and/or if there is swamps, hills, etc...
- return 1;
- }
以上方法中的注释很好的介绍了相关原理,请花时间看下。
接下来,我们需要一个方法去提供方块所有可通行的相邻方块。因为在这款游戏中,HelloWorldLayer管理着地图,我们需要在那里添加方法。
现在在HelloWorldLayer.h文件中添加方法申明,在@interface后面做修改:
- - (NSArray *)walkableAdjacentTilesCoordForTileCoord:(CGPoint)tileCoord;
然后在HelloWorldLayer.m文件中添加以下实现:
- - (NSArray *)walkableAdjacentTilesCoordForTileCoord:(CGPoint)tileCoord
- {
- NSMutableArray *tmp = [NSMutableArray arrayWithCapacity:4];
- // Top
- CGPoint p = CGPointMake(tileCoord.x, tileCoord.y - 1);
- if ([self isValidTileCoord:p] && ![self isWallAtTileCoord:p]) {
- [tmp addObject:[NSValue valueWithCGPoint:p]];
- }
- // Left
- p = CGPointMake(tileCoord.x - 1, tileCoord.y);
- if ([self isValidTileCoord:p] && ![self isWallAtTileCoord:p]) {
- [tmp addObject:[NSValue valueWithCGPoint:p]];
- }
- // Bottom
- p = CGPointMake(tileCoord.x, tileCoord.y + 1);
- if ([self isValidTileCoord:p] && ![self isWallAtTileCoord:p]) {
- [tmp addObject:[NSValue valueWithCGPoint:p]];
- }
- // Right
- p = CGPointMake(tileCoord.x + 1, tileCoord.y);
- if ([self isValidTileCoord:p] && ![self isWallAtTileCoord:p]) {
- [tmp addObject:[NSValue valueWithCGPoint:p]];
- }
- return [NSArray arrayWithArray:tmp];
- }
既然我们定义好了这些辅助函数,可以继续实现CatSprite.m文件中的moveToward方法。在moveToward方法的下面添加以下内容:
- BOOL pathFound = NO;
- self.spOpenSteps = [[[NSMutableArray alloc] init] autorelease];
- self.spClosedSteps = [[[NSMutableArray alloc] init] autorelease];
- // Start by adding the from position to the open list
- [self insertInOpenSteps:[[[ShortestPathStep alloc] initWithPosition:fromTileCoord] autorelease]];
- do {
- // Get the lowest F cost step
- // Because the list is ordered, the first step is always the one with the lowest F cost
- ShortestPathStep *currentStep = [self.spOpenSteps objectAtIndex:0];
- // Add the current step to the closed set
- [self.spClosedSteps addObject:currentStep];
- // Remove it from the open list
- // Note that if we wanted to first removing from the open list, care should be taken to the memory
- [self.spOpenSteps removeObjectAtIndex:0];
- // If the currentStep is the desired tile coordinate, we are done!
- if (CGPointEqualToPoint(currentStep.position, toTileCoord)) {
- pathFound = YES;
- ShortestPathStep *tmpStep = currentStep;
- NSLog(@"PATH FOUND :");
- do {
- NSLog(@"%@", tmpStep);
- tmpStep = tmpStep.parent; // Go backward
- } while (tmpStep != nil); // Until there is not more parent
- self.spOpenSteps = nil; // Set to nil to release unused memory
- self.spClosedSteps = nil; // Set to nil to release unused memory
- break;
- }
- // Get the adjacent tiles coord of the current step
- NSArray *adjSteps = [_layer walkableAdjacentTilesCoordForTileCoord:currentStep.position];
- for (NSValue *v in adjSteps) {
- ShortestPathStep *step = [[ShortestPathStep alloc] initWithPosition:[v CGPointValue]];
- // Check if the step isn't already in the closed set
- if ([self.spClosedSteps containsObject:step]) {
- [step release]; // Must releasing it to not leaking memory ;-)
- continue; // Ignore it
- }
- // Compute the cost from the current step to that step
- int moveCost = [self costToMoveFromStep:currentStep toAdjacentStep:step];
- // Check if the step is already in the open list
- NSUInteger index = [self.spOpenSteps indexOfObject:step];
- if (index == NSNotFound) { // Not on the open list, so add it
- // Set the current step as the parent
- step.parent = currentStep;
- // The G score is equal to the parent G score + the cost to move from the parent to it
- step.gScore = currentStep.gScore + moveCost;
- // Compute the H score which is the estimated movement cost to move from that step to the desired tile coordinate
- step.hScore = [self computeHScoreFromCoord:step.position toCoord:toTileCoord];
- // Adding it with the function which is preserving the list ordered by F score
- [self insertInOpenSteps:step];
- // Done, now release the step
- [step release];
- }
- else { // Already in the open list
- [step release]; // Release the freshly created one
- step = [self.spOpenSteps objectAtIndex:index]; // To retrieve the old one (which has its scores already computed ;-)
- // Check to see if the G score for that step is lower if we use the current step to get there
- if ((currentStep.gScore + moveCost) < step.gScore) {
- // The G score is equal to the parent G score + the cost to move from the parent to it
- step.gScore = currentStep.gScore + moveCost;
- // Because the G Score has changed, the F score may have changed too
- // So to keep the open list ordered we have to remove the step, and re-insert it with
- // the insert function which is preserving the list ordered by F score
- // We have to retain it before removing it from the list
- [step retain];
- // Now we can removing it from the list without be afraid that it can be released
- [self.spOpenSteps removeObjectAtIndex:index];
- // Re-insert it with the function which is preserving the list ordered by F score
- [self insertInOpenSteps:step];
- // Now we can release it because the oredered list retain it
- [step release];
- }
- }
- }
- } while ([self.spOpenSteps count] > 0);
- if (!pathFound) { // No path found
- [[SimpleAudioEngine sharedEngine] playEffect:@"hitWall.wav"];
- }

你将在console栏看到以下信息:
- pos=[22;3] g=9 h=0 f=9
- pos=[21;3] g=8 h=1 f=9
- pos=[20;3] g=7 h=2 f=9
- pos=[20;2] g=6 h=3 f=9
- pos=[20;1] g=5 h=4 f=9
- pos=[21;1] g=4 h=3 f=7
- pos=[22;1] g=3 h=2 f=5
- pos=[23;1] g=2 h=3 f=5
- pos=[24;1] g=1 h=4 f=5
- pos=[24;0] g=0 h=0 f=0
注意路径是从后面开始建立的,所以你必须从下往上看,观察猫选择了哪条路径。我建议尽量与方块保持一致,这样你就可以看到最短路径的效果了!
沿着黄色方块路径前进
既然我们找到了路径,我们只需要让猫跟着前进即可。
我们现在要做的是记住整条路径,然后让猫沿着它一步步前进。
在CatSprite.h文件的@interface private部分创建一个数组去存储路径:
- NSMutableArray *shortestPath;
然后对 CatSprite.m文件做以下修改:
- // Add inside the CatSprite private properties and methods section
- @property (nonatomic, retain) NSMutableArray *shortestPath;
- // After the CatSprite @implementation
- @synthesize shortestPath;
- // Inside initWithLayer
- self.shortestPath = nil;
- // Inside dealloc
- [shortestPath release]; shortestPath = nil;
现在我们创建一个方法,存储整条路径并且负责动画的播放。对CatSprite.m文件做以下修改:
- // Add inside the CatSprite private properties and methods section
- - (void)constructPathAndStartAnimationFromStep:(ShortestPathStep *)step;
- // Inside moveToward, comment out the pathFound BOOL
- //BOOL pathFound = NO;
- // Inside moveToward, replace pathFound = YES with this:
- [self constructPathAndStartAnimationFromStep:currentStep];
- // Also comment all of the debugging statements below that.
- // Inside moveToward, replace if (!pathFound) with this:
- if (self.shortestPath == nil) { // No path found
- // Add this new method:
- // Go backward from a step (the final one) to reconstruct the shortest computed path
- - (void)constructPathAndStartAnimationFromStep:(ShortestPathStep *)step
- {
- self.shortestPath = [NSMutableArray array];
- do {
- if (step.parent != nil) { // Don't add the last step which is the start position (remember we go backward, so the last one is the origin position ;-)
- [self.shortestPath insertObject:step atIndex:0]; // Always insert at index 0 to reverse the path
- }
- step = step.parent; // Go backward
- } while (step != nil); // Until there is no more parents
- for (ShortestPathStep *s in self.shortestPath) {
- NSLog(@"%@", s);
- }
- }
注意在moveToward方法中,我们调用了新的方法,而不是在console栏打印出结果,我们还移除了pathFound布尔值。同样的,在constructPathAndStartAnimationFromStep方法中的注释解释了详细情况。
现在编译运行。如果你像之前一样点击了同样的位置,你将在console栏看到以下信息:
- pos=[24;1] g=1 h=4 f=5
- pos=[23;1] g=2 h=3 f=5
- pos=[22;1] g=3 h=2 f=5
- pos=[21;1] g=4 h=3 f=7
- pos=[20;1] g=5 h=4 f=9
- pos=[20;2] g=6 h=3 f=9
- pos=[20;3] g=7 h=2 f=9
- pos=[21;3] g=8 h=1 f=9
- pos=[22;3] g=9 h=0 f=9
这些信息跟之前的相似,但是现在的信息是从开始到结束(不是反向的),并且每个步骤都被很好的存放在数组中以供我们使用。
最后要做的事情是遍历shortestPath数值,让猫按着路径前进。为了实现它,我们将创建一个方法,从数组中获取一步操作,让猫移动到那个位置,然后使用回调函数去重复调用这个方法直到路径完成。
对 CatSprite.m文件做以下操作:
- // Add inside the CatSprite private properties and methods section
- - (void)popStepAndAnimate;
- // Add to bottom of constructPathAndStartAnimationFromStep
- [self popStepAndAnimate];
- // Add new method
- - (void)popStepAndAnimate
- {
- // Check if there remains path steps to go through
- if ([self.shortestPath count] == 0) {
- self.shortestPath = nil;
- return;
- }
- // Get the next step to move to
- ShortestPathStep *s = [self.shortestPath objectAtIndex:0];
- // Prepare the action and the callback
- id moveAction = [CCMoveTo actionWithDuration:0.4 position:[_layer positionForTileCoord:s.position]];
- id moveCallback = [CCCallFunc actionWithTarget:self selector:@selector(popStepAndAnimate)]; // set the method itself as the callback
- // Remove the step
- [self.shortestPath removeObjectAtIndex:0];
- // Play actions
- [self runAction:[CCSequence actions:moveAction, moveCallback, nil nil]];
- }
编译运行,然后...

我们的猫自动移动到我们点击的终点位置了! :-)
然而,当你把玩它的时候,你会注意到以下问题:
- 猫看起来有点僵硬
- 猫没有带走骨头
- 猫可以穿过狗(没有拿着骨头),而不会被咬死
- 当你在猫走完路径之前点击新的位置创造新路径时,猫会有奇怪的行为。
为了解决猫的呆板外表,还有游戏逻辑(胜利/失败,狗,骨头,等等…)我们必须抛弃在第一次实现中使用的旧版游戏逻辑。接下来我们对它做改进。
重新添加游戏逻辑
为了修复这些问题,使用以下代码替换掉popStepAndAnimate方法中的内容:
- - (void)popStepAndAnimate
- {
- // Check if there is still shortestPath
- if (self.shortestPath == nil) {
- return;
- }
- // Game Logic (Win / Lose, dogs, bones, etc...)
- CGPoint currentPosition = [_layer tileCoordForPosition:self.position];
- if ([_layer isBoneAtTilecoord:currentPosition]) {
- [[SimpleAudioEngine sharedEngine] playEffect:@"pickup.wav"];
- _numBones++;
- [_layer showNumBones:_numBones];
- [_layer removeObjectAtTileCoord:currentPosition];
- }
- else if ([_layer isDogAtTilecoord:currentPosition]) {
- if (_numBones == 0) {
- [_layer loseGame];
- self.shortestPath = nil;
- return;
- }
- else {
- _numBones--;
- [_layer showNumBones:_numBones];
- [_layer removeObjectAtTileCoord:currentPosition];
- [[SimpleAudioEngine sharedEngine] playEffect:@"catAttack.wav"];
- }
- }
- else if ([_layer isExitAtTilecoord:currentPosition]) {
- [_layer winGame];
- self.shortestPath = nil;
- return;
- }
- else {
- [[SimpleAudioEngine sharedEngine] playEffect:@"step.wav"];
- }
- // Check if there remains path steps to go trough
- if ([self.shortestPath count] == 0) {
- self.shortestPath = nil;
- return;
- }
- // Get the next step to move to
- ShortestPathStep *s = [self.shortestPath objectAtIndex:0];
- CGPoint futurePosition = s.position;
- CGPoint diff = ccpSub(futurePosition, currentPosition);
- if (abs(diff.x) > abs(diff.y)) {
- if (diff.x > 0) {
- [self runAnimation:_facingRightAnimation];
- }
- else {
- [self runAnimation:_facingLeftAnimation];
- }
- }
- else {
- if (diff.y > 0) {
- [self runAnimation:_facingForwardAnimation];
- }
- else {
- [self runAnimation:_facingBackAnimation];
- }
- }
- // Prepare the action and the callback
- id moveAction = [CCMoveTo actionWithDuration:0.4 position:[_layer positionForTileCoord:s.position]];
- id moveCallback = [CCCallFunc actionWithTarget:self selector:@selector(popStepAndAnimate)]; // set the method itself as the callback
- // Remove the step
- [self.shortestPath removeObjectAtIndex:0];
- // Play actions
- [self runAction:[CCSequence actions:moveAction, moveCallback, nil nil]];
- }
这里没有施展什么魔法,只是对原来的代码做了重构。
编译运行,你会看到一切工作正常,除了猫在完成旧路径之前开始新路径时做出的奇怪行为。
因为它跟主题关系不大,我将不会对它的实现方法(相当简单)做详细解答。如果你很感兴趣,你可以下载最终的Cat Maze 工程仔细看下。恭喜你,你已经在一款简单的Cocos2D游戏中实现了A星寻路算法!:-)
如何实现对角线移动?
其实在A星算法中实现对角线移动相当简单。
你只需要更新两个函数:
- walkableAdjacentTilesCoordForTileCoord: 更新它,让它也包含对角线方块。
- costToMoveFromStep:toAdjacentStep: 更新它,让它提供一个跟水平/垂直移动不同的对角线移动cost。
你也许会对如何计算出在对角线方向上移动的cost值感到好奇。使用简单的数学可以很容易实现它!
猫从一个方块的中心移动到另一个方块,并且因为方块是正方形的,A,B和C构成了一个三角形,如下图所示:

根据勾股定理,C² = A² + B², 所以:
C = √(A² + B²)
且有 A = B = 1 (从一个正方形移动到另一个的cost = G cost)
C = √(2)
C ≈ 1.41
所以对角线移动的cost等于1.41, 这比先向左移动然后再向上移动的cost值2 (1 + 1)还要少。
正如你所知道的,使用整形数去计算要远比浮点数方便,所以与其使用floats去代表对角线运动的cost值,还不如简单的对cost值乘10,然后四舍五入,这样水平或者垂直移动会消耗10,而对角线移动会消耗14。
我们现在试试它吧!首先使用以下函数对CatSprite.m文件中的costToMoveFromSTep:toAdjacentStep函数做替换:
- // Compute the cost of moving from a step to an adjecent one
- - (int)costToMoveFromStep:(ShortestPathStep *)fromStep toAdjacentStep:(ShortestPathStep *)toStep
- {
- return ((fromStep.position.x != toStep.position.x) && (fromStep.position.y != toStep.position.y)) ? 14 : 10;
- }
然后修改HelloWorldLayer.m文件中的walkableAdjacentTilesCoordForTileCoord方法,返回对角线相邻的正方形:
- - (NSArray *)walkableAdjacentTilesCoordForTileCoord:(CGPoint)tileCoord
- {
- NSMutableArray *tmp = [NSMutableArray arrayWithCapacity:8];
- BOOL t = NO;
- BOOL l = NO;
- BOOL b = NO;
- BOOL r = NO;
- // Top
- CGPoint p = CGPointMake(tileCoord.x, tileCoord.y - 1);
- if ([self isValidTileCoord:p] && ![self isWallAtTileCoord:p]) {
- [tmp addObject:[NSValue valueWithCGPoint:p]];
- t = YES;
- }
- // Left
- p = CGPointMake(tileCoord.x - 1, tileCoord.y);
- if ([self isValidTileCoord:p] && ![self isWallAtTileCoord:p]) {
- [tmp addObject:[NSValue valueWithCGPoint:p]];
- l = YES;
- }
- // Bottom
- p = CGPointMake(tileCoord.x, tileCoord.y + 1);
- if ([self isValidTileCoord:p] && ![self isWallAtTileCoord:p]) {
- [tmp addObject:[NSValue valueWithCGPoint:p]];
- b = YES;
- }
- // Right
- p = CGPointMake(tileCoord.x + 1, tileCoord.y);
- if ([self isValidTileCoord:p] && ![self isWallAtTileCoord:p]) {
- [tmp addObject:[NSValue valueWithCGPoint:p]];
- r = YES;
- }
- // Top Left
- p = CGPointMake(tileCoord.x - 1, tileCoord.y - 1);
- if (t && l && [self isValidTileCoord:p] && ![self isWallAtTileCoord:p]) {
- [tmp addObject:[NSValue valueWithCGPoint:p]];
- }
- // Bottom Left
- p = CGPointMake(tileCoord.x - 1, tileCoord.y + 1);
- if (b && l && [self isValidTileCoord:p] && ![self isWallAtTileCoord:p]) {
- [tmp addObject:[NSValue valueWithCGPoint:p]];
- }
- // Top Right
- p = CGPointMake(tileCoord.x + 1, tileCoord.y - 1);
- if (t && r && [self isValidTileCoord:p] && ![self isWallAtTileCoord:p]) {
- [tmp addObject:[NSValue valueWithCGPoint:p]];
- }
- // Bottom Right
- p = CGPointMake(tileCoord.x + 1, tileCoord.y + 1);
- if (b && r && [self isValidTileCoord:p] && ![self isWallAtTileCoord:p]) {
- [tmp addObject:[NSValue valueWithCGPoint:p]];
- }
- return [NSArray arrayWithArray:tmp];
- }
事实上,例如,只有当顶部和左侧的项被添加时左对角线移动才会被添加到数组中。这是为了防止猫穿过墙壁的角落。以下是所有的详细情况:
- O = Origin
- T = Top
- B = Bottom
- L = Left
- R = Right
- TL = Top – Left
- …

刚才引用的例子如上图的T L所示。
猫想要从原始点(O)移动到左下角的对角线方块。如果在左侧或者底部(或者都有)有一面墙,然后试着走对角线,算法将会封掉墙壁的角落(或者两面墙壁的角落)。所以只有当左侧或者底部没有墙壁时左方和下方的对角线方块才是可通行的。
提示:你可以通过更新costToMoveFromStep方法去模拟不同类型的地形。事实上,如果你减少G cost值,这表示猫会在那些方块上移动得更快,防止亦然。
【附】我的一些补充
补充一:老外的叙述很长,如果你跟着走一遍,想必能够了解A星算法的要点。但这里也要给没耐心的你,提供一点小小的总结:
A星算法的实质,是“最好优先”的深度搜索。
实现的核心,则是两张表,和由父节点构成的一棵树结构。
1)两张表是OPEN表和CLOSE表,其中OPEN表表示还未走过的,可以作为下一步走法的节点集合。而CLOSE表包含那些已经被使用走过的,而且是用最好的方式达到的节点的集合。
2)每次决策的时候,都从OPEN表里面取出一个最好的点,一般是代价最小的点,作为下一步的尝试。
3)由于OPEN表中的节点,其记录的父节点,都已经是最优的方式(可以用递归法推),因此,这个被尝试的点,自然可以,也应当被放入CLOSE表。
4)走了一步之后,我们可能有了一些新的更远方的点,作为再下一步的可选项,那么此时要将这些点放入到OPEN表中,并且将他们的父节点设置或更新为当前节点(如果当前节点更好的话)。
5)反复这一流程,直到达到目标,或是没有选项可以走了
以上就是A星算法的简要流程。
补充二:前面的讨论中,猫几乎总是恰好选择了正确的点。那么如果他选择了一个错误的点,会怎样呢?
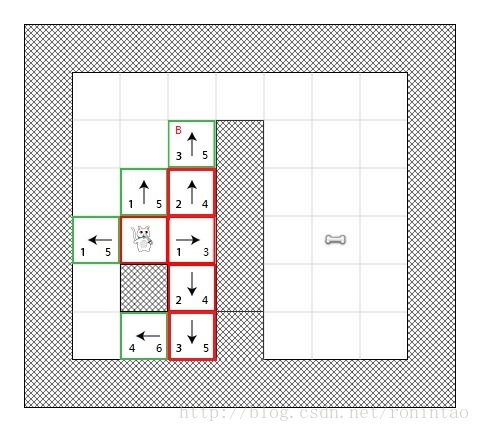
比如我们这只不幸的小猫,走到了一条死路。那么A*算法会将他从死胡同里面带出来吗?
答案是肯定的。观察这张图,根据按照总分来进行排序的规则,你会发现小猫最后无论如何必须要尝试B点(Best),这将改变它的命运。
这是因为,在最坏情况下,实际上A星算法会遍历场景中的每一个点,所以保证了只要存在可行解,就可以取到,其本质类似于广度搜索。
补充三:为A星算法提供一点小小的扩展:如果目标不可达,则返回一条路径,通向距离目标最近的一个可达点。比如上面的那张图,如果上面的路也被封死,则要求小猫走到他右边一格停下。
这样的扩展很容易做到,只需要对closed表进行一次排序,取出其中 H 值最小的点即可。
考虑A星算法的实质终结条件,即将目标点放入closed表,则标志找到路径。就可以知道从这个点进行回溯,就可以找到我们需要的路径。
补充四:A星算法的cocos2dx C++版实现
http://download.csdn.net/detail/ronintao/6674191


 6233
6233


 被折叠的 条评论
为什么被折叠?
被折叠的 条评论
为什么被折叠?
 到【灌水乐园】发言


